From your home network, etc. In order to go into the router settings, you first need to find out the IP address of the router, which will also be discussed. Also, this instruction will help you log into the web interface of your modem, access point, and other similar things. network equipment such popular manufacturers as D-Link, TP-Link, Asus, ZyXEL.
Are drivers needed?
No. You do not need to install any drivers anywhere to configure or use the router. If the kit includes a disc, it will only contain documentation. Drivers may be required for modems that connect to USB ports, but we are not talking about them now.
Default IP address, username and password
Now directly about how to “log into the router” (as modern users like to say). If the router is new, then its settings are factory settings. These settings are called "default" or default settings.Most manufacturers indicate the details directly on the router itself and designate them as Default settings: IP, username and password. Look for a sticker with this information on the bottom or back of the device:

If for some reason the sticker is missing or damaged, open the instructions and it will indicate what the default IP address, login and password are for your router. Instructions are always included. It can be either on a disk, or in the form of a paper brochure, or both.
Typically, by default, modern routers have the following settings:
IP address: 192.168.1.1 or 192.168.0.1
Username: In most cases admin
Password: admin or empty
To enter the router settings, you need to type http:// in the address bar of your browser.<ай-пи адрес>. For example:
http://192.168.1.1
Enter the IP address in the address bar to enter the router settings
If the address is entered correctly, you will see a page asking you to enter your username and password.

Web interface login page D-Link router DIR-300
And this is what the authorization page for routers from TP-Link, the most popular in our latitudes, looks like: 
Instead of an IP address, the sticker may indicate the host (site name) for logging into the web interface. For example, http://tplinkwifi.net or my.keenetic.net. Enter it into any of your browsers and you will be automatically redirected to the configuration page.
How to find out the router's IP address if the standard one does not fit
1. View the IP address in the network connection properties
Open Network and Sharing Center shared access»

Find your connection and click on the appropriate link

Click the Details button

In the window that opens you will see the line:
Default Gateway IPv4: 192.168.1.1
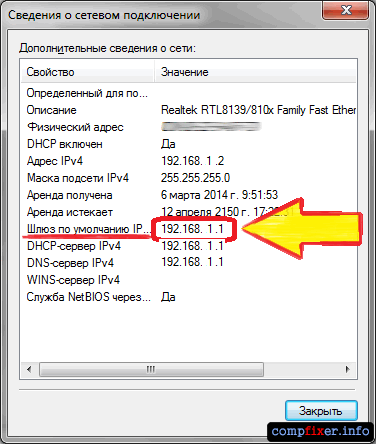
Router IP address
The address specified in this line is the IP address of the router through which your computer accesses the Internet. Now you can write http://192.168.1.1 in the address bar of your browser, then enter your username and password and get into the router settings.
If you cannot connect to the router (it does not give you an IP address over the cable or you do not know the security key wireless network), then all you have to do is reset the router settings and configure it again: i.e. set your passwords and settings.
Read about how to reset your router.
2. View the IP address of the router in the network environment
Go to the section Net.
In chapter Network infrastructure find your router. Select Properties:

On the tab Network device The IP address of the device will be displayed, through which you can access its settings:

3. How to find out the IP address of a router using the command line
Enter the command ipconfig and press Enter:

In the column Main gate The IP address of the router will be indicated, which is what you need. Now copy it, paste it into your browser's address bar and press Enter. You should then see your router's settings web interface.
The most common default router IP addresses and passwords
So, in this article we have described in detail all the setup steps and now you can correctly connect the equipment, find the address of its web interface and go to the router settings. If you have any questions, ask them in the comments.
The operating system of routers (firmware) ensures the relationship between the electronic “stuffing” and the user, allowing you to configure the device to work using a specific communication technology, enable various functions and make all kinds of settings.
Despite the variety of modern routers, they are all similar in functionality. The same applies to the procedure for logging into their settings (in the Web interface) - in all existing routers this is done according to the same scheme, but with some minor nuances. ASUS equipment also has nuances. Let's look at everything in order.
Wireless or wired router
Wireless routers (i.e. Wi-Fi enabled devices) do not require the use of any special equipment to set up. All you need here is a smartphone, tablet, laptop or even smart TV - any device that can connect to Wi-Fi networks. Wired routers can only be configured from a computer, and for this you will need to prepare a network cable (usually included with the router, but any cable will do).
Entering the settings of ASUS wireless routers
To enter the settings menu for Wi-Fi-enabled routers, just follow a few simple steps.
Step 1 - Connect to a Wi-Fi network.
When you turn on the wireless router, a new connection will appear in the “Wi-Fi networks” section (on your phone, laptop, etc.). If the router has just been purchased, then the name of the Wi-Fi network will look something like this: “ASUS-***”, where “***” is the device model number or some set of characters. The network will be open, i.e. to connect to it you do not need to use any passwords (if it is still present, proceed to step No. 3).
Step 2 - go into settings.
Open any browser (Opera, Google Chrome etc.). In the address bar you need to enter the IP address through which you communicate with the router. This address can be written on back side device, if not, look at the instructions. If it is not there, enter the standard (set by default on new routers) IP address in the address bar - “192.168.1.1”, then press enter. If messages like “The site could not be opened” appear in the browser window, proceed to step 4.

If you were able to access the address, a dialog box will appear in the browser asking you to enter your username and password. The default is “admin/admin” (both login and password are the same). After clicking on the "OK" button, the WEB interface (aka settings) of the router should open. If this does not happen (incorrect login or password), proceed to step 3.
Step 3 - the Wi-Fi network requires a password, incorrect login/password for the router’s Web interface.
If the password for the Wi-Fi network is incorrect, you will need to either return all settings to factory settings (i.e. perform a factory reset), or configure the router when using a network cable (as is the case with wired devices). is on our website. The latter will be discussed in more detail below. To reset the settings (both the Wi-Fi password and the login/password for the Web interface), you need to do the following:
- Find the words “Reset”, “Reset” or “Restore” on the router case.
- Next to the inscription there will be a button or a hole with a button inside.
- You need to press the button (if the hole is using a thin object) and hold it for about 8-10 seconds.
- When you hold down the button, all the LEDs on the front panel of the router will light up simultaneously and then go off, indicating that the reset has been completed.
- If the reset does not occur, you can try turning off and then turning on the device without releasing the "Reset" button.

After the reset, you must complete all steps 1 and 2.
Step 4 - error logging into the Web interface using the default IP address.
This can happen for various reasons. The most common of which are the computer accessing the network through a VPN service or the browser running through a proxy server. To solve the problem, just disable the VPN and/or proxy. The error may also be due to the fact that the router's factory IP address has been changed. The solution is to reset the settings or determine the current IP of the device. For this (on Windows example 10):
- Open Control Panel via the Start menu.
- Go to the "Network and Internet" section.
- Next - “Network and Sharing Center”.
- On the left side of the newly opened window, go to the “Change adapter settings” section.
- Find the active connection icon ( wireless connection Wi-Fi or Ethernet network) and double-click on it.
- In the newly opened window, click the "Details" button.
- Here you need to find the "Default Gateway" option.
- The IP address opposite this parameter will be the IP address for logging into the router’s Web interface.
Once you find out the current IP address of the router, proceed to step 2.
Entering the settings of ASUS wired routers
The procedure for logging into the Web interface for wired routers is no different from that for wireless devices. The only exception is the initial connection to the router, for which you will need a computer with a network card on board and a network cable. The latter must be connected to the router in one of its LAN ports (not to be confused with the WAN port, which is highlighted in a different color).
After connecting, the computer should establish a connection with the router, which can be checked in the “Changing adapter settings” section (step 4), in addition, the LAN port indicator on the front panel of the device should light up and blink. If this does not happen, there may be a problem with the cable or the computer's network card. All other actions are performed in accordance with the previous steps (starting from step 3).
Now many users at home have not one, but several personal computers. To ensure that every home computer (laptop, phone with WiFi support) has Internet access, you can use a router.
Different router models are configured differently, but in general:
- The router has a “WAN” socket - the cable provided to you by your Internet provider is connected there,
- Several (usually 4) “LAN” sockets - you need to connect your home computers to them.
- If the router supports wireless connection WiFi (in this case a small antenna is included with it), then you can connect a laptop or mobile phone(if they support WiFi technology) wirelessly.
Since the router is a device that allows multiple devices to share the network, it must be configured to safe work online, because Factory settings do not provide the required level of security and serve only to ensure the initial operation of the device.
When using a router NECESSARILY:
- change the password to access the router settings.
- set WPA or WPA2 authorization and WiFi network access key.
- change addressing local network router on 192.168.123.1 or any other not included in the network ranges 10.0.0.0-10.255.255.0, 172.16.0.0-172.22.255.0, 192.168.0.0-192.168.8.0
If you do not follow these steps, then anyone can connect to your router via WiFi and use Internet access at your expense. In addition to this, because the router divides the channel provided by the provider between everyone who is connected to it, Internet access speed of your computers will decrease depending on how actively the “guests” of your router use the Internet.
In addition, by using a router with unsafe settings, you violate the legislation of the Russian Federation and public interests protected by law, because provide communication services without the appropriate license and legal grounds, which entails administrative and/or criminal liability .
Setting up the router
1. The default setting address on Asus routers is: “192.168.1.1”
It must be entered in the address bar of the browser (Mozilla/Opera/Chrome/ Internet Explorer)
Enter your login and password (Standard login: admin, password: admin)
If everything is typed correctly, you will see a picture similar to this:

2. Since the addresses: 192.168.1.x are service addresses in the Volkhov-Online LLC network and their use may interfere correct operation network, it needs to be changed. To do this, select "LAN" on the left. Next, change the router address, for example to “192.168.123.1”:

To save changes, click the "Apply" button
After the router reboots, you will have to reconnect to the administration page by typing the address 192.168.123.1
3. If your router has WiFi functionality, you NECESSARILY you need to configure access rules over a wireless network; to do this, go to "Wireless Network" -> "General""
In the window that appears, match the data with the images.
In the "SSID" field, enter the name of your wireless access point (any name you like, from English letters and numbers, without spaces). By this name you will find your point on a laptop or other WiFi device/

"WPA pre-shared key" you must set your own, Latin characters, numbers, and special characters (!@#$%^&*). You will use this key to connect your WiFi devices.
After completing the settings, click "Apply".
If you do not perform these actions, your point will be available to an arbitrary number of people who want to use your Internet access channel for their own purposes.
5. Setting up a connection to the Internet is done in the “WAN” -> “Internet connection” section

10. The last thing you need to do is change the password to access the router; to do this, go to the Administration->System section:

Enter a new password, confirm it and click the "Apply" button
The instructions were written by user olympuser.
For initial setup, you need to connect the included Ethernet cable to the computer’s network card and to one of the router’s LAN ports. The cable coming from the provider must be connected to the WAN port.
1. Setting up a network card
Windows XP
In Control Panel, switch to Classic View, then go to Network Connections.


A window with connection properties will open. Highlight Internet Protocol (TCP/IP) and click the Properties button.

- IP address
- Subnet mask: 255.255.255.0;
- Main gate: 192.168.1.1;
- Preferred DNS Server: 10.0.0.1;
- Alternative DNS server: 10.0.0.2.
Then click OK → Close.

The network card is configured.
Windows Vista
Click the "Start" button, select "Control Panel".

In Control Panel, switch to Classic View, then go to Network and Sharing Center.

In the Network and Sharing Center, select Manage Network Connections.

Right-click on the “Local Area Connection” icon and select “Properties” from the menu that appears.


In the Internet Protocol properties, check the box next to “Use the following IP address” and enter the following parameters:
- IP address you can select any one from the range 192.168.1.2-192.168.1.254. For example, 192.168.1.100;
- Subnet mask: 255.255.255.0;
- Main gate: 192.168.1.1;
- Preferred DNS Server: 10.0.0.1;
- Alternative DNS server: 10.0.0.2.
Then click OK → Close.

The network card is configured.
Windows 7
Click the "Start" button, select "Control Panel".

In Control Panel, in the View menu, select Large Icons, then go to Network and Sharing Center.

In the Network and Sharing Center, select Change adapter settings.

Right-click on the “Local Area Connection” icon and select “Properties” from the menu that appears.

A window with connection properties will open. Highlight Internet Protocol Version 4 (TCP/IPv4) and click the Properties button.

In the Internet Protocol properties, check the box next to “Use the following IP address” and enter the following parameters:
- IP address you can select any one from the range 192.168.1.2-192.168.1.254. For example, 192.168.1.100;
- Subnet mask: 255.255.255.0;
- Main gate: 192.168.1.1;
- Preferred DNS Server: 10.0.0.1;
- Alternative DNS server: 10.0.0.2.
Then click OK → Close.

The network card is configured.
Windows 8
From the Start panel, select Desktop.

On the desktop, move your mouse to the lower or upper right corner of the screen and a panel will appear. In it, select the “gear” icon.

In the panel that opens on the right, select "Control Panel".

In Control Panel, in the View box, select Large Icons or Small Icons to display the entire list. Go to Network and Sharing Center.

In the left pane, select Change adapter settings.

Right-click on the local network connection in this window and select "Properties".

In the window that opens, find “Internet Protocol version 4 (TCP/IPv.4)”, double-click on the inscription itself or click on it once, and select “Properties” below.

In the Internet Protocol properties, check the box next to “Use the following IP address” and enter the following parameters:
- IP address you can select any one from the range 192.168.1.2-192.168.1.254. For example, 192.168.1.100;
- Subnet mask: 255.255.255.0;
- Main gate: 192.168.1.1;
- Preferred DNS Server: 10.0.0.1;
- Alternative DNS server: 10.0.0.2.
Then click OK → Close.

The network card is configured.
2. Setting up the router
Web interface
Open a browser (Internet Explorer recommended), type http://192.168.1.1/ in the address bar and press Enter. In the “Connect to 192.168.1.1” window, enter the username admin and password (the default is password admin, it can be changed in the router settings) and click the “OK” button.

Firmware update
If you do not need IPTV support (media playback in the AKADO WinTray program), then it is not necessary to update the firmware. The router works stably with firmware versions 1.0.0.8, 1.0.1.6.
Updating the firmware to version 1.0.2.1 dated 10/05/2010 may only be necessary if the following conditions are simultaneously met:
- IPTV does not work (media playback in AKADO WinTray)
- Firmware version 1.0.0.8 or 1.0.1.6 is used
To update the firmware, follow these steps:
- Select the "Administration" section.
- Go to the Firmware Update tab.
- Choose File new firmware.
- Click the "Submit" button.
The new firmware file can be downloaded directly from the manufacturer's official forum.

Network and Internet

Routing
Setting up routing is necessary for simultaneous operation of the Internet and local network.
- Select the “LAN” section.
- Go to the "Route" tab. Enable multicast routing if IPTV support is required (media playback in AKADO WinTray).
- Enable static routes. Specify a route with the following parameters:
- Network or host IP address: 10.0.0.0
- Netmask: 255.0.0.0
- Gateway: Your gateway
- Metric: 1
- Interface: MAN
- Click the "Add" button
- After the route appears in the table, click the “Apply” button.

Peer-to-peer network
Not all programs can work correctly through a router. For some programs (DC++, Radmin/RDP/HTTP/FTP servers) you need to configure port forwarding. Let's consider this procedure using the example of a P2P client.
In the P2P client for our network version 5, you need to go to File → Settings → Connection Settings. The TCP and UDP port numbers specified there will need to be specified in the router settings, as indicated below. If several computers are connected to the network, then the ports in P2P clients should be different; if necessary, the values can be changed.

In other versions of P2P clients, you need to select the " Manual setting firewall":

Go to the router's web interface and follow these steps:
- Select the "WAN" section.
- Go to the "Virtual Server" tab.
- Enable the virtual server.
- Add two virtual servers for P2P client.
- Click the "Apply" button.

You did everything according to the instructions, but something is not working for you? - Carefully read the article “Features of connecting via a router”, check whether you did everything correctly.
For questions about setting up equipment, you can contact
Before you start setting up the router, you will need to prepare your computer for further setup, as well as clarify some of the connection parameters. How to do this is described in detail in our instructions: ! When the computer is ready, we proceed directly to setting up the router.
Connecting the router:
- We connect the router to the network using the included adapter
- We leave the operator cable “on the floor”
- Connect with the cable included in the kit network cards router ( LAN 1) and computer ( Ethernet) (Rice. 1)

Wait until the lights on the router light up power diodes (PWR), active first port (LAN1) And WLAN (AIR), although it happens that the latter is disabled in the router settings.

Settings ASUS router RT-N10

2.
In the address bar we indicate the IP address of the router: http://192.168.1.1
After entering the address, an authorization window will appear on the screen to access the router settings ( Rice. 5). To enter the configurator, enter:
- login – admin
- password - admin

3. Not For experienced users, the system will offer an attempt to set up an automatic connection through the configurator; to do this, just click “ Further": Rice. 6

4. If your provider provides the Protocol - Static IP address and exactly 192.168.1.1 (how to find out what protocol you have is described in detail in our instructions: Preparing the PC before setting up a Wi-Fi router), which coincides with the router’s IP address, in the “ LAN", in the tab LAN IP address, you should change the router's IP address to 192.168.100.1 , then press “ Apply"and reboot the router. We also reboot the computer and re-enter the router through the browser, but through a new IP address ( Rice. 7):

5. If the protocol is different from the above or your operator has a different IP address, skip Point 4.:
6. If auto-tuning does not complete successfully, go to the “ WAN", where from the list we select the Protocol of your operator ( PPPoE, PPTP or L2TP):

7. Depending on the provider, IP addresses and DNS are provided automatically or must be entered manually. We will also learn these parameters from the instructions: Preparing the PC before setting up a Wi-Fi router. We indicate in the window Username And password, according to the requirements of the operator, and binding, if necessary, to the physical address:

8. After applying and rebooting the router, enter the settings section Wireless network.

According to the above figure, you should specify the parameters of the future Wi-Fi network:
- “SSID” – you can leave the network name or change it to your preferred one;
- “Wireless network mode” - we also recommend choosing a specific one; if the computer does not support Wi-Fi class N (indicated in its specification), select the mode "g Only". Mixed modes are not recommended "...mixed";
- “Channel” - instead of “Auto” we recommend choosing a specific one from 1 to 13 (for example 6 or 9);
- “Authentication method” – (protecting your network - will help protect home network from connecting inquisitive neighborsJ) – we recommend choosing WPA-Personal– a reliable encryption method that will ensure your security. This mode is used for maximum data exchange speed. WEP encryption reduces the speed of network access, and the WPA2 type is not supported by all devices that will connect to the router;
- “WPA encryption” - for the WPA verification method, select TKIP;
- "WPA Pre-Shared Key" is a password that protects your network. It must be entered if the Authentication Method from the previous paragraph is specified - you will have to come up with a password yourself and enter it in the appropriate field, remember it and write it down in your notebook.