Consider buying an iMac or MacBook, but it took many years to get used to the specifics and functionality operating system Windows? Worried about how quickly you can get used to the Mac OS environment? Or perhaps you just want to explore Apple's operating system? For these purposes, it is not necessary to plunge into the dense jungle of the specifics of installing on a Hackintosh PC, if you are familiar with at least the basics of work VMware Workstation. This hypervisor is the most in a simple way launch Mac OS in Windows environment. For this, there are ready-made virtual machines (VMs) on the network with the Apple system installed and configured. How to test Mac OS Sierra or High Sierra on VMware?
1. Ready-made Mac VMs for hypervisors
Ready-made VMs save us from a lot of hassle that we have to face when installing Macintosh on regular PCs and laptops. There is no need to install the Clover or Chameleon bootloader, search for kexts and special files like FakeSMC, or configure component emulation. There will be no need to wait for the system to install. All these efforts were taken on by the VM assemblers. We get ready virtual computer with already integrated guest OS add-ons and a user profile, which we can rename or delete if desired, creating another one.
Since Mac is officially prohibited from being installed on regular PCs and laptops, naturally, test builds of the operating system in the format of working hypervisor files will not be found on Apple’s official resources. But we can find them on Internet torrent trackers.
VM with installed Mac- these are, in fact, the same Hackintosh devices. Lawyers and armchair experts on the topic can debate as much as they like about the existence of an offense under the conditions of using Macintosh on hypervisors, but this has nothing to do with the technical side of the issue. Working with a hypervisor, we, alas, will have to face both problems with the functioning of virtual OSes and problems with Hackintosh devices, such as: lack of smoothness of interface effects, periodic brakes that do not work due to the lack of drivers individual functions or specific equipment, etc. For a VM with a Mac, there are the same processor restrictions as for a Hackintosh - you need a computer with Intel based, preferably with support for SSE4.2.
Ready-made VMs exist for both VirtualBox and VMware. The latter benefit from greater convenience of working with a virtual Mac: guest OS add-ons work stably in VMware products, and we can configure shared folders with the main Windows, as well as the screen resolution we need.
2. Sierra or High Sierra
At the time of writing, there are ready-made VMs with the current Mac OS online:
Sierra (10.12) - version dated September 20, 2016;
High Sierra (10.13) – version dated September 25, 2017.
And perhaps there is already a VM with the latest version of Mojave (10.14). But it is Sierra that is considered the most stable version, suitable for experiments on a PC. It is the Mac OS Sierra VM that we will download and configure to work with VMware. And then we’ll capture it in a snapshot and update it to High Sierra via App Store.
3. Downloading the VM
To download Mac OS Sierra VM files for VMware, go to RuTracker:
https://rutracker.org/forum/viewtopic.php?t=5287454
We add a distribution to the torrent client, and while it downloads the archive from the VM, we will perform some operation directly with the VMware hypervisor. In the description of the distribution, in the “Tablet” column, follow the link “VMware version 11 and higher.” If, of course, you have the current version of the hypervisor higher than 11 installed. Today the last one is the 14th.

4. VMware Unlocker for Mac Support
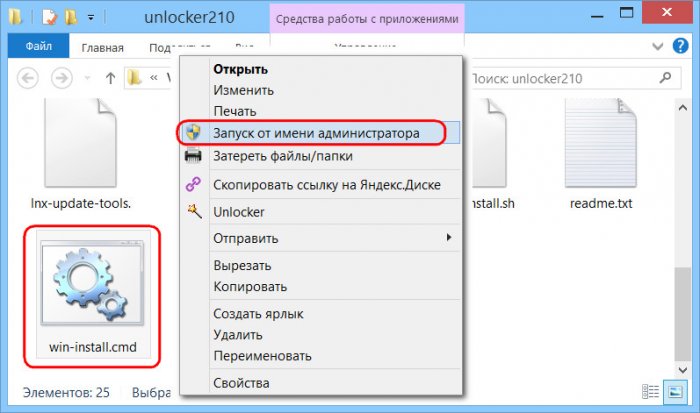
By following the link in the description of the torrent distribution, we download a certain archive called “unlocker210”. This is a VMware unlocker for Mac OS support. The fact is that VMware products do not natively support Macintosh as a guest OS. Actually, this unlocker210 is needed to solve this issue. Unpack the downloaded archive, find the win-install.cmd file in the folder and run it (important) as administrator.
Now VMware, among those supporting guest OSes, will be able to offer us Mac OS - any, up to the latest version 10.14.
5. Unpacking and setting up the VM
We unpack the archive downloaded by torrent using Total Commander or 7-Zip archiver.

We indicate the unpacking path, which is also the path for storing VM files.


If you are using the latest version of VMware products, update the VM.


Click “Edit this virtual machine”, then “Finish”.

Now let's go to the VM settings.

We need the "Equipment" section. In the “Memory” tab, the builder set the amount of RAM to 2 GB. If the computer allows you to select more, select it.


Hello dear readers.
There are several major operating systems that many users use. And Windows and Mac OS are considered among the most popular. The latter comes with computers from Apple. When purchasing such units, people try to use the security they already have. But sometimes some people need to switch to an OS from a “competing” developer. In the next article I will tell you how it goes Windows installation on Mac. This can be done in several ways - it all depends on the needs of the users.
There are several options Windows locations on computers from Apple. This could be a second system (installed on an SSD or on external drive), built into the first or even the main one. We will review each of these cases as they become popular.
So, one of the most common is the use of Win as a second system. Fortunately, the developers of the latest versions of Mac OS have foreseen a similar situation and have provided the appropriate tool. Therefore, this method describes the option of installing an additional OS via Boot Camp. The application is located in " Programs" In addition, it can be found in the search Spotlight.
For the procedure itself you need:
Download the image with the operating system from the official Microsoft website.
Availability of an empty 8 GB flash drive.
Sufficient amount of empty hard disk space.
It’s worth saying right away that this option is perfect for devices without a DVD drive, since the entire installation will take place from a flash drive.
So, now we need to do a number of actions:

To get back into the Microsoft environment after using Apple's OS, you need to reboot and hold down the Option button.
Parallels Desktop( )
In addition to the additional system, it is possible to place the required OS “inside” the main one. This can be done using a virtual machine. There are various software specifically that allow you to do everything you need. So, for example, you can install via Virtualbox- a good free solution.
But the most convenient and most suitable for OS X is considered to be placement via Parallels Desktop. At the same time, the application is also considered the best in terms of performance and battery life.
This option is perfect for users who need to use programs designed for Windows, but at the same time they only have a Mac at hand. It is perfect for clients who do not want to understand the tangle of settings.
True, there is one big drawback - the program is paid. Of course there is a trial version option. But it will end sooner or later. You can always find a demo version or buy the full version on the official website. It also provides detailed help on all features of the application.
So we need to do a few things:

As a result, users are offered complete working Windows, which runs inside Mac OS. At the same time, in the future, users will be able to easily change various settings of the virtual machine.


If something suddenly becomes unclear to you, the application provides detailed help.
macOS is an advanced and at the same time reliable operating system that many PC users chose instead of Windows 10. Unfortunately, install Apple platform to a computer from another manufacturer is not so easy. The simplest and convenient way– loading the virtual machine.
Requirements for installing macOS on a Windows PC
To install Mac OS X (10.5 and higher) on a Windows PC you will need virtual machine. You can use VMWare, which allows you to run the macOS operating system in a Windows environment. As for hardware requirements, they are as follows:
- 8 GB RAM.
- CPU Intel Core i3, i5 or i7.
- 128 GB hard disk space.
Applications needed to install Mac on Windows PC or laptop
You also need to download the macOS image. The password is “xnohat”.
How to install Mac OS X on Windows
Step 1: Install latest version VMWare Workstation.
Step 2. Unpack Unlocker 2.0.8 and run the “win-install.cmd” file as administrator.
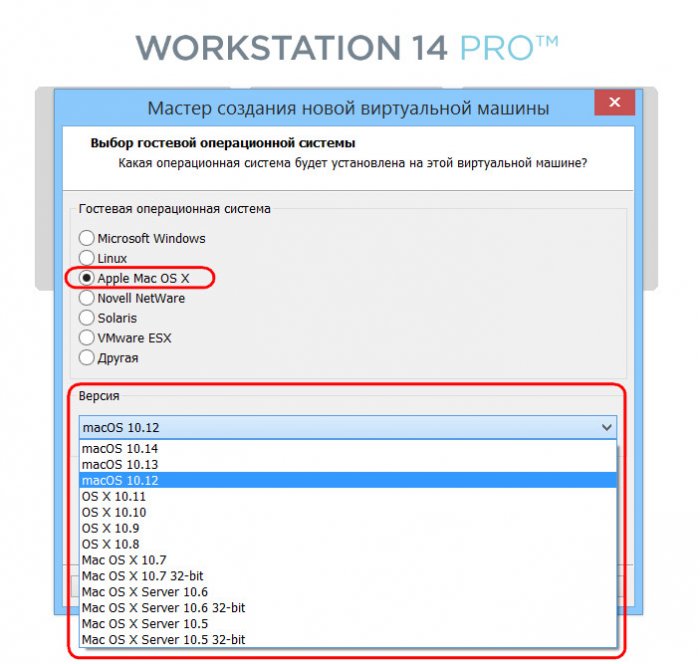
Step 3. After launching, you need to wait until the patch is installed and unlocks the ability to install macOS in VMWare. Open VMWare and create a new virtual machine (automatic method). In the window that appears, select "Apple Mac OS X". In the Version list, select Mac OS X 10.7 or any newer version.
Step 4: After clicking the “Next” button, the virtual machine will be created. In order for macOS to work properly, you need to configure Hardware. To do this, select “Edit Virtual Machine Settings”.
Step 5: Click the "Add" button, then click "Next" twice and select "Use an Existing Virtual Disk" and click "Next" again. Now select the operating system image you downloaded earlier and click “Finish”.
Step 6: After completing all the settings, click on the blue launch button and follow the on-screen instructions to install OS X.
Many users have already successfully migrated from OS X Lion and OS X Mountain Lion to the new OS X Mavericks operating system using the Mac App Store. However, there are Mac users who prefer to do a clean installation of the OS. In this case, the operating system rolls onto the formatted hard section a disk from which all data has been deleted. Or a new drive is used altogether.
It is believed that this method is the most reliable and promising in terms of future stability of the OS. Applications and mods installed in the environment and under the control of OS X Mavericks will work with maximum stability. If you choose this method of installing a new operating system, we recommend that you first run backup all important information.
Clean install of OS X Mavericks:
Step 1: Download OS X Mavericks from the Mac App Store, but do not install the OS.
Step 2: Using the guide on this page, create a bootable USB flash drive with OS X Mavericks.
Step 3: After preparing the boot drive, restart your Mac while holding down the Option (ALT) button.
Step 4: When the machine starts, select "Mac OS X Installer" from the boot menu.
Step 5: Open Disk Utility and indicate HDD, which you want to format. Go to the Erase tab. From the Format drop-down menu, select Mac OS Extended (Journaled) and write the desired drive name.
Step 6: Click the Erase button to start formatting the drive.
Step 7: Once the operation is complete, close Disk Utility and select “Install Mac OS X” from the top menu.
Step 8: Specify the drive and start installing OS X Mavericks.
After a clean install of OS X Mavericks, you can move apps and other important files from backup copy Time Machine or use the OS from scratch.
Operating room installation Mac systems OS X on regular computers is associated with a number of difficult-to-solve problems. The process of creating a hackintosh requires some preparation and often ends in failure.
I guess that most people who want to switch to a Mac are hampered by myths about the Hackintosh - a computer that runs Mac OS. Before moving directly to the description of installing Mac OS X on a PC, I will try to dispel some myths:
1. Mac OS X will only be installed on processors and chipsets compatible with it from Intel, and video cards only from NVidia. Most of the peripherals will not work.
This was once true, but progress does not stand still, more and more new patches and drivers are being released, and the amount of hardware compatible with Mac OS X is growing every day. Now Mac OS can easily be installed on a computer with a processor that at least supports SSE2, but preferably SSE3, for example, AMD or Intel. Many modern video cards support hardware acceleration, namely Quartz Extreme, Quartz 2d, Core Image, GL. I think now you understand that nothing supernatural is required from your computer.
2. Installing Mac OS X is difficult.
In fact, it’s no more difficult than installing Windows XP; I think it’s even easier if you choose the right kexts and fixes.
3. Mac OS X will not be able to “live” on one physical disk with Windows.
Maybe! There are 2 options:
- Windows bootloader + chain0 (for example, this is how it is on my computer)
- Acronis OS Selector
So let's get started.
Step 1. Preparation.
First, you need to check your computer for compliance with Mac OS X requirements.
Minimum RAM(RAM) 256 MB, naturally, the more, the better.
Not exactly an old video card for AGP or PCI-E, starting from GF4.
Step 2. Download the installation disk image.
You can download the image on any Torrent tracker. For example rutracker.org (registration required). Type OS X Yosemite and the search will return many OSes you need.
Step 3. Download the R-Drive Image program and begin installing the OS on your PC. We need it to install it on a flash drive or OS disk.
In this video explains how to use this program, and also describe in detail the installation of Mac OS.
Step 4: Complete installation.
After restarting the computer, there are two options:
2. boot0 error. Let's look at this video. Everything is explained there in detail.
P.S. The layout is switched using the Command + Space (ALT + Space) keys
If everything is done correctly, the desktop loads. Hooray! Works! Congratulations!
P.P.S. The administration of this site in no way forces or offers you to install hack builds of Mac OS X, we are against hacking software! When installing a hacked Mac OS X, you are responsible before the laws of your country.


