Now that almost every residential apartment or office has an Internet connection, downloading information has become easy. This method of transferring files requires minimal costs, and if there is a good connection, it also takes little time. But sooner or later, any user comes across an unfamiliar extension that cannot be opened in the usual way.
At the end of the File menu, select Save or Save As. Disc images also include installation media for programs and operating systems. However, to use such a source, it must start automatically when it is placed in the drive. For systems, the media must be able to boot from the computer. Otherwise the installation will be very difficult. However, this requires special image preparation.
In order for an image to be created when the computer boots, the computer must be equipped with the appropriate files. You can create them, but it's better to use existing ones. If you are preparing additional bootable media, copy the necessary information from the existing bootable media. Open the image and in the status bar at the bottom you will see the self-timer image. Hover your mouse over the drive, change the file name, and accept the command using the Save button.
Very often, disk image files become such a stumbling block. Games and some programs are distributed over the network in this format. They may have the extension isz, mds, nrg or iso. There are also a large number of other extensions, but less common on the Internet. In the vast majority of cases, users are left disappointed: they spent time and bandwidth downloading the game, but in the end received some strange file, with which nothing can be done.
Create a new image file or open an existing one for editing. Use the Add button to populate the image with files. Once the image is ready, open the Tasks and Submenus submenu menu. Click Add boot information. By selecting the "File" field and using the button on the right, you can specify a file that was previously downloaded to the disk that was responsible for loading the disk. However, if you do not have this option, you can use a regular boot floppy to start.
Click the Save button on the toolbar, specify the image data format, give it a name, and click Save. This will speed up the time required for installation operating system. 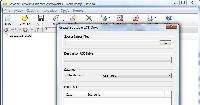
Click the Start button to begin the installation media creation process. If there are no errors, the environment will be ready in a moment.
Some despair and, figuratively speaking, shelve the game. Others do the right thing, trying to find information about an unusual extension on the Internet. As a result, a person receives a large amount of data about the installation and correct operation of the desired file extension. It turns out that simply downloading a game from a torrent or file hosting service is not enough; it also needs to be mounted correctly. And to carry out this action, a special emulator program is required.
Convert images between formats. Sometimes the available image of a disk, partition or disk is in a format that is not suitable for us. For example, it is not recognized by the dispatcher virtual disks or does not work with other software. In this case it is still converted. This is a simple and unpleasant operation if you have necessary tools. The problem is that while converters read many different standards, they only write to a few. So you need to find the right application.
Use the button to the right of the file "Select image file" to convert and specify the source file. If you leave the Use input folder checkbox, the converted version will be saved in the same directory. If you want to place it in a different location, enter the path in the Output Folder field. Record the standard by selecting the appropriate option in the Output Format section. There are six for elections various options.
What does the isz extension mean?
This extension is a standard image file that has been archived. This procedure allows you to significantly reduce the size of the source file, so that several games or programs can be placed in one archive. In addition, the isz extension supports encryption. So, if you do not want to open free access to a particular file, the problem will be solved. There is no such option in iso, despite the fact that, in fact, they are the same extension of isz, only before compression.
Start by uploading an image by clicking the "Open" button. You can also specify it later in the converter window. In the next step, from the Tools menu, select Convert. You can also provide access to the image using a password. Click the button Additional settings" Select the Enable password protection check box and define it by selecting the Change password button. If the target image is stored on media smaller than the image itself, it will be split into parts. Use the Multi-Volume Support section to specify the size of a custom filename and filename style.
The only difference between an archived isz and a regular archive is its narrow focus. Only disk images can be found here. This method of storing information is especially convenient for people who simultaneously keep many games or movies on their hard drive. It should be noted that the isz extension appeared not so long ago and has not yet gained widespread popularity. But everything is going to the point that it will soon replace more cumbersome file storage options due to its convenience and significant space savings.
One of the biggest benefits of images is the ability to connect them to virtual disks. Then it gets data reading speed, reduces error rate, and HDD, from which they are read, does not produce as much noise as optical drive. In addition, there is nothing preventing the system from being configured with multiple or more virtual media with images attached to them. Installing that many physical readers would be very boring.
By default, one disk is configured. Its icon appears at the bottom of the window. To attach an image to disk, first add it to your library. Click the "Add Image" button on the toolbar. You can also right click on the image window at the top of the window and select the same command from context menu.
How to open isz file
Many programs have been created to work with image extensions. The most popular of them recognize not only one specific file type, but several at once. This is done so that users do not have to download a new utility every time, and they give their preference to one, but universal one. Many of the emulator programs are compatible with isz. Among them are Alcohol, UltraISO and Daemon Tools. Moreover, the latter is distributed in two versions - full and lightweight.
Locate the file on your disk and double-click it. Images are removed from the library using the Remove Item command. You can also quickly remove all connections by clicking Disconnect All Drives. Launch a program by clicking its desktop icon or taskbar icon. Go to the “Settings” tab and set the required number of virtual disks in the “Number of disks” list.
To attach images to them, right-click the program icon in the tray, select the drive and click Mount. In most cases, just save the image to your hard drive and use the virtual disk manager. Sometimes, however, you need to put it on a plate.
In this case, it is much easier to use the Lite version of Daemon Tools. Moreover, most people do not really like to understand the numerous settings offered in the advanced version of the emulator.
Instructions for working with Daemon Tools
It is best to download the program on the official website, since the lightweight version is distributed freely. Double-click on the installation file icon and wait for the window to open. There is nothing complicated in the installation process itself; you can safely leave the default path and settings. Don't forget to close it first unnecessary programs, saving all important information, since the computer will need to restart immediately after installation.
Launch the program and in the main window click “Burn image file to disk.” Upload an image file by clicking the Browse File button in the Source section. Place a blank media in the recorder and add it to the destination list. This ensures optimal recording speed. If you want to make multiple copies at once, define them below. Click the "Large Entry" button at the bottom of the window. The default is the maximum speed.
To verify the operation, select the Verify check box. Start recording using the "Record" button. 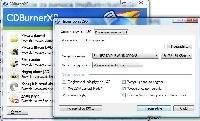
Use the Browse button to point to the image file. In the "Target Disk" list, set the recorder and specify the recording speed on the right. Leave automatically selected in the list of recording methods. If the disc will not be used to record more data, select Close Disc. To check the entry, select the Check data checkbox. Start burning by clicking "Burn Disc".
After the process is completed in the section removable media another drive should appear. The icon is no different from the usual one, and their operating principle is very similar. Please note that in some cases you have to create a new drive yourself. To do this, open installed program and find the “Add drive” button in the tools section. Then a SCSI drive will appear at the bottom of the window, with which we have to work.
If you want to save the image in one of the less common formats, you will need to use a special application for this task or convert. This is a very popular and frequently installed program. 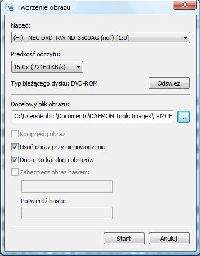
Wait while the scan scans optical discs. If you have multiple computers on your computer, indicate where the drive is located. Set your reading speed lower. Remember that faster does not always mean better.
As speed increases, error rates may increase. Click the button to the right of the destination image file. Select the folder on the disk where the image will be saved and name it. Also decide which format you want to use. Set the saving standard in the "Save As" type list.
Opening the isz extension will now be easy. Just drag the shortcut of the downloaded image into the active Daemon Tools window (directly onto the image of the virtual drive that appears). Usually after this the autorun function is activated. Then you will have to perform the same steps as usual after launching the game from the disk.
Characterized by additional compression to reduce file size.
Leave the "Delete image on failure" option and check the "Add to image directory" checkbox. Compression will be enabled in the Compression field, and the password will be determined when you select a password-protected image. Once selected, you only need to enter and confirm the key. Start recording an image by clicking the "Start" button.
Some recorded media images on disk do not contain any data to allow them to run. This happens most often when the source disk has built-in copy protection. The problem is that a computer recorder cannot record all the necessary information. In this case, the image is still bound to the virtual disk and security emulation is enabled.
Information stored in this form can be written to any external media and read by various programs designed to create virtual images disks.
One of the most popular and frequently used virtual disk emulators. It has the ability to create a copy of data stored on physical media, place it on a hard drive, and then load it into a virtual drive.
This is due to the need to install an additional driver into the system, which is used only when absolutely necessary. Click the "Install" button to begin the installation. Please note that you will have to restart your computer. After installing the driver, the emulation options are unlocked. You can remove it when you are not using it, but keep in mind that the security simulation only works for this type of drive. For this reason, users who use it must be connected to it.
However, before you do this, you will configure the emulator. Click the Options button and go to the Advanced section. Also check the box next to the type of security you want. Now you can place the virtual disk into a virtual disk.
After this, the information that was stored on the CD or DVD becomes available to the user, but only without his direct participation. The program recognizes and reads almost all disk formats, supports high speed recording and reading information and can work with 30 images simultaneously.
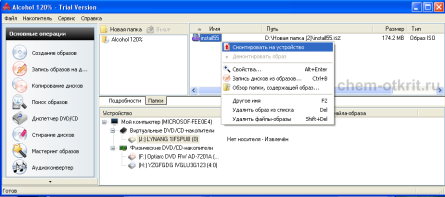
During the installation process of Alcohol 120%, carefully study each stage, selecting the necessary functions and eliminating unnecessary ones.
A program that can open a file
This file can be installed as virtual physical disk by using software For driving virtual disks. In this case, the only thing left is the help of a specialist. From the extended menu, select “Set as default program,” then “Browse,” and find the program you want.
This method allows you to view the contents of many files, but probably not in the same structure as the program designed to run them. The above tactics remind us of service packs from a few years ago, but also ones that were completely abandoned. We're not just talking about vague performance improvements or vulnerability fixes.
After completing the installation process, launch the program and find the item “ in the upper left corner File” – “Open" In the window that appears, indicate the path to the desired image and press the “ Open”.
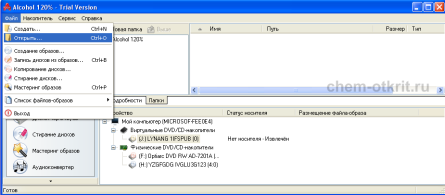
The last step is to mount the image onto the virtual drive. To do this, you need to right-click on the file that appears in the right window, selecting “ Mount to device”.
New benefits for touch screen users
There are some, but most of the changes are more obvious.
How to get rid of the default login screen image
Until recently, you had to use complex registry tricks to replace it. Here you can also choose a monochrome background with your favorite color for this part of the interface.You cannot use your own image instead. Many of them are easily overlooked, but there are and will be enthusiasts when you expect less. An example of this is the automatic control of the printer with which it is installed, the last manually selected printer will be the default until the new order. This may happen to download an internet file with an unknown extension and you don't know how to open it to find out what's in it.
This is probably best program of a kind. Compact and high-performance virtual disk emulator works with almost all known images.
And the Lite version is also free!
The program can record new images of , and , and also create virtual copies of Blu-ray discs. It is possible to compress information and set a password for an individual file.
DAEMON Tools is capable of creating up to 4 virtual drives, absolutely identical to physical ones, differing only in higher speed.
The emulator is capable of mounting both regular and protected disks thanks to built-in protection bypass systems.
UltraISO is popular instrument for creating and editing virtual disk images, giving the user the ability to change files stored on CD and DVD discs, select individual files or folders.
The emulator is capable of converting any information contained on a physical medium or hard drive into -format. You can also perform the reverse operation - create new images, edit them, and then burn them to a CD/DVD disc.
The program is simple and easy to use, basic functions turn on with 1-2 mouse clicks.
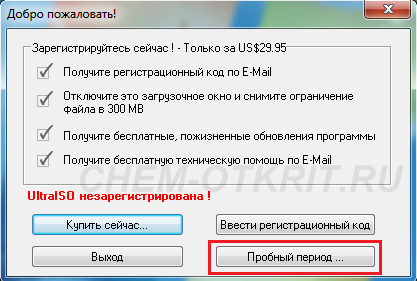
Please keep in mind that the unregistered version of the program has a 300MB limit on image size.
To download the -image using Ultra ISO, you need to do the following:
1. After installation is complete, select “ Trial period”.
2. In the opened program, in the left top corner interface, find the menu item “ File” – “Open” or a button in the form of an opening folder. In both cases, the result will be the same - a window with a choice will open the desired file, then press “ Open”.
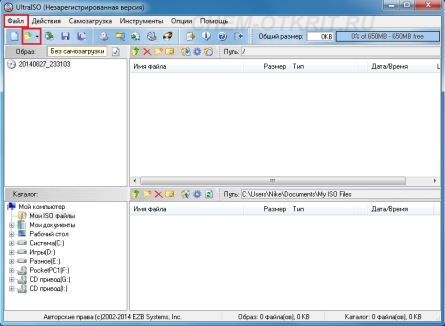
3. Well, in conclusion, go to the menu section “ Actions” – “Mount image”.
As a result, we see that any -file can be opened using one of the popular emulators that can recognize many other image formats.
Updated: 09/15/2014 5 (ratings: 1 )


