Good day, dear readers of my blog. Stylish pictures are becoming increasingly necessary for the popularity of a website. Give everyone quality work. If you make a one-page page or maintain a blog, then you need to learn how to process photos.
Today I will show you how to turn an ordinary mediocre image into an illustration that will be on trend.
So, now you will learn how to select one color in Photoshop and what interesting opportunities this skill opens up. I'll show you how to leave only a certain shade in a picture and remove all the others and vice versa. You'll also learn how to turn red roses white in just a few seconds.
How to replace one color with another
First, let's talk about how to repaint an object a different color. Several centuries have passed and, unlike the queen’s order from Alice in Wonderland, now there is nothing crazy about such a task. Everything will be very simple.
So, open the program, and then the photo. When choosing an illustration, keep in mind that one color will change throughout the entire picture.
If initially, in the example I give, there had been a green car, then nothing would have happened. The grass and forest would also take on a different shade.

So, go to the “Image” section, which is located in the top panel. Find “Adjustment” and then “Replace Color”.
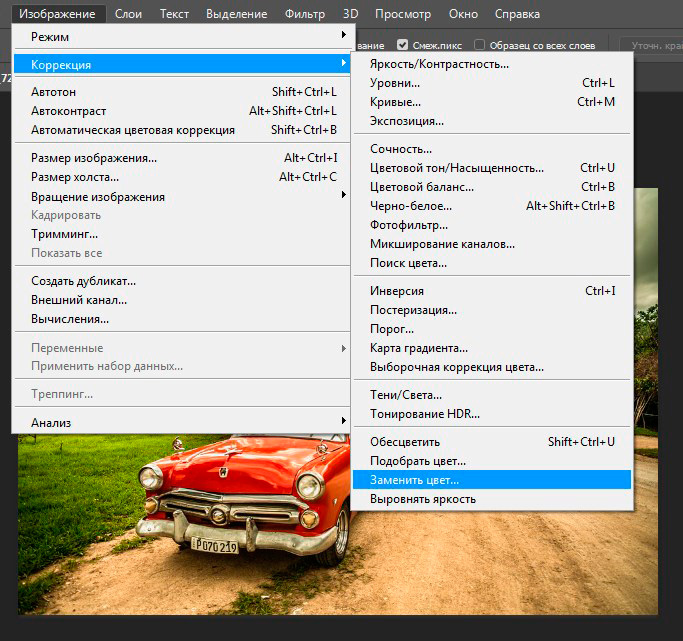
The normal cursor will be replaced with the one you use when you select the Eyedropper tool. Now you only need to click on the color you want to get rid of. Pay attention to what is highlighted in the sketch in the window that opens. additional menu to make sure the choice is correct.
What is "scatter". In Photoshop, and even in modern images, an incredible number of shades are used. The higher the scatter setting, the more colors you capture. This can be done from the very beginning or at the end of processing.

Now you can pull the “Color Tone” slider to change the color, or click on the color bar. I prefer the second option.

This is the result I got. It was as if the car had always been gold.

I chose a good photo and chose the color correctly. As they say, all the stars aligned, and therefore the result looks very cool. In fact, this doesn’t always happen; sometimes you have to fiddle around for a long time. I'll show you very soon.

Play with the "scatter" after you're done to fine-tune the color. I have already spoken about this.

We leave only one color in the photo and change all the others
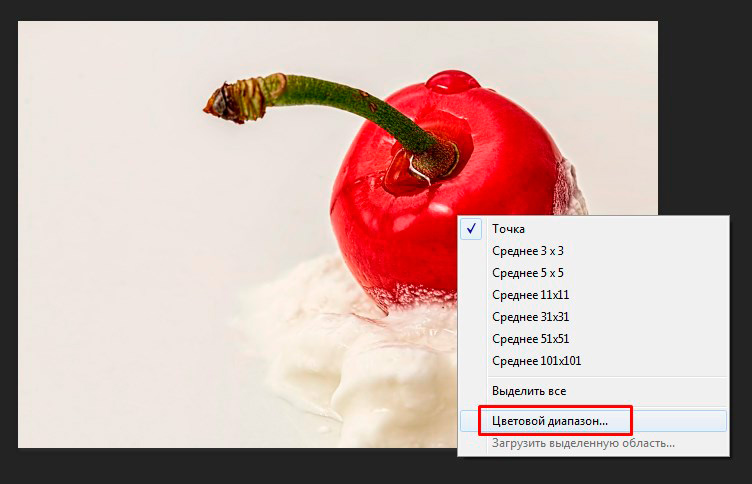
I’ll show you one interesting effect that is often used in movies and advertising. Let's choose one color, and everything else will be black and white. Find the “Magic Wand” tool.

Now, anywhere in the photo, right-click and select “Color range...”.
The magic wand turned into an eyedropper, and almost the same window appeared as in the first method I showed for replacing color. However, there are still significant changes when using this method.
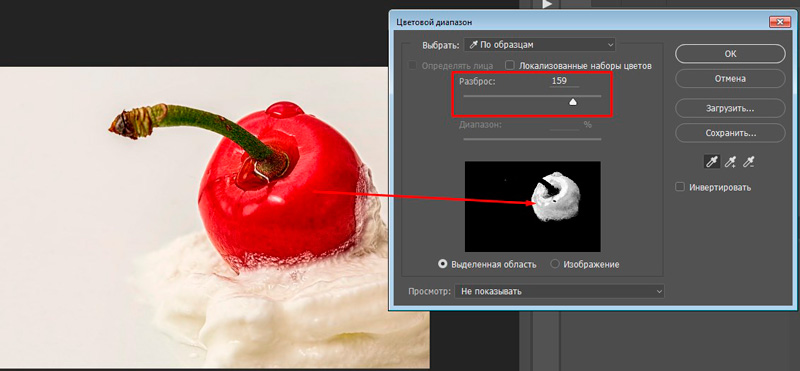
We agree.

All the color has been highlighted and now you can work with it, but more on that later. First, something interesting. In the top menu, find "Select" and then "Invert". You can activate the function by simultaneously holding Shift+Ctrl+I.
What will happen? Now you will not be working with the selected color, it will remain untouched, but all the rest can be deleted without any problems.

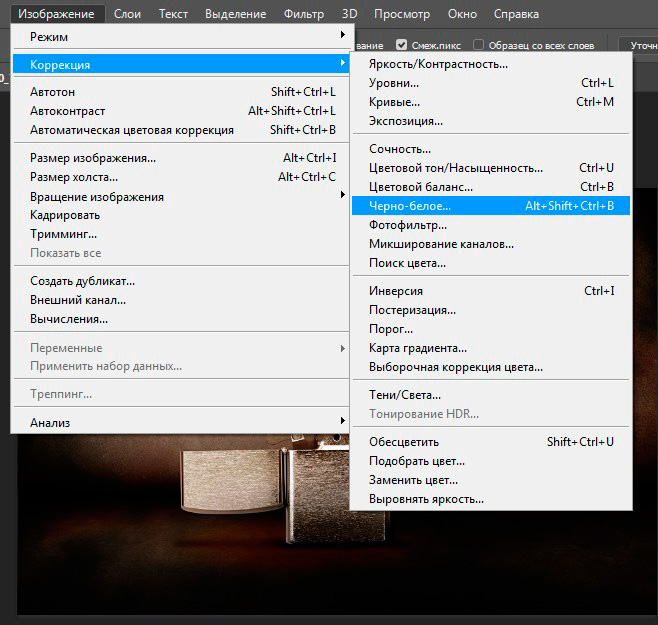
Go to the “Image” - “Adjustments” panel and remove all the colors, making the photo black and white.

All that remains is to press Ctrl+D to remove all selection.

Ready. This is what the picture looks like now.

Removing a certain color
The first method I showed you, with color replacement, is very good, but it will be incredibly difficult for you to make one object black and white and leave the rest in color. Here it is better to use the previous method with some modifications.
First, select the “Magic Wand” tool, then right-click “Color Range” and use the eyedropper to determine the color. There is no need to do an “inversion”. You go straight to top panel"Image".

Find the “Adjustment” function here and you can remove it completely by using the “Desaturate” or “Black and White” function.
In some cases, when many colors are used to display one object, you will have to repeat the operation several times.

In this example, I removed the color by selecting two colors.

Well, for another drawing I had to work hard and activate the “Desaturate” option as many as 3 times.

As a result, I achieved this effect.

Compare with the source.

For such objects, I think it is better to use another technique. You can remove colors, if there are a lot of them, a little faster and with better quality. The ability to create a quick mask helps with this.
Watch the five-minute video to understand how to cope with the task and achieve a beautiful effect. Everything is very simple and for some objects it is simply irreplaceable.
OK it's all over Now. If you liked this tutorial, then I recommend subscribing to the newsletter and receiving more interesting articles not only about Photoshop, but also. A hobby like...
If you are interested, but understand absolutely nothing about this profession, I can offer a free set of mini-courses that will clarify things. In just a week you can firmly decide on your choice and understand whether you want to get involved in web design - go

Well, for those who still don’t understand much about Photoshop, but are very interested in the tools and want to discover all the possibilities of this program, I recommend Zinaida Lukyanova’s course “Photoshop from scratch in video format” , the founder of the largest portal about this program.
You've probably come across a lot of boring textbooks that talk about Photoshop as if it's not a fun program in which you can create incredible projects, but Newton's third law.
Such training can completely kill all desire. Meanwhile, without knowing the basics, you will not be able to make a profit. Thanks to the courses of Zinaida Lukyanova this will not happen, study and work in the future will not cause negative emotions and be associated with mockery of one’s own strength.
OK it's all over Now. I wish you success in your endeavors and see you again!
Very often, when working with websites and images, you need determine the color any point on your monitor screen.
For example, you want to make the background color on your website exactly the same as the color of the blue sky in the photo. Or make the heading font the same color as sea green. Or vice versa, use the font color as the background to create a banner. In short, there are many options. Careful selection of colors means a lot both in web design and in the work of a webmaster.
Determining a color means finding its code. Then the code, depending on your goals, can be used both in various graphic editors and directly in the html code.
Most often it is used, in which the code can be represented in decimal and hexadecimal systems.
It is very convenient to use a pipette to determine color. But, besides this program, there are others with which you can do this.
Adobe Photoshop Eyedropper
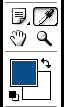 I think few users of this program know that using it you can determine the color not only any point in the picture opened in the editor, but also any point on your monitor screen.
This is done very simply. Open it, create an image in it, and without letting go left key mouse, move the pipette cursor to where the point you selected is located. This can be any point outside the program window. As you move the cursor, you will see how the drawing color changes in the color palette. After selecting the desired point, release the mouse button. Click on the drawing color box on the color palette and see the code for your color.
This method of determining color is convenient because it does not require installation of any additional programs, except for Photoshop, which most users already have installed.
In a graphics editor Adobe Photoshop There are tools with which you can determine color at any arbitrary point in the loaded image. The measurement result can be obtained both in numerical representation and in the form of a reference color and for any drawing tool. There is also the possibility of the reverse operation - knowing the numerical expression color new shade, you can set it as the current working shade color A.
You will need
- Graphic editor Adobe Photoshop.
Instructions
If you need to determine color at some point in an existing image, start by loading it into the editor. A dialog called up by the Ctrl + O key combination is intended for this - with its help you need to find an image file on your computer, select it and press the “Open” button.
If necessary, determine color At some point on the monitor screen, load a copy of the screen image into Photoshop. This is very easy to do - press on your keyboard Print Screen, switch to the graphic editor window, press Ctrl + N, then Enter and Ctrl + V.
After the image is opened in Photoshop in one way or another, turn on the Eyedropper tool - press the English letter I key. You can also do this by clicking on the corresponding icon on the graphic editor toolbar.
Hover your mouse over the desired point in the image. If you need to determine color some small element, enlarge the image - press the Ctrl and “Plus” key combination the required number of times. When do you need to return it? normal size, use the combination Ctrl + Alt + 0.
Click left mouse button - graphics editor will detect the hue at the cursor point and set it as the working one color A. If you need to get the result in numerical representation, open the palette color ov - click on the icon of two intersecting squares at the bottom of the toolbar. In the window that opens, select one of the numerical representations. Components of decomposition color and in RGB and CMYK encodings are marked here with the corresponding letters, and the hexadecimal code is placed in the field next to the hash icon # at the bottom edge of the window.
If you need to perform the reverse operation, i.e. install working color according to the known numerical representation, use the same palette. The components of the RGB and CMYK encodings will have to be entered manually, but the hexadecimal code can be copied from the source and pasted into the corresponding field of the palette. The color will be set when you click OK.
Understanding the principles of color formation and balance contributes to more efficient work in Photoshop. Knowing basic color theory allows you to achieve consistent results without relying on chance.
Primary colors
Primary additive colors are the three color components of light (red, green and blue), which various combinations form all the colors of the visible spectrum. Adding equal parts of red, blue and green gives the color white. The complete absence of the three primary colors produces black. Computer monitors are devices that form color image based on primary additive colors.
A. Red B. Green C. Blue
Primary subtractive colors are dyes that, when mixed in various combinations, form a spectrum of colors. Unlike monitors, printers use primary subtractive colors (cyan, magenta, yellow and black dyes) to form colors through subtractive mixing. The term "subtractive" is used because when pure primary colors are mixed, less pure versions of them are formed. For example, orange is created by subtractively mixing magenta and yellow.

A. Blue B. Purple C. Yellow D. Black
If you've never dealt with the components of color before, it's helpful to have a standard color wheel chart handy when working on color balance. It also allows you to predict how a change in one component of a color will affect other colors and how those changes will be converted between the RGB and CMYK color models.

A. Red B. Yellow C. Green D. Blue E. Blue F. Purple
For example, the intensity of any color in an image can be reduced by increasing the level of its opposite color on the color wheel, and vice versa. Colors that lie at opposite points on the standard color wheel are called complementary. Similarly, color levels can be increased and decreased by adjusting two adjacent colors on the color wheel, or even two colors adjacent to the opposite one.
In CMYK mode, the level of magenta can be reduced in two ways: either by reducing the intensity of magenta, or by increasing the level of its complementary color (which is located at the opposite point of the color wheel), that is, green. In RGB image mode, the magenta level can be reduced by either reducing the intensity of red and blue or increasing the green level. All of these settings affect the overall color balance, which will contain less magenta.
Color models, spaces and modes
A color model describes the colors we see and work with in digital images. Each of the color models (RGB, CMYK and HSB) uses its own method (usually numerical) to describe colors.
Color space is a variant of the color model and is characterized by a certain coverage(range) of colors. For example, the RGB color model includes several color spaces: Adobe RGB, sRGB, ProPhoto RGB, and so on.
Any device, such as a monitor or printer, has its own color space and can only reproduce colors within its gamut. When moving images from one device to another, the colors of the images may change because each device interprets RGB or CMYK values according to its own color space. Therefore, when moving images, you can use color management to ensure that most colors remain the same or look almost the same. See Why colors are sometimes distorted.
In Photoshop color mode document determines which color model is used when displaying and printing the processed image. Photoshop color modes are based on color models, which are useful when working with images intended for printing. The available modes are RGB (red, green, blue), CMYK (cyan, magenta, yellow, black), Lab (based on International Illuminating Commission L* a* b*) and Grayscale. Photoshop also supports modes for specialized color display (such as Indexed Colors and Duplex). Color modes determine the number of colors, number of channels, and file size of the image. The choice of color mode also determines what tools and file formats will be available. See Color Modes.
When you work with the colors of an image, the numeric values contained in the file change. However, it would be too easy to represent colors as numbers. The numeric values themselves are not absolute colors - they merely represent colors in the output device's color space.
This question has probably arisen more than once in a web designer, developer or simple user computer. Often there is a need to select the color used on some object, for example a website or just a point on a monitor screen.
There are several basic ways to represent colors, such as when each color or shade is designated HTML code and color palette RGB as #FF7700. This is the presentation in the form of three pairs of hexadecimal digits, in which each pair represents a different color:
the first two digits are red, i.e. — R(red)
two in the middle - green - G (green)
last two digits - blue - B (blue)
Quite often they use a sneaky representation of the color in the form of three characters #F70, which would be equivalent to #FF7700.
By the way, on web resources colors are usually specified in CSS styles.
Let's move on to answering the main question - How to find out the color of a pixel on a monitor screen or picture?
There are many ways...
Method 1. Find out the color in Photoshop
So, let's take a “screenshot” by pressing the Print Screen (PrtSc) key on the keyboard, in the place where we want to find out the code for our color. When you press the key, the system will save the snapshot to the clipboard. You can simply copy the image, for example from a browser, without PrtSc. Now all that remains is to paste the image from the buffer into Photoshop.
Open Photoshop and insert an image (File - New, Editing - Insert). We look for “Pipette” on the toolbar (Key I), then left-click in the area in which we want to “remove” the color. All is ready! Now all that remains is to go to the palette and find out the color code.
Method 2. Find out the color in Paint
Go to Paint - insert a picture - use the "palette" tool - go to "change colors":

In our case, red is 252, green is 168, blue is 10, i.e. RGB(252,168,10) or in HEX format #FCA80A.
Method 3: View the element code in the browser
I will describe a method for the Opera browser. Select an element on the site with the mouse and right-click on it - “View element code” (Ctrl + Shift + C). A panel with html and css code will open, you will need to find something like “color”.

Method 4. Using special tools or programs.
There is a large number special programs for color removal, I like a very simple program called "Pixie" with a weight of about 10-11 KB. The controls are very simple. Simply move the mouse to the desired point on the monitor screen and press the following keys - Ctrl + Alt + C, as a result color code will be copied to the clipboard.


