Setting up BIOS for a laptop Toshiba Satellite l755
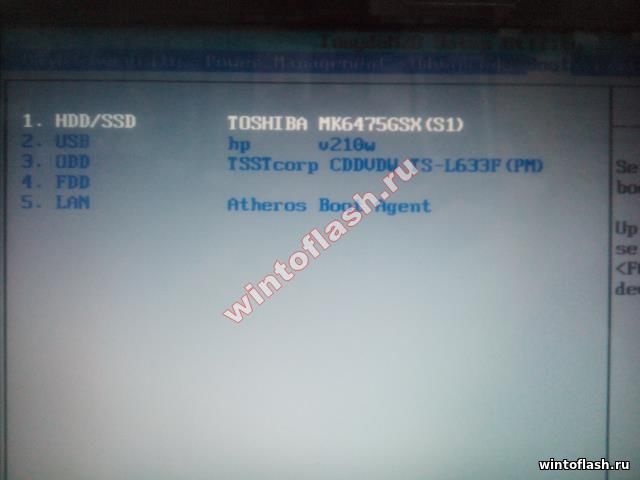
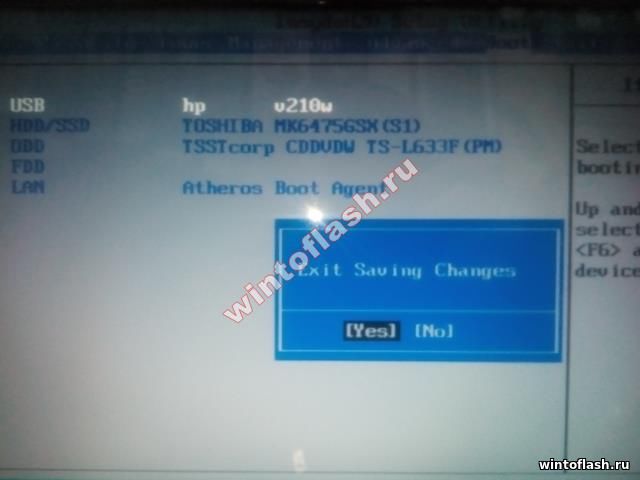
Hello.Now we will configure the BIOS to boot from a flash drive or drive. TheToshiba Satellite l755 laptop has a “Boot menu”, which allows you to quickly and without any settings choose what to boot from, be it a flash drive or a disk.To call the boot menu (boot menu), you need to press the “F12” key.and you will see a window like the one shown in the photo. Here you select your flash drive or drive. In the example, the flash drive is named “USB: HP v210w”, and the drive is “ODD: TSSTcorp CDDWDW TS-L633F (PM)”.
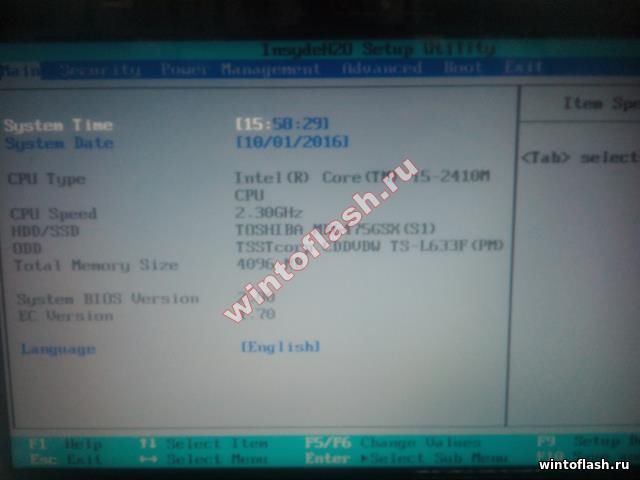
Entering the BIOS of the Toshiba Satellite l755 laptop
If you nevertheless decide to enter the BIOS and configure booting from the flash drive of your Toshiba Satellite l755-16w laptop, then turn on the laptop and press the “F2” key.If you did everything correctly, you will see the same menu as in the photo.
Since no laptop is designed for multiple processor families, but in the normal case it works at best the most fast processor, which the manufacturer planned for this laptop model. So much more than clock frequency at several hundred megahertz, and with only a small number of typical laptop applications it is actually a bottleneck process.
Even so, the user must accept the risk that the manufacturer has equipped the laptops differently. Additionally, some processors have difficulty assessing whether the retail version is actually exactly the same as the manufacturer's version intended for a laptop.
Go to the “BOOT” tab, here we see all the devices that are connected to the laptop, except for the peripherals.
They also rarely recognize new processors. The board jumper is also missing. Many of the tricks that work when updating motherboards for desktop PCs, cannot be used with laptops. New processor used together with fresh thermal paste and screws the cooler back.
Graphics performance usually remains unchanged. The graphics chip is rarely located on a separate board, but almost always directly on the motherboard. There are few exceptions, and the upgrade options are then limited to what the manufacturer has planned for their own laptop model.
After prioritizing, you will need to save your settings. To save the settings, press the “F10” key (a window will appear, the same as in the photo below). Select the “YES” item and press “Enter”.
It's so simple bios setup for Toshiba Satellite l755 laptop.
Instructions
To simplify the process BIOS firmware it is better to use a program that allows you to work in an environment operating system Windows. If you are dealing with a Toshiba laptop, then download the InsydeFlash program. The utility version should not be lower than 3.5.
However, these modules are not available at retail; but some manufacturers produce them when ordered as spare parts. Even worse is converting the display, motherboard or battery because there are no industry standards for this. However, even across a series of models, a component change can fail because manufacturers change small parts that are not reflected in different product descriptions or other criteria recognizable to buyers. There are some approaches to cross-vendor standards, such as plug-in graphics modules or optical drive pads.
Download the firmware for your motherboard. Visit http://ru.computers.toshiba-europe.com/innovation/download_bios.jsp?service=RU. Fill out the table provided, indicating the desired model mobile computer. Never use software designed for other laptop models.
Prepare your mobile computer for flashing the firmware. Disconnect your device from the Internet. To do this, unplug the network cable or turn off the Wi-Fi adapter. Close everything unnecessary programs. Be sure to turn off your antivirus or at least pause it.
However, no one is looking for convenient replacement of components, but the standards primarily meet the demands of laptop manufacturers, who promise cost savings in the design and production of their devices, as well as easier exchanges with the supplier. Conversely, 32-bit cards cannot be connected to 16-bit slots.
But modern laptops also cause problems: some card cards start up very slowly, which is likely due to bad controllers, lame chipsets, or unprocessed drivers. For some conflicts between the controller and the peripheral chip, fixes or driver updates can be found from the laptop or card manufacturer. Laptops without an operating system are often feasible, but it's not worth buying for every user.
If the laptop is running without a battery, then turn off the computer and install the battery. Charge it to 40-50%. Turning off the laptop during the firmware process will cause the motherboard to malfunction.
Launch Inside Flash. Click the search button and select the downloaded firmware file. Click the Start button and wait until the program finishes. Do not under any circumstances stop the process or turn off the laptop.
If you're looking to buy a laptop without an operating system, you should consider in advance whether it's really worth it for you, as measured by the cost-benefit ratio, or whether an all-inclusive solution might be a better option. Detailed information can be found in this article.
After successful installation you can. There may be different messages, but they broadly fall into three categories. The motherboard is not yet supported and is still in the testing phase. Isolated on white background. Laptops, notebooks and netbooks are very difficult to read. The built-in controller on these machines often doesn't interact well with flashing.
- The motherboard and its chipset are supported and tested.
- In this case, the chipset is marked as “unverified”.
- This chipset is marked as untested.
- This chipset is not yet supported.
If you cannot flash the BIOS using this method, copy the downloaded file to a USB drive and rename it bios.fd. Pre-format the flash drive in FAT32 format.
Turn off the laptop and remove the battery. Connect the power cable to mobile computer. Connect the flash drive to the USB port. Press and hold the Fn and F keys. Some Toshiba models require you to use other keys. Now click Power button(inclusion). If the flash drive has an indicator, wait until it turns on and release the Fn and F keys.
The actual flash process starts from the terminal line. Please also provide information about the project here. If flashrom developers should send feedback, the whole process must be "detailed". Example terminal output for the entire flash process.
Disable checks related to kernel loading. When you start or operate your computer, use the chart to determine the power status. The following sections. To determine the problem with the power supply, try the following two procedures.
Wait for the laptop to reboot or just wait 10-15 minutes. Check the stability of the device.
Sometimes bad firmware phone or the desire to roll back to old version, ends in trouble - the phone refuses to work at all. Don't rush to throw away your phone - you can also reflash it from dead mode to a normally working version.
If the computer does not start after charging the battery, remove the battery and connect the adapter alternating current to the laptop. When it starts, run a battery test and calibrate the battery. If it won't start, connect a replacement battery if possible to see if the battery is causing the problem.
If the computer does not start after charging the battery, remove the battery and connect the AC adapter.
- Plug your laptop into a power outlet and try again to start your computer.
- Check the power supply to make sure all plugs are connected correctly.
You will need
- Mobile phone, Charger, computer with Windows OS, Phoenix program.
Instructions
Download the Phoenix program from file-sharing sites on the Internet.
Video on the topic
Sources:
- how to reflash motherboard
If you often work on a laptop, various errors may appear, and from time to time a situation arises when the laptop refuses to boot due to erroneous settings made in the BIOS. In this regard, it needs to be reset.
Steps required to disable camera and microphone on your laptop
On such laptops, help so far. Other different key combinations are possible for other computer brands. 
Well, in order to deactivate our team's camera and microphone, we will need to first open the imaging devices and there we will find our webcam. Now, simply by right-clicking on it, we will have the option to select the “Disable” option.
As with the camera, we right-click on the microphone and select the "Disable" option. Once this is done, we have just disabled our computer's camera and microphone so that no one can use them with any malicious intent. If at any time we want to use them, we simply follow the same steps and instead of selecting the “Disable” option, we must select the “Enable” option. It is recommended that you turn it off again after using these devices.
Instructions
First, you need to find and download a program that will allow you to reset the BIOS. You can use BIOS_PW.EXE as such a program. You can download it from the website http://intellcity.ru. After downloading it, you will need to unzip the program and run it. This utility is not installed on your computer, but is simply launched from an archive or folder. Or you can use another program that will also help you reset the BIOS to laptop. The most optimal utility is unlock6.exe. Download from the site http://necessary-soft.net. The actions will be the same as for BIOS_PW.EXE.
If so, in this article we will see a way to, among other things, eliminate the request for this password at the beginning. There are three methods for this. If the jumper is over the 3-pin connector, place it over the middle pin and over the pin that was not initially covered.
- Typically the jumper is located near the motherboard button type battery.
- Write down the name of the jumper associated with the label.
- It's also close to a heap.
Next, when you boot your computer, you need to remember the error code that the laptop gives. Most often, this code will appear after three entry attempts. Now you need to log into the cmd console, and then go to the software directory (Software). Next, you need to enter the name of the required software, enter the error code separated by a space, and the number 0 separated by another space. After this, you can press the Enter button. The software will generate several passwords. Try each password until one of them works.
How to go from ah to ata in Toshiba
Some site elements, such as the wall, are on all users' pages. It explains booting the computer and various possible reasons that our computer made some beeps when it was turned on. What happens from the time we give the Power button until we see the operating system boot?
It then transfers the storage devices. The microprocessor resets all counters and registers to. This is where the beeps are that indicate the computer's status. Turns on the LED keypad and generates inputs. Boot control gives control to the operating system.
Next, you need to go into the BIOS and insert the specified password. Now you will be able to set the new password as blank. It is very important to reset your existing BIOS password. This completes resetting the BIOS on laptop completed.
Video on the topic
Whenever we turn it on, the way the motherboard is supposed to communicate system status is by beeping. No sound signal: There is no power, or it may happen that the "loudspeaker" that emits the sound signals fails.
Continuous tone: Power failure. Constant short tones: the motherboard is faulty, that is, it is broken, this is the worst thing that can happen to us. This usually happens on older motherboards, people usually pull them out. Long tone and two short ones: Error on the graphics card. The port may fail so there is no need to change the port, but it may also be that graphics card damaged.
Firmware mobile phones Almost 50% of manufactured models are needed, this is due to the fact that over time new software for phones appears, the phones themselves acquire new capabilities. Firmware is also required for phone models that do not work correctly (cause automatic reboot, etc.).
Two long tones and one short: error in image synchronization. Of course, the graph problem. Two short tones: memory parity error. This especially happens on older computers that store two modules of memory in two modules. This means that one of the modules is failing, or that we don't have an even number of memory modules.
Four short tones: timer or counter error. Five short tones: This means the processor or video card is locked. Often occurs when overheated. Six short tones: keyboard error. If it still doesn't work, it's the keyboard receiving port. Many times we hear many of these sounds for what we do not understand, but then continue to function normally. In this case, the problem is error detection or the kind of scanning that will cause us to set the computer on fire.
You will need
- Motorola L-series phone, RSD Lite software, MotoMidMan, P2KTools, data cable (USB-miniUSB).
Instructions
Before any actions related to the phone's firmware, you need to charge the device to 100%. It is also recommended to install drivers for specific model L-series. If a disk with drivers was not included, you can download them from the Internet. After completing these steps, you need to remove the flash card, if you have one, and connect the phone and computer using a data cable. Don't forget that the firmware files should be downloaded before flashing the phone.
First make sure the speaker is connected correctly, then check the power cord. In case everything is in order and the configuration of the helmets and jumpers can also be changed to the defective board. In most cases, this error is caused by ongoing problems.
These beeps indicate that everything is correct. If we see the image, we will receive an error message. If the problem persists, we will change the plate. Same as when serving two sound signals. The same thing happens with two and three beeps. In this case, it may also be an error in the system clock.
Launch the P2KTools program and save everything important to you that is on this phone: contacts, messages, pictures, applications and mp3 ringtones. If it is impossible to save all the data from your phone using this program, use the additional software: MotoMidMan and P2KAE.
Close all programs that are running this moment with your phone, you can go to the “Task Manager” to be sure (Ctrl + Alt + Delete or Ctrl + Shift + Esc). Now launch the RSD Lite program.
The keyboard controller is broken, you need to change the board. The processor could not be detected or failed. We are changing or revising the configuration. The video card is not detected or is not working. We changed the card slot or looked at the video memory. If the problem persists, we will have to change the plate, since this chip is always welded.
Most beeps are accompanied by an error message. Power failure. Check connections and power supply. Change memory bank and check bus jumpers. There is no image signal, this is that our graphics card is damaged, we will try it in another slot or try another graphics card.
Your phone icon should appear in the main program window. Click on the button to download firmware files from your hard drive and specify the path to them.
All that remains is to press the Start button. Several lines will appear on the screen of your phone indicating the start of the firmware (Boot Loader... SW version). If there are no inscriptions on the screen of your phone, it means that it has not entered flash mode. Press "*" + "#" + "red power off button".
The process of flashing the phone can last from 5 to 10 minutes. After flashing the Motorola L-series firmware, the program will display a message about successful firmware and try to automatically reboot the phone. If this does not happen (the phone restarts), do this action yourself. If for some reason a failure occurs (network surge), repeat this operation again.
Video on the topic
Sources:
- flash motorola
Proper storage of documentation will avoid problems with finding the necessary contracts. By spending a little time filing securities, you will be sure that the ones you need will always be at hand, safe and sound.

Instructions
To easily find the document you need, make a ledger. Assign a number to the agreement and enter it in this notebook. In addition to the serial number, write down the date when the contract was concluded. The line in the journal should look like this: 1. Agreement No. 987DL dated March 23, 2010. Next to it, in the notes, indicate the essence of the contract, if required. corporate style maintaining an archive.
Keep for each legal entity, if there are several of them in the organization, your own document log. Use conventional symbols to designate them. For example, enter contracts of LLC "Veselye Kartinki" as 987ВК. And contracts from JSC "Murzilka" are marked 987M. Assign numbers strictly in order to avoid confusion.
File the agreement in a folder only after it has gone through all stages of approval, has been signed by the general directors of both parties, and has all the seals applied. Choose hardcover binders - they will ensure the safety of documents. Create a separate folder for each legal entity.
To place the agreement in a binder, carefully remove the paper clip connecting the sheets. Use a hole punch to punch new holes. Insert the document into the folder and secure it with metal ties. Separate one contract from another with a blank A4 sheet.
There is another way to archive documents. Purchase a set of clear files. Place each agreement in a separate cover and secure it in a folder.
Do not insert too many contracts into one folder - the sheets may become wrinkled. The folder should close easily so that the paper does not peek out.
Set aside a separate shelf on the rack for storing folders with documents. At the end of the folder, indicate the year and entity, for which contracts have been drawn up. This way you can quickly find the contracts you need when needed.
There is no need to keep folders with documents concluded three or four years ago on hand. Place them in thick cardboard boxes, signing the year and the legal entity that owns the agreements. Send the packages to the warehouse. Find a dry storage location. Moisture can destroy securities.
Firmware (reflashing) of a PDA must be done for various reasons, for example, to bring the device back to life after incorrect installed program or system failure. Firmware is also done to Russify devices.