Hello! I have the following problem - I turn on the computer, on the first page where the BIOS is loaded, the following happens - it shows the BIOS version, then the memory is scanned, it says that the memory is working in 2-channel mode, then it displays what is connected to the primary mastery, what to slave mastery (HDD and DVD, respectively) - everything is as usual here, but after that the BIOS freezes for an indefinite time, usually for a couple of minutes, after which it just shows a black screen with a white blinking cursor in the left top corner and that's it - it won't load any further. I waited for 10 and 15 minutes - it was useless. At the same time, the buttons on the keyboard do not work - not Del, F7, F9, F12 - nothing at all. (including on the first page when loading the BIOS)
I described the essence of the problem. Now about why it arose. The cooler on my processor was malfunctioning. I bought a new one (only 3 pin instead of the box 4 pin). I started putting it on. Before this, I completely disconnected everything from the mother (except for the processor), removed the mother, greased the processor and cooler with paste, installed the cooler, installed the mother, connected everything to the mother. After that the computer stopped booting, at first it didn’t even beep at all. My problem here was that at first I forgot to connect the 4-pin plug from the power supply to the motherboard, and I slightly confused the order of connecting the F-panel (the power button and the HDD operation light worked, the other 2 wires were connected in the wrong place). After I figured out all the wires and connected everything correctly, this problem arose. The first time I solved it in the following way - I completely disconnected all the plugs (including the 24-pin one from the power supply, when I removed the mother I did not disconnect it) and turned them on again. Everything worked. After turning on the computer for the third time, the problem repeated itself. Then the only way to solve the problem was to remove the percentage from the mother and reinsert it
After that, the problem recurred again the 2nd or 3rd time I turned on the computer, I solved it again by removing the stone from the motherboard.
Everything I tried, but only reconnecting the processor helped me:
- completely removed everything from the mother and re-inserted it (including plugs) - video card, memory, HDD, power supply, battery (including resetting the settings to factory settings via the BIOS). By the way, I removed the battery when I couldn’t understand why the computer didn’t boot the first time (when I forgot to connect the 4-pin wire from the power supply to the mother), all the F-panel plugs.
- cleaned and purged the computer
- I changed the paste more than once, by the way, the percent does not heat up, so it’s not a matter of the cooler or the paste - the idle temperature is 39 degrees (it used to be about 50)
I did all the procedures with the power completely off.
Once again, the only thing that helps is to pull out the percent and insert it back. I did this procedure 3 times (and the 3rd time I did only this, nothing else) - it always helped. Perhaps when I first pulled out the processor, I accidentally touched the contacts of the processor with my finger, but the problem appeared even before that (before it appeared, I did not pull out the processor at all). When the computer turns on, all devices work normally, no problems were found, there are no brakes either, the processor does not heat up even under load.
Tell me what could be the matter? I apologize for writing so much, I tried to describe the problem in as much detail as possible. By the way, here is the system config: mother Gigabyte GA-8I945P-G, percent Intel Pentium 4 630, 3015 MHz (15 x 201), gig memory (2 sticks of 256 and 1 of 512, stupid of course, but that’s how it was originally), Type BIOS-Award Modular (09/26/05) version F7, vidyukha - NVIDIA GeForce GTS 250 (512 MB), XP operating system. I don't have a tester so I can't check the voltage.
Thanks in advance everyone for your advice!
Addition #1
I also forgot to add about the power supply - FSP 450 watt 20+4 pin ATX 12V.
This article is about how to reset the BIOS to factory settings. This becomes necessary if you have changed something yourself. This could lead to the following consequences: unstable operation of the computer (PC)/laptop, inability to turn on the PC/laptop, black boot screen operating system, unknown password to enter BIOS setup and many others.
Resetting CMOS memory using hardware
Let me remind you that the BIOS is built on CMOS technology (complementary logic on metal-oxide-semiconductor transistors).
Many users respond positively to this method. For many people, after resetting the settings, the laptop monitor started working again, and there were no problems with the image. If this method did not help you, read on.
Detecting a laptop matrix malfunction
If you are faced with a problem when, after turning on the laptop, a black screen appears and the image is not visible at all, then you can use a tricky method to determine whether the matrix and video card are faulty. The method is to connect an external monitor to the laptop. Look at which connectors are on your device and which are on the monitor.
Resetting BIOS Settings
If the problem “the laptop does not turn on and a black screen appears” appeared after changing the BIOS settings, then you just need to reset and roll back to factory settings. This action is performed in several steps.
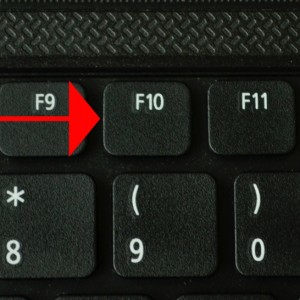
1. When you turn on the laptop, press the f10 key for 10 seconds to enter the BIOS.
2. Then you need to press f9 and enter to return to factory settings.
3. Press the f10 key and enter - this action saves the settings and reboots the laptop.
7. Reinsert the battery.
In this case, you should contact service center and consult with experts.
Reset BIOS
Perhaps the black screen problem appeared immediately after the user made some changes to the main BIOS settings. In such a situation, it is necessary to reset these same settings and return to the factory settings, that is, the original ones.
To complete this task, you must adhere to the following instructions:
resetting the BIOS (pulling out the battery, and closing the contacts does not help...)
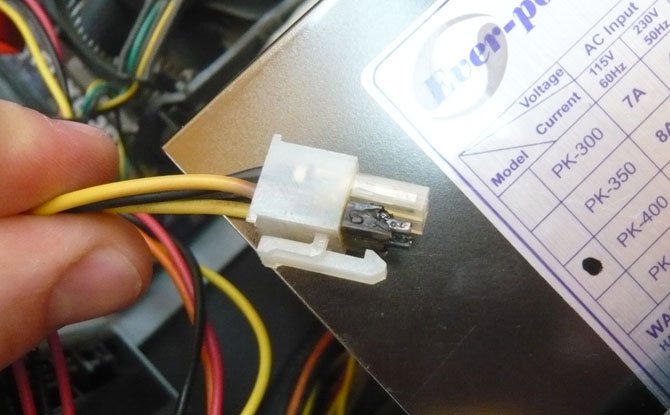
And finally, the power supply, because of which the computer does not turn on at all, we connect the faulty power supply to an electrical outlet, then, as expected, we closed the green (PS-ON) and black (ground) wires on the contacts with a paper clip, then as we see nothing happens, the cooler on the unit does not rotate, in this case it is useless to connect a load in the form of a disk drive, the power supply is faulty.
Also, once I came across a computer that did not turn on due to the melted wires of the additional processor power supply.
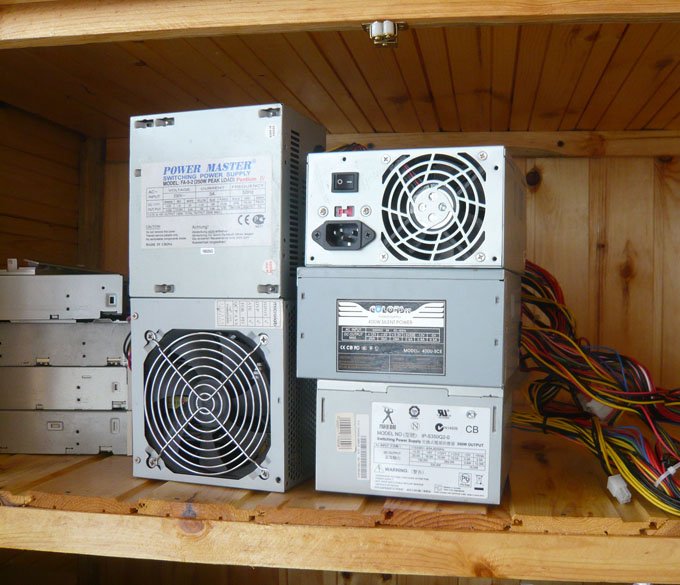
As you can see, friends, using a multimeter you can determine whether the power supply is working or not, but unfortunately the multimeter will not help you turn on the computer, so I advise that if you come across a computer that does not turn on at all, then to 100% identify the fault, keep a working unit ready nutrition, this will save you a lot of time and nerves.
The computer does not turn on due to a faulty POWER button
Someone bad kicked it and doesn’t tell you, and this happens, friends, you check the power supply, change CMOS battery, but the matter is completely different. If when you click on POWER button, you feel that it is physically faulty, for example, it is failing, then you can directly try to turn on the computer bypassing it.
The memory in which the BIOS settings are stored, as well as the motherboard clock, are not non-volatile: there is a battery on the board. Removing this battery resets the CMOS memory (including the BIOS password) and the clock (although sometimes you have to wait a few minutes before this happens).
Note: sometimes found motherboards, on which the battery is not removable, be careful and do not use unnecessary force.
We do as described above. Return the jumper to its original position.
We launch our “patient” and - oh, miracle! Our ears hear a single short “beep” from the speaker (which indicates that the system has successfully passed starting POST test), the eyes see the blissful picture of white lines of initialization of all components running across the black screen, the system administrator’s soul wants a holiday and beer! :)
What lesson can you learn from this story? What should have been done first ( completely reset bios settings) was done at the last minute. Hence - a lot of wasted time at the company, but - one good article on the site! :) Conclusion? - any understanding and knowledge comes with experience (positive or negative is no longer so important). So - experiment, gentlemen, experiment! :)
P.S. This computer works stably to this day, and more than six months have passed. Decoding sound signals You can get the BIOS here (included is a specialized utility).
Hi all. Today’s article will be to some extent a continuation of the story that we started in the last one about HDD markup styles. It so happened that a computer came in for repair with a rather interesting malfunction. When you turn on the computer, it displays the BIOS picture, and then there is silence - just a black screen. Having gained experience and knowledge from the last article, I decided to experiment a little and solve the problem not with a regular reinstallation, but in some tricky way. The ultimate goal is to get a working, starting computer with all the data. Read on to find out how I did this.
How to fix black screen after BIOS splash screen?
Well, the first thing I decided to start with was to actually examine the computer for hardware faults. I started with scanning random access memory. The RAM consisted of one single 4 GB DDR-3 stick. I scanned with an interesting program that was already automatically built into the BIOS, which later turned out (due to UEFI). Unfortunately or fortunately, the scan didn’t show anything bad; everything was fine. Next it was time to scan hard drive. This took a little more time. But here the result was positive, bad sectors There is not. The resulting picture is interesting, the main tested parts are still working, but the problem with the computer’s operation has not yet been solved, so we turn on our heads and think possible options. Then it occurred to me to try resetting the BIOS settings, but it happens, albeit not often, that it is the culprit, but as it later turned out, not this time. The reset was carried out both through the BIOS itself
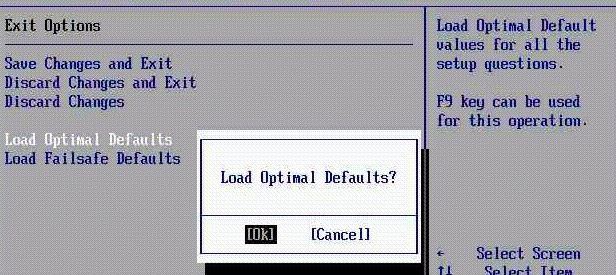
and using a special button on the motherboard.
All settings were reset successfully, but to no avail. And at this stage I decided to give up on everything and just install Windows 7 from the disk. I insert original image, at first everything loads quickly, but suddenly, at the moment when I need to select partitions, the installer throws me such a picture.
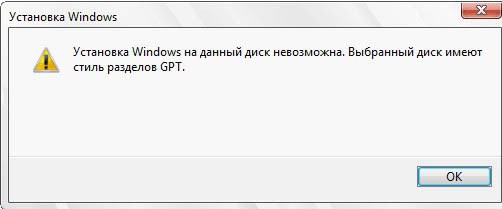
And then it dawned on me. Turns out on this computer HDD placed using the GPT style in place of the MBR and perhaps all the problems come from this. Minutes of thought began... the most mysterious thing for me was that Windows 7 was somehow installed on this very computer. Then, of course, I remembered that Windows 7 x64 can see GPT, which means it is installed here. Now the further path to solving the problem for me looked like this:
- Copy at LiveCD help all the necessary data on external drive, then delete all sections and make an envelope according to the previous one;
- Check settings in BIOS, availability of UEFI support, devices in Boot Order;
And as you might have guessed, I took the second path. I went into the BIOS, checked all the settings, indeed it supports UEFI, then I went to the boot devices section and this same boot-order was interestingly divided into two parts, on top of the device (but under the UEFI block), just below almost the same devices ( but under the Legacy block).
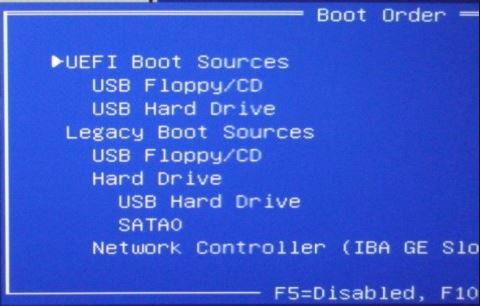
In the search, I found the necessary information, and then inspiration awaited me again :) In the last article, I even touched on this a little. In general, briefly, what is the difference between these two blocks (UEFI vs Legacy). You can boot from your external device the same way, either from a UEFI block or from a Legacy block, but in the first case, your BIOS will use special algorithms that will allow you to see! HDD partitions in GPT style. In the case of Legacy, you will see partitions only if your hard drive is marked by old technology MBR. And this is exactly the gag. Because my attempts to go to the “System Restore” section ( installation disk) for some reason always ended in failure. Now, being an expert in this, I again cling to the installation Windows image 7 x64, I boot from it. Continue to “System Restore”


