- Prices are 15% lower than the purchase price due to the purchase of components directly from manufacturers
- Express diagnostics of Panasonic radiotelephones within 15 minutes - 0 rub.
- Urgent repair Panasonic cordless phone from 30 minutes
- Official warranty up to 6 months
We are optimal prices in Moscow we carry out high-quality repair of Panasonic radiotelephones. All restoration work in the service is carried out by experienced craftsmen after a free diagnostic of the device. After an accurate analysis of external and hidden damage, we calculate the cost and timing of the operations. In the process of repairing devices in the workshop, original spare parts from the manufacturer and high-precision dealer equipment are used. The high professionalism of the craftsmen and innovative tools return Panasonic radiotelephones to working capacity in the shortest possible time.
Prices for Panasonic radiotelephone repair services
Prices for accessories for Panasonic cordless phones
Specify the cost of components for your Panasonic radiotelephone model from the SC managers.
The most common types of breakdowns of Panasonic cordless phones
The main symptoms of problems with Panasonic cordless phones that require competent elimination are:
- loud noises and crackling in the tube;
- there is no or unstable connection between the base and the handset;
- no dialing;
- the signal (beep) of the station call is not heard;
- the phone does not respond to any commands;
- the caller cannot hear you.
Our workshop provides services for (including DECT phones). Before calling our workshop, please look at the model of your home phone, then it will be easier to estimate the cost and time of phone repair. Most often, the model name is indicated on the bottom of the base unit. When handing over the radiotelephone for repair, indicate in writing: the reason for the appeal - what kind of defect the phone has, the history of the defect. This information will speed up the diagnosis of your radiotelephone.
Modern radiotelephones have very small, high-tech wiring. Therefore, to eliminate even typical malfunctions in a radiotelephone, sophisticated equipment is needed, soldering stations, various fixtures. It is impossible with one soldering iron to skillfully replace an SMD or BGA standard part. An instrument complex is also needed to check all the parameters of the radiotelephone.
In modern household appliances, "block" repairs are successfully carried out. This is when a faulty unit or unit changes entirely. Such repairs are relevant for washing machines, refrigerators, electric stoves, microwave ovens. It is not always possible to repair modern TVs, DVDs, Videos using the "block" method.
The masters of our service use only durable repair technologies and high-quality parts.
Why is it better to repair radiotelephones with us?
Our service employs only qualified craftsmen with extensive experience in phone repair, who have been trained and trained in the best service centers in Moscow. High-quality is possible only in a hospital where there is all the necessary diagnostic equipment. For all types of services for the repair of radiotelephones, the masters provide a guarantee for several months.
Radiotelephone malfunctions
Most radiotelephone malfunctions occur due to mechanical impacts on the handset, and in this case, as a rule, the connection between the base and the handset is lost. If there are no visible mechanical damages on the electronic board of the handset, the most likely cause of the malfunction may be the detuning of the contours of its receiving or transmitting part.
In this case, the core of the reference circuit of its RP is rotated within a small range (for example, in Panasonic KX T37 ** devices this is the T8 circuit, and in KX T38 ** - L8) and achieve a position at which the base steadily receives the tube signal.
Panasonic Corporation
Panasonic Corporation is a large Japanese engineering corporation, one of the world's largest manufacturers of household appliances And electronic goods. Until October 1, 2008, it was called Matsushita Electric Industrial Co., Ltd. (Panasonic was one of the trademarks of this company). The headquarters is located in the city of Kadoma, Osaka Prefecture (Japan).
History of Panasonic Corporation
- 1918 - Japanese businessman Konosuke Matsushita founded the Matsushita Electric Factory
- 1927 - National trademark introduced
- 1931 - production of radio receivers began
- 1932 - acquisition of a patent for the creation of radio equipment and its free provision to other Japanese manufacturers, as a contribution to the development electronics industry Japan
- 1933 - adoption of the company division system; construction of a large plant in Kadoma, Osaka Prefecture; transfer of production to a new plant
- 1935 - restructuring of Matsushita Electric Industrial Company; Establishment of a subsidiary of Matsushita Electric Works
- 1941 - the beginning of the production of military products; production of ships and aircraft from wood
- 1946 - imposition of restrictions on the company by the General Staff of the Allied Forces (Allied Powers General Headquarters)
- 1952 - Foundation of Matsushita Electric Industrial Company, with technical cooperation with the Dutch company Philips Electronics; construction of a new plant and further development
- 1954 - start of cooperation with JVC
- 1957 - creation of an effective National Shop system - a trading network designed to sell goods under the National brand
- 1965 - Enactment of a weekly two-day weekend for workers; adoption of a new trading system that reduces the number of links involved in the sales process
- 1977 - the beginning of the sale of video cassettes in the VHS format
- 1979 - the legendary Technics SL-1200 MK2 hi-fi turntable was released, which later became the world standard in the DJ industry.
- 1983 - release of the Panasonic JR-200 home computer
- 1986 - Beginning of the Panasonic name as a trademark in Japan
- 1987 - the beginning of the production of bread machines.
- 1989 - start of large-scale reform of technological departments
- 1990 - Renaming consumer electronics under the brand name National to Panasonic (in Japan)
- 1993 - Panasonic's attempt to profit from the video game market with their 3DO Interactive Multiplayer video game console; strong competition from the Sony PlayStation did not allow this console to develop and its release was completed at the end of 1995
- 1993 - cancellation of the joint venture agreement with Philips and change of the contract to the proprietary license mode
- 1994 - Creation of a joint venture between Panasonic Shun Hing Industrial Sales (Hong Kong) Co., Ltd and Panasonic SH Industrial Sales (Shenzen) Co., Ltd in China with Shun Hing Electric Works (Hong Kong); Shun Hing's Rasonic trademark becomes Panasonic's
- 1997 - Establishment of group consolidation policy resulting in the reduction of subsidiaries
- 2001 - Panasonic released the Nintendo GameCube ("Q" in Japan) using DVD
- 2002 - Technics branded products sold in the US and Europe are renamed Panasonic
- 2003 - introduced the global brand and motto - "Panasonic. Ideas for life.”
- 2008 - change of company name from Matsushita Electric Industrial Co., Ltd. at Panasonic Corporation
- 2009 - signing of a merger agreement with Sanyo Electric Co.
- 2010 Complete switch from National brand to Panasonic in Japan.
Since its formation in 1918, the company has been known as Matsushita Electric Housewares Manufacturing Works, which was changed to Matsushita Electric Manufacturing Works in 1929. Name Matsushita Electric Industrial Co., Ltd. the company has worn since 1935, when it became a stock corporation. Although the company used the Panasonic and National brands for a long time, in 2003 it was decided that the Panasonic brand would become a global brand to strengthen its competitiveness in the global market along with its slogan - "Panasonic ideas for life".
Since the early 1960s, the company has owned a controlling stake in JVC (Victor Company of Japan, Limited), the developer of the VHS consumer video standard. In 2007, the company sold a majority stake in JVC to a group of investors.
Since October 1, 2008, Matsushita Electric Industrial Co., Ltd. changed its name to Panasonic Corporation. All brands of the company were subject to renaming in the names of which there were the names Matsushita or National. In 2010, the company made the transition from the National brand to Panasonic in Japan.
Merger with Sanyo
On December 10, 2009, a merger agreement was signed with Sanyo Electric Co. The purchase of a 50.19% stake in Sanyo cost Panasonic 404 billion yen ($4.6 billion).
History of the Panasonic brand
The Panasonic brand was created by Matsushita in 1955. It was intended for use in the United States, Canada, and Mexico (originally planned to use the National trademark, but it was already registered by others). The name Panasonic was derived from the ancient Greek words "pan" meaning "everything" and "sonic" meaning "sound", as the brand name was first used for audio equipment.
Activities Panasonic Corporation
Panasonic Corporation has 638 enterprises. The main brands under which the products are produced:
- Panasonic (consumer electronics for the mass market, including plasma panels, DVD players, telephones, projectors, digital cameras, as well as computer chips, automotive equipment);
- Lumix ( Panasonic Lumix) is a sub-brand of the digital Panasonic cameras. Under the Lumix brand, a wide range of devices is produced: from compact to single-lens reflex cameras.
Trademarks under which consumer electronics were previously produced and are no longer used by the company:
- National (consumer electronics for the Japanese market, out of use since 2008);
- Technics (audio engineering, since 2008 used only for professional musical equipment for DJing);
- Quasar (cheap consumer electronics for the North American market, not used since 2008);
- Ramsa (professional audio equipment, retired from 2008).
Panasonic cordless phone - The handset has lost contact with the base, what should I do?
To use the telephone, the handset must be registered to the base unit. You need to do the following:
- 1. On the base unit, press and hold the "Search" button for 10 seconds until a series of beeps appears.
- 2. On the handset, enter the "Handset Settings" section, select "Registration".
- 3. In the "Registration" menu, select "Registration Handset".
- 4. Select the desired base unit number, the display will show "Please wait".
- 5. Enter the PIN-base (factory PIN - "0000"), press the "Function" button, the display will show "Wait", the handset should be registered.
Downloading new ring tones on Panasonic DECT cordless phones?
Downloading new melodies is possible in the 300th and 500th series of Panasonic DECT phones. To do this, you need a communication kit with a computer, which can be purchased at Panasonic ideaplaza consulting and exhibition centers. For the 300th series of Panasonic phones, the PE-TCD300 model kit is intended, for the 500th series of phones, the PE-TCD500 model kit. It is also possible to download new melodies in Panasonic KX-TCD815RU and KX-TCD825RU models, software and a cable for communication with a computer for these models of radiotelephones are included in the package of delivery of these devices.
In Panasonic DECT radiotelephones, the incoming number is determined only after pressing the Caller ID button
Caller ID work by pressing the "answer" button (radio tube symbol) to determine incoming number is normal and is due not to technical, but to legislative restrictions in force in the Russian Federation (the law on certification and the law on Human Rights). Such an ANI algorithm makes it impossible to view the numbers of subscribers who called in the absence of a DECT phone user, because. incoming calls are not fixed by pressing the "answer" button.
Panasonic phones have a "Caller ID" feature that, when connected, paid service number identification on the city PBX allows you to automatically determine the numbers of incoming subscribers. Caller ID works only according to the ETS300659 standard, therefore, a prerequisite for its performance is that the city station maintains this standard.
The value of the operating voltage of the telephone line for the correct operation of Panasonic radio telephones of the DECT standard
Panasonic DECT cordless phones are designed for use on public lines with an operating voltage of 60 V (volts).
The difference between Panasonic DECT cordless phones models KX-TG1311, KX-TG1312, KX-TG1313 and KX-TG1314
Models of DECT cordless phones Panasonic KX-TG131N have the same technical and functional characteristics and differ only in the number of handsets in the delivery set: KX-TG1311 - one handset in the set. KX-TG1312 - two radio handsets included. KX-TG1313 - three radio handsets included. KX-TG1314 - four radio handsets included.
Calls from landlines to mobiles in Moscow
Calls from a landline phone to a mobile are now paid. Subscribers of the Moscow City Telephone Network, in accordance with the law "On Communications", pay for calls from their phones to mobile phones. At the same time, the charge for all incoming calls received on Cell phones. The only exceptions are cases when the call is made at the expense of the callee or if the subscriber is in roaming.
For MGTS subscribers, the cost of a minute of conversation from a landline number to a mobile phone will be 1 ruble 50 kopecks. At the same time, there is no special signal informing the subscriber of the city network that he is connected to a mobile phone. "The implementation of the 'caller pays' principle has put all subscribers in the same position: people pay only for those calls that they make themselves."
Phones
The phone is broken
What to do?
In the event of a breakdown during the period warranty service You can have your radiotelephone repaired free of charge at an authorized service center. Phones and addresses service centers listed on the warranty card. Do not repair your phone yourself. Warranties do not apply to products that have not been repaired at a service center.
What is needed to repair a faulty phone in a service center?
In order to repair the phone, it is enough to present a correctly completed warranty card, which is issued upon purchase of the product (with a mark of the trade organization on the date of sale of the phone and with the signature of the seller).
Craftsmen and workshop service
Cash and non-cash payments for private clients and organizations in Moscow.
Repair of radiotelephones and cameras in the workshop
Diagnostics of radiotelephones and cameras in workshop.
Radiotelephone repair V workshop Moscow.
If the handset rings when calling from the base unit and cannot be answered, and you cannot make a call, dial the number, this is a malfunction of the base receiver or handset transmitter. Registration will not help, needs repair.
Urgent help for computer users
Urgent help in installation computer technology.
Search malfunctions computer technology.
Helpful Hints By repair of computer equipment. Consultations in the workshop of Moscow.
Radiotelephone terms
Index of radiotelephones.
Panasonic radiotelephone repair in Moscow
Phone repair and tuning Panasonic. Urgent . Repair landlines Panasonic. The Panasonic cordless phone does not ring. Repair of home telephones with answering machine. The Panasonic answering machine model 4311 has malfunctions in the operation of the AO during normal operation of the handset and base. The reason lies in the increased amplitudes of the power supply ripples. In the radiotelephone models 3611 and 3621, such a malfunction often occurs - there is no connection between the handset and the base. The reason for the lack of communication is a poorly soldered output of the transmitter quartz in the tube. Radiotelephone repair Panasonic in Moscow and MO.
Repair of LG radiotelephones
Repair cordless phones. Radiotelephone repair LG. LG. LG.
Siemens radiotelephone repair
Radiotelephone repair Siemens. Repair and adjustment of radiotelephones Siemens. Urgent repair of radiotelephones Siemens. Certain buttons on the handset do not work.
Sanyo radiotelephone repair
Radiotelephone repair Sanyo. Repair and adjustment of radiotelephones Sanyo. Urgent repair of radiotelephones Sanyo. There is no connection, and the discharge LED flashes in the handset (with charged batteries). In sanyo radiotelephones, pressing the button hard may break the contact of the microprocessor legs. People push the buttons harder than necessary when the conductive rubber of some keys stops conducting.
Philips cordless phone repair
Radiotelephone repair Philips. Repair and adjustment of radiotelephones Philips. Urgent repair of radiotelephones Philips.
Radiotelephone repair - We will talk about those malfunctions that can be eliminated even by a non-specialist, having detailed instructions. And you will find them here.
Hello dear visitors. In this post, I will try to talk in detail about what can be done at home in order to bring such a “toy” as a radiotelephone back to life. Everything will be on the example of the Panasonic radiotelephone, but other brands will be similar in many respects.
Of course, when it comes to a breakdown of the electronic part, this is the lot of specialists, but most often something that many people can do on their own fails, about how and what to do, we read and look below.
Radiotelephone buttons not working
One of the common malfunctions of radiotelephones after prolonged use is that some buttons, when pressed, stop working at all or require a lot of effort.
Usually this happens with those buttons that are pressed most often, they can be easily identified by their wear. This malfunction is akin to the same problem as in the remotes. remote control. And therefore it is removed in the same way.
But just do not think that it is enough to clean, rinse and that's it. This method is very widely described, but believe my many years of experience in the field of repairing remote controls, this does not help for a long time, in 90% of cases for a week. For a quality repair, you will need to purchase something in advance, but more on that below.
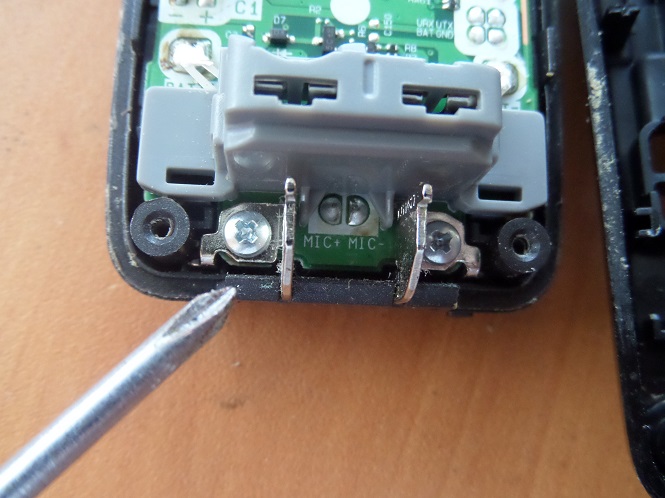
Any repair begins with disassembly.
When disassembling an unfamiliar device, there is no need to rush, be careful, try to remember and, if necessary, write down / photograph / mark some nuances, for example, even the fastening bolts can be of different lengths in different places and they should not be confused. Attentiveness will help to unmistakably put everything in place and you will not be left with unnecessary details.
But in this case, everything has already been described and photographed. Begin!
We disassemble the Panasonic radiotelephone
The owner of the phone complains that he stopped turning on, the reason is banal, the buttons do not work. The photo clearly shows that the power and reset buttons are heavily worn.
After removing the batteries, we find the mounting screws in the case and unscrew.
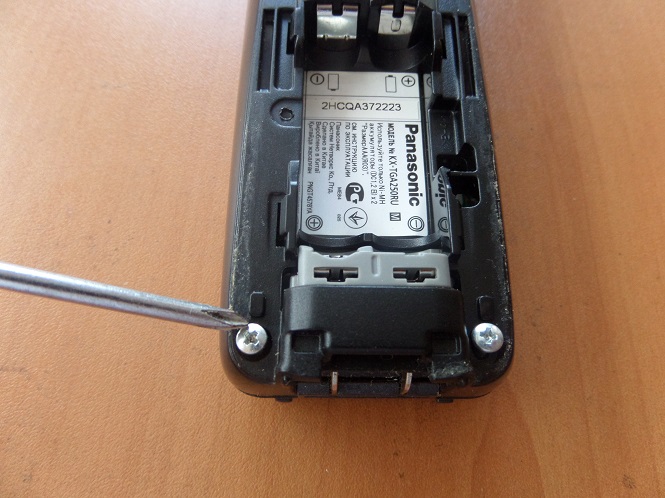
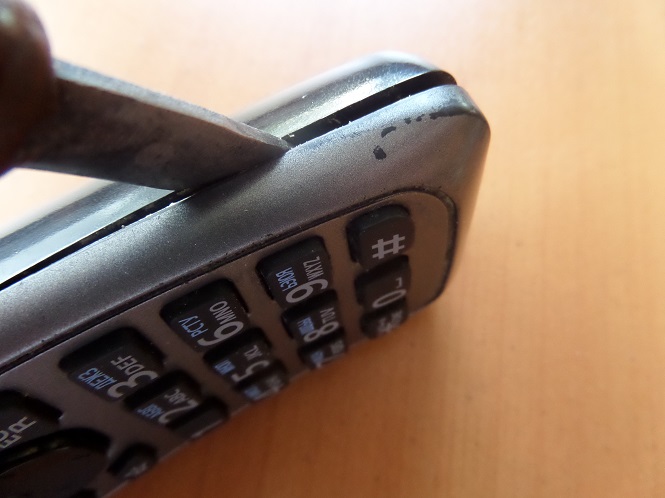
With a short and preferably not very sharp knife, you can also use an unnecessary plastic card or something else like that, open the phone by applying a little force down and to the side to open the latches, try not to break them.
We pay attention to the wires, they do not need to be soldered, but they also do not need to be torn off.
The next step is to find all the screws that secure the board and unscrew them.
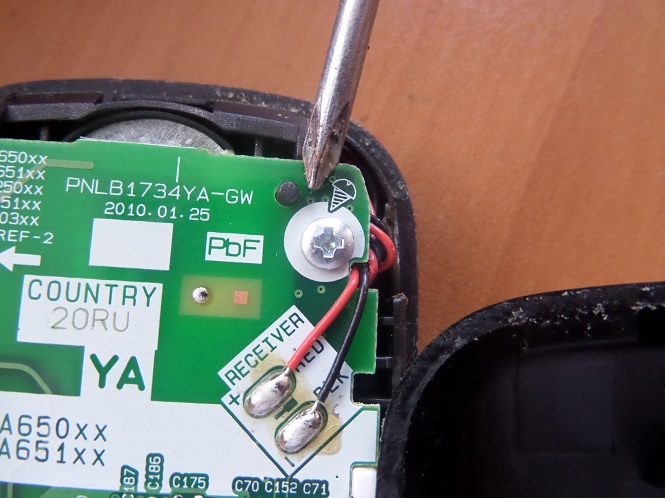
And here are the nuances, we pay attention to how these metal terminals are placed.
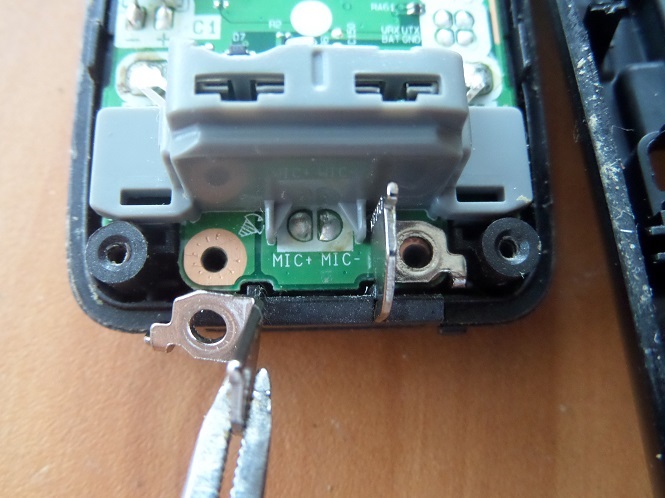
Well, we got there, it's not difficult at all.
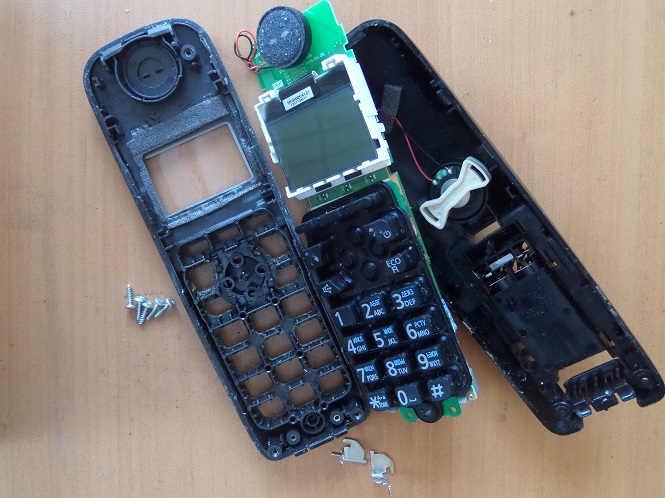
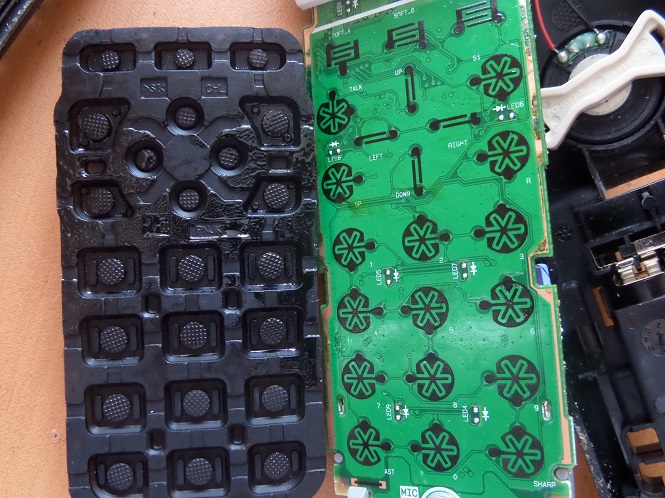
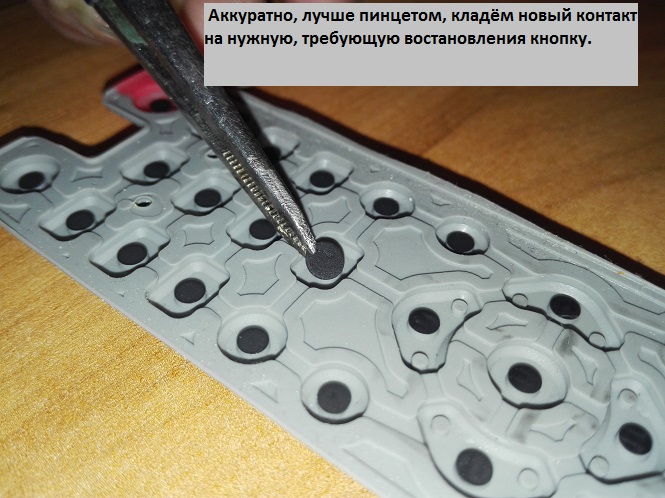
We separate the rubber mat with buttons from the board.
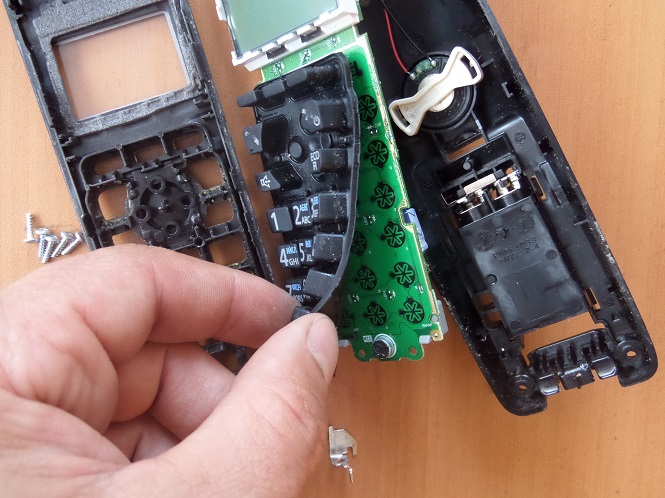
The board itself, the part that was under the rubber band, is carefully wiped with a cotton pad soaked in alcohol (you will have to drive it to the pharmacy 🙂) from grease and other contaminants. Without fanaticism, there is no need to try to erase these black graphite conductors in the form of stars and other figures. There were cases, even sandpaper was used. We carry the gum itself under the tap and in warm water with soap and cotton wool, and preferably with an old toothbrush, carefully wash and dry.
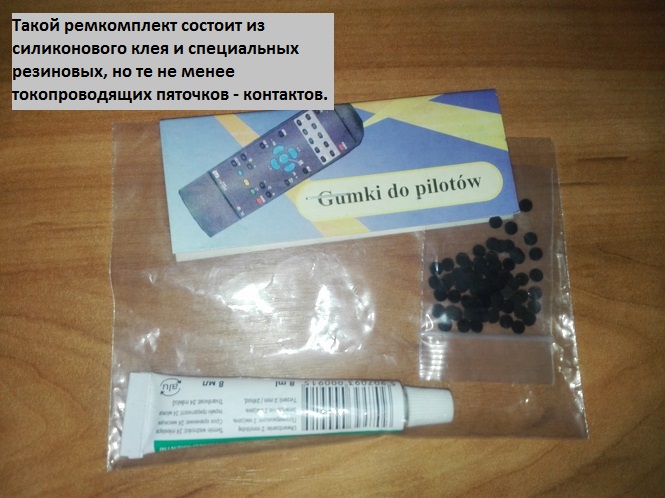
When everything is ready, the gum is washed and dried, we proceed to repair. And here, for a quality repair, we need a repair kit for remotes, you can buy it in stores with a radio engineering bias. The cost is usually no more than 100 rubles. A little later I will talk about alternative methods.
This is what the repair kit looks like.
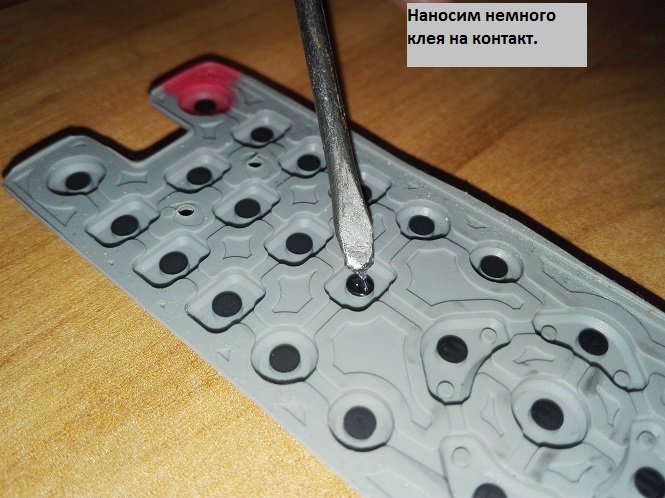
The radiotelephone repair material was filmed some time ago and now I can’t understand where the frames with the restoration of these buttons have gone. Therefore, I will show this whole simple process on an elastic band from the remote control. The essence is absolutely the same ... We apply glue to the buttons that need to be restored.
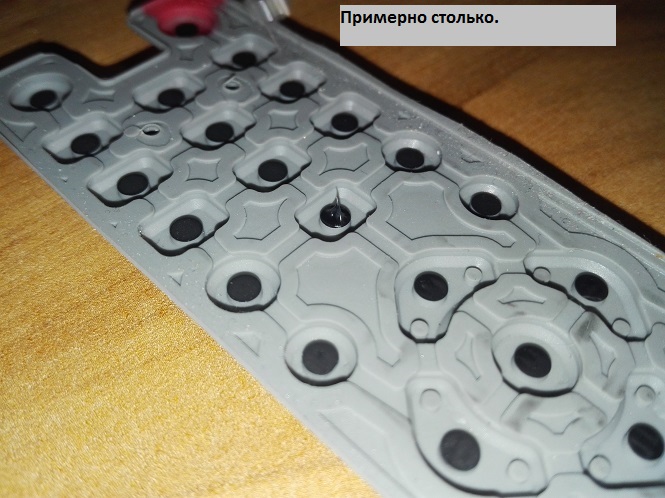
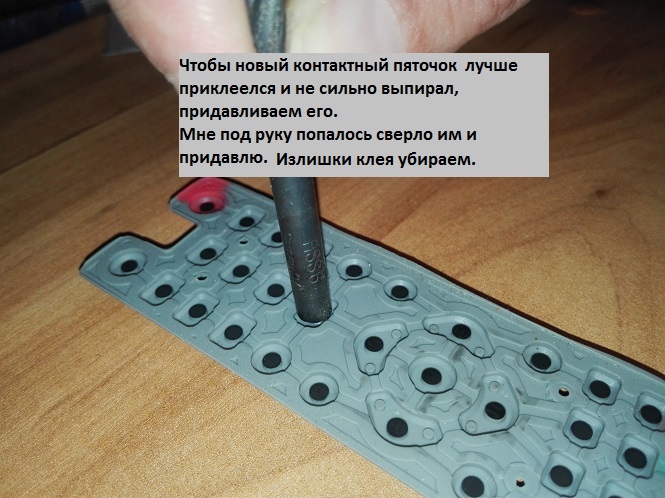
When all the necessary buttons have been glued in this way, we can proceed with the assembly. Already after 20-30 minutes you can safely use it, but you can check it right away. As you can see, the phone turned on, the buttons work easily. 
Other ways to restore buttons
If it is not possible to purchase a repair kit for remotes, then you can do the following.
1) Find some foil, but only the paper-based one used in cigarette packs. Cut out small pieces with scissors so that you can stick them on the button without going beyond its dimensions, if anything, just press down on the piece of foil put on the glue so that it compresses down with its edges. Use glue or silicone, or one that is capable of gluing rubber, such as moment, rubber, etc.
- Never use super glues in this case (those in small tubes harden quickly and glue fingers together wonderfully). When they harden, they become brittle, and when you press the button, it bends and this glue starts to crumble, as a result, everything can fall off.
- Never use foil without a paper base, it will also fall off
2) Perhaps there was some kind of old faulty remote control, calculator. The same buttons are also used there, you need to carefully, thinly, cut off the desired layer with a blade in order to stick it where it is needed.
These are on-duty options that can be applied, but it is better to find a repair kit.
Time to replace the battery
Well, for dessert! Cordless phones are usually powered by batteries that are charged from the base connected via an adapter to the network.
This chain, Battery - Base - Adapter, is another weak link.
Therefore, if your radiotelephone stops charging, pay attention to it. The contacts on the base, as well as on the handset and in the battery compartment, must be clean and not oxidized.
Make sure that the power adapter is working, you need to measure the voltage at its output according to the parameters of the adapter. For this you need a multimeter. Often the wire breaks in the adapters and this is not noticeable, the breakage is hidden under the outer insulation. You can find out the parameters and choose a power adapter.
By measuring the voltage at the contacts of the base, those with which the tube is connected when it is in it, we can make sure that the power supply circuit in the base itself is working, through these contacts the battery is charged. If, with a working adapter, there is no voltage on these contacts, then the malfunction may be in it, in the base.
If voltage comes out of the base unit, it should be equal to the total voltage of the batteries or slightly more. But the batteries are not charging, the reason is in the batteries themselves. There is still a small percentage for a malfunction of the electronics in the phone's board, there may be a charge controller - but this is for specialists.
You can check the batteries, for example, by substituting ordinary batteries into the handset instead. This is only true if the phone uses batteries of the same size. In some models, a pack of several batteries assembled in one package may be used.
In this case, you will need to purchase a battery of this type or equivalent.
That's probably all. Thank you for showing interest in this project.
1.) PANASONIC TX-9280 radiotelephone. Manifestation of a malfunction: a weak glow of the indicator, a message about a bad battery although it is fully charged. Defect in diode D1 according to the scheme. How to find: check for a supply voltage of 5.5 volts at the anode, the voltage at the cathode should be 5.2 volts. If the voltage at the cathode is below 4 volts, then the diode must be replaced.
2.) Sanyo CLT-55 and similar often suffer from such a defect - even with a fully charged battery, the BATT indicator flashes. LOW. In principle, this does not interfere, if it were not for the squeak during a conversation. It is treated by soldering the legs of the processor (although no solders are found during visual inspection).
Alexander Popkov
3.) "PANASONIC" models 3611, 3621 there is such a defect: There is no connection between the tube and the base - the reason for this is a poorly soldered output of the transmitter quartz in the tube.
4.) In the answering machine "PANASONIC" model 4311, during normal operation of the handset and base, malfunctions in the operation of the AO are observed - the reason for the increased pulsations of the PSU.
5.) in r. phone ""NOVA"" the call was constantly on the handset - it turned out to be a leak in the optocoupler of the call node on the base unit. When checking with an ohmmeter, the optocoupler is good. When replacing the device earned.
6.) Such a defect is often found - the device connects the line, there is no set - Measure the resistance of the line wires towards the device with an ohmmeter, it is hundreds of ohms, immediately find the reed relay, check the contacts in it, they are probably stuck. If so, feel free to change it to RES-55.
Sergey Gorlanov
7.) How to quickly check if the handset or base transmitter is working - Make a few turns around the antenna with the wire marked * on the tester, if the transmitter works, the arrow will deviate to the right, but there is one feature - you need to experimentally find the measurement limit and the type of current.
Sergey Gorlanov
8.) RTA NOVA model RX-3610TP-there is a constant call to the handset - Open the base, find the 4069N chip, measure the level at pin 5, if log.1, then unsolder jumper J15 and short the 5th pin to minus power - if the call stops, change optocoupler IC5 LTV817 - there is a leakage in the optocoupler transistor, it can be replaced with a domestic one. PS-the rest in another letter.
Sergey Gorlanov
9.) Sanyo CLT-XX In the handset, when the batteries are charged, the discharge LED blinks. To eliminate this trouble, you need to solder the processor (32nd leg responsible for power) and everything is OK.
10.) SANYO CLT-75KM. reduction in range. Presumably, problems with the base, because. the effect is the same on both tubes. Is it possible to fix the phone? In 90% of cases, the output transistor in the base burned out and needs to be replaced.
11.) Code telephone "TELECOM" The following method of removing the password from the telephone set is necessary in the event that you forgot the password and your phone was password protected at that time (the key is on the display and the device does not dial more than 4 digits). To remove the password from the TELECOM telephone, you need to open it and find the AT24C04 microcircuit (EEPROM, 8pin) on the printed circuit board. On it, bridge the pins 5 (DATA) and 7 (GND) between each other and connect the phone to the line. If after pressing the SET key there is no key on the display, then the operation was performed correctly. Then press the SET keys and 2 times O (not zero) and 8 dashes will light up on the display. Now break the jumper and enter the 4 digits of the new password. To exit the setup, press the SET key. If you want to change the password, then alternately press the SET and O keys. Then enter Old Password and press the O key (if the old password is entered correctly, you will be given access to enter a new password). Now enter a new four-digit password and use the SET key to exit the setup. If you want to protect the phone with a password, then alternately press the SET and # keys (4 dashes will light up on the display). Enter your password and press SET (if the operation is performed correctly, the key will light up on the display). The process for canceling a password is similar to entering it.
12.) SANYO CLT55,65, etc., the low battery light flashes and there is no connection., the batteries are normal. The contact of the legs of the microprocessor is broken. due to strong pressure on the TEL button (bad contact in the conductive rubber, so people press harder)
13.) Panasonic 9080 and similar. Problem: during operation, a crash is heard that disappears (for a while) after impact or disassembly. Reason: poor contact in the connector between the RF unit and the board.
Repair: 1). each pin of the connector is carefully rotated 90 degrees.
2). unsolder the connector and solder pieces of tinned wire in its place
14.) How to bind any handset of PANASONIC radiotelephone models 7980, 9080, 9050?
The memory chip must be removed from the handset. And in the base you need to install a jumper as shown in the figure. The code for the handset and base becomes 0000. Using this method, in small towns you can do something like cellular communication. (by setting the bases with zeroing (jumpers) after a certain distance. Sometimes the handset with the base lose contact with each other. In this case this method very helpful and works flawlessly. (I personally remade about 20 phones.)
There is no need to remove the memory chip from the base. I removed it for clarity (the tracks are better visible).
15.) A material with which you can increase the power of a 1W Harvest base up to 3W.
16.) LG GT-9500 900 MHz cordless handset ringer off. On the "base" you press the Flash button twice - the buttons on the "base" for the direct call of the connected handsets start flashing, then you press the button corresponding to the number of the handset on which you want to turn off the call. Once again we press Flash, we hear one "confirmation beep".
Oleg Gudovany
17.) Panasonic KX-TC904-B/W To change the TONE PULSE mode, press the following key combination.
1 program
2AUTO
3 Press # 2x to select PULSE mode
to select TONE mode, press * 2 times
4 PROGRAM
18.) KX-TS408 and the like: the handset does not work, while there is a keyboard poll - the zener diode D17 flew out on the MX power supply;
KX-TS900 and similar: the short range has become - the filter at 903 MHz "leaks" in the tube;
KX-T9500: unstable tube-base connection, but the base-tube is excellent - the pipe noise detector is naughty. Treatment - replacement of the filter at 455 kHz;
KX-T7980, 9050, 9080, 9280: there is no connection between the handset and the base due to the frequency drift of the transmitter or receiver (the defect is common with 3-4 year old devices) - trimmer capacitors in the RF unit have oxidized;
KX-TS408 and similar: it is impossible to adjust the transmitter frequency - the varicap needs to be replaced.
Dmitry Tsygankov
19.) The SIEMENS Gigaset 1010 radiotelephone handset is on a PIN code, the code is naturally unknown. solder EEprom 24c04, read it Poni Programmerom and look at the addresses: 27 and 28 is the coveted PIN in explicit form.
20.) Panasonic KX-T9080, 9050
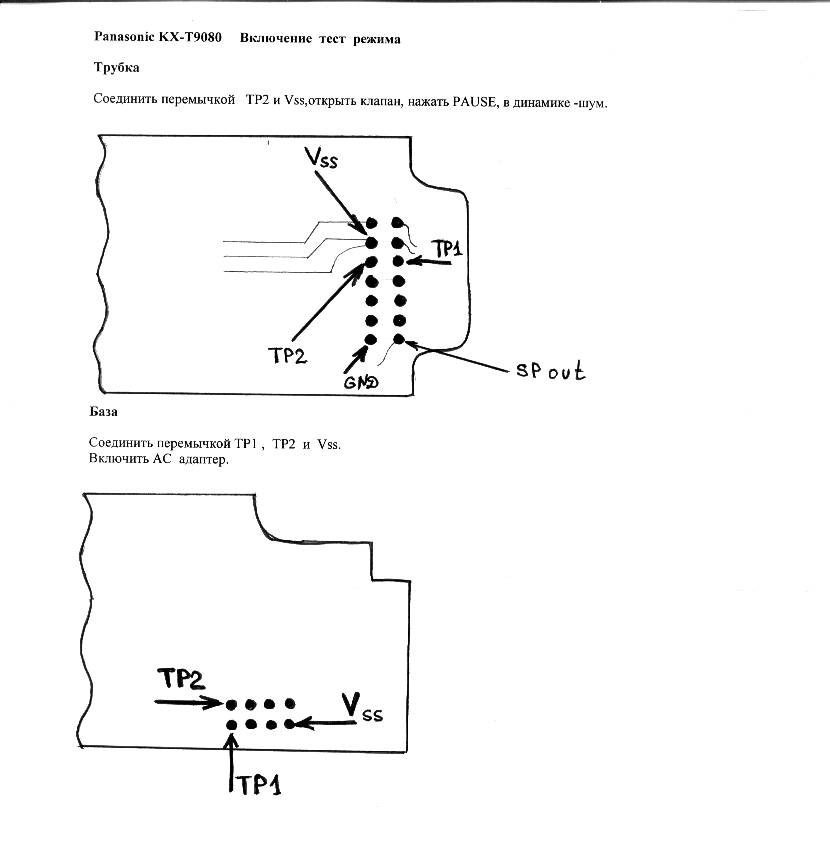
You can check the operation of the base and handset transmitters as follows: we make a load equivalent: We extract from unnecessary wrist watch 1.5v backlight, solder a small piece of 50 ohm coaxial cable to it and connect it to the output of the RF block instead of the antenna. With a working transmitter, the light should glow brightly at 30mW.
21.) Defect in Panasonic KX-T9050, KX-T9080 - there is no or unstable connection between the base and the handset. I recommend setting up RF blocks, this is done as follows:
Handset: We solder the jumper to enter the test mode, press the Pause button (noise is heard in the speaker). By rotating the trimmer capacitors TX and RX, we set the voltage to 1.8v at the VXO test points for TX and RX, respectively. For this operation, it is desirable to have a repair cable, but you can do without it by soldering to the test points with a short piece of wire (the control points are on the underside of the RF block) It is convenient to control the voltage with an oscilloscope 0.5v / div. The setting is quite "sharp", it is necessary to rotate the trimmers with a dielectric screwdriver. I use screwdrivers made from a strip of fiberglass with the foil removed and sharpened accordingly. It is also useful to adjust the 12.800 MHz reference oscillator. We connect the base to the phone. lines, establish a connection, use an oscilloscope to watch the signal at the output of the tube discriminator - 400Hz. - line tone. By rotating the trimmer, we achieve the maximum undistorted signal amplitude. By adjusting the discriminator circuit, we achieve the same. Base: Configured in the same way. To enter the test mode, three counters are shorted. point, then power is applied.
Tighten all screws in the RF blocks well before adjusting.
22.) Panasonic KX-T9080. Fault: very quiet audibility of the subscriber in the handset. The connection between the handset and the base is established normally and the signal from the handset microphone, in mode intercom, sounds good on the base. To determine, in this case, where the malfunction is in the handset and base is very simple. Suppose your handset and base are connected to each other (in the same intercom mode), at this moment it is necessary to de-energize the base (unplug the base power supply from the socket) and if you hear in the handset loud noise, then the fault must be sought in the database. In addition, indirectly, loud clicks from its speaker indicate the serviceability of the handset when you dial a number. My fault was caused by poor metallization of the via in the base, between components R27, C11 (pin 15 of IC4). By lightly pressing a screwdriver on the board, it was possible to localize the malfunction.
Sudakov Alexander
23.) Panasonic KX-T9080. Fault: No communication between handset and base. As I was told - instead of 4.5V they connected 12V to the tube !!! But the handset turns on and searches for the base. As a result, only transistor assemblies Q14 and Q15, as well as diode D13, turned out to be faulty (that is, power was not supplied to the radio frequency unit).
Sudakov Alexander
24.) All Panasonic KX-T7980....9080 type cordless phones. Fault: during a conversation and at the same time as you move, unpleasant rustles are heard in the handset. The antenna turned out to be faulty (it was less necessary to pick in the ear). The "spring" of the antenna is inserted into the brass adapter, on the other hand, a plate with a hole is inserted into the adapter. It is necessary to move the antenna and if rustles are heard in the tube, then you just need to compress this adapter, but not much, otherwise it may burst. If it still bursts (or compression does not help), then it just needs to be properly soldered.
Sudakov Alexander
25.) Panasonic KX-T7980. Fault: at the end of the conversation and closing the flip cover, the handset does not turn off. It turned out that the axis that pressed the beak of switch S2 was broken (or worn off over time). In the magazine Repair & Service 1998 No. 2 p. 34, several lines were devoted to this malfunction. I took this advice and I want to tell you what problems I had in connection with this. The meaning of troubleshooting is as follows: you need to put a magnet in the hinged cover, and a reed switch in the tube opposite this magnet - with normally closed contacts(switch S2 - desolder). Firstly, I did not find a miniature reed switch (10 mm long, 1.5 mm in diameter) with such a group of contacts. In Mitino, they told me that such people exist in nature, but they are very expensive and you won’t find them here. I had to install a medium-sized reed switch (about 18 mm long, 3 mm in diameter), and besides, a three-pin one (because I didn’t find a medium one with two normally closed contacts either). Because of the large reed switch, I had to look for a powerful magnet in the hinged lid. I carved it from a black magnet from a three-watt speaker (3 GDSh-xx), it turned out to be quite large 15x15x5 mm (I don’t recommend smaller sizes, because before that I carved a 15x10x5 mm magnet and the reed switch did not work with it). Now we need to choose the mutual position of the magnet and the reed switch so that when the lid is closed, the reed switch opens. I placed the reed switch tightly under the radio frequency unit (RFB), it worked at a distance of approximately 1.5-2 mm before the lid snapped into place and released when the lid was opened at a distance of about 5 mm. The distance from the reed switch to the magnet was about 8-9 mm, taking into account the printed circuit board and the plastic parts of the cover and tube. The lid turned out to be quite heavy, so when opening it, I recommended holding it with your hand. By the way, who knows where are miniature reed switches (length 10mm, diameter 1.5mm) with normally closed contacts sold? A miniature reed switch could be placed under printed circuit board(near the LEDs), and not above it, as I did, and accordingly it would be easier to find a smaller magnet.
Sudakov Alexander
P / S This defect occurs when the return mechanism wears out. It is made of salumin, so it is simply not possible to solder to it or bend it. In Moscow, a complete mechanism is sold and costs $9.
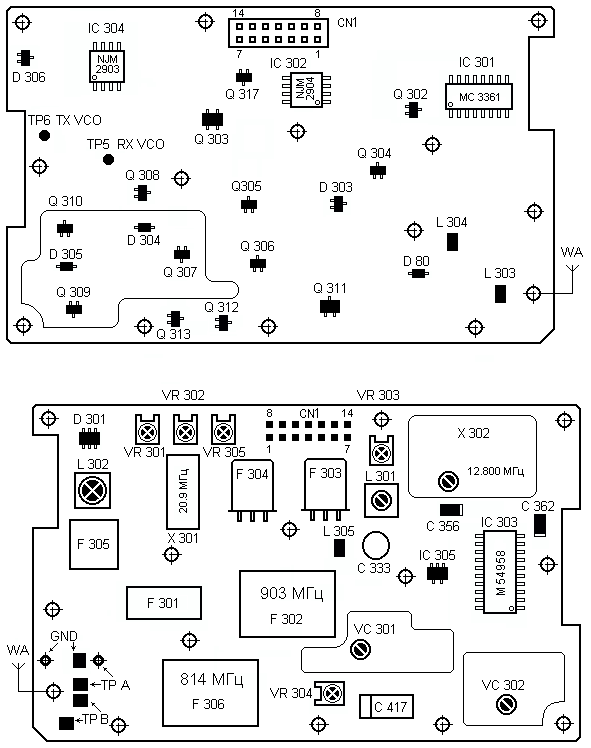
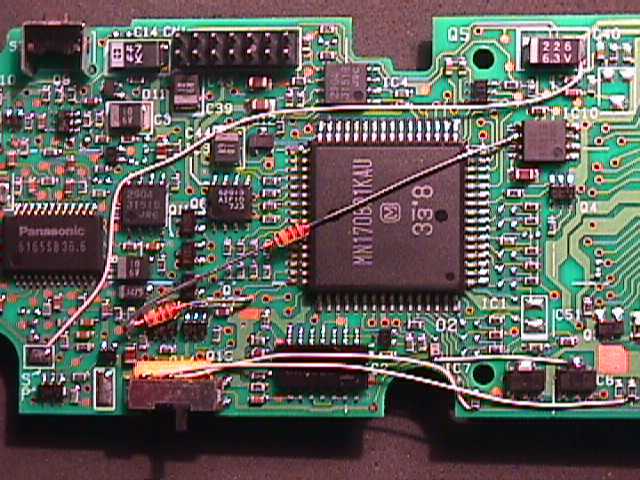
26.) Wiring diagram of the RF unit r/t Panasonic KX-T7980...9080, with the location of active and some passive components. I drew it myself because I did not meet it in any "manuals".
Sudakov Alexander
27.) Immediately after the purchase of NT5b, a drawback was discovered - after a minute of operation of the radio tube, noises began and after a few seconds the connection of the handset with the base stopped. We opened the base and found that the output transistor on the power amplifier board (NT5b base visually differs from NT3 only in the presence of an additional scarf stuck next to the antenna connector) is installed on a radiator made of a 2 * 3cm plate. We replaced this radiator with a larger copper plate - thickness 4mm, size 8 * 6cm. After this replacement, the handset lost contact with the base after 10 minutes. Next, the old radiator was soldered to the above plate - so that the case closed and the time increased to 11.5 minutes. We decided to stop there. The transistor was pressed on top with a small plate using the same two screws that secure the amplifier board - they were taken longer - it (the transistor) is not pressed to the radiator except for the petals. I will be glad - if it helped someone. I would love to read another solution to this problem.
28.) Panasonic KX-T9000, KX-T9080: The handset does not work or is fooling, there is no connection with the base. Check the power to the circuit after the three-pin IC6 chip, if less than normal, change it.
29.) In adapters for r-phone. transformers with a midpoint, as well as without it, are used. At least in r-phone. primitive firms, you should not change one type of trance to another, because the filter cuts out a specific frequency (for transformers with a midpoint - 50Hz, for simple ones - 100Hz naturally).
30.) For all models of Panasonic type 408 cordless telephones, the connection between the handset and the base is lost due to the following reasons:
1. Big ripple B.P. and because of this, the handset does not exchange a PIN with the base. The malfunction is eliminated by replacing the 470 Mkf capacitor with 1000 Mkf or more in the PSU.
2. Failure of the zener diode in the charging circuit of the handset, the batteries are charged to an overvoltage and the handset and the base do not exchange a security code (PIN code).
3. Do not exchange PIN due to dirty contacts on charger base or due to mechanical damage to these contacts.
4. The filters in the radio channels of the base and handset are out of tune. Many tuning methods have been described if normal frequency analyzers are not at hand. I suggest another one, for those models that have a Speaker button on the base. If you put the handset on the base, press this button on the base, and then pick up the handset, then the algorithm for connecting the handset with the base will be executed. But with detuned radio channels, the passage of speech signals is not audible. It remains in this position to adjust the filters and achieve the passage of both voice and telephone line signals.
Sergey Savoshchenko
31.) 90% of the failure of completely new devices is a violation of the AT2401 firmware in the handset or in the base, before picking, read both and compare. 4 pieces were repaired by flashing the memory. AT2401 differs from just 2401 and is not sewn by a regular programmer, only for Atmel.
32.) PANASONIC KX-TC1000. The handset-base connection is lost. Defect in the charge contact group on the base, - (contacts are connected to the tube through a switch on springs?!). During operation, the connection fails and, of course, the PIN code fails. And it's hard to understand!
Vladimir Glukhov
33.) In HT3, when the tube is connected, after a while the connection breaks and the tube goes into some kind of down. The solution to the problem, in the tube near the connector for connecting the headset, there are two ceramic ground conduits, throw them away.
Alexander Fursin
34.) KX-TC185-B The range of 1.5-2 meters has greatly decreased. In the handset, when establishing a connection, even on short distance faint noise is heard. I calculated that the malfunction is in the tube (in the radio receiving path). Usually, the URC is to blame for the decrease in sensitivity (it knocks out a field-effect transistor (most often in Panas) or a bipolar one (this is exactly what it is here). Replacing the transistor did not give a result. Further, only m / s TB31224F- 1st mixer, 1st local oscillator , 2nd mixer, etc. to the demodulated signal.Since replacing it is problematic, I tried to replace the filter at 455 kHz.The problem turned out to be in it.
36.) Panasonic KX-T408 During the repair, I encountered a tube malfunction, the processor does not start and does not respond to button presses. It turned out that it was flashing the D15 diode from the battery to the charging mark. As a result, Q15 opens and the handset thinks it is on the base. Ringing by a tester does not leak. Thus restored 3 devices.
Konstantin
37.) Panasonic KX-T9350 range drops, then first of all you need to check the band-pass filter in the tube (pos. designation FL405). Almost 100% he is dead.
Alexander Miroshnichenko
38.) Panasonic KX-T9050B, KX-T9080BX, KX-T9000, KX-T9100, KX-T9200, KX-T9150, KX-T9250.
Symptom: Noise during conversation. Reason: When the battery is discharged, the voltage changes, which causes noise in the handset. Elimination. Change the resistance value R87 6.8kOm to 12kOm.
Panasonic technical support.
39.) If there are problems in the Panasonic KX-T9080 radiotelephones or similar ones (hinged cover): the stem is broken or the cover is broken, then it can be modified using a simple device assembled on the K561LN2 chip. This is the most original and simple solution to the problem that I have ever seen. The device is easy to assemble, it works very well, it has no failures. The cover and stem can be bought, the price of the complete cover (cover, cable, microphone, bell) costs about 1000 rubles, the salum stem will cost 300 rubles. Very often you meet customers who refuse to replace expensive components. And you lose money and a client.
1. Refinement of the call.
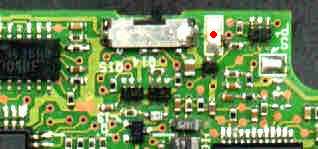
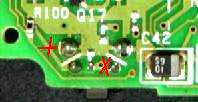
In these phones, the call can replace the actual earpiece. With the help of a fluoroplastic wire, it is necessary to connect the negative terminal of the capacitor C40 (it is decoupling between the generator of the ringer circuit and the emitter located in the phone cover itself) with the P headphone contact, in Figure 1 there is a red dot.
2. Scheme replacing the S2 button (this button turns on the handset when the cover is tilted)
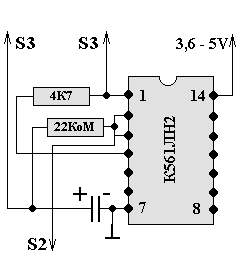
The circuit figure 3 is assembled on a K561LN2 chip. Moreover, only 1/4 of the microcircuit is used. Electrolytic capacitor C1 47 microfarads from 6.3 to 16 volts. used in the circuit should be small, for the convenience of placing it in the tube body. SMD type resistors are mounted directly on the chip. The S3 button is the microphone mute button. The tracks from the button to the phone circuit need to be cut. The places where the tracks were cut are shown in Figure 4 with red crosses.
Leg 7 of the microcircuit must be connected to the phone circuit case in any convenient place. Leg 14 of the microcircuit must be connected to a switch that turns off the handset. Figure 5, the connection point is shown by a red dot.
You can use the old microphone, which must be removed from the socket in the cover. You can fix it in the hole that remains in the tube body from the stem. When unsoldering the microphone, observe the polarity. The minus of the microphone is connected to its body. Figure 6 shows the microphone connection points.
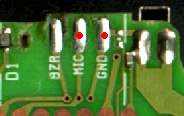
Figure 7 shows the connection point of tap S2, see diagram.
You need to place the switch circuit under the phone board in the area of \u200b\u200bthe head phone. None advanced settings schema is not required.
3. How the modified tube works. When you receive a call on the handset or, if necessary, make a call, you must press your thumb on the button that previously performed the function of mute the microphone. After the end of the conversation, the button must be pressed again. The handset will go into standby mode.
This modification has been tested on several models of Panasonic phones. For two months, not a single complaint was received from the owners of the converted devices.
40.) After the breakage of the shutdown mechanism (Panasonic 7980 handset and the like), structurally combined with the hinge cover axis, circuit diagram tubes, used a conventional reed switch with normally open contacts. I placed the reed switch in the area of the LEDs of the tube under the board, fixing it on the light guide so that its axis was located along the tube. In this position, the reed switch is most sensitive to the magnet, which is located at the end of the hinged cover. I used a rectangular magnet from a magnetic furniture latch, it did not require any refinement. The standard switch is shorted with a drop of solder. We connect the reed switch with one end to a common wire (-), the second to the 60th leg of the processor ( it is better to solder to R105, which can be found on the left edge of the board: one of the contacts of the standard switch is connected to two resistors, one (R49) to a common wire, the other (the desired R105) to D18 and the 60th leg of the processor). When the tube cover is closed, the reed switch provides low level on the 60th pin of the processor corresponding to the CLOSE mode.
41.) PANASONIC KX-T408 radiotelephone and similar.
In several devices of this type, a defect was found, the external manifestation of which was as follows: with a good battery, the handset did not react in any way to pressing the keyboard buttons. When checking with an oscilloscope, it was found that the 32.768 kHz clock generator was working, and at the inputs 5-7 of the microcontroller there were high voltage levels instead of low ones. The reason is a break in the printed conductor connecting pin 3 of IC3 with pin 33 of the microcontroller. We measure the voltages at these pins, which should be the same and have a level of about 3.5V. If the voltage level is low at pin 33 of the microcontroller, we connect the indicated pins with a jumper from the MGTF wire.
42.) I propose another way to restore the working capacity of the handset of radiotelephones 9050.9080, etc. with a broken flip, which can rightly be called “lazy”, because The whole job takes no more than half an hour.
After the rework, switching St.By - Talk and back is done by the former power switch, and the ringing signal is played by the earpiece of the handset, as in the previous version, however, it seems to me more appropriate to send a signal to the other end of the earpiece. In order for the earpiece to turn on during a call, it was necessary to apply an additional control signal to the Q7 key, untying it with the previous control signal Sp. Mute using two diodes KD522 or similar. Actually, these are all the newly installed parts, the rest are jumpers (photo 1).
The power switch has been replaced by a jumper between the top pin of IC6 and the cathode of Zener D2. The switch itself should be removed from the board, bend the contacts away from the board, solder wires to two of them and, after isolating the former contact pads on the printed circuit board with adhesive tape, install the switch in place. The second ends of the wires are soldered to resistors R49 and R51. Minus C40 connects to point Sp+.
A printed conductor is cut (photo2) on the other side of the board, connecting the Q7 base and the 48th leg of the processor, and a diode is soldered into the vias on this conductor with the cathode to the base. The cathode of the second diode is soldered to the cathode of the first, the anode - to leg 6 of IC10. Using the pins cut off from the first diode, the microphone is soldered to the board, as shown in photo 3.
You can drill a hole in the body of the tube opposite the microphone, although this will have little effect on the sound.
Viktor Anatolievich Nikulin
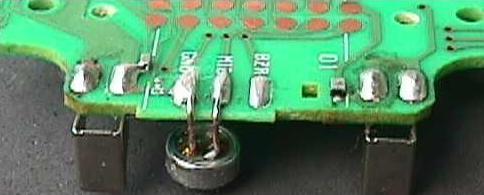
43). Panasonic KX-TC1000 KX-TC1005. When the owner is connected to the phone with a non-standard soldering adapter, the KREN 7808 planar version fails. You can install the usual KREN 7808 in a plastic case without additional modifications. Attach the ROLL to the antenna mount. In this case, the antenna serves as a radiator, see fig.
44.) Panasonic KX-T1005 defects and how to treat. Got a bunch of these phones with two identical defects
1. The pipe does not respond to buttons. It turned out the capacitor C905 with a leak - 900-1000 ohms are called. Replaced everything
2. The pipe with the base does not ring. Capacitor C108 sounds exactly the same. And you can not put it at all if there is no desire.
45.)
PANASONIC KX-TCD951: you cannot register a pipe - solder a flash drive in the base.
LG GT-7101, SEIMENS GIGASET: segments disappear on the indicator - solder the indicator cable through thick paper (whatman paper)
PANASONIC KX-TC1019: no tube-base connection - register the tube. The 5-digit code is indicated on a paper label (in the base, short-circuit R909 next to the process and turn on power, press 2.7, # on the pipe and turn on power, dial the code. If everything is OK, the pipe will go into talk mode)
PANASONIC-and with a lever on the base of the charging contacts: no charging or matching - solder the contacts by removing the springs
LG GT-7320: Can't exit Direct Call mode - there is an inaccuracy in the instructions in Russian - exit by double pressing (within 0.5 seconds) the microphone mute button
SIEMENS GIGASET, BT: no line - often 2 and 5 pins are used in the phone jack (DOMASTORAL SHOES USE 3 AND 4)
LG CT-9130 and GT-7101 use different polarity on contacts in power supplies
PRIMER, SANYO CLT, CLA: in case of failure of the reed relay, it is possible to replace the reed switch itself with a domestic small-sized one
LG GT-9130A: noise in the pipe - replacing the 3.99 MHz quartz in the pipe with quartz in a metal case can help
PANASONIC-and new models (not DECT) when a pipe enters the water under the process, a conductive blot is formed in 98% of cases
Dmitry Tsygankov
46.) I don’t know about you, but we were simply flooded with Chinese radiotelephones with 200-400 MHz extension cords. What kind of names do not occur - and SONY and SENAO and HARVEST. In fact, of course, these firms were not even close, the quality is terrible, but appearance and the price is doing its job. In general, ordinary radiotelephones with increased output power, the circuitry is quite simple, it is a pity that there is almost no documentation and you have to figure it out yourself. Some regularities appear - very often the firmware flies, I send files with comments, here are the procedures for binding to the database. Very often there is such a defect - the call goes to the handset, but it does not connect, or rather, when it is turned on in the transmission mode, it contains only noise without a line or intercom signal. The transmitter power switch transistor fails - you can find it in a crack on the case, or by measuring the voltage at the radio channel connector with the control board - when the transmission is turned on, the voltage does not change, the current consumption does not change (db about 500mA). By the way, when connecting an external source instead of a battery, do not believe your eyes - where + is drawn on the batteries, in fact, "-" ... China in one word!
Korzhov Oleg
47.) Panasonic KX-T9080. Fault - there is no connection between the handset and the base. The problem was in the tube. Upon entering service mode, it is not possible to set the voltage to 1.8v at the RX VCO and TX VCO test points. Instead of 1.8v at the control points, the voltage was only about 0.2v and did not change when adjusted with trimmer capacitors VC301 and VC302. The defect turned out to be in the 12.8 MHz reference oscillator. On the diagram X302 from MEIDEN. It was evident that the trimmer was twisted. After replacing the generator, the device started working.
48.) Panasonic cordless telephones, DECT standard:
Instructions for altering phones - packed.rar
The information is presented in .pdf format >:
6.29 MB
Software, firmware, database - packed.rar:
7.58 MB
49.) SANYO CLT-5280, CLT-5880 - Always the same (except for a thunderstorm on the line) - the buttons on the handset are not pressed. Requires tube processor replacement - LC66358B-4D73(-4D63)
CLT-536 - same one-shot failure - buttons on the base can be pressed, but the base has gone crazy. Requires replacement of the processor in the base - LC662312A-4J03
The price of processors is about 500-600 rubles.
Please note that processors with other firmware do not work, for example, those that are sold in Compel for ~ 100 rubles.
50.) LG-200 Many users complain that the phone stops ringing when receiving incoming calls. At the same time, the message "Incoming blocking" is displayed on the display. To bring the phone out of this state, do the following: In the menu, select Audio profile, standard, apply, vibrate, on. Then exit the menu and turn off the vibrating alert by pressing the * (star) key.
51.) LG GT-9762A Electronic adjustment of TX and RX levels in the handset and base.


