Currently, in order to ensure communication between computers in the office, Virtual Private Network technology is actively used. allows not only to ensure reliable communication between corporate PCs, but also to support all units computer equipment the best cryptographic protection. For this reason, you can be confident in the security of the transfer of corporate information, in the complete exclusion of third-party intrusion.
Setting up a VPN connection in different versions Windows OS has differences.
It is very important to understand that setting up a VPN creates a new dedicated zone. All technical devices, including scanners and printers, will be visible to every user connected to the VPN. Every attempt by an outsider to penetrate the corporate network will be accompanied by absolute failure.
Of course, it’s easy to provide an ignorant user with Windows connection 7, 8, 10 to VPN is impossible. First of all, it is very important to saturate yourself, first of all, with a sufficient portion of theoretical knowledge regarding the features of various operating systems.
If you have the slightest knowledge of computers, but are actively trying to figure out how to set up a VPN, we recommend that you familiarize yourself with our recommendations, and then, strictly following them, sequentially perform each step we have outlined. In this case, we can guarantee you a positive result.
To connect to the VPN network, first click on the “Start” shortcut located at the bottom right. When the secondary menu opens, select the Control Panel option.

After this, it is important for you to go to the network settings. To make this transition, find required parameter. In this case, it all depends on what type of display you have previously selected. Even if you didn’t choose it yourself, it means that it was chosen independently by the operating system or by the person who originally installed Windows on your computer.
You can easily switch categories if you wish. This kind of switch is located at the top of the window on the left side.

So, if the “Browse by category” option is set there, look for the “Network and Internet” line and click on it. If the “Display in classic style” option is selected, then it is important to find the line “Network and Sharing Center shared access».
So, after making these transitions, you will be able to seamlessly visualize the “Set up a new connection or network” sentence. Just click on it with the left mouse button, you will immediately go to new page, which will prompt you to create a new network connection.

If you decide to connect your PC to a VPN network, then select the “Workplace Connection” offer, which is often fourth on the list. Next, you just have to strictly follow all the advice that appears, but also be sure to take into account some of the nuances that arise as a result of installing different versions of the operating system.
Connection to virtual network is carried out only after installing a kind of VPN server, which can perfectly serve as one of the corporate computers. It is this VPN server that will control access to all other computers included in the corporate network space you created.
Of course, Windows itself will not be able to perform the “magic” manipulations that provide you with a successful corporate network. In this case, your participation will be required, which involves making certain settings.
ADVICE. Of course, it is difficult to figure out how to set up a VPN on your own, so we recommend that you do not break through an impenetrable wall, but carefully study our recommendations on how to connect to a VPN server if different versions of the operating system are installed on your PC.
Settings in Windows XP
If Windows XP is installed on your computer, click on the “Start” button, find “Control Panel” in the list that opens, go to it. After performing these simple manipulations, a window will open, on the left side of which the “New Connection Wizard” will be located, activate it, just run it. In the new window that opens, in the second position there will be the parameter that we will need to use.
Click on the line “Connect to a network at your workplace”, and then go to the line “Connect to a virtual private network”.

Now the connection wizard will confidently guide you to your desired goal, only recommending that you enter some information. In particular, initially he will ask you to come up with and enter the name of the project you are creating. corporate network. Of course, no one limits the flight of fancy, so the name can be anything. Next, the connection wizard will ask you to register the server. If it was decided to use one of the computers as a server, then it is better to enter the IP address of this PC in this field.
At the final stage, the wizard will automatically create a shortcut to the corporate network space you created. It wouldn’t hurt to make some additional changes, so double-click on the shortcut that appears to bring up a dialog box in which all the necessary settings are made.

There will be four tabs in this dialog box, go to one of them “Security”, select “Advanced (Custom Settings)”. Next, all that remains is to carefully study all the proposals and choose the acceptable parameters for your corporate network.
Settings in Windows 8
If Windows 8 is installed on your PC, then the algorithm of actions will not just be different, but as automated as possible. Of course, if you own a PC with Windows 8, you may be relieved that everything will be so easy to implement, but this does not mean that you can ignore our recommendations. One wrong step and you won't be able to successfully connect between corporate computers.
At the bottom of the screen with right side In the part where the clock is located, you will easily find a network status icon; in appearance it resembles a monitor. Right-click on this shortcut. After this, a new window will open in which you will find the “Network and Sharing Center” option. After clicking on this option, a new shortcut “Create a new connection or network” will appear, click on it and confirm that your PC has a direct connection to the Internet.

The Connection Wizard will also ask you to enter a name for your environment, and will also prompt you to make changes to various options if necessary. In this case, you can enter Extra options network security, including:
- data encryption;
- password verification protocol;
- access parameters.
You can contribute whatever you consider necessary. This completes setting up a VPN network in Windows 8.
Settings in Windows 7
If your computer comes with operating system Windows 7 or 10, which means you are also somewhat lucky. Even if you are a beginner, but fearless user who took the risk of following the route we described in order to install a VPN network, we can rejoice in you that everything will certainly work out for you.
ADVICE. Connecting to a VPN network on a PC with Windows 7 or 10 is quite simple and fast; you just need to follow the prompts that appear on the screen. Once the connection is established, you also need to make some useful changes.
In Windows 7 and 10, there is a shortcut near the clock indicating the connection status to various networks. If you click on this shortcut with the left mouse button, a list of all connections that can be considered as possible option, providing communication with the Internet or a general network.

Among this list you can find the name of your VPN network, select it, and immediately after that the “Connect” button will appear. By clicking on this button, you will have the opportunity to make some changes to the parameters.
Please carefully review the security, login, and data encryption options offered by this Windows case 10, check the checkboxes next to the parameters that are most important to you.
So, if you set out to connect several computers running Windows XP, 7, 8 and 10 to the corporate network, do not hold back your technical impulses. You can do everything if you carefully study the recommendations, and also make changes to the settings without undue haste, reading the wizard’s suggestions more than once network settings, and even 10 times in order to understand why and what specific actions need to be taken.
) I talked about how to create your own VPN server in 10 minutes and completely free for 2 months (then $5 per month).
This is the final article in the series, in which I will tell you how to connect to your VPN server from a computer, phone or tablet.
Setting up a VPN on Windows
In all modern Windows versions The VPN connection is set up almost the same way. This instruction is suitable for Windows 10, 8 and 7, but there is no point in considering older versions.
1. Press the Win and R () keys at the same time, write “control.exe” in the window that appears and press the Enter key.
2. The control panel will open. In the search bar (top right of the window) write “Networks”, go to the “Setting up a connection to a virtual private network (VPN)” section:
3. Enter the IP address of your VPN server and the name of the connection (any), then click the “Create” button:

4. Your VPN connection is ready. To connect, click on the network icon next to the clock at the bottom right, select your VPN connection there and click the “Connect” button in the new window. When you connect for the first time, you will need to enter your username and password.
Setting up a VPN on Android (phones and tablets)
In the operating room Android system VPN connections are supported by default, you don’t need to install anything additional.
1. Go to Settings -> Connections -> Other -> VPN (in different Android versions item names may vary slightly).
2. Create a new VPN connection, enter the name and IP address of the server:

3. That's it! To connect, select the desired VPN connection and connect. When you connect for the first time, you will be required to enter your username and password.
Setting up a VPN connection on iPhone and iPad
1. Go to Settings -> General -> VPN and click "Add VPN configuration".
2. Select "PPTP", enter a description (any), server IP address, login and password. The remaining points do not need to be touched:

If you have any questions or need clarification, please ask a question or leave a comment.
Telegram has been blocked, free proxies and VPNs work intermittently due to a large influx of users or stop functioning altogether without explanation, like.
Paid tools can also disappear at any time: the law banning anonymizers and VPNs was passed a long time ago, but has not yet been applied. In this situation, the only guarantee of freedom on the Internet is your own VPN. Lifehacker will tell you how to set it up in 20 minutes.
Choosing hosting
To set up a VPN, you need a VPS - virtual private server. You can choose any hosting provider, as long as the following conditions are met:
- The server is located in a country that does not fall under the jurisdiction of Russian authorities, but is quite close to your real location.
- Random access memory (RAM) must be at least 512 MB.
- Speed network interface- 100 MB/sec and above.
- Network traffic - 512 GB and above or unlimited.
The amount of allocated hard disk space and the type of drive does not matter. You can find a suitable solution for $3–4 per month.
When purchasing a server, choose KVM. OpenVZ and Xen are also suitable if they have TUN connected - you need to ask the technical service of the hosting provider about this.
There is no need to perform any additional manipulations with KVM, although some hosting providers may limit the ability to create a VPN on it. You can also clarify this with the support service.
When setting up a server, you can enter any value in the “Hostname” item: for example, test.test. The prefixes NS1 and NS2 are also not important: we write ns1.test And ns2.test.
Operating system - CentOS 7.4 64 bit or any other distribution, there are no fundamental differences in the settings. Leave the network traffic at 512 GB or select additional volume if you are afraid that the existing one will not be enough. Location - the closer, the better. The Netherlands will do.

After payment, you will receive an email with all the necessary data to set up a VPN. You have purchased space on a server in another country, all that remains is to redirect all traffic to it.
Setting up a VPN
We will use the Putty program to connect to the server and send commands. I received a link to it in an email with registration data for hosting. You can download the program. Putty and its analogues are also available on macOS, the settings will be identical.
Launch Putty. On the Session tab, in the Host Name field, enter the IP address that came in the letter and click Open.

When a warning window appears, click Yes. After this, the console will launch, through which you will send commands to the server. First you need to log in - the authorization data is also in the letter from the hoster. Login will be root, type it by hand. Copy the password to the clipboard. To paste the password into the console, right-click and press Enter. The password will not be displayed in the console, but if you are logged in, you will see information about the system or server number.

There should not be much time between entering your login and password. If an error message appears, restart Putty and try again.
To configure the VPN, I used the ready-made OpenVPN road warrior script. This method does not guarantee complete anonymity, so the user can be easily found when committing illegal actions. But it is enough to bypass the blocking. If all VPN services stop working, this connection will continue to function as long as I pay for hosting.
To use the script, paste the line wget https://git.io/vpn -O openvpn-install.sh && bash openvpn-install.sh into the console.

After successfully adding the script, a dialogue with the setup wizard will start. It independently finds the optimal values, all you have to do is agree or choose the appropriate option. All actions are confirmed by pressing the Enter key. Let's go in order:
- The IP address must match the IP address that you received in the letter from the hoster.
- Leave the default protocol as UDP.
- Port:1194 - agree.
- Which DNS to use - select Google. Erase 1 , write 3 and press Enter.
- Client name - enter the user name. You can leave client.
- Press any key - press Enter again and wait until the settings are completed.
After completing the setup, you need to create a file through which you will connect to the VPN. Enter the command cat ~/client.ovpn.

The contents of the file will appear in the console. Scroll up to the command cat ~/client.ovpn and select everything that appears below except the last line. The selection should end at. To copy a fragment, press Ctrl + V.

Launch Notepad, paste the copied fragment and save the file on your desktop with the name client.ovpn.

Connecting to the server
To connect using the created file, you need an OpenVPN client. The computer version can be downloaded. Download and install the program, but do not run it. Right click on the file client.ovpn and select Start OpenVPN.

A console window will appear with the connection initialized. If the connection was successful, the Initialization Sequence Completed status will appear below. During the connection process, a network selection window may appear, click on the public network.

To make sure the connection is correct, . It must match the one the hoster wrote in the letter. To stop sending requests to a server in another country, close the OpenVPN window.
OpenVPN also has clients for mobile devices.
To establish a connection, transfer the file to the phone memory client.ovpn. Launch the application and select OVPN Profile. Specify the path to the file and move the slider to the “Enabled” position.


A VPN connection icon will appear at the top. To make sure that traffic is being redirected through a server in another country, open any IP address checking service in your mobile browser.
Modern technologies are improving at tremendous speed, opening up an amazing breadth of new opportunities for us. Not long ago, Internet users began to use a private network - VPN. It allows you to create a secure connection between remote PCs, providing:
- anonymity of work on the World Wide Web;
- the ability to download applications when the IP address is located in a different regional zone;
- high safety of work in a corporate environment;
- high transfer speed without interruptions;
- the ability to create a channel protected from hackers.
Let's look at how to connect to the Internet via VPN on different OSes.
OS is more complicated previous versions. But setting up a connection via VPN turns out to be very simple. Follow the step by step instructions below.
Open Start. From the drop-down list, go to “Settings”. This subsection may be called "Options".
Where can I find “Options”?
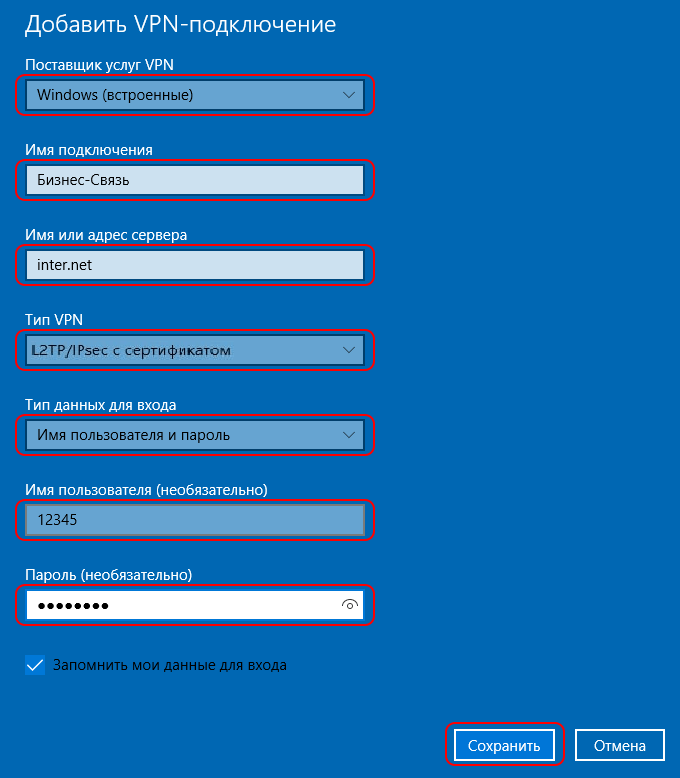
When the Windows Settings window appears, you will see the Network and Internet option. Open the content. There is a “VPN” item here. Make one click. Click "Add VPN connection". In the new window, set the following parameters in order:
- Windows (embedded);
- Business Communication;
- L2TP protocol;
- . The necessary information is specified in your agreement for the provision of Internet services.
Check that the fields are filled in correctly and click “Save”.
Setting up a VPN on Windows 7
Here the phasing has no fundamental distinctive features. The only difference is the location of the sections that interest us. Proceed to the "Control Panel".

Where is the Control Panel located?
We will need “Network and Internet”.

We need a control center. From here you can manage networks and access. You will need to configure the connection. This will be a new direction.

You will need an active “Connect to workplace” button. Go ahead. “Use my Internet connection” will appear at the top of the form. Let's make a selection. A form will appear where you enter in the stated sequence:
- Business Communication;
- Check the "Don't connect now" checkbox. You will be prompted to simultaneously check for future connections;
- move on.
On the page that opens, enter your username and password. This information is provided when signing an agreement for the provision of communication services. Place a marker in the box that asks you to remember your password. Next, a working connection will be displayed. The form can be closed.
While in Control Center, continue working with custom metrics. In the form, click on “Change adapter settings”. The active and passive connections will be highlighted. Click on the configured option and select Properties. This is done through the right key.
You will be on the General form. Here the address information regarding the VPN server is checked. Correct view: inter.net.
In the “Security” form, you also need to make certain settings. Put VPN type here. There is no need to register anything. It is enough to use the drop-down list. Select the item: L2TP/IPsec. In the “data encryption” line, enter: optional. Click OK.

Stay in the connections tab. Here you will need to create a shortcut for “Business Connection”.
When you see a message that an icon cannot be created in this folder, agree to move it to your desktop.
Go to the main screen. Here you will find the corresponding label. Double-click with the left mouse button. A window will appear where you should select “Connection”.
You can check this point by following this path:
- go to “Network and Internet”;
- specify the section you are interested in. This is the control center;
- you need to check the configured indicators. Go to the form where the adapter settings are changed;
- Before finding the information you are interested in, read the sections. You will need “Network Connections”;
- we require "Connection via local network»;
- go to “Properties”, open “Network” and select “TCP/IPv4”;
- click on “Properties”;
- clause on obtaining an IP address in an automatic way must be activated, click OK.
Now we can say with confidence that the connection to the VPN is complete.
How to connect a VPN on Windows XP
Getting started is exactly the same as in version 7 of the OS. After activating the creation of a connection, the Connection Wizard will automatically launch. With it you will resolve the issue faster and more conveniently. After following “Next”, find the second item. It will allow you to connect to the network on your desktop.


Keep tuning. You will see the “Connection name” window. Specify Business Connection. Proceed to the second stage.
Stop at “Select VPN Server”.
You will be taken to the last page of the wizard. Check the box where you are offered to display a shortcut on the desktop. Complete the procedure.

Confirming settings and creating a shortcut on the desktop
Click the right mouse button on the window that appears. Go to "Properties". In the first tab, check the VPN server address. It should be written here: inter.net. Go to "Options". Mark with the marker “Call back when connection is lost.” Then open “Security”. Remove the checkbox from “Data encryption required.”
The connection window appears. It asks for a username and password. Enter the information provided by your Internet service provider when completing the contract. Place a marker next to the prompt to save passwords. Start connecting.

As in the option discussed above, double-check that you received the IP address. It should be done automatically. This is done through Start. Find "Network and Internet Connections". From the suggested sub-items, select “Network connections”. Find “Local Area Connection”, right-click to get to Properties. Here you need to highlight TCP/IPv4. Then you need to go to Properties again. Now check for the checkbox next to the offer to register your IP address automatically.
Setting up mobile equipment on Android OS
If you need to set up a VPN on mobile devices, use the following step by step instructions. It will create a secure channel connecting separate networks and providing access to them for people who regularly change their location.
Important! For the setup to be successful, you need to know the address of the server to which you will connect, your login and password.
Open the Settings menu on your device.
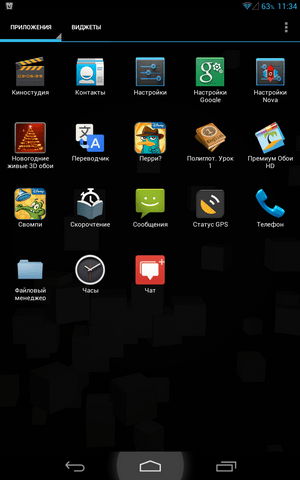
In the column " Wireless network» Click on the “More” sub-item, select “VPN”.

Check the box to add a VPN connection. It may be called that or designated as “+”.
A form will open in front of you where you need to enter the settings:
- “Network name” - any name. You decide what name to give your new VPN connection;
- "Type" - "PPTP";
- “Address”—VPN server address;
- click on the “Save” button.
find out detailed instructions for settings home internet in the article -
When you first start, the system will ask for your username and password. To avoid having to enter them again next time, check the box next to the prompt to remember user data.
The VPN connection is configured and ready to use. You will learn about this thanks to the corresponding notification. By clicking on the icon that appears, you will see detailed information on the connection.
Every year electronic communications are improving, and increasingly high demands are placed on information exchange for speed, security and quality of data processing.
And here we will look at a VPN connection in detail: what it is, why a VPN tunnel is needed, and how to use a VPN connection.
This material is a kind of introductory word to a series of articles where we will tell you how to create a vpn on various operating systems.
VPN connection what is it?
So, a virtual private network vpn is a technology that provides a secure (closed from external access) connection of a logical network over a private or public one in the presence of high-speed Internet.
This network connection computers (geographically distant from each other at a considerable distance) use a “point-to-point” connection (in other words, “computer-to-computer”).
Scientifically, this connection method is called a VPN tunnel (or tunnel protocol). You can connect to such a tunnel if you have a computer with any operating system that has an integrated VPN client that can “forward” virtual ports using the TCP/IP protocol to another network.
Why do you need a VPN?
The main benefit of a vpn is that negotiaters need a connectivity platform that not only scales quickly, but also (primarily) ensures data confidentiality, data integrity, and authentication.
The diagram clearly shows the use of VPN networks.
Rules for connections over a secure channel must first be written on the server and router.
How VPN works
When a connection occurs via VPN, the message header contains information about the IP address of the VPN server and the remote route.
Encapsulated data passing over a shared or public network cannot be intercepted because all information is encrypted.
The VPN encryption stage is implemented on the sender's side, and the recipient's data is decrypted using the message header (if there is a shared encryption key).
After the message is correctly decrypted, a VPN connection is established between the two networks, which also allows you to work on a public network (for example, exchange data with a client 93.88.190.5).
Concerning information security, then the Internet is an extremely unsecured network, and a VPN network with the OpenVPN, L2TP / IPSec, PPTP, PPPoE protocols is a completely secure and safe method of data transmission.
Why do you need a VPN channel?

VPN tunneling is used:
Inside the corporate network;
To unite remote offices, as well as small branches;
For digital telephony services with a wide range of telecommunications services;
To access external IT resources;
For building and implementing video conferences.
Why do you need a VPN?
VPN connection is required for:
Anonymous work on the Internet;
Downloading applications when the IP address is located in another regional zone of the country;
Safe work in a corporate environment using communications;
Simplicity and convenience of connection setup;
Provisions high speed connections without interruptions;
Creating a secure channel without hacker attacks.
How to use VPN?
Examples of how VPN works can be given endlessly. So, on any computer in the corporate network, when you establish a secure VPN connection, you can use mail to check messages, publish materials from anywhere in the country, or download files from torrent networks.
VPN: what is it on your phone?
Access via VPN on a phone (iPhone or any other Android device) allows you to maintain anonymity when using the Internet in public places, as well as prevent traffic interception and device hacking.
A VPN client installed on any OS allows you to bypass many of the provider’s settings and rules (if the provider has set any restrictions).
Which VPN to choose for your phone?
Mobile phones and smartphones running Android OS can use applications from Google Playmarket:
- - vpnRoot, droidVPN,
- - tor browser for network surfing, also known as orbot
- - InBrowser, orfox (firefox+tor),
- - SuperVPN Free VPN Client
- - OpenVPN Connect
- - TunnelBear VPN
- - Hideman VPN
Most of these programs are used for the convenience of “hot” system setup, placing launch shortcuts, anonymous Internet surfing, and selecting the type of connection encryption.
But the main tasks using a VPN on the phone - this means checking corporate email, creating video conferences with several participants, as well as holding meetings outside the organization (for example, when an employee is on a business trip).
What is VPN on iPhone?
Let's look at which VPN to choose and how to connect it to your iPhone in more detail.
Depending on the type of network supported, when you first start the VPN configuration on your iPhone, you can select the following protocols: L2TP, PPTP and Cisco IPSec (in addition, you can “make” a VPN connection using third-party applications).
All of the listed protocols support encryption keys, user identification using a password and certification are carried out.
Among additional functions When setting up a VPN profile on an iPhone, you can note: RSA security, encryption level, and authorization rules for connecting to the server.
For iPhone phone From the appstore you should choose:
- - free application Tunnelbear, with which you can connect to VPN servers in any country.
- - OpenVPN connect is one of the best VPN clients. Here, to launch the application, you must first import RSA keys via iTunes into your phone.
- - Cloak is a shareware application, since for some time the product can be “used” for free, but to use the program after the demo period has expired, you will have to buy it.
VPN creation: selection and configuration of equipment
For corporate communications in large organizations or associations deleted friend from other offices use hardware equipment capable of supporting continuous, secure work on the network.

To implement VPN technologies, the role of a network gateway can be: Unix servers, Windows server, network router and network gateway on which VPN is installed.
A server or device used to create a VPN enterprise network or a VPN channel between remote offices must perform complex technical problems and provide a full range of services to users on both workstations and mobile devices.
Any router or VPN router must provide reliable operation on the network without freezes. And the built-in VPN function allows you to change the network configuration for working at home, in an organization or in a remote office.
Setting up VPN on the router
In general, setting up a VPN on a router is done using the router’s web interface. On “classic” devices, to organize a VPN, you need to go to the “settings” or “network settings” section, where you select the VPN section, specify the protocol type, enter the settings for your subnet address, mask and specify the range of IP addresses for users.
In addition, to secure the connection, you will need to specify encoding algorithms, authentication methods, generate agreement keys, and specify DNS server WINS. In the “Gateway” parameters you need to specify the gateway IP address (your own IP) and fill in the data on all network adapters.
If there are several routers in the network, you need to fill out the VPN routing table for all devices in the VPN tunnel.
Here is a list of hardware equipment used to build VPN networks:
Dlink routers: DIR-320, DIR-620, DSR-1000 with new firmware or D-Link DI808HV Router.
Routers Cisco PIX 501, Cisco 871-SEC-K9
Linksys Rv082 router with support for about 50 VPN tunnels
Netgear router DG834G and routers models FVS318G, FVS318N, FVS336G, SRX5308
Mikrotik router with OpenVPN function. Example RouterBoard RB/2011L-IN Mikrotik
VPN equipment RVPN S-Terra or VPN Gate
ASUS routers models RT-N66U, RT-N16 and RT N-10
ZyXel routers ZyWALL 5, ZyWALL P1, ZyWALL USG


