Today, few people can do without their electronic mailbox. Its presence is required for many games or serious software on the phone, as well as for registration on any website. And it’s easier to send a message with files via email. Therefore, everyone who at least somehow uses the Internet should know how to set up mail on Android.
Application used
Outlook on Android is an opportunity to connect your corporate email to your mobile device. It is linked to a Microsoft account, and therefore will allow you to access your computer files, as well as synchronize calendars and contacts.
To work with this service, one of the following programs must be installed on the gadget:
- Gmail.
- Microsoft Outlook.
The latter can be downloaded from the Play Market, and absolutely free.
Setup process
If you configure through a native Android program, a prerequisite is that the addresses do not match, i.e. Your Microsoft account cannot be registered to an address that is Google account. If the condition is met, it will be enough to simply enter your data, i.e. address and password from it and you can start using it.
Using special utility The algorithm of actions is as follows:
- Go to Settings and find the item “Add account” Email».
- We write down the full address.
- Now you need to enter a password, after which you can click “Login”.
- Allow synchronization.
- We can use it.
Initially, this service is configured for instant synchronization, which is why a notification will be sent to your phone immediately when new messages arrive. This and many other parameters can be configured in the “Options” item of the program.
Rambler
Application used
To set up email from Rambler, you don’t need to install any third party software to the device. Enough for this native program“Mail” or “Email”, the name may differ depending on the model or version of Android.
Some other email services can be configured in the same way. These include, for example, Mail.Ru and Yandex. The only difference will be in the port number and domain name.
Setup process
This process works as follows:
- We go into the program provided by the device developers.
- Select Rambler from the list and enter the data.
- If it is not there, then click on “Other” or “Other”.
- In the next tab you will need to enter your account information and click “Next”.
- In the window that appears, you need to enter the following parameters: protocol (POP or POP3), repeat the address and password for it, specify pop.rambler.ru as the server, protection type (security) – SSL/TLS, port – 995.
- In a new window, you need to enter your email address and password again, the server is smtp.rambler.ru, the protection is the same, port is 465.
- In the last window you will need to come up with a name, as well as a name to display in outgoing messages.
Mail.Ru mail differs in the entered values. For the first window it is:
- account type – IMAP or POP3;
- server – imap.mail.ru or pop.mail.ru;
- type of protection is the same;
- server port number – 993.
For the following:
- server – smtp.mail.ru;
- type of protection is the same;
- port number – 465.
For Yandex mail on Android, you need to change the domain to yandex in the last settings.
Gmail
Application used
In this case, setting up email is usually much simpler, i.e. generally automatically. The whole point is that operating system Android and Gmail have a common developer. Usually, without connecting to his account, the user cannot even access the basic services and capabilities of his device.
If this does not happen, you will have to enter the settings manually, for which you will need the application of the same name on your phone or tablet.
Setup process
Below are the parameters that you will need to enter when the account does not connect and does not synchronize on its own:
- server – imap.gmail.com;
- port – 993;
- security type – SSL (always);
- server for outgoing mail – smtp.gmail.com;
- port – 465;
- type is the same.
At first, you don’t even have to create a new account, but simply check the settings of the one you’ve already added.
Nowadays, email is often required to register accounts on different sites, subscribe, or exchange messages with other users. Not all users have constant access to a PC in order to create an account through the official website of the mail service. Therefore, we offer you instructions on how to complete this process on a smartphone or tablet with the Android operating system on board.
First, we recommend choosing the service that suits you where you will register your mailbox. Each service has an official application, its own characteristics, additional tools and privileges for users. Below we will look at guides for creating an account in the four most popular services. You can choose one of them and immediately proceed to the manipulations.
Gmail
A Gmail mailbox is created immediately after registration account Google. In addition, you have access to all the resources of this company, for example, spreadsheets, Google Photos, Drive or YouTube. At the link below you will find another article from our author, which describes in detail the process of creating a Google account. Follow all the points, and you will definitely be able to solve the problem.

Yandex Mail
The postal service from Yandex is considered one of the most popular in the CIS. Especially for users mobile devices An application was released that makes interaction with the service even more comfortable. Registration is carried out through this program. You need to do the following:
- Go to Google Play Market and search for Yandex.Mail, then tap on "Install".
- Wait for the installation to complete and launch the application.
- You can immediately connect mailboxes of different services, but to create a new one you should click on “Start Yandex.Mail”.
- Enter your basic registration information and proceed further.
- If you specified a phone number, wait for a message with a code. In some cases it will be entered into the line automatically. After that select "Ready".
- Check out the main features of the application.
- You will now be taken to the section "Inbox". Your account has been created and you can get started.


Rambler mail
Gradually, email from Rambler is losing its relevance; more and more users are switching to other services, which is associated with frequent malfunctions and limited capabilities. However, if you want to register with Rambler/Mail, you will need to perform the following steps:

Mail.ru
The Mail.ru company produces many services and supports social networks, and also has its own postal service. Registration in it is available not only through the official website. This can be done through a special mobile application:

If you are the owner of several email accounts from different services, we advise you to take a closer look at special mail clients for operating room Android systems. They unite all accounts and allow you to interact with all of them more comfortably. You will find a description of popular applications in our other material at the link below.
Mail.Ru is one of the most popular mail services on the Internet. With the advent of smartphones, it became possible to use email directly on the phone. However, on Android, setting up access to the mailbox has some peculiarities. In this article we will take a closer look at how Mail.Ru mail is configured on Android.
How to set up Mail.Ru mail on Android
First you need to find the Mail utility, which comes standard preinstalled on Android. Go into it, go to the “E-mail” item and click the “Menu” icon and then “Settings”. In the upper left corner there will be an “Add account” button. After this, the “E-mail supports most popular services” window will appear. There will be two lines, you need to fill them out. The first line is “Name”. It must be entered in full as [email protected] and mailbox password.
The next window will prompt you to select an account type. There will be 3 options: POP3, IMAP, Exchange.
For better smoothness and speed of operation, it is better to choose the second option. Consider the case where POP3 was selected.
Here another window will appear where you will need to fill in the “POP3 Server” fields. Here you need to enter pop.mail.ru. Next “Port” – enter 995, “Security Type” – SSL/TLS, and in the last column “Delete messages from the server” you need to select “Never”.
IMAP is configured in a similar way. Only in the “Port” column you need to enter 993, “IMAP Server” - imap.mail.ru, respectively, “Security Type” is the same as in POP3. We leave everything else unchanged.
After installing the protocol, the last window will appear where you need to fill in the “SMTP Server” item, you need to enter smtp.mail.ru, “Security Type” - SSL/TLS, and in the “Require account login” item there should already be a checkmark. Everything else is already filled in.
After this, all that remains is to click the “Next” button and enjoy all the benefits email box. It was described in detail how to set up Mail.Ru mail on your device. If there is a need to add another account, you will need to do everything described above, only change the data in the “Password” and “Username” columns.
Setting up Mail.Ru mail on Android: Video
Possible problems when setting up an email service
The Android system is not perfect. Sometimes a network error occurs while working with mail on Android. In such a situation, the first thing to do is to check that all data has been entered correctly. Next, see if the Internet has disappeared. If everything is fine, you need to restart the device and try to enter everything again. In most cases, after such manipulations, everything starts to work normally.
Mail client for Android system: Video
Mail agent for using the Mail.Ru service
There is an official mail agent for Android from Mail.Ru. You can download it at Google Play link . The client is configured according to the algorithm described above. The application is smooth and stable. In addition, there are a huge number of alternative clients. They are both paid and free, and differ in functionality. Which one to choose depends entirely on personal preference.
Thus, we saw that installing the Mail.Ru service is not at all difficult, but instead standard client alternatives can be used.
Despite the fact that classic email is losing popularity, it is still one of the most popular methods of online communication. Therefore, users often ask how to set up mail on an Android smartphone.
You can set up mail on Android in two ways: using a client application, which is tailored for one email service, or using a universal mail program. The first method is best if you use only one email service (for example), the second method will be useful for those who need to receive mail from several mailboxes, which are located on different mail services. In this material we will look at both of these methods of setting up mail on Android.
Method No. 1. Using a special client application.
If you use one specific email service, then you can download an application created specifically for this service. Such applications are available for all popular email services. As an example, we will demonstrate how this is done for Yandex mail.
First, we need to find and download the client application. To do this, open and enter the name of your email service into the search. Then open the page of the found application.

After installation is complete, launch the application. This can be done directly from Play Market or using a shortcut on the desktop.
After launching the client application, you should see a form to sign in to your email account. Typically, this form contains only two fields: your login and your password. In general, everything is exactly the same as when accessing email through a browser.

Enter your username/password and click on the “Login” button. After this, the client application will automatically download your letters and display them on the screen.

As you can see, setting up mail on Android using a special client requires very little effort. Install the application, enter your data and you're done.
Method No. 2: Using a universal email application.
If you want to receive mail from several mail services, or you have corporate mail on a separate domain, then you will have to use universal mail applications. There are quite a lot of such applications for Android. As an example, we will demonstrate how to set up mail using the K9 Mail application as an example.
First, open the Play Market and enter the phrase “K9 Mail” into the search bar. Then open the page of this application.

Here we click on the “Install” button and wait for the installation to complete.

After opening the application, click “Add a new mailbox” and see in front of you a form for entering your login and password. After entering your login and password, you can click on the “Next” button, in this case the application will try to connect to mail server using standard settings. If you need to enter the settings manually, then click on the “Manual” button.

After clicking on the “Manual” button, the application will ask you to select the protocol type for accessing your email. For example, let's choose POP3. You can choose the one you need.

The next stage is settings for accessing the mail server. Here you need to enter the server address, security method, connection port and authentication method.
Information about the settings to use can be found in the help of your email service. Or from your administrator if you use corporate email. After filling out all the fields, click on the “Next” button.
If all the entered settings are correct, then after clicking on the “Next” button, the program should download your mail and display it on the screen.
The article talks in detail about how to set up mail on Android. All the most popular email services among CIS users are affected. Thanks to the information received, you will be able to set up a mailbox on your smartphone as quickly as possible.
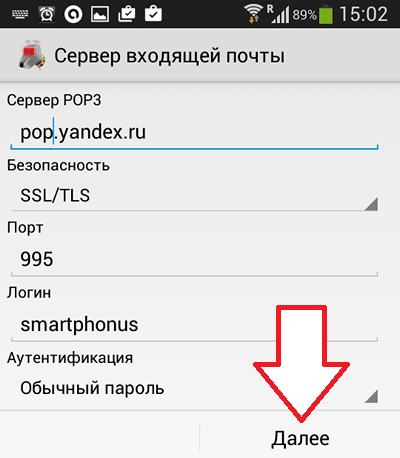
How to set up Yandex mail on Android using built-in software: instructions
You can set up Yandex mail on Android in several simple and straightforward ways: using utilities from the application store or using the built-in Email program. To begin the synchronization process, the device must have an Internet connection.
Here brief instructions on how to set up mail on Android using the built-in software of your smartphone. To get started follow these steps:
- Find in the menu of your smartphone a standard utility that is responsible for email. It is available in absolutely every smartphone running Android OS. It should be noted that in different versions OS this utility can be called differently.
- The standard application supports the Yandex mail service, like most other mail services. Enter your email address and enter your password. Click the "Next" button to continue the setup.
- Select the account protocol type. The POP3 protocol allows you to access absolutely all letters from your account on the Yandex server. IMAP protocol can not only receive all your letters from the Yandex server, but can also save all your actions on them.
- The next step is that the smartphone will set all the necessary settings automatically.
on Android
The above instructions are suitable for setting up all popular email services, including mail.ru. But, if you want to use third-party software, pay attention to the most the best program for synchronization with Mail.ru mail.

The MailDroid.Mail program is a client with the most pleasant user interface among all the programs presented. The application supports the Mail.ru service. Using this utility, the user will be able to sort all incoming letters. There is a choice of themes. The program will provide convenient instructions on how to set up mail on Android.
Synchronization of Gmail and Rambler mailboxes
For synchronization Gmail Google has developed a program that is included in the standard set software any Android smartphone. It is most convenient to use. If you have a number of problems with this program, you can install the Inbox utility from Gmail. It scans emails into the user's inbox, sending the user instant notifications.
If you are unable to synchronize Rambler mail in a standard way which is indicated in the first paragraph of the article, install the Profi Mail application. This is a fairly popular mail utility on the Android software market. The application has both free and paid versions. There is the ability to synchronize with a huge number of email services, including Yandex. The program runs in background, instantly notifying the user about new emails.
Connecting Yandex using third-party programs
K-9 Mail program is an open source utility source code, which is very popular among Android users. You can download K-9 Mail completely free of charge. With Yandex mail, the application works stably, without errors. Setting up mail takes a minimum amount of time. The application has a nice and user-friendly interface.

Thus, having considered all of the above methods for synchronizing mail with your device, you now know how to set up mail on Android and can choose the most suitable setup option for yourself. The described methods are suitable for all Android devices.


