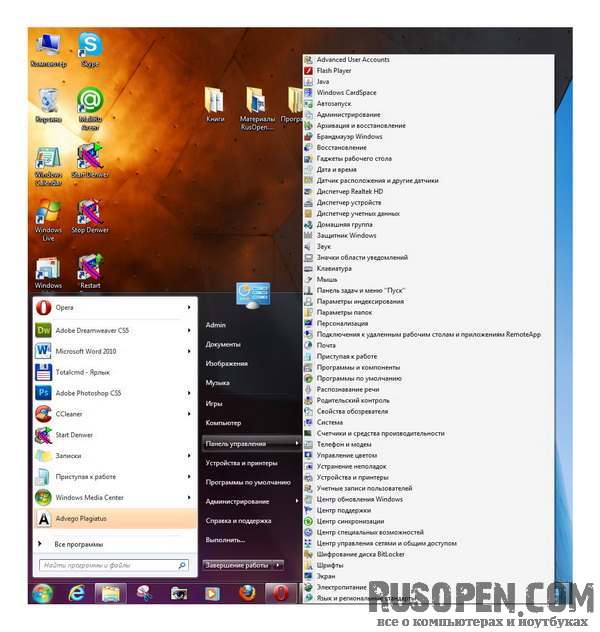
The Control Panel is used to configure your computer (or laptop, which doesn't matter). Using the control panel, you can completely customize your computer - from changing the time to connecting to the Internet.
Panel Windows management 7 has been redesigned, and it is no longer at all similar to the control panel that was used in Windows XP or Vista. It is clear that there are many similar things - otherwise a user who is accustomed to the previous Windows versions, it wouldn't be comfortable. Launch Control Panel by selecting the Start menu command => Control Panel.
Click " Extra options display." When we change a theme, we'll change screens, system sounds, window colors, and perhaps the most obvious: desktop backgrounds. It is possible, however, that many Internet users will have to go through the Internet. We can change the motives in the Control Panel.
Desktop backgrounds, screensavers, window colors, system sounds and screensavers. As mentioned, the motif will immediately change all of these items. If you want to choose a motivation from a larger offer, click on the "Get more themes online" link. 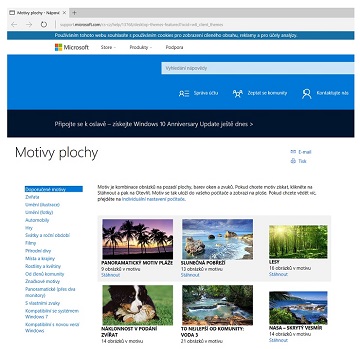
This way you can choose a theme according to your taste. Even panoramic themes are available. Therefore, if you use more monitors, it is useful to choose some of these types of motivators. When you're done, press the "Get Down" button.
The default control panel displays categories of utilities that are used to configure one or another aspect of the system (adding users, removing programs, etc.) and the most commonly used utilities. For example, in the Programs category, the most popular utility is Uninstall a program.
If you want to see all the available Control Panel utilities, select Small icons (or Large icons, whichever you prefer) as the viewing type (from the View list).
You will have a choice of where you want to go. It depends on the number of photos the motif contains. Stay just downloaded from where you saved it, double tap. There is an immediate exchange of sanity. 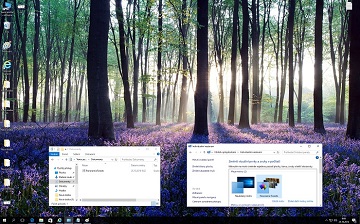
And this is not surprising, because such solutions are in demand. An example would be an application that allows you to change the smallest details of the Start menu - such as changing the color and background of the menu bar, the size and placement of icons, or even the appearance of the Start button itself.
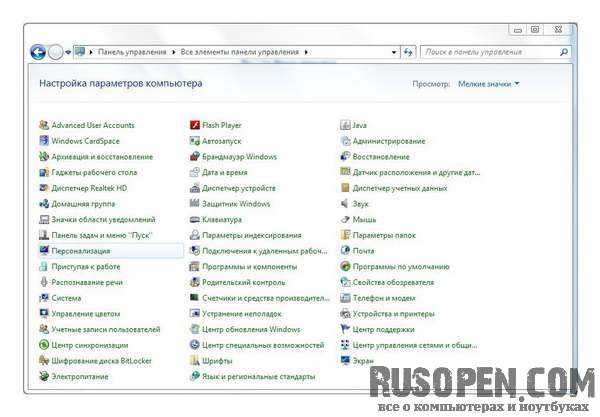
In this version, the Windows 7 control panel resembles the classic look of the Windows 7 control panel. Who is used to classic panel management will undoubtedly use this view. But novice users will prefer the Category view, which is selected by default.
There is also an option to change the default keyboard shortcuts for launching applications. A clock will immediately appear in the lower left corner of the desktop, showing the time, date and day of the week. Just click anywhere outside of it and the clock will disappear. Modified interface modifications.
This solution is not convenient, so applications such as e.g. Once installed, the program "pops up" in the context menu - if you right-click on the desktop and select "Personalize", the personalization panel will launch. A similar feature also offers a program called - but in its case, the options for personalizing the appearance of windows are a little more complex.
Control Panel utilities can be accessed directly. To do this, right-click on the Start button and select Properties. On the Start Menu tab, click the Customize button. Next, find the Control Panel item in the list and select Show as menu.

If this is the case, the title bar we select is ignored by the system and the panel itself is displayed in white. 
If you think it's too complicated, you can also download a set of ready-made files from the developer's site. If this does not happen, then we already know that this limitation can be easily circumvented. It works but adds a wide border around the window and tint button.
And if you change it, you have to manifest so much! The above method only changes the color of the frame in windowed applications. It works, but you should still be able to see which window is active. Can anyone add an instance of how to make an inactive window, for example, white, but without losing the effect described above?
Click the OK button, then OK again. Then click on the Start button. The Control Panel button will be converted to a menu. After this, you can select the desired configuration utility without calling up the entire control panel.
Users of Windows-based computers are often very picky, and over time they no longer like the “native” graphical interface of the system. The Windows 7 Start button is no exception. And you can change it.
Very often he is asked about the possibility of including it. It is not surprising that many users software or even websites prefer a darker appearance. As soon as they have the opportunity to change color scheme interface to dull or even black.
Unfortunately, operating system and application creators are often reluctant to share dark color schemes, making it impossible to change the appearance. The dark side of the app elements and interface doesn't match the eyes like their bright counterparts, which is why some users decide to change it up. Unfortunately, this is not always possible and sometimes requires various, often unauthorized, software changes.
What you need to change the Start button
First of all, it is worth noting that it is not possible to do this using the G7’s means. Therefore, the “Start” button for Windows 7, or rather its appearance, is changed exclusively by third-party programs. Next, we will consider one of the most interesting and popular utilities called Windows 7 Start Button Changer.
Start Menu, Taskbar, and Action Center
Complete color change in the dark belongs to another group. It also changes color context menu, displayed by right-clicking on the Start icon and taskbar. This step is probably all of us. Although almost 4 months have passed since the launch of the last operating system and Lately debuted large, the dark color scheme is still in testing and not generally available.
In the new window you will need to navigate to the key. And adding new meaning to it. Repeat the same action in the key. Finally, you will need to log out or restart it. Simply, to clear the option, simply delete the previously created values in the registry and log out or restart your computer. Users who do not want to modify the system registry can download the files that we have prepared. Just save it to disk, double-click, agree to make changes, and simply log out or restart your computer.
But things are not so simple with her. When you try to open it after installation, the system reports that the application should be started as an administrator (this is already clear), but when you select the appropriate launch type from the context menu, nothing works. Why? Yes, only because the user, although he seems to be his own administrator on the local computer terminal, does not have the necessary access rights in the global context (after all, there is also a super administrator). Thus, initially such rights will have to be obtained.
You can choose one of the high-contrast compositions, but they are designed for people with low vision and are designed to be used for longer periods of time with healthy eyes. If you decide to change your operating system, changing the color scheme of your interface in hopes of giving you a sore feeling, then you should also consider apps that will help you maintain your eyes and can also help you sleep better. Similar to how you can change the appearance of windows and other elements, you can change the color and transparency of the context menu.
How to change the Windows 7 Start button: preliminary steps
The lack of administrative rights is directly related to the explorer.exe file, which is located in the root Windows directories, so you need to start with it.
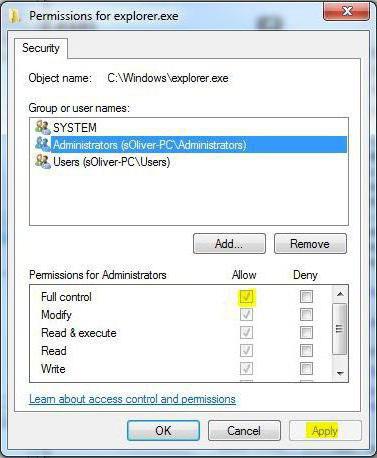
Right-click on the file and select the properties access line. On the security tab, select the administrator group and click the change settings button located just below on the right. A list of permissions will appear in the window below, where you should mark all available components, and then confirm the changes made.
The default context menu looks pretty bad - it gets the job done, but it doesn't look very good. Luckily, there are applications that allow you to spruce up certain sections of your system. After downloading, we launch the installer. If you don't want them, you just need to click "Reject" on the first installation screen, then follow the traditional procedure, that is, approve the rules, select the installation path. When the program starts, an icon appears in the system tray - right-click the option to control the transparency and color of the context menu.
At the next stage, use the “Advanced” button on the same tab, again select the administrator group and proceed to change permissions. In the corresponding column, we again set the “birds” opposite all available lines, and then confirm the changes again.
On the Opacity tab, you can select the transparency level of the context menu. In the "Skins Menu" section we can select color theme, which changes the appearance of the context menu. Interestingly, the changes take effect not only in the Desktop menu, but also in other programs that use the system overlay.
There are really a lot of color themes, so there is something for everyone. You'll see shortcuts to your most frequently launched programs on the left, as well as system apps on the right. The tile size in the Start menu can be changed using the context menu and Resize. For universal applications we can set one of four sizes, and for classical programs, attached to the Start menu tile - two sizes. To lock the appearance of dynamic tiles, right-click on the tile and select More and Disable Dynamic Tile. To create a new group of tiles, simply move the tile slightly to become part of new group; When you upload it outside of a group, a text box will appear for the name of the new group. Additional customization options for the Start menu can be found in system settings. On the right we'll see a set of switches that control the display of Start menu items. To access even more options, click Select Folders in the Start menu. In the next window we will see additional set switches allowing you to determine which of the standard system folders will be visible in the Start menu.
- Start menu content can be freely added.
- We open the settings window by clicking “Start”.
- Then click Personalize.
- On the left side of the window, click Start.
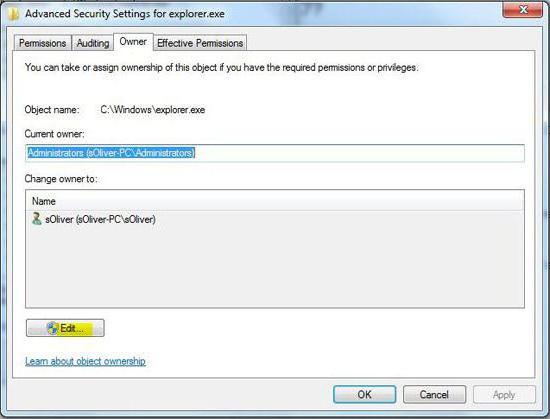
It is imperative to make sure that the user is the administrator or owner of the computer (the registration name must be written in the appropriate line).
Practical application of the program
The Windows 7 Start button can now be redesigned. In practice this is not difficult. First, we launch the installed utility exclusively as administrator. After the steps taken, everything should work fine.
In the new window on the left, click on the background. Desktop background options are displayed. As standard, the desktop background changes from time to time in slideshow mode. By expanding the Background list, we can change the slideshow mode to show a single image or simply set it to a color of your choice.
If we leave the slideshow mode a little lower, by expanding the "Change Images" list, we can choose how often the desktop wallpaper will be automatically changed. If we click on background image in the “Background” list, we can select any picture for the desktop wallpaper.
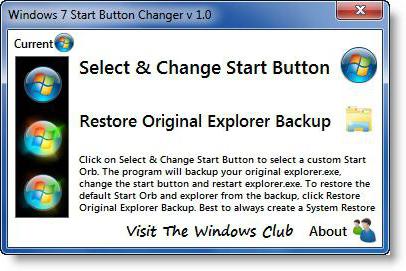
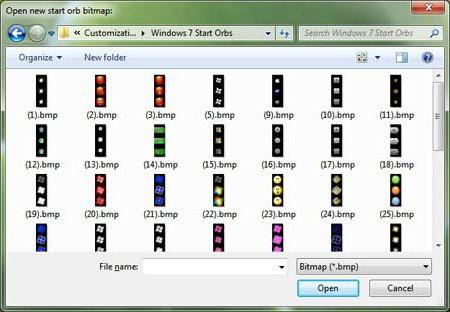
There are two items in the main window: the first allows you to change the appearance of the button (Select & Change...), the second is responsible for restoring the original appearance (Restore Original...). We are interested in the first line. Click on it, and then look for the Sample Orbs directory (the Windows 7 Start button icons are stored here). Choose what you like and press the open button.
In the Personalization window, select Colors on the left. Now we can choose the colors of the window borders or tiles, or instead standard setting Colors to select the interface color, set the color based on the background color. By right-clicking on an empty area of the desktop, we can, by selecting “View”, resize the icons on the desktop, enable their automatic placement or alignment.
The main task of the program is to store desktop layout information for each screen resolution in which we work. If the resolution changes and the icon layout is distributed, the program allows you to quickly restore the layout to which we are accustomed. The application does not require installation, it can be reduced to the notification area when launched.
It is important to pay attention to the type of folders. If you need to preview images, select the appropriate type in the view menu (special button at the top) (large icons, huge icons - whatever is convenient for you).
If you need the Start button for Windows 7 to take on the classic look provided graphical interface the “seven” itself, in the program we use the second line of restoring the default view. In general, everything is simple.
Changing the system sound scheme
They signal the appearance of notifications on the desktop or in a warning message window. We can easily change both the purpose of these sounds and the recording itself. By default, on the "Active Sounds" tab in the "Program Events" section, you can change and set sound effects for many system events. Those that have already been marked by default are listed with a speaker symbol.
Changing and setting your screen saver
If you want to change the default screen saver settings, you must call Control Panel, then Appearance and Personalization, and click on Change Screen Saver under Personalization. The screen saver settings window will appear. If you want to enable a screen saver, simply select any item from the drop-down list under the Screen Saver section.
Conclusion
It remains to add that the utility described above was taken solely as a clear, simple example. You can find quite a lot of applications for changing buttons and, in general, the entire interface. For example, a utility called Windows Blind was once very popular. It was precisely she who could customize the system interface very finely, however, when emulating an OS of a higher rank, it consumed too many resources. But with modern processor chips and volumes random access memory this problem has disappeared.
As for the primary actions with setting permissions, they will have to be performed in any case, otherwise the system simply will not allow the user to make the appropriate changes in appearance. Yes, before performing all the procedures, it wouldn’t hurt to create a system restore point (just in case), otherwise you never know…


