Good afternoon
I'm having trouble calibrating my L800. Original ink, Lomond 230 paper.
My friends sent me a file with dies - I printed them out - everything according to the instructions as here http://resetters.com...etprint_icc.php and sent them
They made me a profile and I installed it on the printer, but the printer began to print very dark pictures (several shades darker).
I started complaining to my friends, they came to me with a color solid from their profiler (Xrite) and it turned out that, in general, the printer prints the way it is on the solid. The question immediately arose - maybe it’s the monitor? I tried to adjust the brightness on the monitor so that it approximately corresponded to the test plate, but with such settings I simply cannot see anything on the monitor and it is impossible to work. Everything is very dark. I also print photos from Canon 7D and 550D cameras without any processing - it can’t be that all the photos taken with such cameras and by a normal photographer on the street in sunny weather are dark?
I ask for help, because I don’t understand what’s going on....((What’s the mistake? The comrades who made the profile shrug their shoulders, saying it corresponds to the test die. They themselves don’t really understand this - they do everything according to the instructions and hello. They said that an RGB printer had never been profiled before ((
Now I’ll try to use the services of Resetters, but it looks like it will take a very long time, since I’m from Moscow.
1 The guys don’t do profiling themselves - they have several solvent plotters on which they print. We asked the management to play with this Xrite quickly))
2 As far as my unprofessional eyes can see, the color match is good. The test plate is matte, and I print on glossy paper, but in my opinion the result is good. It's black - really black. And if you print from a standard profile and Epson drivers, then instead of black there is dark green and all colors are 2-3 tones lighter than the test solid. Even a blind person can see this. But visually, photos from standard drivers are more “beautiful”.
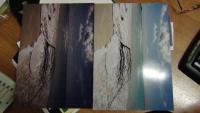
In the photo in the attachment - on the right are the standard Epson driver settings, and on the left with the profile applied. To make it clear that we are not talking about a small discrepancy, but about complete garbage.))
| Message Posted July 31, 2012 - 12:35 NorthStar
Well, my question is not about blue at all. ((Yes, I still don’t understand what needs to be done ((
It wasn’t me who made the profile - but judging by the training videos from the Xrite website - there is no such option.
NorthStar
"Well, damn it, you give..."©
1. To begin with, read carefully and for several days
2.
their profiler (Xrite)
Which one specifically? They have pregnancy monitoring devices...
3. Profiling (characterization) of the printing system (printer) and monitor is like a watch and panties. It sounds similar, but the things are completely different. At the head of everything is “His Majesty the file”, which is on the computer. And which someone was shitting according to his own understanding. Now the monitor (in its own way), using its profile, must correctly show the contents of the file (picture) so that the user can shit it as he wants. The printer (in its own way), using its profile, must correctly print what the user has sculpted. There is no need to insert the profile into the printer (after all, you are not a proctologist). The profile file must be clicked “insert”
move it to the color folder (Windows/system32/driver/color) and click the “install” button. Then it can be seen and used in the “print” panel of PHOTOSHOP.
4. If it’s completely hopeless, write in a personal message. Let's call you. I'll do it for free.
From color laser printing We expect accurate color rendering, rich and, most importantly, natural colors. However, as with all printing technology, certain color calibration procedures are required to obtain high-quality and accurate color reproduction. These procedures involve adjusting the printing device so that the color printed on the paper matches the color displayed on the display screen. Unfortunately, calibrating the printer once is not enough. During its operation, calibration must be carried out periodically so that the colors do not gradually “go away”. About how this is done in modern laser printers, is discussed in this article.
It turns out that it is not enough to calibrate the color rendering of the printer once when putting it into operation. Calibration must be performed periodically. The fact is that color rendering in laser printers is determined by many parameters and conditions. Considerations for regularly calibrating your printer include:
- the characteristics of photoreceptors (photodrums and photobelts) strongly depend on the number of prints made on them, because over time the sensitivity of photoreceptors decreases;
- the characteristics of photoreceptors strongly depend on their temperature;
- toner characteristics are directly dependent on its humidity and temperature;
- the magnitude of the high-voltage voltages of the corotrons, transfer and development shafts changes with fluctuations in temperature and humidity;
- the characteristics of the lasers that form the image also change over time and with changes in temperature (when lasers heat up, their power decreases; as the printer’s lifespan increases, the laser also loses its output power).
Thus, once a printer is configured, it requires more and more configuration procedures, and the number of these procedures is directly dependent on the print volume.
Based on the fact that printer calibration is quite labor-intensive and must be carried out periodically, the developers decided that it should be performed automatically, without user intervention. The purpose of this procedure is to save the specified color parameters.
The frequency of the recalibration procedure is, of course, determined by the characteristics and parameters of the printer itself: its operating life, permissible monthly load, the type of toner used, the type and characteristics of photoreceptors, etc. In other words, the recalibration period is set by the printer manufacturer based on print quality considerations.
Let's look at the basic principles of automatic printer calibration Hewlett Packard family CLJ (Color LaserJet). In printers of this family, recalibration is performed taking into account the number of printed pages. As the cartridge life increases, the toner and image drum gradually degrade, which leads to instability of color rendering, or more precisely, to instability of image density (density image). To stabilize image quality, Color Laser Jet printers provide two types of auto-calibration procedures:
1. Density calibration (DMAX procedure).
2. Halftone calibration (DHALF procedure).
But some printer models, for example the HP CLJ3500/CLJ3700, provide three types of auto-calibration procedures:
1. Calibration for environmental conditions (Environmental control).
2. DMAX density calibration.
3. DHALF halftone calibration.
DMAX procedure
This procedure adjusts the bias voltage on the developer roller. The DMAX procedure is performed on the printer in the following cases:
- when turning on the power;
- after replacing the cartridge;
- after a certain number of printed pages;
- after a certain period of printer operation;
- when receiving a command from the user (printer driver) to perform calibration.
In addition, in printers that have the ability to calibrate depending on environmental conditions, the DMAX procedure can be carried out even if the environmental conditions have undergone significant changes since the last DMAX calibration, i.e. it is carried out if several Environmental control calibrations have been performed on the printer.
The DMAX calibration procedure proceeds as follows:
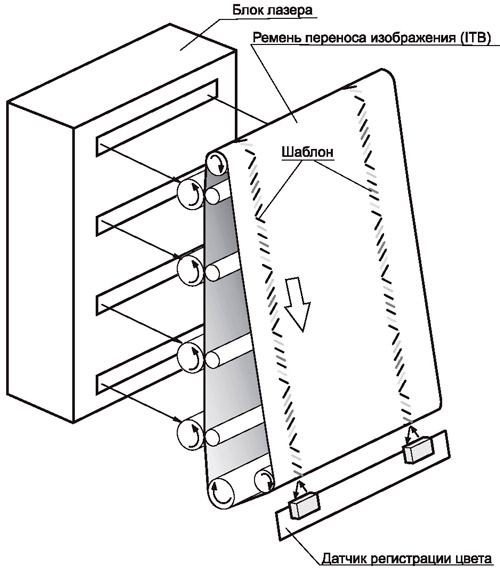
1. On the intermediate transfer drum or transfer belt, designated ITB or ETB in the documentation, two density pattern strips are formed along the edges. Each color is formed several times at different voltage levels on the developing rollers, i.e. All colors in this template are represented by several rectangles with different densities (Fig. 1).
Rice. 1. Density pattern stripes
2. The patterns are read by color registration sensors. As a rule, there are two such sensors and they are located at the edges of the intermediate carrier (Fig. 2).

Rice. 2. Color registration sensors
These sensors ensure accurate color registration and monitor toner density. The last function is used to color calibrate the printer. The sensors are of the optical type; they work by reflecting the light flux. The sensor contains a light emitting diode (LED), which generates a luminous flux of a fixed power, and a photodiode (PD), which reads the light reflected from the template and generates an output signal directly proportional to the power of the incident luminous flux. Thus, analog signals are generated at the output of the sensors, the amplitude of which corresponds to the density of the template.
3. The signals generated in this way are read by the microcontroller and processed by its control program. As a result of analyzing the received data, the microcontroller sets the bias level (developer voltage) corresponding to the best toner density value.
DHALF procedure
Using this procedure, the color gradation data sent by the formatter to the controller is corrected. The general order of the DHALF procedure is as follows:
1. After DMAX calibration, the optimal offset level is set on the developing rollers and its value does not change. This is why the DHALF procedure is performed only after the DMAX procedure.
2. The formatter sends data to the controller describing the various gradations of each color.
3. The controller forms a template on an intermediate medium (drum or tape) with color gradations specified by the formatter.
4. The formed template is read by the same color registration sensors. The signals received at the output of the sensors, describing each color gradation, are sent back to the formatter.
5. Control program The formatter compares the data that was sent to the controller with the data received from it. As a result of analyzing this data, the formatter adjusts the digital halftone codes so that they match the generated image as accurately as possible.
Summarizing information about the DMAX and DHALF calibrations, we can say that the DMAX procedure provides calibration of the printing mechanism, and the DHALF procedure ensures that the formatter is adjusted to the parameters of the printing mechanism.
ENVIRONMENTAL procedure
In addition to the procedures discussed above, some printer models have an Environmental control procedure - calibration for environmental parameters (humidity and temperature). To monitor environmental parameters, temperature and humidity sensors are installed in the printer. These sensors in HP CLJ 3500/3700 printers are installed on the outside of the exhaust fan, i.e. The sensors blow air from the printer and monitor the temperature and humidity inside the printer.
At the output of the sensors in question, two signals are generated: one shows the humidity level (HUMSNS), and the other shows the temperature value (TEM-SNS).
Depending on the readings of these sensors, the printer mechanism controller changes the following voltages:
1. Bias voltage on the developing rollers.
2. Voltage at the primary transfer coronons.
3. Voltage at the secondary transfer corotron. The location of these elements on HP printers
CLJ 3500/3700" is shown in Fig. 3.

Rice. 3. Location of developing rollers, primary and secondary transfer coroners in HP CLJ 3500/3700 printers
Horizontal color matching procedure
The color rendering of a laser printer is greatly influenced by the accuracy of color registration. In a simplified version, this can be explained using the following example. If a laser printer is supposed to print a green dot, then in fact the printer puts two dots next to each other - blue and yellow. Since the sizes of the dots are small, and they are placed close to each other, our eye, unable to distinguish very small details, perceives these two dots as green color. However, if the distance between the points increases, then we will be able to distinguish them, and instead of the green dot we will observe two adjacent dots of yellow and blue, i.e. the color green can no longer be reproduced. In order for dots of different colors to be “sealed” close to each other, very precise synchronization of many printer components is required. Whichever color printing technology we take, it is clear that the different colors that make up a full-color image are applied to paper or intermediate media one by one, and four cartridges are involved in the formation of i colors.
Note. IN inkjet printing 4 or more cartridges are used (up to 6-8). But these secondary color ink cartridges are just gradations of the primary colors: black, yellow, cyan and magenta. Classic full-color printing is carried out in either 3 or 4 passes
Since all cartridges differ from each other to one degree or another, and various inaccuracies and backlashes are possible during their installation and positioning, it is not yet possible to talk about good color matching accuracy in laser printers. In addition, it is necessary to take into account the temperature deformations of the printer mechanisms during printing. Thus, for accurate color registration in a color laser printer, it is necessary to ensure the following parameters are corrected:
- initial position of the animation in the horizontal direction;
- scale factor for horizontal scanning;
- initial position of vertical feed. Horizontal color synchronization
(the initial position and scale are carried out by beam sensors and speed sensors of the scanning motors located inside the laser unit. Horizontal sync calibration is usually carried out either at the factory or performed off-line. Additional mechanisms may be introduced into the printer for such calibration ( motors, solenoids, couplings, etc., designed exclusively for horizontal alignment and nothing else.The operation of these mechanisms cannot be interfered with by software - using a driver or built-in service modes work. On some models, this adjustment can only be made by a service technician, for example, by mechanically moving the laser units relative to each other, and this requires partial disassembly of the printer.
The issues of horizontal synchronization are quite extensive and require a separate topic. However, many printers check the horizontal color registration every time a cartridge is replaced, since after reinstallation the relative position of the cartridges is disrupted. In addition, horizontal registration calibration can be performed after a certain number of printed sheets, or when the printer receives a calibration command.
The procedure for horizontal color registration on the intermediate image medium ITB is as follows:
1. On the intermediate carrier, a pattern is formed on both sides, consisting of inclined strokes of each color (Fig. 4).
Rice. 4. Forming a pattern with oblique color strokes
2. The position of these strokes is read by color registration sensors (the same sensors that were used in the DM.AX and DHALF procedures), and for each stroke the moment at which the signal is generated by these sensors is determined. The difference in signal formation time for different colors shows how much the cartridges are displaced relative to each other in the horizontal direction (Fig. 5).
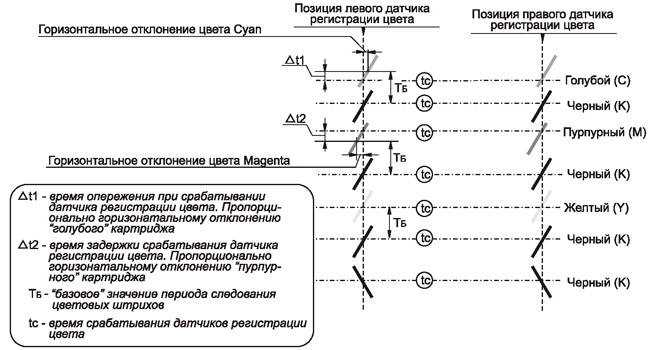
Rice. 5. Smoothing the signal from the template with color registration sensors
3. The received data is sent to the formatter board, where it is analyzed by the control program.
4. When forming an image, the formatter generates control signals for laser beams of each color, taking into account the time delays that were received by the color registration senders. These calculated time delays compensate for horizontal color variance. In this case, the formatter sends confirmation to the mechanism controller that the appropriate adjustment has been made.
Vertical color matching procedure
Vertical color registration also involves applying a pattern to an intermediate medium, and the pattern is very similar to that formed during DMAX and DHALF calibrations - rectangular zones of the four primary colors are formed on both sides of the intermediate medium. Next, the registration sensors read this pattern, and the controller calculates the intervals between the periods of each color. The obtained values will be taken into account when generating a full-color image.
But you can also find more sophisticated ways to synchronize colors. For example, on HP CLJ 4600 family printers, vertical color registration calibration is carried out using direct and indirect calibration methods. Both calibrations are carried out in a certain sequence and are designated CPR (Color Plane Registration - combination of color plans).
Direct calibration involves applying a template to an intermediate medium and reading it with color registration sensors. This method has already been discussed, so the indirect calibration method is of more interest.
Indirect (indirect) calibration consists in the fact that the microcontroller evaluates the linear (precisely linear, not angular) rotation speed of all four photodrums and the feed shaft of the ITB image transfer belt. To control the rotation speed of all these shafts, there are corresponding sensors - sensors for the initial position of the photodrums and an initial position sensor for the ITB (Fig. 6).
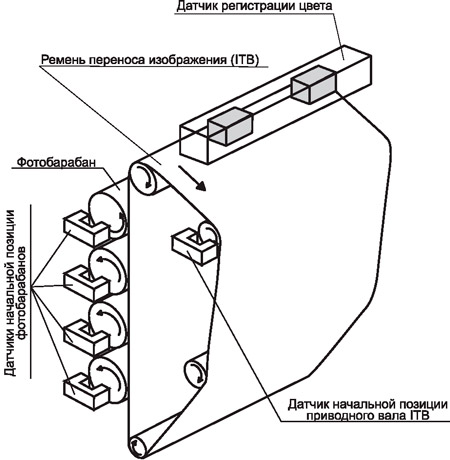
Rice. 6. Location of photodrum and ITB initial position sensors
The printer microcontroller, receiving information from these five sensors, summarizes it, adjusts it and calculates the speed for each of the five motors that rotate the photo drums and the image transfer belt. Thus, the microcontroller generates an individual control program for each motor involved in the process of creating a full-color image. According to the printer designers, indirect calibration in combination with direct calibration will provide the best possible alignment of colors in the vertical direction and avoid all color distortions caused by inaccuracies in the drum and ribbon drives. The location of the drive motors of the photodrums and ITB in the HP CLJ 4600 is shown in Fig. 7.
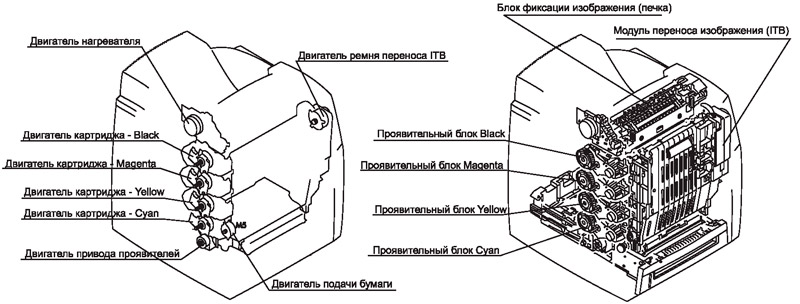
Rice. 7. Location of drive motors for photodrums and 1TV in the HP CLJ 4600 laser printer
Phase calibration
For correct color registration during full-color printing, the accuracy of the drive of the photodrums of the cartridges is also of great importance, which depends on the quality of the gears, i.e. on the accuracy of the alignment of gears, the presence of backlash, etc. To reduce the influence of the “mechanical component” on image quality, the printer also performs phase calibration, the task of which is to combine the four cartridge motors with their gear drives. This calibration is purely mechanical, i.e. by rotating the motors in a certain direction, and over a certain period of time, all gaps and backlashes of the gear transmission are eliminated. After this, the printer microcontroller measures the rotation speed of the photodrums and the CPR is calibrated. The considered calibration is called phase calibration of photodrums and is designated DPC (Drum Phase Calibration).
Using the HP SY4600 model as an example, the table provides information about at what points in time and under what conditions auto-calibration procedures are performed in Hewlett printers Packard CLJ series.
Auto-calibration frequency and procedures for Hewlett Packard CLJ series printers
| Turning on the printer (Power-on calibration time is added to the overall initialization procedure at power-on, so the total time it takes to get the printer ready for use after turning on is about 2 minutes) | DMAX. DHALF | 75 |
| Installing one or more new cartridges (cartridges that have not been installed in this printer before | DMAX,DHALF,CPR | 150 |
| 50 pages printed after installing a cartridge in the printer. If the printer counter detects the 50th page while printing a job, then first the current job is printed to completion, and only then the calibration procedure begins. | DMAX, DHALF | 75 |
| 1000 pages printed since last calibration Calibration does not begin until the current job is printed | DMAX DHALF | 75 |
| More than 8 hours of continuous operation have passed since the last calibration, i.e. During these 8 hours the printer did not go into energy saving mode. This calibration is performed before printing the first job sent to the printer (or specified via the control panel) after these 8 hours have elapsed | DMAX DHALF | 75 |
| The calibration procedure is started by selecting the appropriate menu item on the control panel | DMAX DHALF CPR DPC | 280 |
You don't need expensive equipment to get the most out of your photo printer. Detailed step-by-step instruction for those who want to calibrate their printer at home.
We need all theoretical knowledge about color and color rendering, of course, only in order to learn how to reproduce colors with the highest possible quality. A photographer - both an amateur and a professional - today has two ways to obtain high-quality color prints. This is printing in a darkroom - and then the operator takes all the care of color and its reproduction (or does not, in accordance with our usual sloppiness) or print independently, as a rule, on a color inkjet printer.
And although vendors are trying in every possible way to make their printers as easy to use as possible and are constantly improving print quality, there are still many pitfalls in this matter.
Let's not forget that ink is either a solution of dyes or a colloid, a suspension of paint microparticles, usually in water. And paper is a certain surface with a certain porosity, roughness, its own “white” color (I hope no questions arise here?), thickness, reflectivity...
I remember a good old story:
Once upon a time there lived a prince. And he dreamed of meeting a real princess.
And there lived a princess. And she expected that the real prince would find her, touch her tenderly, kiss her...
And then one day these two toads met.
The fairy tale is silent about what happened to the two amphibians. But when ink and paper “meet” - and especially from different vendors - there is often nothing good, when standard settings printing does not work: the physical and chemical processes of absorption and polymerization of ink are often unpredictable.
In order to compensate for differences in color rendering, there are so-called color profiles. These are essentially color reproduction correction tables. They indicate how much in one direction or another it is necessary to shift the color coordinates in order to this device on this particular type of paper, using exactly these inks, it printed with the quality that suits us.
So, as a matter of fact, the calibration process should be performed for each new batch of paper and ink that you use. Printers are well aware of this. In order to launch, for example, an art album, previously (and even now, frankly speaking, despite all the color management systems), the bulk of the time was spent not on printing the edition, but on selecting a satisfactory combination of colors with the available batch of paper.
It could be easier. “Cutting” the color space, artificially narrowing it. When we select the sRGB space, this is exactly what we do.
A distorted color space is perceived better than an unbalanced one.
The eye seems to “expose” the brightest and darkest point of the image, and then examines everything that is between them. And if the relative difference in brightness and colors is close to that of the real object, then the eye will perceive the picture as realistic. And he will be “satisfied” with the image.
But if you put two prints side by side, one of which is made using a “cut” color space, and the other is expanded and balanced, then and only then the eye (unless, of course, it is the trained eye of a photographer or printer) will recognize the better print.
It must be said that everyday photography often suffers from low contrast prints and “faded” colors. Consumers of mini-lab products have long been accustomed to this. But this article was not written for them. An ordinary consumer will not print photos on a photo printer, especially trying to extract everything possible from its settings. But we will try.
For setup - calibration of printing devices - densitometers and calibrators have been created. The principle of their operation is generally the same. They read color information from reference points in the test image. This information can then be used to build a color profile.
Sooner or later, a bright idea had to come to the minds of software manufacturers. After all, a flatbed scanner is currently a very advanced tool for reading color information. The 4 D optical range, declared, for example, by Epson, obviously covers dynamic range any image printed on white opaque paper, therefore it would be quite logical to use scanners for colorimetry.
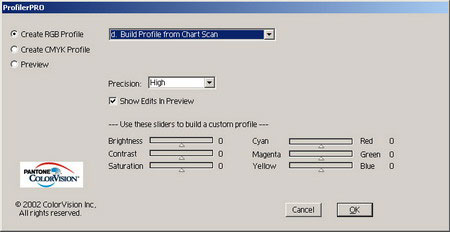
The corresponding software has been written. Actually, there are several such programs, but I had the ProfilerPro program at hand.
ProfilerPro is not a standalone program, but a plugin for Adobe Photoshop. Personally, this only makes me happy - I love it when graphic inventions different manufacturers called from good old Photoshop. So, using ProfilerPro you can build color profiles for printers. Of course, for a wide variety of papers and inks.
The plugin works not only with scanners - it is also quite compatible with calibrators. The creators of the program have provided several operating modes for the program. The profile can be built using densitometer measurements or by analyzing a scanned test image.
But, however, let's take it in order.
The practical task that I set myself when writing this article is to build color profiles for my printer. I have an Epson1290 installed, equipped with a capsule system continuous feed ink from resetters.com. Thanks to the fact that I have a capsule CISS, I can easily change the ink. I usually use OCP or WWM ink. As a rule, I print on Lomond paper.
Here I will describe in detail how to build a color profile for the RGB workspace.
Install the plugin.
In Photoshop settings, set the working color space to Adobe RGB.
After installing the plugin, two new items appear in the menu – DoctorPro and ProfilerPro.
Here we will launch ProfilerPro.
![]()
Select the first item - download the calibration table for the scanner.
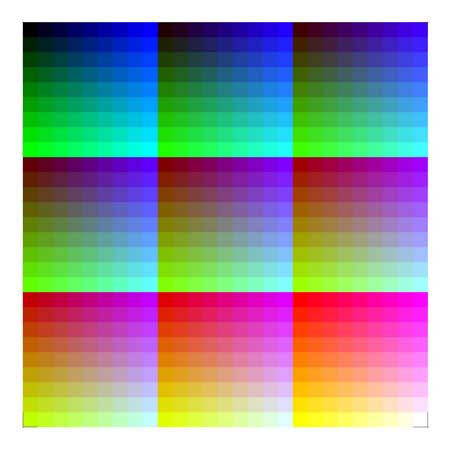
She looks so beautiful. Not printed yet. We print.
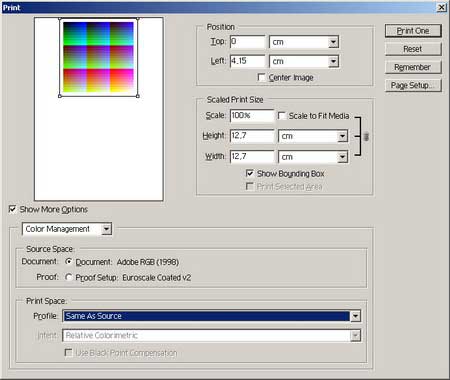
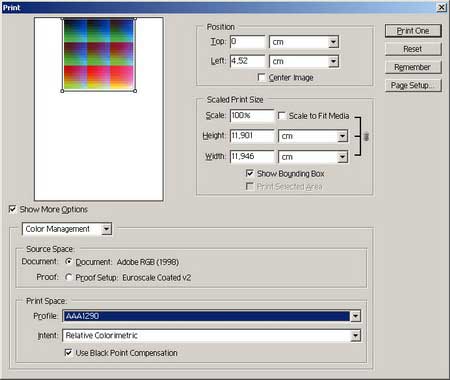
In the print settings, set color management – print profile – same as source.
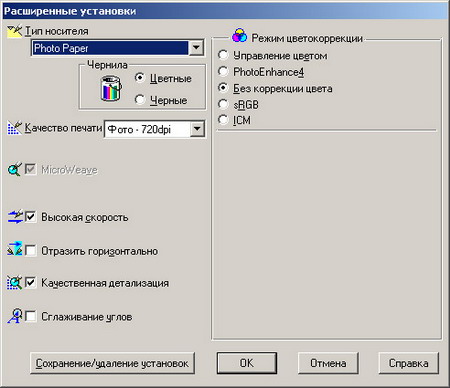
And in the printer settings, turn off color correction. Now our table will print without any “improvements” from the software.
After the table is printed, let the colors stabilize. Simply put, the ink needs to dry. Only after drying do we send our calibration table to the scanner.
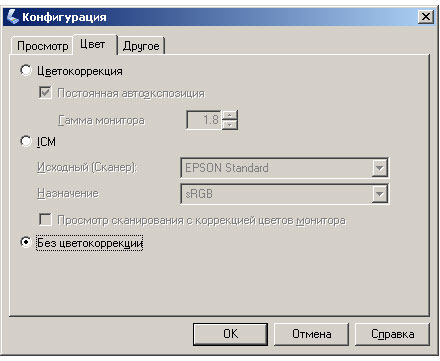
There, of course, we also set the mode “without color correction”
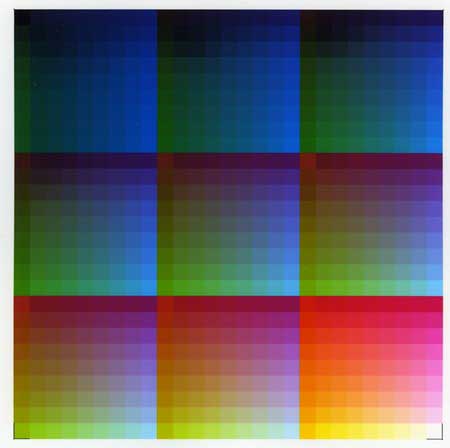
And as a result of scanning we have the following result. It can be seen that the table was printed with distortions. The color transitions are uneven; the darker areas of the table are printed lighter than the adjacent light ones. We save the result in *.tif.
We are building a profile. To do this, open ProfilerPro and select item D – Build a profile from a scanned table.
The first thing we do is check the profile for professional suitability.
To do this, we print the calibration table again, but with our profile already set.
Like this:
I built profiles for both OCP and WWM inks. If earlier I could clearly tell what kind of ink this or that image was printed with, now the printing results are almost the same. Now it’s even funny to remember that I sometimes changed the ink in order to get a better result. For example, blue tones were better with WWM ink, and green tones were better with OCP. Now there is no need for this.
A reasonable question arises: is it necessary to pre-calibrate the scanner in order to then use it as a measuring tool?
When experimenting with calibration, I used two different scanners. These are Epson Perfection 4990 and Epson Perfection 1650. The results obtained on these scanners are almost the same. Both scanners were used in "no color correction" mode without any color profiles.
I cannot answer unequivocally: “no, the scanner does not need to be calibrated.” Your scanner may need to be calibrated first. This will probably be the subject of the next article. And now I can only repeat myself - using two different scanners, I received wonderful profiles that completely satisfied me.
Correct printer calibration involves creating a working profile created for a specific printing device, cartridge, or paper. Accordingly, if we decide to replace one of the components with another, then the whole process will have to start from the very beginning. The good news is that any device designed to print files must be calibrated. Moreover, we are completely uninterested in whether they recognize work profiles or whether they are connected to our computer... The main thing is that the device has the ability to accept digital graphic files.
It should be noted that calibrating a printer is a process very similar to setting up a monitor. Although in terms of practical execution they are slightly different. Let's return, however, to the main thing.
The first thing we need to say is this. Setting the black point, as well as the white point, does not make sense for the print. The fact is that the first is determined not only by the properties of the selected paper, but also by the dye. While the first is solely due to the reflective ability of the paper. 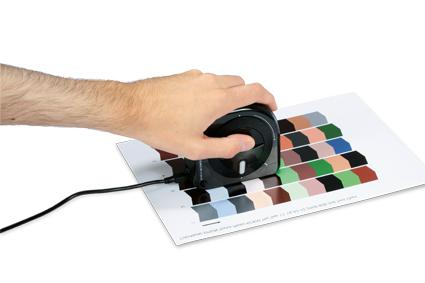 In addition, printer calibration has nothing to do with such a concept, since it still has nothing to do with surface painting. But let's talk about the properties of radiation.
To carry out proper setup, we will need to print a test file. It contains a considerable number of fields, painted in all the colors of the rainbow. The next stage is measuring each of them with a special device called a calibrator. This process helps to obtain feedback for the setup program. By comparing the original and obtained color values, you can create an ICC profile. It will fully match the current printer ink and paper combination.
Another important point. It is important to understand that the printer calibration we perform (hp, for example) is color management using a profile that is hardware-created.  Therefore, all other methods used for the same purpose should be disabled! It's very easy to do. We go to the driver settings of our device and set something like “No color management” or “No color adjustment” (“Do not use color management” or “Do not use color adjustment”). Please note: the name of this item may differ for different devices. Therefore, if calibration is carried out Canon printer, it is not a fact that you will find the above options in the settings.
At the next stage, events develop as follows. In the case when the printer connected to our PC has been calibrated, when sending photographs or other graphic files for printing, we simply use the created profile. Believe me, this is very simple to do: activate the “print” option and carefully read the available options. This option seems to be the simplest when it comes to printing from ACDSee or Photoshop. Although it must be admitted that with any other applications the sequence of actions is similar. Of course, provided that the required option is generally supported by them.