In the new operating system, the user has a lot of opportunities to customize the appearance of its interface. This includes the color of the windows and even the font of the inscriptions in any part of them, which was not in previous versions OS. Today we’ll look at how on a computer with installed Windows 10 change the font. This feature is necessary to improve the readability of text if the user constantly works with text documents.
Let's start studying the topic by changing the scale of the text displayed in a certain part of the window. This can be done in relation to the window title or menu items (including contextual ones). You can change the font in Windows as follows.
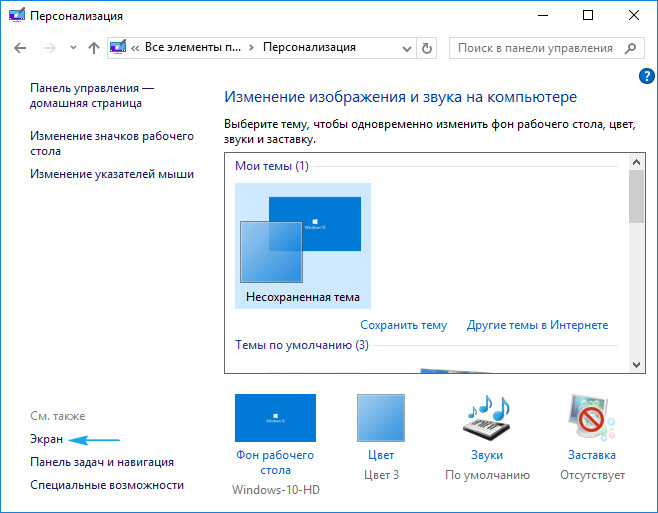
1. Call context menu desktop.
2. Open the window for personalizing the appearance of the operating system interface.
3. In the vertical list on the left side of the window, follow the “Screen” link.
Note: In later versions there are dozens to change screen settings, personalization must be selected in the control panel.
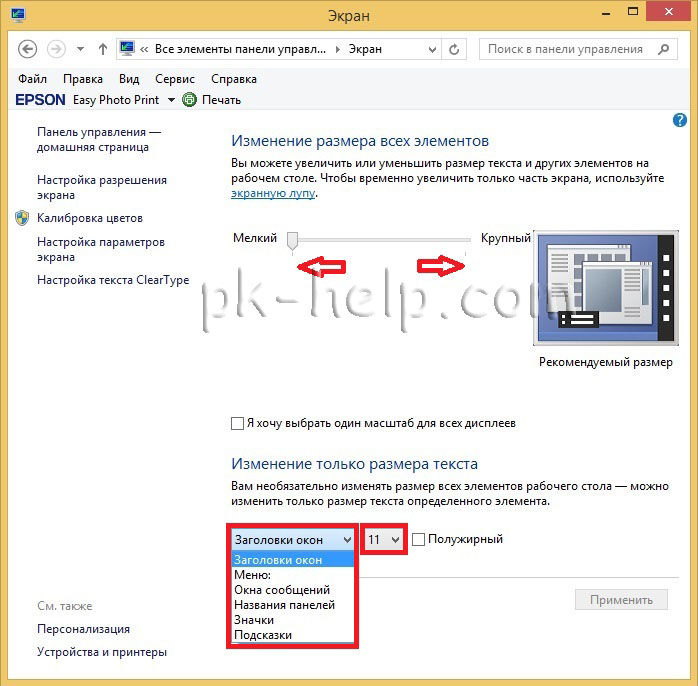
4. Here we move the checkbox to one of the classic options for scaling text in Windows environment 10 or go to the user settings section and set your own text scaling factor.
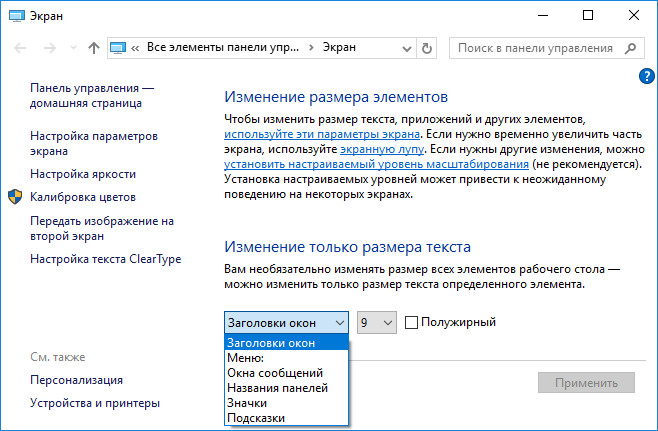
Below are “Advanced screen settings”, which contains “Additional text changes”, which is responsible for changing the size of labels in a certain area of the window (header, tooltip, menu). Select the desired item and indicate the size of the letters in pixels and, if necessary, select a bold inscription style.
5. Save the changes made with the Apply button.
Solving font display problems
Often, after installing new drivers for a graphics adapter or applications that add a package of new fonts to Windows 10, one of them is installed by default, but is displayed very clumsily, stepwise, or, on the contrary, blurry. Let's look at how to deal with such a minor but unpleasant problem.
Lower DPI
The DPI parameter is responsible for the readability of text. The lower its value, the more convenient the text is perceived, and if this indicator increases, the font may become virtually unreadable.
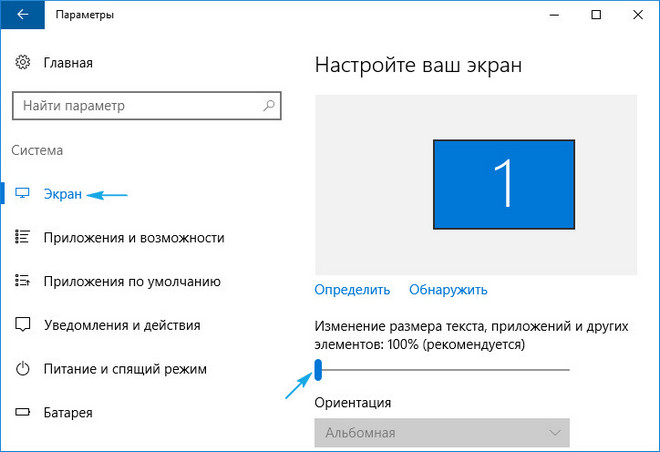
1. Open the “Options” menu using the keyboard shortcut Win→I.
2. Click on the “System” section.
3. Go to the first tab “Screen”.
4. Select the device, if the computer uses a pair of monitors, using the “Define” button.
5. Move the slider “Changing the size of text of programs and other elements” to the desired position.
![]()
6. Exit the system or reboot it.
If this action did not help solve the problem, you can return all settings to their original settings.
Restoring Basic Settings
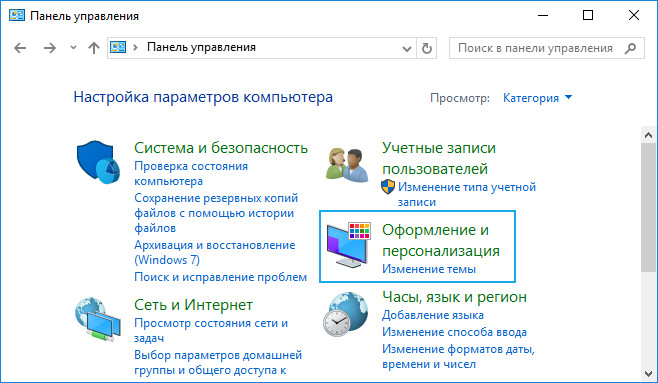
1. Using the Win→X menu, open the System Control Panel.
2. Switch to the view of its icons in the “Category” form.
3. Open the “Personalization and Design” applet.
4. Click on the “Fonts” item.
5. In the vertical menu on the left, click “Font Options”.
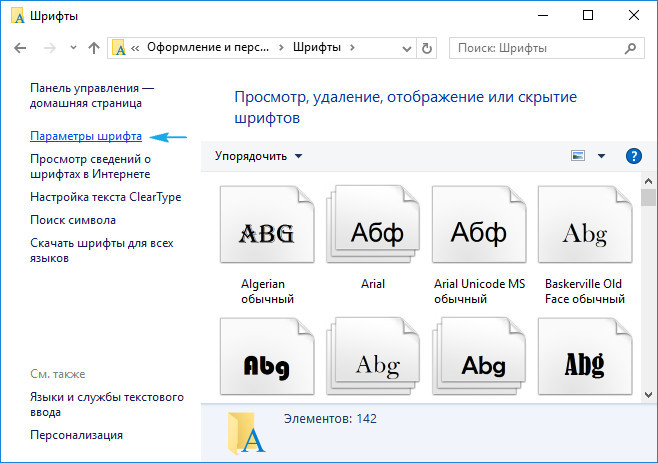
6. Click on the button called “Restore font settings...”.
All settings related to labels and text in Windows 10 will be returned to standard without predefinitions and the requirement to confirm actions.
Changing the font used by the system
Windows 10 also provides the ability to change the standard font to any one downloaded from the Internet or present on the system.
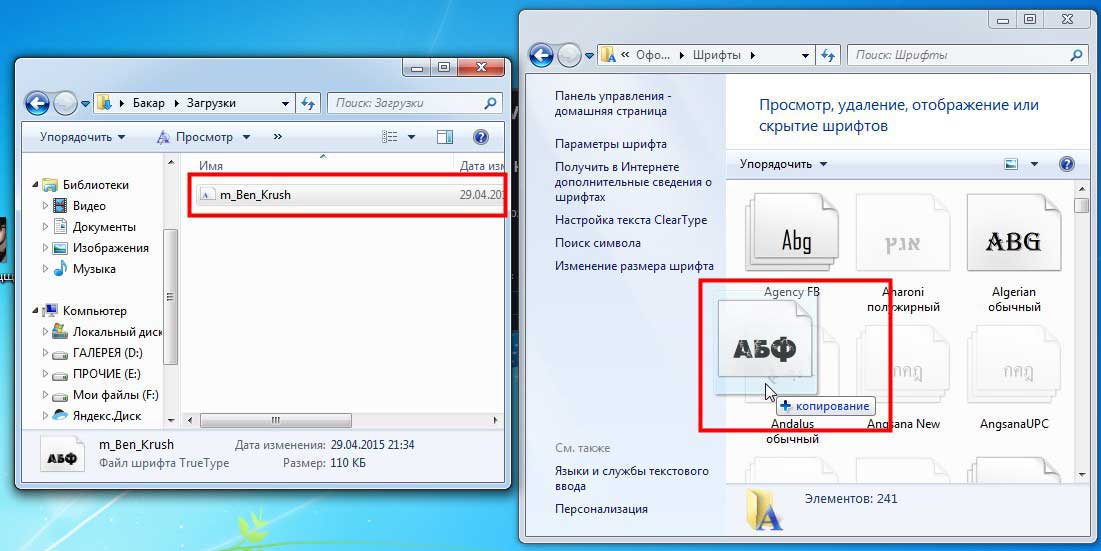
1. Download the font in .ttf or .otf format.
2. Unpack the archive into the Windows\Fonts directory.
3. Go to this folder.
4. Open the font you like.
5. Click on the “Install” button.

6. Log out and log in to Windows 10 again for the new settings to take effect.
If this does not happen or an error occurs during installation, disable the firewall while changing system parameters.
Many have noticed that modern computers/ on laptops, icons and fonts have become smaller, although the diagonal has increased, this is due to the fact that the screen resolution has increased. In one of my previous articles I wrote How to enlarge (reduce) desktop icons in Windows , in this same article I will continue this topic and describe in detail the process of increasing/decreasing the font size and the scale of windows on a computer/laptop.
Enlarge font in Windows XP.
In order to change the font size in Windows XP, there are two ways:
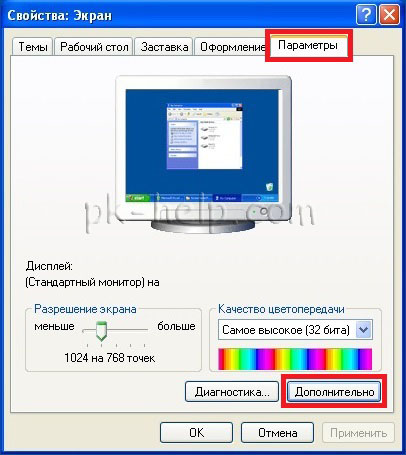
1 Method. Right-click on an empty desktop field and select "Properties" from the context menu.
Select the "Design" tab and in the field Font size select the required size.

2 Method. To use this method, paste installation disk from Windows XP DVD drive. After that, right-click on the desktop and select "Properties".
In the menu that opens, open the "Options" tab and click the "advanced" button.
In the "General" tab, select the font magnification scale.
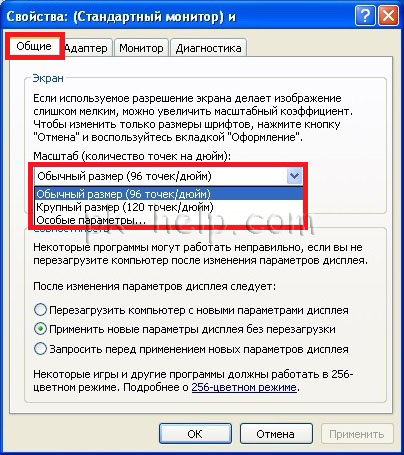
If you want to specify your magnification factor, select "Special parameters" and indicate by what percentage to enlarge the font.
For the settings to take effect, you must restart the computer.
Increase/decrease font, scale in Windows 7.
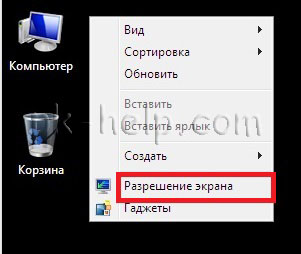
To change the font and scale of windows in Windows 7, you need to right-click on an empty field of the desktop and select "Screen Resolution".
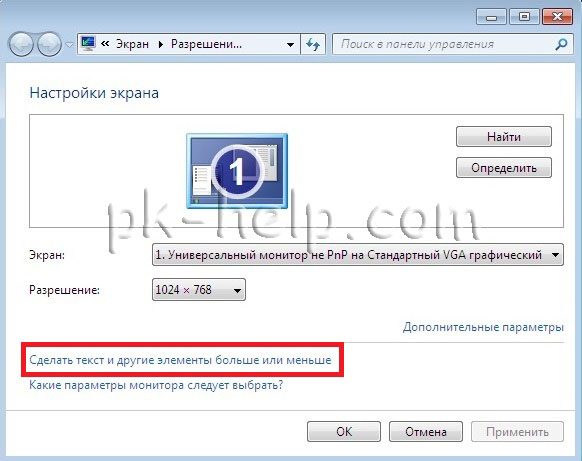
In the window that opens, select "Make text and other elements larger or smaller."
After this, you will be given a choice between how much to mutilate the font and other elements. Specify which item suits you and click the "Apply" button.
If you would like to change the font to your ratio, select "Other font size (dpi)".
After that, indicate by what percentage you would like to increase the font and window size in Windows 7.
After this, you need to re-login ("Start" - "Log out"). Please note that this procedure will close all applications; close all applications before clicking Quit Now.
Increase/decrease font, scale in Windows 8/8.1.
Right-click on your desktop and select Screen Resolution.
![]()
In the properties window that opens, select "Change size of text and other elements."
![]()
Using the slider you can change the size of text and windows. If you want to change any specific parameter, such as Window Title, Menu, select the appropriate parameter and specify the size. At the end, don't forget to click "Apply".
As you can see, changing the font size or window scale in Windows is quite simple and easy, regardless of Windows versions XP/ 7/ 8.
Greetings, friends. In this short article I will tell and show you how to install windows font 7 and how to change the font.
On the Windows operating system there are two ways to install a font.
The first way to install the font:
In order to install the font, go to “start” “control panel” then “design and personalization” and in the window that opens click on the “fonts” section
Now go to the folder where you have the new font that you want to install, press the left mouse button and drag it to the “fonts” section while holding it down.
Second way to install the font:
Open the folder where the font is located, hover the mouse cursor and press the right mouse button and click “Install”, after that it will start quick installation font.
How to install a windows 7 font
To install a windows font, you first need to download the font. To do this, enter in search query in Yandex or Google “font for widows 7”
download this file and unpack if the font is archived. Please be careful when downloading the font.
Do not download fonts from sites infected with viruses. Install browser protection. Next, simply double-right-click on the font and click “install”
Installing a font in the Windows 7 operating system is as simple as installing an operating system update,
The thought even comes to mind why I wrote such a simple article. But, however, given the cases when there is no sound on the computer, the user is scratching his head not knowing what the reason is,
But it turns out that silent mode was turned on. There are also cases where I simply have no idea how to install a new font.
At least when I was a beginner in computer science, I came across this question.
How to change the font in windows 7
In the Windows operating system, you can change the font of certain elements. The default operating system interface font is Segoe UI.
But you can change the font of some system elements:
Choosing specific element and by changing the font, you can also change the font size, you can select a color and specify a bold or italic font.
To change the font to your taste, right-click on the desktop and select “personalization” from the menu that opens.
Instructions
In many applications, the font toolbar looks the same. It includes fields to customize the style, size a, format and color. So to change size letters in applications Microsoft Office Word and Excel, open the document in which you need to make changes, select the desired piece of text or group of cells.
Go to the Home tab and find the Font section. Using the drop-down list in the “Font Size” field, set the value you need or enter it on the keyboard and press Enter. You can also use the Ctrl, Shift and Latin [P] hotkeys to bring up the Font dialog box. Another option: right-click on the selected fragment and select “Font” from the context menu.
IN graphic editors The Font context menu becomes available when the user selects the Text tool. It looks like a button with Latin letters oh [T]. Click it, enter text, select it, and in the text formatting panel, use the drop-down menu to select the value you need in the “Font Size” field.
If your text is a 3D object (for example, it was created using the Text Generator tool in MilkShape 3D), select the object and click the Scale button on the Model tab in the Tools group. Enter the value by which to increase or decrease letters along the x, y, and z axes and click the Scale button in the Scale Options group as many times as necessary.
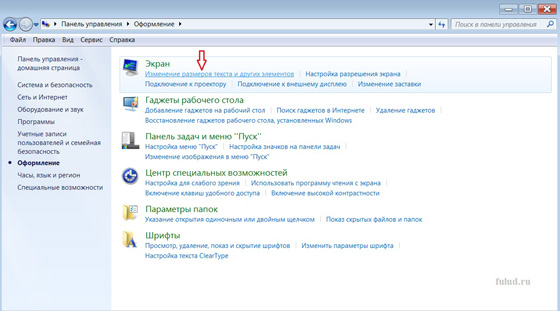
in order to change size font for various system elements, right-click on the desktop, select “Properties” from the context menu. Or open Control Panel via the Start button and select the Display icon in the Appearance and Themes category. In the window that opens, go to the “Design” tab.
In the “Font Size” group, use the drop-down list to set the desired value. If this is not enough, click on the “Advanced” button, select the element in the new window size letters for which you want to change. Will be available Extra options for settings. Find the “Font” group and enter the value you need in the “Size” field. Apply the settings.
One of the mandatory requirements for the correct operation of a computer on a network is that it belongs to the same workgroup in which other computers and network hardware. Even a novice user will not have any difficulty changing the working group for your computer.
Instructions
Restart your computer for the changes to take effect.
note
In the change dialog working group You can also change the name of your computer, which will be visible to other users on the network.
Sources:
- How to create home group in Windows 10, configure, delete
Performing a parameter change operation cells in the application Microsoft Excel included in Microsoft package Office, can be done with standard tools office suite and does not require use additional tools third party developers.

You will need
- - Microsoft Excel 2007.
Instructions
Drag the right line that is the border cells, to the desired column width to perform the operation of changing the width of one column.
Select the columns to be edited and drag any right line that is the border cells, to the desired column width to perform a multi-column resizing operation.
Click the "Select All" button and drag any line to the right that is the border cells, to the desired column width to perform the operation of changing the width of all columns on the selected page.
Select the lines to be edited and drag any bottom line that is a border cells, to the desired line height to perform a multi-line height change operation.
Click the Select All button and drag any bottom line that is a border cells, to the desired line height to perform the operation of changing the height of all lines of the selected document sheet.
Select the cell to be edited and go to the " home page» in the item “Cells” top panel window tools Microsoft applications Excel.
Select the "Format" command and select "Column Width" in the " Size cells».
Enter the desired value in the "Width" field and return to the "Format" item.
Select Row Height and enter the desired value in the Row Height field.
Call the context menu of any Excel sheet by right-clicking on its icon and select “Select all sheets" to perform the operation of changing the width cells, used by default.
Select Column from the Format menu of the application window and select Standard Width.
Enter the desired new value.
The default cell width is 8.43 characters of standard font. The default cell height is 0.45 cm.
Sources:
- Changing Column Width and Row Height
- how to change cell format in
Not every user will like the standard design of the desktop and the entire operating environment Windows systems 7. If you want something unusual in the design, or your eyes are tired of the white font color, you can change standard settings and create your own unique graphic design.

You will need
- - computer;
- - Internet;
- - administrator rights.
Instructions
Click on the "Start" button and select "Control Panel". Find the “Design” section and click on it. You will be taken to the graphical design settings area of Windows 7. You can also click on the “My Computer” shortcut, which is located on the desktop of your personal computer. Next, on the left side, find a tab called “Control Panel”.
Find the item “Change color scheme” in the list on the left and click on it. The Color and appearance window" in which you can select different color schemes with ready-made combinations of colors for panels, windows and fonts. IN operating systems, as a rule, there is a huge assortment of different colors that can be used in both applied software, and in the operating system itself.
Click on the “Element” item to bring up the entire list of elements whose color can be changed. Find the item you need and set the color you like. You can also select the element presented in the window at the top by simply clicking on it with the mouse. If font settings are available for this element, the settings buttons are activated.
There are various graphical mini-applications that change the desktop settings in the most bizarre ways. You can find similar applications on the Internet using search engines. However, it is worth clearly understanding the fact that some programs may contain malicious codes, so for data reliability, use licensed software.
note
LESSON “How to change the font color.” Dear friends! In this lesson you will learn how to using HTML Easily change the font color of the text you write. To do this, use a text container with the color attribute and the value you need (the name of the color or its code in hexadecimal), specified in quotes.
Helpful advice
Change text color. IN Office Word 2007 for quick formatting text, you can use the mini toolbar with formatting options. When you select a new color theme, different parts of the document are automatically formatted with a single set of colors. On the Page Layout tab, in the Themes group, click Theme Colors. Note. If you want to change the fonts, colors, and layout of your document, instead of clicking the Theme Colors button, click the Themes button.
Sources:
- how to change color in word
Working on a computer is most comfortable and productive when it is correct setting, including a wide variety of parameters. If the user has to deal with texts, it is very important to properly configure the keyboard.

Instructions
First you need to select your primary keyboard input language. Open: “Start” - “Control Panel” - “Region and Language”. In the "Regional Settings" section, select Russian. In the "Location" section, indicate the country in which you are currently located. This will allow various online services to provide you with more accurate information - for example, about the weather.
In the same window (“Regional and Language”), open the “Languages” section and click the “More details” button. A window will open in which you can select the default input language. Very often the default is English language, which is quite inconvenient. Select “Russian – Russian” from the drop-down list.
There you can also set up a key combination to switch the keyboard layout. Click the "Keyboard Options" button, and in the window that opens, click "Change keyboard shortcuts." Find the option “Switch keyboard layouts”, it should be marked with a bird. Select the keyboard shortcut you need.
Language options installed, now configure the keyboard behavior. Open the "Keyboard" section in Control Panel. In the window that opens, configure the delay before starting to repeat a character when a key is pressed and held, and the repetition speed. The amount of delay and repeat speed depend on how confident you are in using the keyboard. The faster you work, the lower the latency and higher the retry speed.
By selecting the “Hardware” tab, you can view the keyboard type, properties and, if necessary, run its diagnostics. Along with the keyboard, immediately configure the mouse settings: “Control Panel” - “Mouse”. Select the “Pointer Options” tab and set the speed of its movement that is convenient for you.
how to change font size on computer screenHow to increase size
font on computer screen
On a computer, to increase the text size, it is possible
use hot keys. To do this you need to click
Ctrl key and, holding it, press the + (plus) key.
To reduce - press the Ctrl key and, while holding it,
press a key –
(minus).
You can increase and decrease more than once.
But the ability to use hot keys is a one-time use.
Open another site and the font size will be the original one.
There is another option on your computer to change the font size.
And then all applications will open with an already enlarged
font. This includes Explorer, Notepad, WordPad, etc.
True, not all browsers respond to such settings.
On my computer - they react Mozilla Firefox and Opera.
Change font size from Computer Control Panel
How to change font size
from Computer Control Panel
Click Start → Control Panel → select
in the new “Design” window.
![]()
A new window will open.
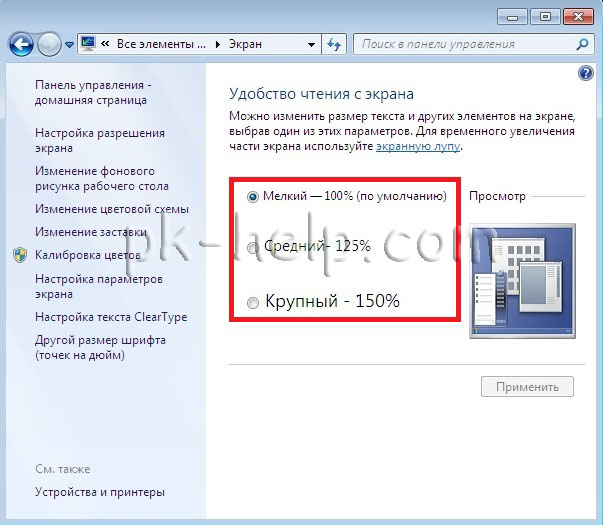
In the “Screen” section – select “Change
dimensions of text and other elements.”
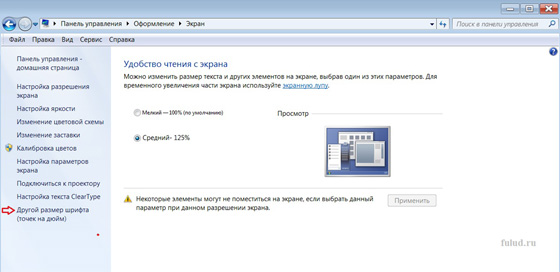
In this window, you change the switch from the default small font to medium. And click the “Apply” button below. A warning will appear below that if you select a medium font, some elements will not fit on the screen. But, firstly, when the elements do not fit on the screen, the horizontal scroll bar is automatically turned on. Secondly, I have a medium font installed on my computer and the horizontal scroll bar appears extremely rarely.
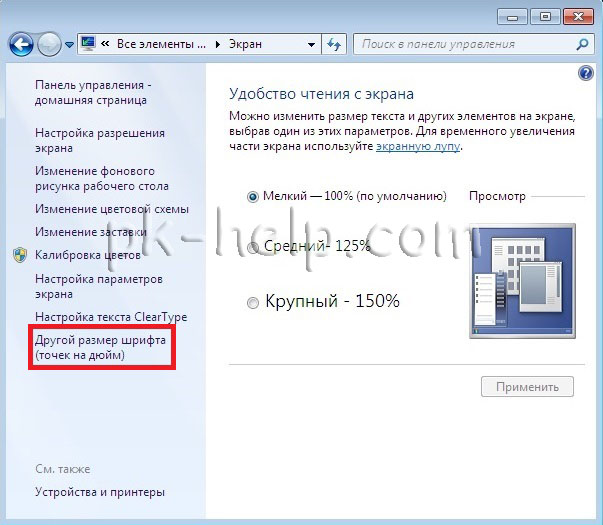
In addition, you can set a different font size.
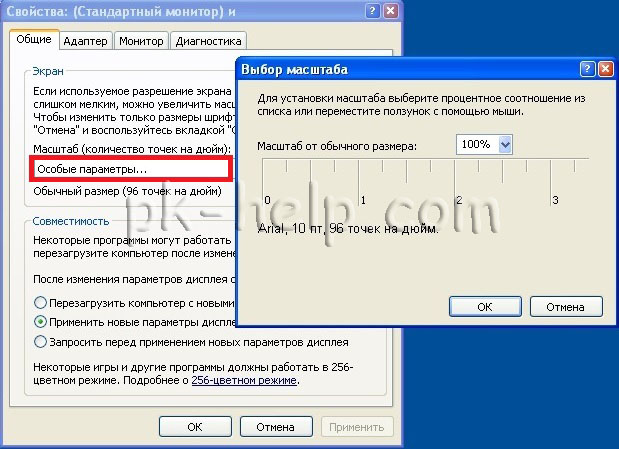
To do this, click the “Other size” button in the left column
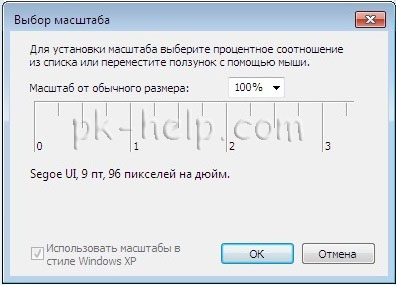
font (dots per inch)". The “Scale Selection” tab will open.
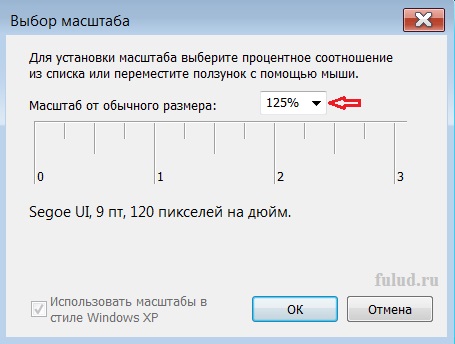
The arrow will open other scales.

Choose what suits you and click on this
tab, the OK button, and then the “Apply” button.
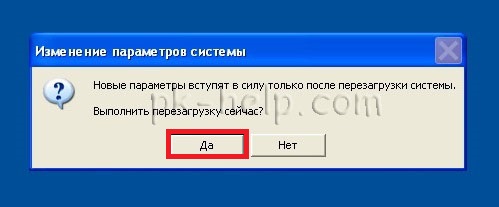
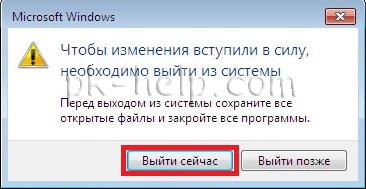
It may be necessary to do reboot the computer ,
for the new settings to start working.


