“Dark horses” come across not only among people, but also among CMS. One of these “horses” is DLE.
While there is a lot of information about other PHP engines on the Internet, you can only find a few decent materials about this CMS. Let's make this article worthy by telling readers how to install a template on DLE:
Known about unknown CMS
This engine is not as popular on the world Internet as WordPress or Joomla. It is the creation of Russian programmers. Therefore, you can most often stumble upon a site running on this CMS and template for DLE in RuNet.
CMS DLE is positioned by its creators as a basis for deployment information portals and blogs. The internal engine system is adapted for heavy loads and has a high degree of fault tolerance:
Like most engines, DLE (DataLife Engine) runs on php and MySQL. The main disadvantage of this content management system is that it is paid. Despite this, DLE ranks fourth in terms of prevalence among resources located in the ru zone. Although most of them (59 thousand sites) use pirated versions engine.
A license for a basic CMS package for a period of 1 year costs RUB 2,190. Its extension for the second year (and subsequent ones) will cost 1,490 rubles. The price of the extended version is 2790 rubles.
In addition to paid versions, there is also a free version. This version of the CMS is presented by the manufacturer as a trial version of the engine and the basis for creating your first website:
The main disadvantage of DLE is its poor security. Back in 2008, experts criticized the CMS for its low security internal system when working with requests. Most likely, this problem has not been eliminated today.
According to Yandex analytical data for 2011, sites that work specifically on the basis of CMS DLE are most often infected. The latest release of the engine on this moment is version 10.3. It was released in September 2014.
Features of the template for DLE
Templates for DLE websites have a number of features that fundamentally distinguish this CMS from other content management systems:
- The engine template structure is built on the basis of TPL files. This greatly simplifies the process of layout and adaptation of the template design;
- The main structure file is main.tpl. All additional template elements ( menu, sidebar) are also specified using TPL files;
- Style decisions are written in two files: styles for the software part are specified in engine.css, and everything else is specified in style.css:
Before installing the DLE template, download its installation package and place it in the templates folder:
Then you need to go to the site’s control panel (file admin.php). After that, in the menu on the left side, select “ Script settings», « System settings»:
At the bottom, in the “General settings” section, go to “ Default site template" Select the desired template from the drop-down list. After making changes, do not forget to click the “Save" button:
After that new template is activated and the site will change its appearance. But before you put the template on DLE, do not forget to unzip it.
IN CMS DLE Unlike other popular content management systems, the template installation does not occur from the archive.
Unfortunately, most of the templates for DLE, like the engine itself, are paid. But if you search hard, you can find a couple of decent resources on the RuNet where you can download templates for free. Here are a few of them:
- dle-shablony.net – about 50 different templates are available here for free download. But they are all “lumped” in one general section without sorting by category. Although among them you can find very “strawberry” specimens:
- newtemplates.ru – the site presents a large collection of paid and free templates. All of them are conveniently sorted by thematic headings. But even among the paid ones you can find samples costing $5-10 and with a circulation of only 5 copies. And this will provide the resource with a design with a fairly high degree of uniqueness!
- 10.dle-shabloni.ru is a cool resource with a huge collection of templates for DLE websites. Tags will help you find the ones you need by topic or even color. You can see how the template works using the built-in demo version or in the video played in the Youtube video player window:
Don't forget that each template was developed for a specific version of CMS DLE. Their compliance must be checked before downloading the selected sample.
How to edit a DLE template
Unlike other popular content management systems, DLE has a simpler template design. Thanks to this, editing them is much faster and easier. The administrative part of the engine includes an integrated code editor.
To access this instrument need to:
- Go to the site admin panel;
- In the menu on the left, select “ Template management", "Site templates";
- In the drop-down list located in the " Selected template for editing"Install the desired instance and click on the "Run" button:
- After this, the built-in code editor window will appear below. But before you edit the template, you need to select a file to edit. The template file tree is located on the left. After clicking the cursor on the desired source, its contents will be displayed in the editor window:
As you can see from the figure, the tpl file is a regular html, the structure of which is easy to understand. But before editing this code, it is strongly recommended that you familiarize yourself with the design features of the DLE engine.
This article shows the installation of a template on Joomla 3 step by step and with explanatory illustrations.
Installing a template on Joomla 3- this is probably the simplest thing you have to do when creating a website on the Joomla CMS, well, maybe except for the CMS installation itself. But despite this, many beginner and prudent website builders still prefer to look for instructions on the Internet before performing such steps.
STEP 1.
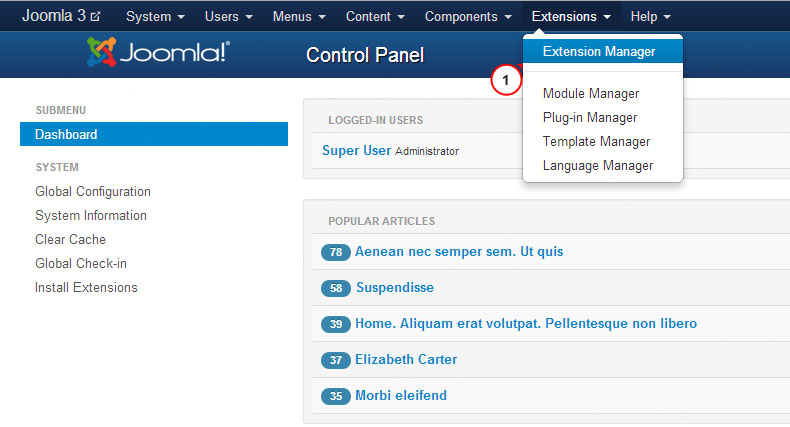
This step assumes that you are already logged into the control panel of your site and are on its main page.
Now let's go to the "Extension Manager" section, since templates, like components, plugins and modules, are all considered extensions. (Fig. 1)
STEP 2.
In the third version of Joomla, there are three ways to install templates, which can be useful in one case or another.
The first of them is installing a template from a ZIP archive by downloading the archive file from the local computer (the "Download package file" tab), followed by its automatic unpacking directly on the server and installation. (Fig. 2)

The second way to install the template is to install it using a link from remote server("Install from URL" tab). You may need to store your extensions in the cloud. In this case, simply provide a link to required file archive and click "Install". (Fig. 3)

The third way to install a template is to install it from the TMP folder, which is located in the root of your site (the "Install from directory" tab). For this type of installation, you need to first unpack your template files and upload them via FTP to this folder, having first removed all garbage from it (absolutely everything that could remain from previous installations).
This method may be needed if the first two did not work for some technical reason.

STEP 3.
Let's look at installing the template using an example method No. 1. Click on the “Select file” button and select on your local computer the archive of the template that you are going to install.
Next, click the “Download and Install” button and watch the installation process. (Fig. 5)

If everything went well, the result will be a message, the contents of which are shown in Figure 6.

STEP 4.
The next step is to enable the installed template. To do this, go to the template manager. (Fig. 7)

On the template manager page, find the template that we installed by name, and click on the asterisk next to its name. (Fig. 8)

When the template is used in the system as the default template, we will receive the following message: “The style has been assigned as the default” (Fig. 9)
Why style? If you noticed, when we go to the “Template Manager” page, we initially end up on the “Styles” tab, this can be seen on the left side of the page. But there is also a “Templates” tab.
On the "Templates" tab we can:
- view the list of installed templates
- view thumbnail images of templates
- see what your website will look like with the selected templates, without including it
- edit template files
- create overrides for modules and components in these templates folders
but this is a topic for a separate article and is not directly related to the installation of the template.
On the Styles tab we can:
- set the template style to be used by default (Fig. 8)
- duplicate and change template styles according to our desires (Fig. 9)
- bind template styles to the desired menu items, etc. (Fig. 11)

You can duplicate the styles of existing templates and assign your own for each copy CSS styles. This may be necessary if, for example home page your site is slightly different from the internal pages. (Fig. 10)
You can get to this page by clicking on the “Template Manager” page (Fig. 9) on the name of the desired style and selecting the “Custom CSS” tab

The figure below shows the tab for linking a template style to specific menu items. Menu Link Tab

just by clicking on in the right place On the page
If you have any questions, write them in the comments to the article, I will try to answer if possible.
author:This installation method can be used if you already have an existing Joomla and want to simply change the appearance of the site using a template.
1. Open the Joomla control panel and go to the menu "Extensions > Extensions Manager".
2. Using the button Package File "Browse" find the file "theme###.zip" in folder "joomla" template. Click the button to install the Joomla template.

3. Install all modules from the folder 'sources_XXX.zip'(this folder must first be unzipped according to the instructions in the file 'info.txt').
4. The next stage is installing demo data.
To install demo data, you must complete the following steps:
Step 1. Upload demo images.
Connect to the server using an FTP client. To download demo images, open the folder "sources" in the template.
The folder is here "to_the_root_directory", containing the files that need to be placed in the Joomla root folder.
Step 2. Import SQL file.
The last and most important step of installing demo data is importing the SQL file using a database management tool (phpMyAdmin).
SQL File - "dump. sql» is in the folder "sources" template.
Do NOT import the SQL file if you have a live website because... it will completely overwrite existing data!
Attention: Before importing the SQL file, make sure that the prefix of the database tables matches the prefix in the SQL file.
The table prefix can be checked directly in the database through a database management tool. Pay attention to the names of the tables. The prefix is a set of characters before the table name. ( for example, in the table "jos_assets" the prefix is "jos_"). You can also find the database prefix in the “configuration.php” file in the Joomla root folder. Line 19: public $dbprefix = "jos_"; ( where "jos_" is the prefix)
If the table prefixes do not match, open the file "dump. sql" V text editor and, using Find and Replace (hotkeys CTRL+F or CTRL+H), replace the prefix "jos_" ( in the SQL file) database prefix. You can also use detailed video tutorial on how to change the prefix in a SQL file.
or how to import SQL file using phpMyAdmin tool
Refresh your browser window. Please send us a request if you have any questions.
To create a website you can go in two ways. Make a website yourself, that’s what we do on this site. Or contact a specialized company that creates a website and promotes it online. The second option seems simpler. For example, you need to create a website for Voronezh, your home city. Look for a company that creates a website with localization in Voronezh and after a while you will be the owner of a working website. If you want to do everything yourself, read on.
The Joomla 3 template is quite reasonably called the clothing of the site. We wanted to change the appearance of the site, installed a new template and that’s it. The site has a new design. There are more serious reasons for changing the pattern. For example, the template becomes outdated, is not updated by the author, and with the next Joomla update, the template begins to “glitch”. In any case, whatever the reason is to change the default Joomla template, you need to install the template first. There are three ways to do this.
What is a Joomla template
A Joomla template is a system extension that can be created and published by any author. On the Internet you can find options for free and paid templates from a variety of authors.
The difference between paid and free Joomla templates is the author’s technical assistance (support) and the possible presence of external links to the author’s site or sites. Those. support is present in paid templates, and external links hang on free templates.
How to check a template for viruses
- It doesn't matter where you get the template. At the end of the article there are several links to excellent free templates (by author). Download the template in a zip archive.
Checking the template for viruses
- To be safe, check the downloaded template file for viruses. Do this in at least two ways:
- Check the security of the template with your antivirus installed on your computer;
- Check the template archive file on the Virustotal website ( https://www.virustotal.com/)
Checking the template directory
Check out the downloaded plugin. Unpack it. There is a high probability that the archive you downloaded contains two archives: the template itself, plugins and modules for it. There can be many of them.
You need to select the template archive and the system plugin archive. Template modules are add-ons and are optional for the initial installation.
Now the important thing! To get acquainted with the template, unpack the template archive before opening all files and folders. See if there is a template in the directory installation file XML. If it is not there, the template cannot be installed from the site panel.
Three ways to install a Joomla 3 template
There are three ways to install a Joomla 3 template.
- Installing a template from the Joomla site panel;
- Via FTP;
- By URL of the file from the storage.
Template installation method No. 1. Install template from Joomla site panel

The most acceptable option for installing a Joomla template to understand the quality of the template and its readiness for work. If the author of the template assembled it correctly, then this installation method will work and there is a high probability that there will be no pitfalls in further work.
- To install the template, go to the tab: Extensions>>>Install;
- Select “Load file from package” from the manager menu;
- Select the downloaded template on your computer;
- Install;
- Correct and correct installation will be indicated by a green information bar;
- To check the installation of a Joomla template, go to the template manager and see the installed template in the list.
Template installation method No. 2. Install template via FTP
- Unpack the Joomla template archive file until all template files and folders are visible;
- We enter the site directory via FTP using an FTP client (FilleZilla or WinSCP);
- In the root directory of the site, find the tmp folder. Clean it up by deleting everything except the index.html file;
- Upload the template folders and files to the tmp folder;
- Return to the site panel. On the Extensions tab>>>Extension Manager>>>Install, select the “Install from directory” menu item;

- Check that the path to the tmp directory is correct and click the “Check and Install” button;
Note: You can do the same, but upload the template in your own folder. Then you need to add tmp/template directory to the path.
Template installation method No. 3. Install template by URL from storage
In the Extension Manager>>>Install there is a button “Install from URL”. In theory, it allows you to install a template from an open file storage. I have never used such a setup.

Several authors of free Joomla templates
- Joomshaper (HELIX3 basic). https://www.joomshaper.com/joomla-templates/helix3
- JoomLead. https://joomlead.com/
- Joomdev. https://www.joomdev.com/
- Agethemes. http://agethemes.com
This article provides answers to frequently asked questions regarding working with ready-made templates Joomla. The main example will be Russian-language Joomla 3.4.3 (with the already added option “Install from JED”), the front-end template is RSEvento 1.0.28 (in Russian), the administrative part of the site template is isis 1.0.
Installing a template in Joomla is no different from installing other extensions (components, plugins, modules). In the article “Installing a cracker in Joomla 1.5 - 3.4” this process is discussed for Joomla 1.5, 2.5, 3.0, 3.2, 3.3 and 3.4. Let's look at it in more detail.
Let's return to ISPmanager 4. Log in to the control panel with your username and password.
In chapter Tools, in the left pane, select File manager and go to your Joomla temporary folder. The path to it can be clarified in the Joomla administrative control panel in in the line "tmp_path".
In ISPmanager 4 using the button Create create a folder named "shablon" (without quotes). The name may be different (picture below).

Using the button Upload specify the template file on your computer and download it (picture below). The time depends on the speed of your Internet connection, the size of the template file and server load, approximately 1-3 minutes.

After downloading the file, select it and click the button Extract, which is located in the upper right part of the ISPmanager 4 window. After this, return to Joomla and install the template as described at the beginning of this subsection.
If you know the exact path (URL) to the Joomla template file, for example, on the server of its developer, you can specify it in the field Install URL on the tab (picture below) and install. This method is similar to the method , but does not require you to download the template file to your server and unpack it (everything will happen automatically).

The first tab (picture below) allows you to install an extension on your website from the Joomla Extensions Directory (JED - “Joomla Extensions Directory”, an abbreviation for “Joomla Extensions Directory”). As of 09/05/2015 there were no templates in the catalog. It doesn't suit us very well.

But if they were, having found the desired template, you could click on its icon and go to its direct installation (picture below), as in the example with AcyMailing Starter.

If the extension is paid, such as RSForm Pro, you can proceed to purchase it (picture below).

If you copied a folder with files already installed templateJoomla, perhaps from your other site, into the “templates” folder, then you can try installing it by going to Extensions – Extension Manager – Search by pressing the button Find(picture below).

Wait about 2 minutes. Once the desired template appears, mark it in the table and click the button Install(picture below).

Please note that if the template requires installation of add-ons (framework, plugins, modules, etc.), they must be installed separately. Perhaps the same thing can be achieved using “Search”.
Please note that not all extensions and templates can be installed correctly in this way.
What to do if the template is not installed
During installation of a Joomla template, various errors may appear. In principle, this applies to any extension. Below are some errors, their possible causes and solutions. The list is far from exhaustive. Please note that solutions to one problem may work for others.
Please provide the package directory. May occur when installing a template using “Install from directory” and “Install from URL”.
- The specified address\path to the file\directory (folder\directory) of the template is specified - check the correct spelling and existence of all folders.
The installation package cannot be found. May occur when installing a template using any of the methods.
Possible causes of the error and their elimination:
- The specified address\path to the file\directory (folder\directory) of the template is incorrect - check the correct spelling and existence of all folders and files.
- The template file is damaged, or the archive is missing the required file - use the “working” template file from the developer’s website. If necessary, download it again and try installation again. Contact the template developer.
- The template version is not intended for your version of Joomla - download its version for your version of Joomla from the template developer’s website. Contact the template developer.
- Archive extension is not supported by Joomla - make sure that the template archive has one of the following extensions “.zip”, “.tar.bz2”, “.tar.gz”. If not, then unzip the template on your computer and pack it, for example, into a ZIP archive. Simply renaming the template extension may not help.
Error uploading file to server
Possible causes of the error and their elimination:
- The Joomla and/or server temporary directory is not writable - change the access rights to the Joomla and/or server temporary directory to “755” or “775”. For more information about this problem, you can ask the technical support of your hosting or their help system.
- The Joomla and/or server temporary directory is missing - check the presence and correct spelling of the path to the Joomla and/or server temporary directory. The path to the Joomla temporary files directory can be found in the Joomla administration panel System – System Information – Configuration file Joomla in the line "tmp_path". And the path to the temporary server folder can be clarified in the technical support of your hosting or in their help system.
- The folder with templates is not writable - change the access rights to the templates folder to “755” or “775”. You can read about this in this article.
- The uploaded file is too large - use the tips listed below in the article for the “413 Request Entity Too Large” error.
Error connecting to the server: 404. Error connecting to the server: Could not resolve host . Error connecting to Joomla! server. Try later. May occur when installing a template using “Install from URL”, “Install from JED”.
Possible causes of the error and their elimination:
- Incorrect address - check the URL.
- The server is not available - try again and/or later.
- You do not have access rights to the server - contact the server administrator.
- The file has been deleted - contact the server administrator.
Fatal error: Allowed memory size of XXX bytes exhausted (tried to allocate XXX bytes) . Can occur when installing a template using any method.
Possible causes of the error and their elimination:
- The template file size is too large - use the tips listed below in the article for the “413 Request Entity Too Large” error.
- The server is overloaded - try again later.
- You have reached a limit on the use of memory (RAM) by scripts (Joomla) on your server/hosting account - the easiest way is to first contact the technical support service of your hosting provider or their documentation. But you can try to solve the problem yourself. Option No. 1: in the root of the site, in the “.htaccess” file (not to be confused with “htaccess.txt”), add the line “php_value memory_limit 64M” (without quotes), increasing the number “64” - you increase the memory limit. Option No. 2: create a “php.ini” file in the root of the site (if it does not exist) and add the line “memory_limit = 64M” to it, increasing the number “64” - you increase the memory limit. Please note that the first and second methods may not work depending on your hosting. I recommend that you first contact the technical support service of your hosting provider or their documentation.
413 Request Entity Too Large. Can occur when installing a template using any method. But when using the “Install from directory” method, the likelihood of an error occurring is less.
Possible causes of the error and their elimination:
- The template file size is too large - use the “Install from directory” option. Or try again later (there may be connection problems). Also, some templates are packaged in an archive with documentation, demo data, “QuickStart” (quick start), and so on. It's worth unpacking the archive; it may contain several archives. In this case, install each of the archives in turn. The QuickStart archive is a separate topic, and we will talk about it in.
- The server limits have been exceeded: max_input_time, upload_max_filesize, post_max_size - I recommend that you first contact the technical support service of your hosting provider or their documentation. You can try it yourself in the root of the site, create a “php.ini” file (if it doesn’t exist) and add the following lines to it:
max_ execution_ time– the maximum time that the script can be executed. In most cases, the default is 30-60 seconds.
max_ input_ time– the maximum time during which data can be received on the server\hosting. In most cases, the default is 30-60 seconds.
upload_ max_ filesize– the maximum file size (in megabytes) that is allowed for uploading to your server\hosting.
post_ max_ size– sets the maximum permissible size data sent to the server\hosting (using the POST method). This value affects file downloads. For loading large files it must be greater than the value of the directive upload_max_filesize.
Please note that memory_limit must be more than post_max_size. You can read more about these directives in the article “Description of built-in php.ini directives”.
After installing the Joomla template, go to and click the name of the desired template. In my example it is “RSEvento”.

Please note that template settings may differ significantly from one another. But the "Default" and "Link to Menu" options should be available in all templates.
On the page that opens, in the “Default” drop-down list, select for which languages you want to display this template. If the site is multilingual, then you may want to display one template for one language, and another for another. If you have a monolingual site, or you want to display the template for all languages, then select “All”.

Go to the tab Link to menu and indicate for which menu items you want to apply this template (picture below). Please note that these menu items must already be created in the menu manager.


Customizing\modifying a Joomla template
Most ready-made professional Joomla templates are equipped with settings. These settings are in Extensions – Template Manager and by clicking on the name of the desired template, in my example it is “RSEvento”, you can go to its settings.
Applying a template to a site Defining positions in a template To do this, you can refer to the documentation on the template developer's website or to the documentation that comes with the template. In “RSEvento” the position map is in the settings of the template itself (picture below).

There is a “universal” way.
- Go to Extensions – Template Manager and click on the button Settings in the upper right corner.
- On the tab Templates enable the option View module positions.
- Go to the site (to its front part).
- In the address bar, append "?tp=1" (without quotes) to the URL and press the key Enter on keyboard. The names of the template positions will appear in front of you in the places where they are located (picture below).

When you no longer need this option, I recommend disabling it (in order to make it difficult to determine that your site is made on Joomla - to protect it).
How to delete a template
To do this, go to Extensions – Extension Manager – Management. For convenience, in the “- Select type -” drop-down list on the left side of the window, select Sample. Select the desired Joomla template that you want to delete and click the button Uninstall(at the top of the window) (picture below).

If you see the message: “Deleting a template: You cannot delete the default template.” There was an error deleting the template.", then assign any other template installed on your site as the default template. How to do this is described above in the “What to do after installing the template” section. Please note that the administrative part of the site template (control panel template) and the website template are different “types” of templates. If you want to delete a site template that is currently set as the default, you must first set another site template (not the Control Panel) as the default template.
Also, if the folder\files with templates are closed for writing, then there may be a problem with deletion. Change the access rights to “755” or “775” (this can be done on your hosting\server). You can read about this in this article.
In the next article “Answers to questions about templates for Joomla. Making changes » we will touch on the issues of making changes to the template, installing “quick start” (QuickStart) and others.


