The provider Maryino.net uses the widespread FTTB technology to connect its subscribers to the Internet. A UTP (unshielded twisted pair) cable is installed into the user's apartment, through which a connection is established. The cable can be connected directly to a computer or to a Wi-Fi router if you plan to use the Internet on several devices.
Selection and connection of equipment for Maryino.net
The company provides the opportunity to take Wi-Fi router for rent. The monthly cost of the service depends on the model of router used. It ranges from 39 rubles per month for a budget Netis to 149 rubles for a dual-band Asus with gigabit ports. You can also purchase the device from your Internet provider. Available to choose from different models following manufacturers:
- TP-Link;
- Asus;
- Netis;
- UPVEL.
During installation, just insert the connector of the cable provided by the provider into the desired port on the Wi-Fi router. It is indicated by the inscription “Internet” or “WAN”. After this, insert the plug of the power supply into the “Power” connector, and plug the unit into a power outlet. This completes the wireless network connection. If not all home devices are equipped with a Wi-Fi module, use the “LAN” inputs for a wired connection.

Advice! Place the router away from active household appliances. Some devices may cause interference, reducing Wi-Fi signal strength.
Login to the router control panel
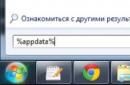
Open the device's IP address through any browser. Typically, manufacturers set one of the following addresses as the standard IP:
- 192.168.0.1;
- 192.168.1.1.
If these addresses are not available, check the IP on the router itself. The connection information sticker must be located on the bottom panel of the device. You can also find the data for going to the web interface page in the factory instructions. On the login page, enter your username and password (by default on most firmware it is admin/admin).

Important! After successful login you will be redirected to home page control panels. Usually there are performance statistics there, but on modern versions of ZyXEL home page contains a choice of setting method. Click " Quick setup» to change parameters step by step.
Setting up an Internet connection
The connection technology used by the Internet provider Maryino.net is PPPoE. Select it from the drop-down list if the system does not automatically detect the presence of a PPPoE server. Fill out the text fields “Login (user name)” and “Password for Internet access.” Necessary information can be found in the annex to the agreement concluded with the company Maryino.net. Leave the remaining fields blank and click “Next” to move to the next step.

When the connection is successfully established, service statistics will open. At the bottom of this window there are two buttons: “Go online” and “Web configurator”. If you do not want to change additional settings, click the first button. To switch to the advanced version of the web interface, select the second option. Through it you can configure Wi-Fi by selecting the necessary security settings.
This instruction is suitable for setting up all Tp-link routers
Preparing a computer or laptop for setup
Before setting up the router, you need to prepare your computer. Open this page so that it is at your fingertips, because until you configure the router you will not have Internet.
In our example, the operating room Windows system 8.1. Windows 7 and Windows 10 are configured in the same way.
There are two ways to set up your internet connection, they are slightly different at first. Let's get a look:
First way
1. Go to the Start menu. It's located at the bottom left of your computer.
2. Go to

3. Select "Network and Internet"

4. Go to “Network and Sharing Center”

Second way
1. Find the computer icon next to your clock, like in the picture 
2. Left-click on the icon and select “Network and Sharing Center” 
Next, the setup of the two methods is identical

2. Right-click on the “Connect via local network»

3. In the appeared context menu, at the very bottom find “Properties” and click on them

4. The “Local Area Connection - Properties” window will open in front of you. In this window, in the components, find “Internet Protocol Version 4” and open it by double clicking the mouse

5. In the “Properties - Internet Protocol Version 4” window that opens, you need to put the dots in the top position “Obtain an IP address automatically” and “Obtain a DNS server address automatically” and then click “OK”. If the dots are already in the top position, do nothing.

We have prepared the computer to configure the router. Now let's move on to setting up the router.
Setting up a router via a computer or laptop
After you have finished preparing your computer, you need to connect the router to the computer.
Connect the network cable to any yellow port, connect the other end of the cable to your computer or laptop. The connection cable is included in the box with the router. Look in the box: it is gray, 1-1.5 meters long with plugs at both ends. Plug in the power supply.
For now, we don’t need to connect the Internet cable that comes to your apartment to the blue port of the router. We'll do this later.

We will configure the TP-link wr841n router via the web interface.
1. Launch your browser. A browser is a program through which you open websites. The most common browsers are shown in the figure below. Look for a similar icon on your desktop, there may be several of them. Choose any.

Turn the router over and see what address you need to enter to enter the router settings:


Now enter into the address bar of the browser: http://192.168.0.1/ or http://tplinklogin.net/, depending on the information at the bottom of the router, and press “ENTER” on the keyboard.
Now enter “Username” and “Password”. They are also at the bottom of the router, see the picture above: “Username” is username, and “Password” is password. Default “Username”: admin; “Password”: admin.

2.You are inside the router. Let's start setting up. From the menu on the left, select "Network" and then "WAN". Here are the main Internet settings. Click on the arrow to the right of “Dynamic IP Address” and select “Static IP Address”.

3. Fill in 5 fields of network details: IP address, Subnet mask, Default gateway and two DNS servers. Network details are in your contract on the first page in Appendix A to the contract, see the table. You can also call technical support and find out the network details from our employees. After making the settings, click “Save”.

4.Now let's set up a wireless connection so you can use the Internet via your phone, tablet or laptop.
In the menu on the left, go to “Wireless Mode” → “Wireless Mode Settings”
In the “Network name” field, write the name of your WIFI. It can be anything: Anton_wifi, TP-link12414, fawgwagag. The main thing is that you know the name of your network.
In the “Channel” field, set the mode to auto. This is usually the optimal mode. In some situations, your devices will disconnect from WIFI in auto mode, in which case you will have to force set the WIFI channel. Try setting any channel from 8 to 11, they are usually the least loaded.

5. To ensure that no one but you can connect to the router, WIFI needs to be protected. To do this, in the “Wireless Mode” menu, find “Wireless Protection”
By default, the router has the “WPA/WPA2” mode selected, so we’ll focus on that. Leave “Version” and “Encryption” unchanged.
In the “Wireless Network Password” field, enter the password. Use lowercase and uppercase letters, numbers and symbols in your password, it’s safer. For example: FahqyAR245. If you forget your password, you can always look it up in the router settings. Next, scroll down the page and click “Save.”

6. Almost everything. Now go to “DHCP”→“DHCP Settings” and enter two DNS servers: 10.10.0.100 and 10.10.0.20. This will slightly speed up the devices when working via WIFI. Click "Save"

7. Now that’s it for sure. In System Tools, select Restart. Click on the “Reboot” button and wait for the process to complete.

To check, log into the router again. In your browser's address bar, enter: http://192.168.0.1/ or http://tplinklogin.net/, depending on the information at the bottom of the router, and click " ENTER".
Then enter the “Username” and “Password” that you entered at the beginning of the setup.
Check the settings with your contract. The settings in the picture have been removed so as not to confuse you.

From home network, etc.. In order to go into the settings of the router, you first need to find out the IP address of the router, which will also be discussed. Also, this instruction will help you log into the web interface of your modem, access point, and other similar things. network equipment such popular manufacturers as D-Link, TP-Link, Asus, ZyXEL.
Are drivers needed?
No. You do not need to install any drivers anywhere to configure or use the router. If the kit includes a disc, it will only contain documentation. Drivers may be required for modems that connect to USB ports, but we are not talking about them now.
Default IP address, username and password
Now directly about how to “log into the router” (as modern users like to say). If the router is new, then its settings are factory settings. These settings are called "default" or default settings.Most manufacturers indicate the details directly on the router itself and designate them as Default settings: IP, username and password. Look for a sticker with this information on the bottom or back of the device:

If for some reason the sticker is missing or damaged, open the instructions and it will indicate what the default IP address, login and password are for your router. Instructions are always included. It can be either on a disk, or in the form of a paper brochure, or both.
Typically, by default, modern routers have the following settings:
IP address: 192.168.1.1 or 192.168.0.1
Username: In most cases admin
Password: admin or empty
To enter the router settings, you need to type http:// in the address bar of your browser.<ай-пи адрес>. For example:
http://192.168.1.1
Enter the IP address in the address bar to enter the router settings
If the address is entered correctly, you will see a page asking you to enter your username and password.

Web interface login page D-Link router DIR-300
And this is what the authorization page for routers from TP-Link, the most popular in our latitudes, looks like: 
Instead of an IP address, the sticker may indicate the host (site name) for logging into the web interface. For example, http://tplinkwifi.net or my.keenetic.net. Enter it into any of your browsers and you will be automatically redirected to the configuration page.
How to find out the router's IP address if the standard one does not fit
1. View the IP address in the network connection properties
Open Network and Sharing Center

Find your connection and click on the appropriate link

Click the Details button

In the window that opens you will see the line:
Default Gateway IPv4: 192.168.1.1
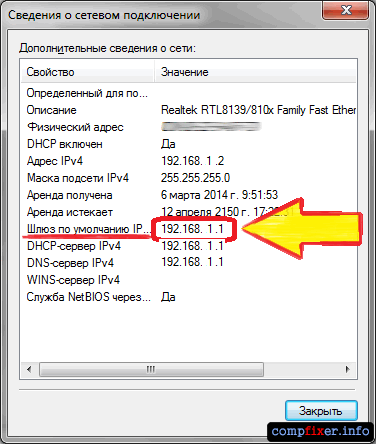
Router IP address
The address specified in this line is the IP address of the router through which your computer accesses the Internet. Now you can write http://192.168.1.1 in the address bar of your browser, then enter your username and password and get into the router settings.
If you cannot connect to the router (it does not give you an IP address via cable or you do not know the wireless network security key), then all you have to do is reset the router and configure it again: i.e. set your passwords and settings.
Read about how to reset your router.
2. View the IP address of the router in the network environment
Go to the section Net.
In chapter Network infrastructure find your router. Select Properties:
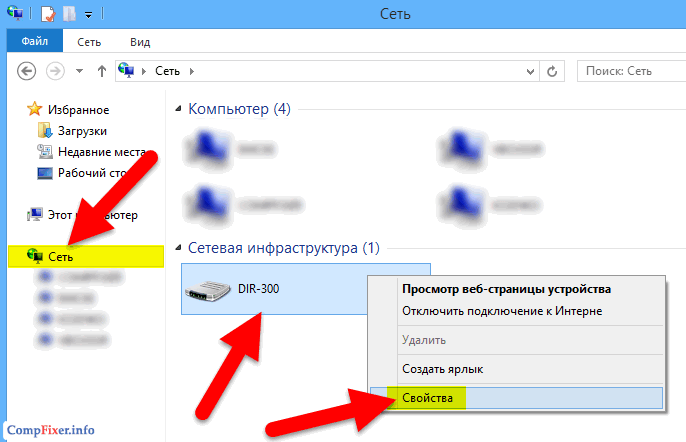
On the tab Network device The IP address of the device will be displayed, through which you can access its settings:

3. How to find out the IP address of a router using the command line
Enter the command ipconfig and press Enter:

In the column Main gate The IP address of the router will be indicated, which is what you need. Now copy it, paste it into your browser's address bar and press Enter. You should then see your router's settings web interface.
The most common default router IP addresses and passwords
So, in this article we have described in detail all the setup steps and now you can correctly connect the equipment, find the address of its web interface and go to the router settings. If you have any questions, ask them in the comments.
ASUS RT-N66U and similar


[collapse]
TP-Link TL-WR841N/ND and similar
A) Connect the power supply to the router, the Netts network cable to the blue port, the cable connected to the laptop/computer to any port yellow color. Plug the power supply into an electrical outlet and press the power button on the router.
B) Open your browser, enter in the address bar
(1) http://192.168.0.1 and press Enter. In the window that appears, enter
(2) login
(3) password specified on the router information plate (usually login: admin, password: admin).
(4)
Click the "Login" button. 
IN) Select:
(1) section “Network” - “WAN”.
(2) Specify WAN type— “PPTP/PPTP Russia” connections.
(3) Specify your login to connect to the Internet (it is specified in the agreement and user manual).
(4) Enter the password to connect to the Internet twice (it is specified in the agreement and user manual).
(5) Check the box "Dynamic IP"
(6) Specify the VPN server address: vpn.netts.lan (most subscribers) or static.netts.lan if you ordered the “static IP address” service
(7) Specify Maximum Idle Time = 0
(8) Specify “Connection mode” - “Connect automatically”
G) Switch to section
(1) "Wireless Mode - Wireless Settings"
(2) Set the name of the wireless network and click (3) the “Save” button: XXXXX
XXXXX _site, where XXXXX are your login numbers

D) Select
(1) "Wireless protection" item
(2) check the protocol “WPA/WPA2 - Personal”
(3) indicate the version - WPA2-PSK,
(4) AES encryption
(5) and enter your wireless network password. For safety reasons, we recommend not using simple passwords. It is better if it contains letters in different cases and numbers
E) The router is configured. All that remains is to connect all wired devices (yellow ports) and wireless devices (find in the list wireless networks network with the name specified in paragraph D2 and connect to it with your password specified in paragraph D5)