The LG flatron W1942S – SF January 2008 monitor shows no signs of life and does not turn on. Turned it off and didn't turn on again.


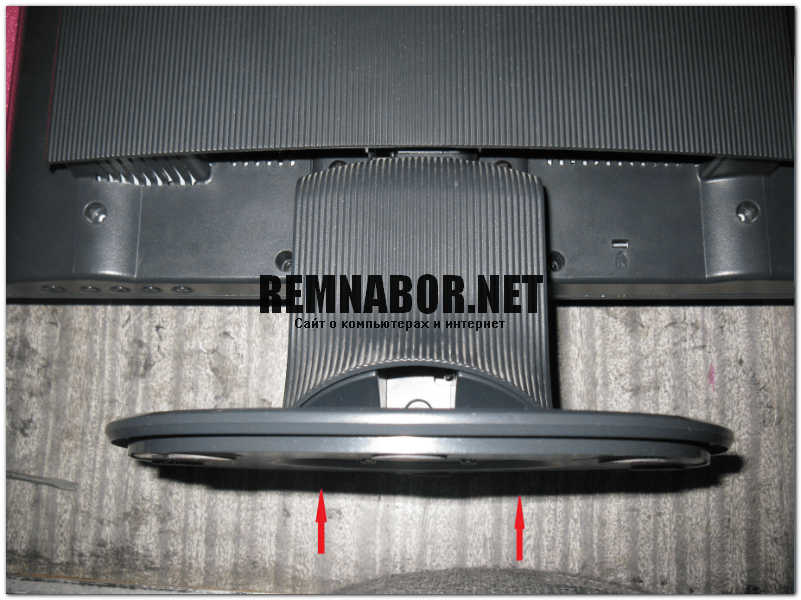
Let's disassemble. We start approximately 1/3 from the edge from the bottom. We press the back cover inward, the front outward. It is better to use plastic cards and several flat strips or screwdrivers.


Note the double latches on the silver frame. You cannot bend the black part too far down (or vice versa, the silver part) as the latch will break on the side of the black part. Therefore, we put plates where there are none.


At the edges of the latches on the LG flatron W1942S they look like this

Well, a little skill and everything will work out. It is better to disfigure the black part, because... The scratches are not so noticeable later.


A classic of the genre, we change the capacitors on the LG W1942S - SF. They are swollen to make it easier to find.


These are the instigators of trouble 47omk35v 105 degrees WITH

The parameters of these capacitors are not suitable ESR became 3.3 Ohm, should be less than 0.1 Ohm

This is an ordinary new Chinese capacitor (Extra “E-C” class) ESR is overestimated by 1.5 - 2 times.
It will work, but may cause heating of the capacitor and transistor of the pulse converter.
We install capacitors of a normal brand (Jamicon, Suntan, Samwha, Yageo).
They changed it, but it was too late. You may be lucky and the monitor will work, but our transistor assembly has already been broken. I needed .
The transistor wiring (according to the inverter circuit for the monitor backlight) was not damaged, all parts turned out to be working.
All that remains is to purchase the TO252-4 case or analogues STU407D, AR4525GEH, IRF7389, IRF7319PBF (worse in current). I put STU407D, because The current characteristics are almost 2 times better.
I soldered more tin onto the assembly and pad for good heat transfer.


Everything worked for me. You also need to check the temperature of the transducers and the temperature of the capacitors every minute in the first 10 minutes. If they are not hot, then we check the temperature every five minutes.

LG W1942S backlights do not turn on - APM4048DU4 is to blame
If the repair did not end with resoldering the capacitors, and the LG flatron W1942S - SF apparently does not have protection triggered after a capacitor leak (they need to be changed in advance), then everything may turn out to be more complicated. Short circuit of the trances in the inverter or the trance legs are missing in the transformer itself, then search for “inverter circuit for monitor backlighting”.
Damn, what an ambush... I came home from work today, turned on the computer, and went to change clothes. It started to start up, beeped, buzzed, and crackled. But for some reason the monitor did not turn on. I him this way and that way. Dead. Completely. Even in his hearts he hit him... 🙁 (didn’t help, by the way)
He has worked for me for probably six years, maybe even seven. Apparently it's time for him to die. Crap. What a bad time. I'll have to go get a new monitor. Well, this will only work for the weekend. Today I’ll try to pick this one up.
My monitor is the most ordinary one, bought a long time ago for 6 and a half thousand “everwooden” ones, I don’t remember exactly. Called LG FlatronL1953S. He doesn't have any special qualities. Just ordinary workhorse. It looks like this:
The patient was examined and no signs of life were found. Let's start opening:

The four screws came out very quickly. It's time to remove the back cover. But it, the back cover, is not held on by screws, but is attached together with the front frame with latches.

Well, it’s a hassle to separate them. You're afraid you might break the latches. And there are so many of them around the perimeter... You have to use all available means and devices.

But “the one who walks will master the road.” “It’s long or short,” but we won. The patient is opened! Separate the back cover from the front frame:

So, let's see what we have here. The entire metal protective casing that covers the boards is secured with tape. Nothing, not a single screw, not a single latch.

The guts of the monitor are not rich in variety and consist of two boards: a power supply board and a control board.

Guts of the monitor - control board and power supply
Let's start with nutrition. We pick out the power supply board. Well, there’s dust on it (I’ve never vacuumed the monitor since I bought it).

Blow/wipe/vacuum the dust from the board. And here she is in person in all her glory:

We carefully inspect the board. First of all, let's check the fuses. There is only one on the board. He works. Let's look further.

So, sir, what is this? And these are awesomely suspicious, swollen, electrolytic capacitors. Let's take a closer look.

Well, the most likely cause of the death of the monitor is these electrolytes. We are looking for a replacement. I looked through all my radio-electronic junk, but didn’t immediately find the necessary electrolytes. I had to be smart.
In the end this is what happened:
Yes, I was lucky that I found a large gray Conder, still made in the Soviet Union, from God knows what shaggy year. I'm not at all sure if it's working. But there is no way out, there is no other Conder that is close in parameters. I'll have to install it. Here's what happened:

I don’t know whether this large aluminum cap of the capacitor is connected to the positive or negative contact, so I just put insulation from a piece of electrical tape (I should have rung it with a tester... hmm...). In general, the final board looks like this:

I put everything together and turned it on. Everything worked. It turns out that the patient's death was clinical and not complete. Very very best!!! The trip to buy a new monitor is postponed indefinitely.

This is the cause of the breakdown!
Well, and finally, a video with the process of picking the insides of a patient.
Sorry for the rambling speech. I came home from work, my head just can’t cook... :)
By the way, I talked about transformers in the video - this is about .

It is no secret that owners of LCD monitors often encounter breakdowns of these devices. In many cases, you can repair a faulty device yourself.
Let's look at an example of several steps with which you need to start repairing an LCD computer monitor.
Disassembling an LCD monitor is a rather troublesome operation and can be more time-consuming than eliminating the cause of the breakdown itself.
To disassemble an LCD monitor - in this case, the ACER AL1716 model - you need to place it with the screen on a flat surface, and place a soft cloth or other material directly under the LCD screen that will protect its surface from scratches.

Attaching the stand to the chassis
After the stand is disconnected from the main body, using a sharp knife blade or other sharp tool, we snap off the plastic latches that hold the front and rear parts of the case together. This operation is quite labor-intensive and you need to be careful, as a sharp blade can damage appearance housing and break off the latches.
In order to gain access to the control and power printed circuit boards, you need to disconnect the metal frame with the LCD panel from the back of the plastic case. To do this, you need to bend the latches of the four latches on the sides of the plastic panel. After this, the main frame with electronic filling can be easily removed and disassembly can continue.

Locks for the rear of the case and the main unit
After the back cover of the plastic case is removed, we will see that the LCD monitor itself is a metal frame on which three electronic printed circuit boards s and LCD panel. All printed circuit boards are covered with metal covers in order to reduce electromagnetic radiation. Radiation from high-frequency circuits can affect the normal operation of other electronic devices, so all electronics are hidden under a metal cover.

Main metal frame with electronic filling
Structurally, a computer LCD monitor consists of several printed circuit boards and electronic components, namely:
Liquid crystal display (LCD) panel.
Power supply and inverter for powering backlight lamps.
VGA control and interface board.
Keypad with operating mode indicator.
These are the main electronic components that we will find during disassembly.
Next, unscrew the four bolts that secure the LCD panel to the frame. Attention! The LCD panel is connected to other boards through several wires and multi-core cables. Namely, the panel has two wires with four connectors. These are connectors for connecting backlight lamps to the inverter board. They need to be disconnected. The easiest way to do this is with tweezers.
The LCD panel is also connected to the control board via a multi-core flexible cable. It is better to disconnect it from the control board side, because it is fixed quite rigidly on the LCD panel board, and it is not advisable to touch it.

LCD panel
When the LCD panel is detached from the main frame, access to the control and power boards, which are located in a niche in the metal base, opens.

Printed circuit boards for power supply and control
An LG monitor can fail for various reasons; in order to diagnose and be able to repair the device, it must first be disassembled. It is the disassembly process that causes difficulties for owners, so we decided to write detailed instructions How to disassemble lg monitor. Depending on the specific model This process may differ slightly, so in this review we will consider several options.
Procedure for disassembling the monitorLG:
- The first step is to remove the monitor stand;
- Remove the back cover;
- Carefully remove the front frame of the monitor;
- Unfasten the latches holding the matrix;
- Remove metal plugs;
- Remove the two connectors with the backlight cables;
- The monitor matrix is connected to the board using a cable; before removing it, you must also disconnect it;
- Electronic boards and the power supply are now also available for disassembly; they can also be removed;
How to disassemble the lg flatron l1953s monitor
First, you need to unscrew the bolts holding the LG monitor supply; its absence will provide access to the back cover. Before you begin this simple task, the monitor must be placed on a flat surface in order to minimize the risk of damage to the screen itself. Usually the stand is secured with four screws using a Phillips screwdriver, that is, removing it will not be difficult. In addition, the stands are equipped with plastic covers that will have to be removed to get to the screws.
Back cover
The process of removing the back cover of the device is not much different from the previous one; we unscrew all the screws in the same way and remove it. After this, the cover can be removed to the side; the easy part of the disassembly process ends here.
Front frame of the monitor

If you are looking for an answer to the question of how to disassemble an LG monitor, proceed to the next step of the process, here you will need to remove the front frame of the equipment. The process is very responsible and requires maximum care from the performer. The fact is that the plastic of the front part of the case is very thin, in addition, there is a possibility that you will damage the matrix of the device. That is why, armed with a thin, flat screwdriver, carefully open all the latches, and then remove the frame.
Device Matrix
After the front part of the case is removed, access to the plastic fastening elements of the monitor matrix will open; they also require a special approach; even slight damage to the screen will lead to its failure. Disassembling the lg flatron l1953s monitor does not imply removing the metal plugs, however, if you have a different model, disconnect them; you can do this with your hands; it will require a little effort. Now the matrix can be removed, just do not make sudden movements; you will also need to disconnect the screen cable that is connected to the board.
Backlight

The next step, for applicants on how to disassemble a lg flatron monitor, will be to disconnect the backlight terminals, usually there are two of them, but here again it all depends on the model of equipment. You can remove the terminals without the help of any tools, although this will require a little force, as is the case with the plugs.
Microcircuits and power supply


Now you have access to the “brain” of the monitor, its microcircuits, as well as the power supply; by the way, the majority of malfunctions are associated with just one of these parts. They are also fastened with bolts; after unscrewing them, you can inspect the components for damage. In general, we received an answer to the question posed - how to disassemble an LG monitor.
This article is intended for people who are taking their first steps into the world of equipment repair.
Monitor model: LG Flatron L1730 S
Symptoms: When you turn on the monitor's power, the screen turns on for 1 second. and immediately turns off, the indicator LED lights up green.
The most common reason: Over the course of the monitor's service life of about 3 years, swollen capacitors appeared that no longer fulfill their intended purpose and also interfere with normal operation
Let's start disassembling the monitor. Tools: 2 small flat screwdrivers, 1 Phillips.
We place the monitor screen down on a flat surface so as not to damage the screen, or for convenience, on a foam stand, disconnect the power cable and the D-Sub signal cable as shown in Rice. 1.
To remove the leg, press simultaneously with two fingers on the levers and pull towards yourself, as shown in Rice. 2 And 3

On Rice. 4. shows how to remove the leg cover.


After removing the bolts, lightly pull the leg towards you and remove it from the hinges. Next, unscrew and remove the remaining 2 screws ( Rice. 6.).
Read also: While working, the computer suddenly freezes or stops responding to the keyboard or mouse

To make opening the case easier, you can insert a flat-head screwdriver into the lock ( Rice. 7) we insert it easily without much effort and see that if you look from the end, the central part has moved away a little. With an object (screwdriver) inserted, turn the monitor over so the screen is facing up.

Carefully slowly pry up the front frame with a flat screwdriver and move from the center to the edges.


Raise the frame and remove it completely.
And so, the next step is to remove the back of the case. To do this, we take out a board with buttons
(Rice. 12.), after which we slightly move the 4 latches holding the screen module (Fig. 14), we will need 2 flat screwdrivers, first we open the 2 latches on one side and insert one screwdriver, then do the same on the other side, then with both hands we simply lift the screen, and the back we remove the wall.


Turn the screen over again and remove the two protective shielding caps located on both sides ().
Read also: Which HDMI cable should you choose?

We disconnect the 2 plugs connected to the power supply board, to avoid problems during assembly, before we disconnect them, we make marks on the wires in the form of numbers or marks with a marker so as not to confuse where to insert which plug (Fig. 15).


On the other side we also disconnect 2 plugs.
Now you need to remove the metal protective screen-mount; to do this, you need to unscrew four screws (Fig. 17, Fig. 18), after which you can easily carefully lift the casing and see the cable going from the screen to the control board, power supply board


power unit

- Squeeze and disconnect the cable
- Unscrew the four screws
- We get the board
- We carry out an external inspection for burnt parts, etc.
This malfunction consisted in the fact that during the service life of the monitor for about 3 years, swollen capacitors appeared, which no longer fulfill the assigned task and also interfere with normal operation, the capacitors are replaced with similar or better ones. Initially, this instance had the so-called installed. electrolytic capacitors Samxon GF Low ESR 105C 680mf*25v and 1000mf*16v Description on the manufacturer’s website (


