There are many various ways flushes, but here we will consider only the most useful and most effective, namely washing the Epson printer.
If your device from Epson "got sick with horizontal stripes", then garbage has got into the print head (PG). You can get rid of it in the following ways. They should be used exactly in the order in which they are proposed here! Let's start flushing Epson heads!
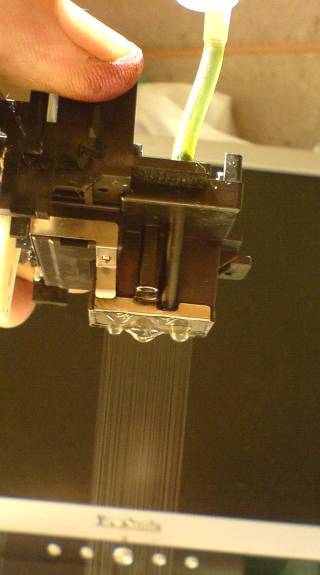
With a few hand movements, you can prevent the printer from splashing the remaining ink onto the floor. To do this, simply connect the hoses to the new hose lines leading to the outside. Then the cover is simply removed from the holes with a flathead screwdriver. In the example below, the external hoses are already connected. Extraction occurs through the hole.
HP and Canon Print Head Cleaning
Hoses numbered 1 and 2 are connected to a pump that carries residual ink to the "basement". Then take care of a plexi with an outer diameter of about 3mm and an inner diameter of 1.5mm. Alternatively, larger diameter hoses than those provided by the printer can be used. This reduces resistance. Suitable hoses are available from the aquarium store. The hose clamps are then no longer usable, but where no pressure is built up, nothing can leak.
There are various methods for cleaning the print head and Epson printer. Let's consider one of them. Use Epson Print Head Cleaning from the Device Utility. Click "Start", then "Printers and Faxes", select your device, right-click on it, select "Printing Preferences" from the proposed one, and you will see the following menu, click "Service". Select the "Epson print head cleaning" mode, and print out the test, if your test does not have the necessary "dashes", you should not repeat the cleaning. Do the following:
The printer says no more crap. Hardware details need to be updated
To ensure safety, the connection point can be secured with adhesive tape. Externally, you can then use an arbitrary vessel, which includes the ends of the laid plexiglass tubes. Does the printer only have one year on its back and already parts of the equipment need to be renewed?
The protection counter is full because there is too much residual ink in the printer. The waste ink packs are exchanged and the counter is reset by customer service. But it's also cheaper - free. However, you must obtain additional cleaning inks as described above.
In any program convenient for you, type vertical stripes on the entire A4 sheet, and print 2 sheets.
- flush the Epson printer and test the nozzles again, compare the first and second nozzle tests, if the nozzles missed in the first test “work”, then proceed to further printing, but if the nozzles do not “come to life”, try repeating the procedure with a printout.
What paper should be used best for pigment printers?
Here is a tool to reset the protection counter for residual ink. This is related to the German printer driver. The US driver shows all paper media in the printer driver. Last but not least, it's the end of taste and personal enjoyment, whether you prefer glossy or matte papers. However, it should be borne in mind that pigment printers have certain tactile properties. For example, blank glossy papers are less suitable because the pigments dull the glossy surface.

If the number of skipped nozzles has increased, it means that the amount of debris in the print head PG is so large that, as a result of washing the Epson printer from the printer utility, it was shaken up and began to “come out”.
"Sandwich" - as a method of cleaning the print heads of Epson printers. Its essence lies in passive soaking with active detergent chemical components. Here and below, under the soaking liquid, we mean the liquid "Mr. Muscle" (MM), green or blue, but only for washing glasses! Before installing the "sandwich", ALWAYS remove the cartridges, or CISS.
This is especially noticeable with prints that have high ink saturation, such as when printing with high black detail. The pores of the paper quasi-grow so that a pigment layer forms on the paper. If you hold the pressure slightly obliquely against the light, you will immediately recognize these dull spots.
Cleaning the print head manually
Therefore, paper with a microporous surface is ideal. These include semi-gloss or pearl paper. For example, for images of passports and applications, or for all types of small prints. The more complex the coating, the more expensive the paper. The increase in semi-gloss paper is the pearl or luster of the paper. This can be noticed by constantly missing nozzles or even completely fantastic custom colors. Sometimes this is not necessarily noticeable in the printed image by typical banding when printed at a corresponding high resolution.
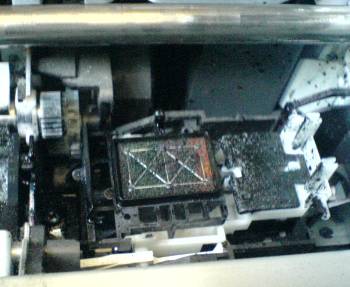
To install the “sandwich”, turn on the device, select the replacement of the cartridge, when the PG carriage moves to the cartridge replacement position, turn off the plug from the power outlet, move the carriage to the left, in the lower right part of the device you will see the PG seat when parking, it looks like a foam rectangle edged with a rubber rim, called a cap. You need to make a template for further procedures. Attach a piece of thick paper or a plastic bottle to the mouthguard, on which the contours of the mouthpiece will be imprinted
If problems cannot be corrected using normal cleaning procedures through the printer menu, you can clean the print head yourself. Then the nozzles can be seen anyway after pressing the sublimation pressure. Due to the unusual color, this is also missing from the motif - the print image is damaged and slips depending on the color failure, for example, into an area of red or bluish tint, or has low contrast and an unnatural effect.
Clean or wash the print head?
If such jets cannot be cleared with a few washes and patience, it may be necessary to flush the printhead with cleaning fluid and gentle pressure. The chances of getting rid of blocked injectors are usually quite high, provided the printhead flush is done with clean cleaning fluid and a little manual skill.

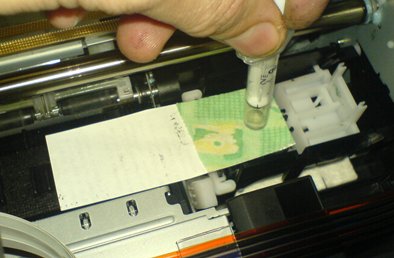
Take a dense, lint-free fabric, attach the pattern print to it, and cut out this print from the fabric.

Glue the fabric to the paper on double-sided tape, or with Moment glue, so it does not move out of place, glue the element cut out of the fabric together with the paper onto a long strip of cardboard, for subsequent manipulations, because. wet tissue sticks to the metal, and it will be difficult to unstick it from the PG of this strip, put the resulting strip on the tray, cloth up, draw 5 ml of MM into the syringe, and drip onto the tissue,
It is not recommended to use specially prepared and partially aggressive detergents, nail polish remover, and other pharmacy solvents, as they can attack the plastic on the printhead and make it brittle. In addition, a significantly better cleaning effect with such agents has not yet been proven.
Pressure heads support direct rinsing
The best solution is to use a cleaning fluid that matches the ink being used. Usually it is water with appropriate additives that maintain the cleansing effect during rinsing. Place the syringe on the nose of the clogged ink in the print head and gently press the liquid through the print head when the print head is on the print head. The liquid that exits under the printhead should then be renewed with an absorbent, lint-free cloth.
Wait a while, and then drip some more - this is a “sandwich”, do not be afraid that a certain amount of MM will pour out of the kappa, everything is designed for excess liquid there. Without turning on the printer, move the PG carriage with your hands to the maximum right position, i.e. park manually. After 12 hours without turning on the device, move the carriage manually and remove the “sandwich”, install cartridges or CISS, return the carriage to the cartridge replacement position, and connect the device to the network. After turning on, the device will automatically enter the cleaning mode, then follow step 1. If the situation with non-printing nozzles has improved and there are fewer of them, then continue this way daily. If some nozzles do not work within 14 days, go to the next level. To enhance the effectiveness, put on the PG needles, pieces of a dropper at the time of soaking, and fill these pieces with washing, i.e. MM, so cleaning will act on both sides.
If necessary, repeat the procedure several times until all nozzles are passed. If you feel that the print head is clean or rinsing, you must be careful. If necessary, the corresponding ink channel is already added very firmly. Higher pressure on the syringe may cause slippage.
The pens described here for rinsing the print head are at your own risk! We have provided you with cleaning instructions. The experienced hobbyists among you may try to screw the printer in to get to the pluggable print head. We would like to share our experience with our blog and pass it on to our readers. But one of those interventions that we advise on our part, as the parts of the printer are usually connected to each other, and this usually means a break in the plastic here and there.
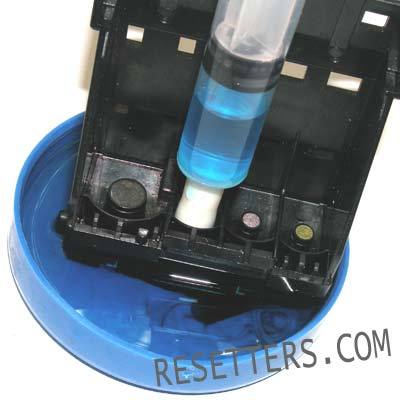
Forced cleaning with a syringe. All subsequent actions are recommended if you have technical skills. Take a 5 ml syringe, cut off a 5 cm tube from the blood transfusion system, put one end of the tube on the spout of the syringe without a needle. Set the PG to the cartridge replacement position, remove the cartridges or CISS, unplug the device from the network. Move the PG to the left to the middle so that the flush falls on the foam rubber sponge and does not drain onto the gears. Draw 2 ml of MM and 2 ml of air into the syringe (i.e. 50:50 air to flush ratio). Put the free end of the tube on the PG needle. Press down on the plunger of the syringe, compressing the air in it from 2 ml to 1 ml.
First, of course, you should check if all the printer cartridges are full! There are times when the ink just ran out, and this sponge in the printer disappeared. It is also important that the yellow seal peels off. Otherwise, the negative pressure will not be released and the ink will not flow. Also make sure this is completely removed.
You should refrain from purchasing all compatible ink cartridges. They are often used to block the print head as lower universal inks are used. If you are suspicious of ink cartridges, we recommend that you use genuine cartridges. Often the problem is already solved.
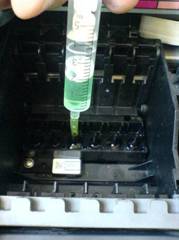
Attention! When washing the Epson printer, you should not push it very hard, PG has adhesive joints that collapse under strong pressure! If the ink from the syringe began to leave, it means that the nozzles are partially clogged and further forcing is recommended to be done until the syringe is empty, after washing in the syringe, without removing the syringe, pull the piston up by 2 ml, then push it all the way down again, creating bubbles at the exit PG. Such actions create the effect of cavitation at the outlet of the steam generator, increasing the cleaning efficiency. Pump the Epson print head with foam 10 - 20 times, then draw MM and air again and push the entire MM, trying not to let air into the PG, leaving 0.3 ml of MM in the syringe. Repeat for the remaining flowers. Important! Avoid splashing flush on the surface of the carriage, a small amount is allowed in the cavity around the needles of the PG, spread toilet paper around the needles, and change it when wet. If flushing is abundant, dry the Epson print head carriage with a hair dryer, do not overheat. But if the ink does not come out of the syringe, and you have already made a “sandwich”, there is another way.
Check if the nozzle is clogged
You should now print a test print. This feature can be found under Maintenance or Ink. Press the button for about 5 seconds. After printing, you will see a sample in which you can already find nozzles.
Clean the print head using the print program
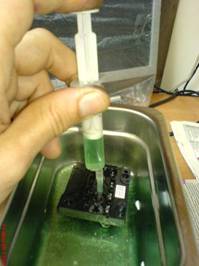
Now try to print the printhead cleaning program. You can still choose an intensive program, but be careful! Don't clean too often. The ink is discarded. Then print again test page and see if there is any improvement.Ultrasonic bath + syringe. From the name it can be seen that this method will require an ultrasonic bath, into which MM must be poured 5 mm from the bottom. The use of MM in this case is important - when it hits the surfaces of internal parts of the SG, it minimizes electrical short circuits, probably due to low electrical conductivity. Attention! Constantly control the amount of flushing in the bath, pump out excess with a syringe, flushing gets inside the steam generator, on the surface printed circuit board, forever irreversibly disable it! We will not describe the removal of the print head when washing the Epson printer here, look for the removal scheme in the appropriate section. Type MM 50:50 with air into the syringe, turn on the bath, lower the PG by 2-3 mm into the liquid, do not put the PG on the bottom of the bath, keep the PG by weight in the liquid and pump it with a syringe, repeat for each color.
If so, do further cleaning around the nozzles gradually until a complete test pattern has been printed. In a word processing program, write about one quarter of the text on the page and color it magenta, cyan, yellow, and black. After the cleaning button has been pressed for 5 seconds, the cleaning program will start automatically. Repeat this process several times because the cleaning level increases each time. During the process, print the previous page again. . There are various options for manual cleaning.
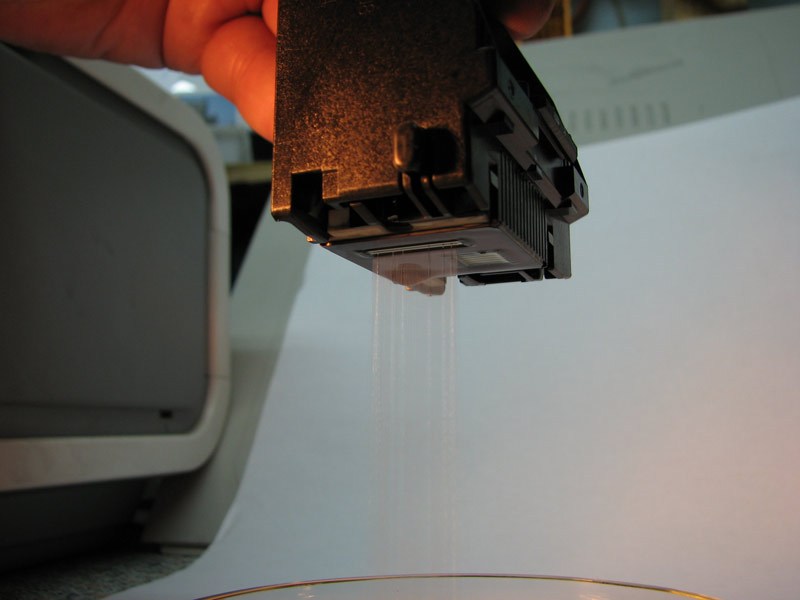
Perform quality control visually, lift the Epson print head out of the tray, and carefully look at the nozzle part. When squeezing with a syringe, you should see a rain from the flush. High-quality flushing is considered to be one in which a rain of MM consists of parallel, not “oblique” jets, without gaps.
Cleaning the print head using the utility
Take out the syringe with nozzle cleaner cannula and take old or empty cartridges, for example, to fill them with approximately 2 ml of liquid. Then reinstall the printer cartridge and leave it in the printer for 2-3 hours. Then clean if the inserted empty cartridges are still recognized by the printer, otherwise, get a new one. Now the test pressure should be better. Perform a maximum of 3 times to clean the printer in the program.
Here again you are using a syringe, but this time without a cannula. Take hoses about 10 cm long, which you get in every construction market for about 3 euros, look in the aquarium department from time to time. Then the hose should be applied to the syringe. Now pull the syringe with the printhead cleaner and press the end of the hose onto the printhead rim where the ink cartridge is actually exposed. Slowly press the cleaning liquid into the print head, preferably pull the syringe up and down several times during the process.
If it is not possible to blow out all the nozzles in 10-15 pumps, use the "back and forth" system, but only in air, i.e. not in a liquid, because suction of liquid from below through the nozzles will cause debris to enter the print head of the Epson printer, which will disable it! Some nozzles still do not work - put the steam generator in the bath, cover it with a cloth, (because the condensate resulting when the lid is covered will get into the steam generator) unplug it and leave it overnight, check the depth of the steam generator immersion - no more than 5 mm. Then repeat the entire cleaning again.
Washing the print head with a homemade solution
After this intensive cleaning, you must reinstall the cartridges and perform a small cleaning program. Do them up to 3 times. You should now be able to see the improvement. When cleaning, be careful not to mix colors when transferring the syringe. Therefore, always clean the hose before starting the next color process.
To see any improvement after head cleaning
Now there is practically no way to restore the print head. If you have any questions or comments, please feel free to contact us! Just call us or send email by the address. Clean the printer yourself! If your printer only prints stripes or produces white pages, the print head may be clogged or dry. It depends if you use ink cartridges or use the printer for a long time.
In some cases, it is sometimes very difficult to clean one or two curve jet nozzles, and in such cases, cleaning ... with a finger imitating cleaning with a rubber scraper on a printer helps. Pressing with a syringe, in the problematic color MM, make cleaning movements with your finger on the surface of the nozzle plate, then visually control the rain, after such procedures, unevenly beating nozzles very often break through. unrefined. Due to the fact that the cost of PG in the service sometimes exceeds the cost of the device, the choice is yours. Well, those who have cleared all the nozzles, we congratulate! After cleaning, dry with a PG hair dryer and place on the windowsill on the sunny side. Dry the PG for 3-5 days, then install the PG on the device very carefully. Repeat step 1.
Cleaning Method Using Ultrasonic Bath and Syringe
However, saving a printer is often not that difficult. In addition to the usual cleaning functions controlled by installed driver printer, you can also manually clean the print head. To do this, you need a print head, a flat bowl, some skills, and a manual for your printer.
Soaking the Print Head in Cleaning Liquid
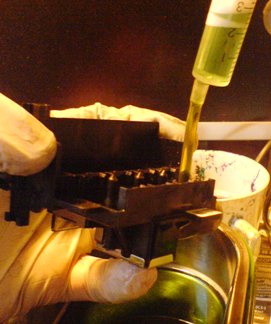
Your manual describes how to replace the print head. Don't confuse cartridges with printers. Printheads from different manufacturers as an example. Now take the printhead and place it in a flat bowl. fill the shell from the print head of the vacuum cleaner to the print nozzles at the bottom of the print head is completely covered. Now pour a few drops of cleaner from above into the area where the printer cartridges normally insert into the print head. Now it's best to leave a few hours or overnight.
You may be interested in:
 Clogged steam generators are far from the only reason why printers stop printing. However, there is a high probability that this is the problem if on your device:
- white streaks appear across the paper movement;
- one or more colors are missing;
- nothing is printed even though the printer does not warn and the carriage is moving properly.
Most often, the print head does not want to work well:
After a long period of inactivity
When the ink has dried up. In this case, several nozzle cleaning sessions through the printer's utility program may help. If cleaning twice did not help, use the " Deep cleaning”, in a day you can repeat. Didn't work again? This means that the problem is much more serious, flushing may be needed.
Due to mixing incompatible paints

Water-based and pigment inks categorically do not want to cooperate, curl up, precipitate, quickly clog nozzles. Well, if you noticed the problem in time and the nozzles did not have time to burn out. It may also be incompatible paint of the same type from different manufacturers. Ideally, ink tanks should be refilled with the same consumables. Some experts even advise not to print with new original cartridges if you are going to refill them later, but immediately rinse and fill in exactly the ink that will always be used.
As a result of printing with an empty cartridge
Carefully monitor the condition of the ink tanks, fill them in time, as printing with ink residue quickly disables the PG. First, the nozzles get clogged, and then, if you do not pay attention to the print quality in a timely manner, the nozzles burn out. Here, flushing will not help, such a head cannot be restored.
Washing liquids
Specialized ink shops also sell washing liquids. For example, OCP RSL100 or more concentrated Bursten PDK. But they are quite expensive, and a large amount of product may be needed to wash a very dried head.
You can make an alkaline solution yourself according to the following recipe. For 7 parts of distilled water, take one part:
- ammonia,
- isopropyl alcohol,
- glycerin.
Mix the resulting mixture thoroughly and strain. It does not make sense to use distilled water separately, since it is ineffective for water-based ink and does not dissolve pigment paint at all.
Important: Do not wash blockages with alcohol and vodka. Dried or curdled paint gives the remaining liquid to ethyl alcohol, further soaking becomes problematic or impossible.
The best glass cleaner Mister Muscle blue or green. Its effect is comparable in results with specialized flushing fluids, but the price is significantly lower. You can use other window cleaners, the composition of which is close to Mister Muscle and contains ammonia.
How to remove the print head
Open the cover while the printer is on to drive the carriage out of the parking space. Turn off the printer. Take out the cartridges. The print head is clearly visible, but it is too early to get it out.
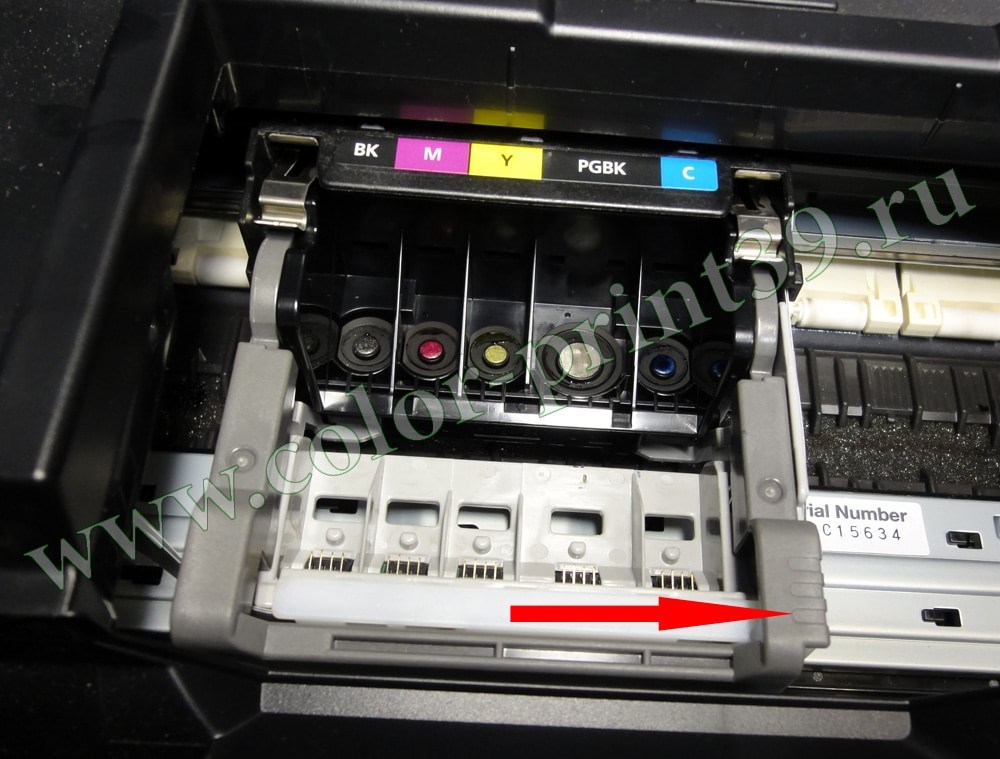
IN different models printers, the latch holding the PG looks different, although the principle of operation is the same in almost all models. WITH right side there is a lever, or the frame has a certain shape. You need to lift it up.
A slightly different principle in the MG5440 model. The latch here is a bar with the image of ink colors, which does not rise up: you need to pull it towards you until it clicks. Now the PG is free, tilt it forward and carefully remove it from the printer.
flushing
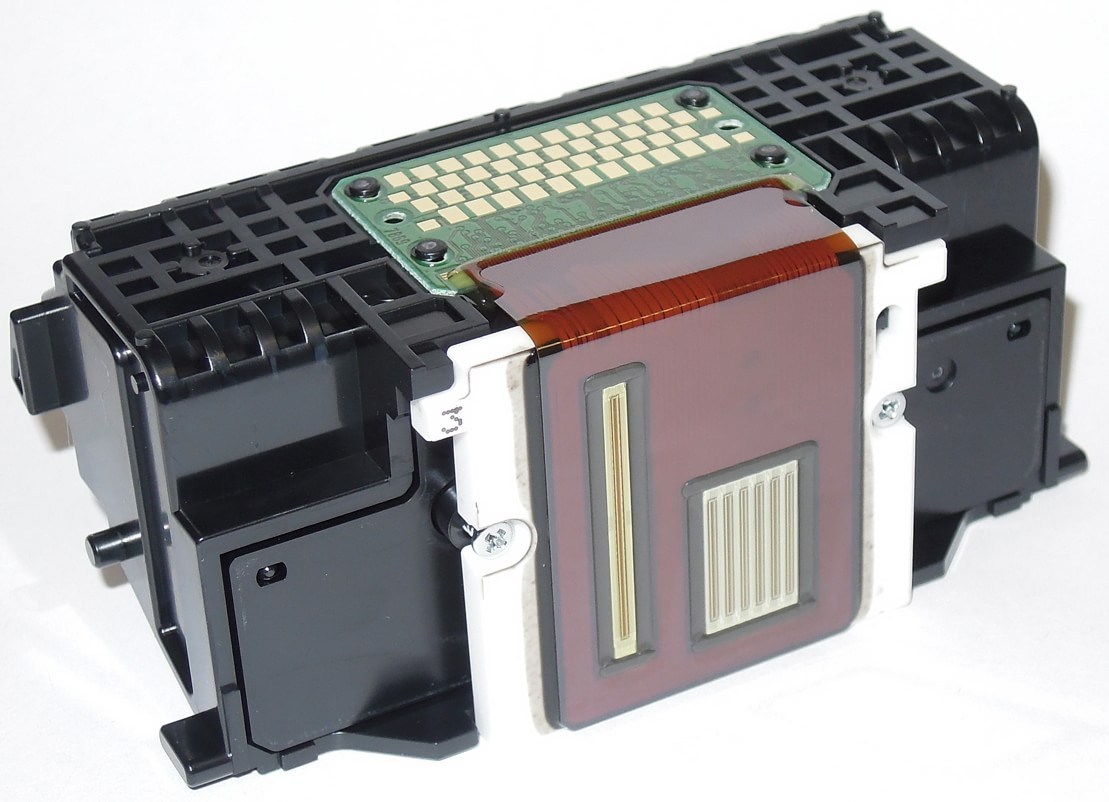
Make sure that the PG of your printer does not have burnouts near the nozzles, the nozzles are intact, and flushing

Burnouts in the nozzle area (Click to enlarge)
has the meaning. If so, prepare:
- washing liquid;
- gauze, napkins or bandage;
- syringe;
- a low plastic container that will fit the steam generator;
- tube from a medical dropper.
Cover the table with newspapers and place a piece of bandage folded several times soaked in flushing liquid under the PG. With another piece of cloth, also dipped in cleaner, gently blot the intake grates.
Remove the rubber seals, wash them, carefully wipe the head body around the intake holes. Drying of ink in these places is fraught with depressurization of the system. As a result, air may be sucked in, the paint will flow intermittently. It's a good idea to periodically clean the O-rings as a preventive measure, even when there are no printing problems.
digging

Instillation of PG (Click to enlarge)
A little liquid is instilled into each lock with a syringe with a needle. As soon as the drop is absorbed, add more. Change the bandage as it becomes dirty and continue to drip until the liquid passing through the head no longer stains the color of the ink. If the liquid is not absorbed very well, warm it up to 50-60 degrees. To enhance the effect, you can use a more aggressive agent, following the instructions for its use.
When each of the sluices begins to absorb well and skip flushing, set the head to stand. After an hour, the fabric should not show strong streaks of ink. This means that the flushing was successful, the head can be returned to the printer. Before printing, be sure to clean the nozzles of cleaning agent with a service program printer.
Nozzle plate soaking
But washing is not always so easy. Perhaps one or two locks do not allow liquid to pass through: the drop is not absorbed for a long time. For some time you need to remove it with a bandage and drip again, but if nothing has changed in an hour, it's time to proceed to the next step.
Pour 2–3 mm of washing liquid heated to 40 ° into a plastic container, lower the print head there with nozzles down and put it in a warm place to soak, after covering the gateways from above with a wet bandage from drying out and covering the PG with a plastic bag. If no change is observed the next day, reheat the cleaning fluid and leave for another day. In general, flushing the print head is a long process; saving a part can only be done slowly.
Soaking intake holes

If the sluices still do not let fluid through, you can try to create some pressure from above. It is necessary to put tubes about 5 cm long on each of the intake holes and fill them with cleaning liquid.
In this form, the structure can be left for a long time, periodically adding flushing. If the liquid from the tube through the problematic gateways still leaves, continue the procedure for two days.
Stretching
When the liquid level in one of the tubes does not decrease, you can try the next trick. Pour a little product into the container, put a piece of cloth and press the PG nozzles against it. Insert a syringe without a needle into the tube and, carefully moving the piston towards you, stretch the cleanser through the nozzles.
Do this several times, adding clean liquid to the pan. Pour the used wash out of the syringe, then refill the tube and leave for another hour. The process can be repeated several times.
Important: The head must be pressed firmly against a wet cloth so as not to draw air into the nozzles.
If now the liquid leaves the tubes at approximately the same speed, the steam generator has been flushed out.
pumping
If after two days of soaking the liquid still does not pass well, you can
Pumping liquid through PG (Click to enlarge)
try pumping it with a syringe in both directions. Still press the nozzles to the wet bandage, drawing in the liquid in the same way. Extrusion in reverse side must be carried out with a filled tube.
Liquid is drawn into the syringe in such a way that there is a layer of air between the piston and the flushing agent. This technique helps to avoid a sharp push that can damage the nozzle plate.
You need to press the piston very carefully, no more than 2-3 divisions at once, then even more slowly, depending on the liquid leaving.
Extreme Methods
That, in fact, ended the ways in which there was a high chance to save the print head. If the goal was not achieved, you can apply several more much more risky methods:
1. Squeeze liquid with a full syringe without an air cushion. The pressure on the nozzles will increase significantly, as will the risk of damaging them. Do not press the head against the fabric, but slightly raise it. Press the piston carefully, as before, the pressure is much greater due to the lack of an air cushion.
2. Hold the SG nozzles over the steam for several minutes and push through the flush heated to 40–50 degrees.
3. Lower the head for a few minutes on the surface of hot water, without dipping more than a millimeter, and pull the liquid through the nozzles.
Print head flushed (image taken from www.chernila.com) (Click to enlarge)
4. Use a more aggressive agent: mix 9% vinegar and distilled water in a ratio of 1:9. Such a composition cleans well, but has a destructive effect on internal parts, and after its use it is necessary to rinse with an alkaline solution to neutralize the acidic environment. Do not use this method unless you are prepared for the print head to fail in two to three months.
If one of these extreme methods helped achieve the desired goal, do not rush to return the PG to the printer. After such extreme measures, be sure to dry it with a hairdryer. You can’t overheat the head: take breaks for twenty minutes. If you doubt that everything has dried well enough, leave it near the battery for two days, and before installing, drip a little flushing liquid into each gateway.
You can also order the washing of the print head by leaving a request.
Print with pleasure.


