27 November 2012
In contact with
Classmates
When in inkjet printer running out of ink, the user needs to refill the cartridge or purchase a new print cassette. Some users purchase only original consumables, others prefer compatible inks, but both the former and the latter are interested in obtaining high-quality prints and extending the life of their printing equipment.
However, the accuracy of your personalized profile will depend on the profiling tests you submit to us. If you don't print the profiling tests correctly, the process will fail and you will have to submit new tests to us. There will be 20 more iterations of the measurement and profiling process.
If so, run a cleaning cycle and recheck to make sure all nozzles are working properly. The amount of ink drastically affects both the details of the shadows and the maximum saturation of colors your printer can reproduce, since you have determined the right amount of ink for a particular paper, you should notice it well and use these settings in the future, as for printing profiling tests , and for all your photos in the future using this type of paper. Download our.
Unfortunately, it is impossible to check the quality of the ink in the store, so the user has to rely only on the integrity of the manufacturers and personal experience in choosing Supplies. But at home it is not difficult to test the quality of the purchased ink. This will require a printer, high-quality paper, and, in fact, purchased ink. The essence of testing inkjet ink at home is to print out special test pages or test tasks and their careful analysis in order to identify the advantages and disadvantages of these inks. test page to check the quality of inkjet ink can be found on the Internet.
Detailed instructions for use are included. Don't change the size and resolution of the profiling tests, print them just like you do. It is very important that your print program and printer driver do not modify the tests. Make sure the automatic or image enhancement options in the printer driver are disabled. Set all color settings to position.
Set the paper type and print quality settings as you plan to use them for future photo printing. It is important that you record these settings and keep track of how they are used when printing with a custom profile. Allow at least 24 hours for the tests to dry and for the colors to stabilize before shipping.
Test Page Elements for Inkjet Quality Testing
If you plan to use ink for printing home photos, then the first two elements of the test page will be enough for you, but if you use ink for professional commercial photo printing, then the test page should contain all the elements listed in the figure above.
Evaluate your printer's performance before and after with a new custom profile. Be sure to select "Printer Properties" and not "Properties" or you won't be able to see the "Print Test Page" button. On the General tab, click or Print Test Page. Select Devices and Printers Right-click the printer and select Printer Properties. Double-click Printer Right-click the printer and select Properties. Double-click Printers and Faxes Right-click the printer and select Properties.
- In the taskbar search box, type Devices and Printers.
- Click or select Devices and Printers.
- Hold down or right click on the printer.
- Tap or click Printer Properties.
- Select Control Panel.
- Select Control Panel.
- Click Print Test Page.
- After printing the test page, click Close.
- After the test page has printed, click OK.
An example of a test page with the designation of its main elements is presented below.
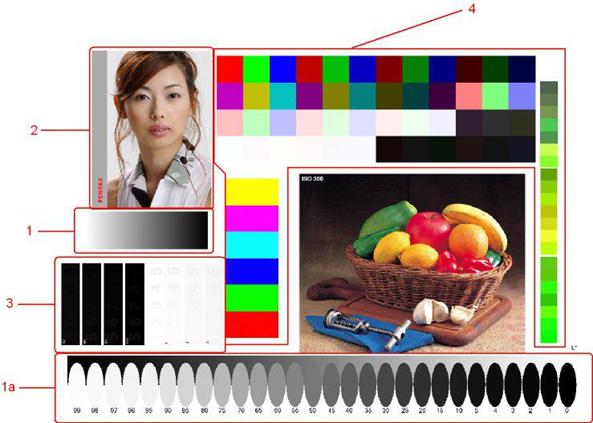
Legend:
1, 1a – gradient transition from white to black; 2 - a portrait of a person with a natural skin tone;
3 - image fragments containing light elements on a dark background and vice versa;
This page is a basic explanation of how to do this. The first thing to remember is the color test: simulation across the device, what the result would be if it was printed on a second device. In tests, as in everything, there are qualities. Further testing of the results, which will leave the final apparatus, the worse the test. Thanks to colorimetry, this "distance" of error can be measured and allows you to set the minimum values within which the test is acceptable, and beyond which the test cannot be considered a valid test.
4 - dies with filling of different colors.
An example of a test page with the designation of its elements
Considering the received test page, you should pay attention not to the exact match of the shades of the received image with the original, but to the balance of the selected ink set. The main criterion here is the gray fill that the inkjet printer generates during printing. The gray color should be pure, without foreign tint. If such a shade is present on the print, then the selected ink is far from ideal.
When the test is within the margins set out in the print agreement, we can speak of proof of contract. However, there are five things that are necessary to obtain sufficiently acceptable evidence. 
If you are going to make changes, it will be essential to have a well calibrated monitor.
Test Method for Laser Printers
Let's go to the "File - Print" menu. 
In my opinion, the simplest and fast method. Test Setting Meaning: We have set the test setting we created earlier and check the Simulate paper color box. Print: We checked the "Test" option. . With absolute colorimetric representation, the first few times you will have the feeling that the test is wrong. The eye tends to start white, and by trimming the burrs we avoid unconscious comparison. For a better assessment, the tests should be viewed in a fairly adequate light next to original paper and issue paper. it's more than possible that what seemed so yellow and deviant wouldn't be there when it was next to what he's trying to imitate.
An example of color distortion in gray printing is shown in the following figure. Here is a comparison of several scans obtained during testing of inkjet ink. In testing, the same printer was used, the same settings were set when printing, printing was done on the same paper.
If you don't have artificial lighting, go to a window and watch the sun test. The home test does not replace the contract test, it only complements it. In the application you use to print, click File and then Print. Consider changing some or all of the settings in the print shortcut menu to improve quality. Print quality. If the quality of the printouts is not satisfactory, try increasing the print quality. To print faster, try lowering the print quality. Paper type. If one of the options matches the type of paper you are using, select it instead of automatic. Paper Size - Make sure this option is appropriate for the paper.
- Make sure the printer is selected, and then click Settings.
- On the Print Shortcuts tab, select a job.
Ink A
![]()
Ink B
Ink B
Scans from inkjet testing
Ink B And IN when printed, they form extraneous shades: on the print B– blue, printed IN- lilac. This is especially noticeable in the gray fill of the picture located in the lower right corner. Ink A showed accurate color reproduction, which indicates their quality and balance.
The Advanced Features window opens. Consider the following options. Ink Volume - Adjusts the amount of ink printed on a page. For lighter images, drag the slider to the left. For darker images, drag the slider to the right. The lower the ink volume, the faster the ink will dry.
Solution 2: Check the self-test report for defects. Step one: Print a diagnostic page. To verify that the cartridges are being used correctly, print a self-test report. This page presents helpful information about various aspects of the device, including cartridges.
An extraneous tint can appear both on the entire image and on its individual sections. Also, the low quality of the ink may be indicated by excessive pallor of the print, distortion or mixing of colors, insufficient image clarity and low rendering of fine details. In the appearance of these signs, only ink for cartridges can be guilty. Most likely, the manufacturer did not test their ink enough and released it to the market ahead of time. Pay attention to the drawing of fine details in the darkest and lightest areas of the image. Good printer ink draws fine details better than bad ones. As an example, consider two scans of photographs printed in different inks on the same inkjet printer using the same paper.
Figure: Self test report. 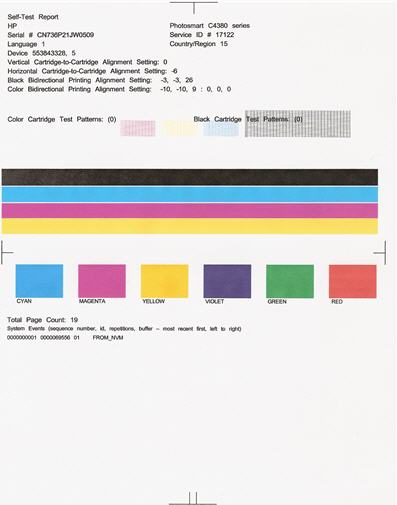
Observe which cartridges printed which areas of the diagnostic page. You need to identify which cartridge you printed in which part of the self-test report so that if defects are found on the page, you can identify the problem cartridge.
Font reproduction quality rating
Please note that different combinations of ink cartridges may be installed in the product, and different combinations print different patterns. The self-test report may not look like the picture below, but the left and right cartridges will print in the same areas regardless of which cartridges are installed.
Ink A

Ink B
Photos printed using the same photo paper
on the same inkjet printer but with different inks
Ink A show more realistic color reproduction and better render the smallest details of the image. Ink B do not convey halftones and small details clearly enough, their colors are not as natural and deep as on the first print. Light halftones in the figure B look screaming, missing smooth transition between light and dark areas of the image.
In general, if the device and cartridges are working properly, the patterns will show multiple lines or none of them will be missing. The color should not be missing, and the colors of the boxes at the bottom of the page should match the names below each box. Also, the report must be free of ink.
You can install different combinations of cartridges in the product, which will result in different self-test report templates. The self-test report may not match the images below. If the pattern has more than a few missing lines, or if the stripe is interleaved, the cartridge is not working properly.
If you're about to run to the supplies store for new ink after receiving poor quality test prints, stop! Practice shows that it is possible to achieve quite satisfactory print quality by experimenting with the settings in the "printer - ink - paper" system. If you do everything right, you can increase the realism and colorfulness of your photos and improve the color reproduction of midtones and shades. If you are planning to use jet ink for professional photo printing, you will have to spend a little more time finding the balance in the printer-ink-paper system. You may need to print more than one test page before you get a satisfactory image. Let's take a picture as an example.
Figure: Left cartridge showing missing lines and striped refill - the cartridge is not working properly. 
The color blocks at the bottom of the self-test report are printed by the color cartridge only. These blocks are accompanied by the name of the colors they should have. If the color of the block does not match the text, this is because the left cartridge is not working properly.
Maximum print speed
Figure: The color of one of the left cartridges is very different from the color on the cartridge label - the cartridge is not working properly. If you have already installed the printer, you will surely understand that at the end of the installation procedure, the program will offer a test to check if everything is in order. Test this, which usually consists of printing a standard "test page", which in inkjet printers generally includes at least one colored number or logo in addition to fragments of black text. This ensures that more than just the installation and "printhead" status of all cartridges, both black and primary, are checked.
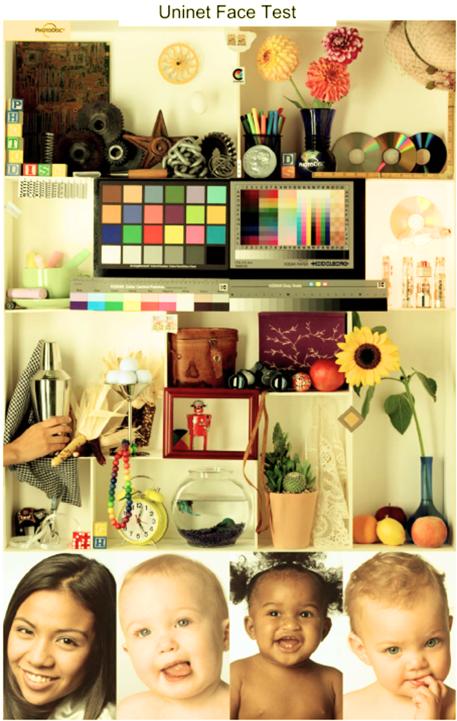
Basic test page
The base test page has a pale yellow tint. The faces of the children shown at the bottom of the test page look faded, the shades are not vibrant and natural enough.
Open the color settings window on your computer and find the halftone curve. Turn it down in settings yellow, increase and adjust the brightness and clarity of the image. Print a second test page with the new settings.
This is very practical as it ensures that the newly installed device is ready and in ideal conditions of use. But when do you want to test a printer that has been installed for a long time? In this case, most users print any file and check the print quality.
Because, for the most part, a file containing a multi-color image that takes up most of the page is selected, printing it consumes a lot of ink. Worse, even if the printed image is found to be defective, there is no guarantee that all holes in the printheads have been tested, as imperfections can be masked by mixing ink. The color image printed on the "test page" contains "clean" color areas that are generated individually with the head of each cartridge, which guarantees the detection of any defects, even if they are that they interfere with the cartridge. one hole in one of the printheads.
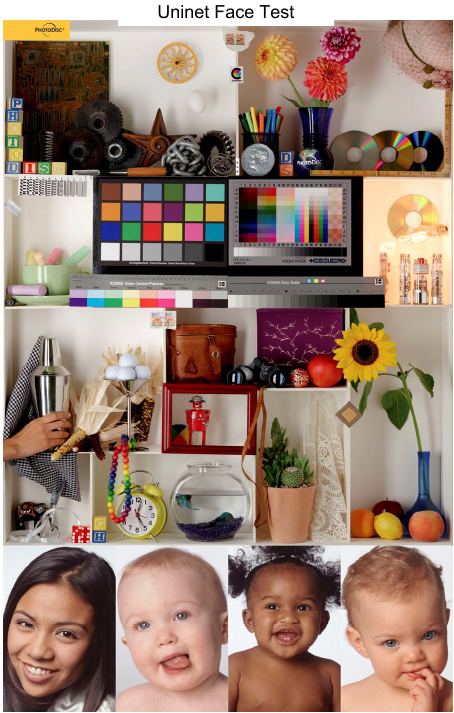
Test page after additional settings color reproduction
The test page after adjusting the color reproduction looks more natural: the milky yellow tint has disappeared, the images have become more realistic, clearer, and brighter.
If the color rendering setting does not give the expected results, then most likely you are using photo paper that is not suitable for this ink. In this case, you will not get satisfactory print quality without color distortion even using original inks, not to mention cheaper compatible inks.
Some more advanced users can print an "official" test page through one of the suite's support applications installed with the printer. Which one depends on the printer. But in this case, there are two errors: not every printer provides an application that prints a test page, and when installing a printer, your applications are not always installed, since this last step is optional.
But isn't there a "generic" way to print a test page, regardless of installed printer? Including a way to test any printer that has been added to the system, either directly on the machine or over the network. To get started, you need to open the Printers and Faxes object. Depending on the settings and settings made on your system, this object may appear directly on the Start menu in the same group as Control Panel. So, the first step is to launch the start menu and search for it.
In conclusion, it should be noted that the correct selection of ink for inkjet printing- the process is quite time-consuming and complicated for the average buyer. Therefore, if you are not confident in your knowledge and strength in the field of inkjet printing and printer maintenance, it is better to seek the advice of professionals.
27 November 2012
In contact with
Comprehensive Printer Testing Methodology
Introduction
Most often, people buy printers for specific tasks. Both an advanced digital photographer with high quality requirements and a caring parent, choosing an inexpensive printer “for study” for their child, albeit vaguely, formulate the qualitative characteristics of the device. Therefore, when developing this technique, we proceeded primarily from the possible areas of application of each specific model printing device.
To eliminate pointless testing of printers in all possible (and innumerable multiple) combinations of applications, drivers, modes of operation and settings, we primarily start from several generalized types of printers, users who may need certain features, and tasks specific to each printer . It follows from this that we do not aim to make, say, an inexpensive inkjet from the “under $100” category work under conditions more suitable for a powerful laser printer with its own PostScript interpreter.
1. Maximum print speed
This test shows the maximum speed of the printing mechanism. Multiple copies of a single-page PDF file are sent to the printer with a standard 5% page coverage. The number of copies launched for printing corresponds to the number of copies per minute declared by the manufacturer + 1 copy. The time measurement starts immediately after the printer issues the first copy. This eliminates the dependence of the result on the power of the computer, file type, drivers, printer interface and the speed of processing the job by the printer itself.
The test runs on all types of printers. The result is the number of pages per minute.

2. Printing a multi-page document with illustrations
Unlike the previous test, which simulates the replication of a one-page document, this test shows the printing time of a simple 20-page PDF document containing small raster illustrations in RGB format and text typed in 10 pt. The print is made from Adobe software Reader 6.0; time is measured from the moment the document is launched for printing. Since the volume and type of the document are not standardized, and the processing time of the task by the driver is also measured, the result reflects the relative performance of a particular “application-computer-printer” bundle. Configuration test bench given in the appendix.
The test runs on all types of printers. The result is the time in minutes, seconds.
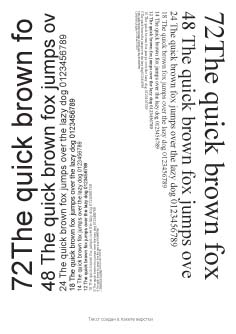
3. Evaluation of the quality of font reproduction
This test allows you to evaluate the quality of printing text material typed in serif and sans-serif fonts (Times New Roman and Arial, respectively). Font sizes are reduced from 72pt to 2pt.
If the printer does not support PostScript, a PDF file will be printed from Adobe Reader 6.0. However, if the manufacturer declares support for the PostScript standard, the test page is output to the printer directly from the Adobe InDesign CS layout package.
The test runs on all types of printers. The result is the minimum readable font size (size in points), the print quality of curvilinear and oblique letter elements. The readability of the font means the preservation of the integrity of the main elements of the letters (the absence of "swollen" elements or breaks in the letters).
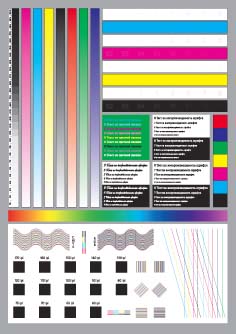
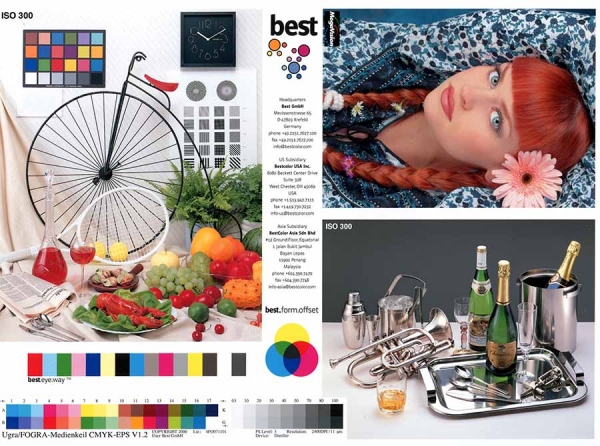
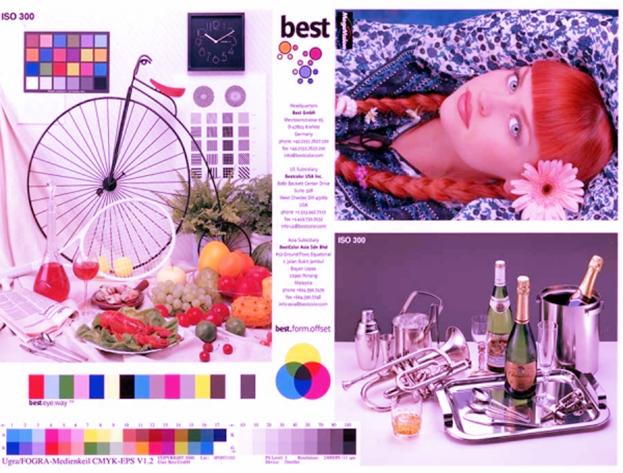
4. Printing a universal test strip
A special test page is formed in such a way as to show explicitly the capabilities of the printer. The following items are available for evaluation:
- neutral density scale. Range 0-10% in 1% steps, 10-90% in 10% steps and 90-100% in 1% steps;
- color stretch CMYKRGB 100-0%;
- scales showing the minimum and maximum reproducible CMYK ink densities. The minimum densities are the numbers from 1 to 8, painted in their respective shades, on a white background (0%). The maximum densities are numbers from 92 to 99 with the corresponding color on a 100% background. Each color has its own pair of scales;
- a scale consisting of 100% solids of RBGYMCK colors;
- RYGCBM color stretch created by Adobe Photoshop CS
- text typed in sizes from 4pt to 8pt (5-9 pt for decorative type) in styles: decorative, serif, sans serif. Options are given: normal (black text on a white background), reverse (white text on a black background) and color (text of different colors on a rich green background);
- scales that allow you to measure the maximum reproducible lineature. They are sets of concentric circles. Available values, in lines per inch: 60-80 in 5 l/d increments, 80-170 in 10 l/d increments;
- a set of scales that allow you to evaluate the combination of colors and the accuracy of the printer calibration.
They are sets of longitudinal, transverse, oblique, wavy and intersecting lines of different colors.
All test elements are located on a solid gray background, which has no margins, which allows you to determine the actual print margin of the printer.
For non-PostScript printers, a PDF document is printed from Adobe Reader 6.0. For PostScript printers, printing is done directly from the Adobe InDesign CS layout package. The printed strip is scanned, after which all parameters are evaluated.
The test runs on all types of printers. The result is the actual values of all parameters.
5. Evaluation of the quality of color reproduction
 |
 |
 |
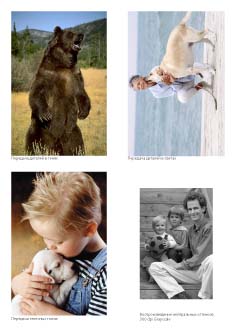
This test consists of a selection of photographs that are typical for assessing color fidelity, saturation and image detail:
- photo of a brown bear. Dark wool with rich tonal variations allows you to appreciate the reproduction of details in the shadows;
- photo of a woman with a dog. The dog's light coat, the woman's clothes, and a fragment of the pier make it possible to appreciate the transmission of details in the highlights;
- a photograph of a boy reveals the quality of the transfer of flesh tones;
- a black-and-white family photo with a wide range of tones helps to evaluate the quality of the printer's reproduction of the entire gamut of neutral shades;
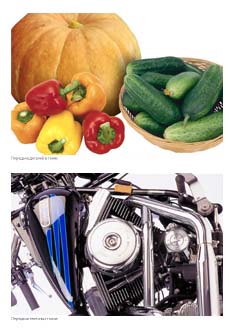
- photography of vegetables. The colors of vegetables and greens are very familiar to all of us, therefore we use them as commemorative colors and add their contribution to the assessment of color rendering;
- photo of a motorcycle engine. Metallic surfaces, glare, and harsh shadows show the printer's ability to produce high-contrast images with deep shadows and "ringing" reflections;
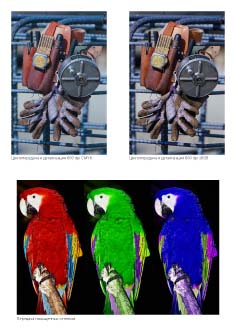
- photographs of instruments contain small details (texture of gloves, leather, scratched metal surface), warm, cold and neutral shades. In addition to checking print detail, they help evaluate color separation algorithms. To this end, one of the photos is in CMYK space and the other has an embedded sRGB color profile. The profile with which the image was transferred to the CMYK space is non-standard, created by us with our own hands. However, this profile has been repeatedly used in preparing images for high-quality sheet-fed offset printing, which has proved its viability. The sRGB profile for the adjacent photo was not used by chance: more and more devices (digital cameras, monitors, printers) declare full support for this space, so it becomes interesting to compare two different approaches: independent color separation in Photoshop or automatic separation by the printer driver. Due to the fact that it makes no sense to print CMYK images on printers that do not support PostScript and then find fault with the color quality, for such devices this test only evaluates end-to-end sRGB profiling;
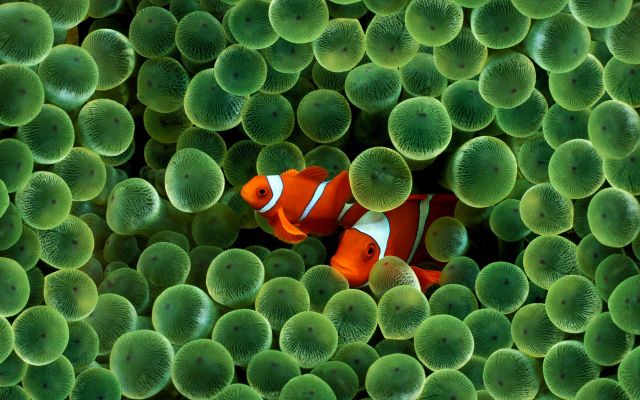
- pictures of parrots are a synthetic test. The feathers on the chest of parrots contain many details, but at the same time they have a pronounced dominant color. Since in real life we rarely have to deal with such saturated colors, this kind of stress test, which reveals the printer's borderline capabilities, will be all the more revealing.
All images (except the photo of the instruments) have a resolution of 300dpi. Photo tools - 600 dpi. Non-PostScript printers use a PDF file with RGB versions of images without embedded profiles (with the exception of one of the photo tools). On PostScript printers, images in CMYK version (except for one of the instrument photos) are output directly from the layout package. For printers that support PDF format, a PDF file is sent with CMYK versions of images (with the same exception as in the previous case). Photo printers are printed from the Adobe Photoshop CS package, each image (in the RGB version) is printed in a separate session. Also for photo printers, the time elapsed from the start of a print job to the output of the finished sheet is measured.
The test runs on all types of printers. The result is a visual assessment of the printed samples and time in minutes, seconds.
6. Other
Along with the main characteristics of the printer, it is also important for the end user to know such parameters as the noise level of the printer, the ergonomics of the controls, the thoughtfulness of the design, and even the aesthetic impression of the printer. appearance printer. We do not attach absolute importance to these parameters and evaluate them subjectively.
Paper used when testing laser printers:
- uncoated paper with a density of 200-220gr/m 2 .
Paper used when testing inkjet printers:
- plain, uncoated, office paper with a density of 80g/m 2 ;
- third-party universal glossy inkjet paper;
- third-party high-quality glossy photo paper for inkjet printers;
- high-quality inkjet photo paper recommended by the printer manufacturer.


