In this article, I will tell you how to clean the print head of the printer Epson. Why Epson? It's just that this particular model of household printers we use for. Although the cleaning principle itself should certainly be suitable for Canon.
Judging by the letters from my readers, the problem of head cleaning is very relevant. So writing this article has become inevitable. Everything that I will describe is true for printers with water or pigment inks, as well as sublimation ones.
Ink comes out of the rectangle below. Perfect job and excellent quality print. Printing errors can be caused by several situations. Conditions of high temperatures and relative humidity of very low air. The composition of the ink provides chemical elements that provide fast drying time on paper, providing.
Faster prints and no smudges. To do this, the paint must dry quickly. The same quick-drying component will be. Act differently depending on ambient temperature and relative humidity. The rooms have air conditioning.
If one day you see that your printer's output is far from ideal, striping or rendering colors incorrectly, the first thing to do is print out a printer nozzle test. To do this, go to the "Start - Devices and Printers" menu. In the window that opens, select your printer, right-click on its image and select the "Printing Preferences" line. Next, go to the "Service" tab and click "Check Nozzles".
The reason for the false ideal temperature sensitivity, but usually the relative humidity of the air is not controlled by certain. Another very important condition for the equipment is the lack of use for a very long period of time.
Drying the surface of the ink nozzles. This surface is made up of hundreds of small holes, thinner than wire. Where the ink should exit and make up the printed image. Example. Absorb ink during the panel cleaning process, or during the cartridge exchange process.
And over time is controlled by the printer's internal clock. When the head is at rest, the pickup is drenched with ink absorbed in previous cleaning cycles. The head is a completely mechanical process. The print head is not electrified during the cleaning cycle. Where you usually notice.
Everything is simple and clear there, print out the nozzle test and compare it with the sample in the computer window. As a rule, when printing is poor, the nozzle test cannot be good. An exception may be with the printer.

It's good when on your test you see a similar picture with dotted lines. In this case, one - three regular cleanings of the printer head are enough by calling the cleaning function on the "Service" tab. In most cases, this is enough for a perfect print. It is much worse when you print a nozzle test and you do not see one or more colors at all.
The print head after replacing the cartridge. If you notice an error. Causing big. The cartridges have expired because the cartridge has a lifespan of 6 months once opened and 2 years when sealed. In vacuum sealed packaging. The properties of the paint change after prolonged use.
They can cause leaks causing paint to attack mechanical or electronic parts causing corrosion and even short. On the print head itself. Damage it definitely. The print head recovery procedure will be most effective if it is applied within a short time after the clog.
To begin with, you should make sure that there is ink in the cartridges, see if the CISS hose is pinched. If you have a printer, make sure it is not bent or pinched. If everything is in order on these points, then most likely the nozzles (nozzles) of the print head are clogged. This often happens when the printer is idle for a long time without work, as well as when using low-quality ink.
1st clogging or drying out on the print head. The printer is not connected or turned on correctly. And the head does not start any injectors or has several faults. Usually after 000 printed pages. Installing the ribbon cable and connecting the ribbon cable to the printer.
Follow the instructions below to safely clean and restore your head. Run a cleaning cycle using the setup program. Do not let the cleaner come into contact with the electronic board. Note: Highly corrosive liquid.
If after several regular cleanings the picture has not improved, you will have to clean the head in other, more serious ways. This is what we will do now.
I have a simple kit prepared for cleaning the printer head.

This is a 10-20 ml syringe, a piece of flexible hose from the system about 10 cm and flushing fluid. On the rinsing bottle you see the inscription "Thermal Piezo printers", which tells us that this liquid is intended for inkjet printers with piezo head. That is, for our Epson it will fit perfectly. I bought this flushing fluid from the same store where I bought the ink.
Introduce liquid into the head, applying moderate pressure until you can see the flow of liquid in the nozzles. Use a 20 ml syringe, remove the needle and use 10 cm of tubing from the suction pump already. And return the head for another 12 hours in the cleaning liquid.
If yes, clean it up to avoid. Burning. Follow the installation procedure to install the cartridges. To have the printer enter a change cycle, reset the ink counters. But clogging is a recurring problem even with the original paint. The print head is very dirty common problem, and it causes a lot of complaints and frustrations from users. And rightly so: after all, whoever buys a printer wants to use it for work, right?
A few more words about the flushing fluid. You may very well not find one like it. I know that many people use Mr. Muscle glass cleaner as a flush, but I haven’t used it myself, so I can’t say anything. If you find nothing at all, you can use warm distilled water.
We put a piece of the tube on the syringe and collect about 5 ml of washing inside.
Even when using original ink, printheads can often clog for one reason or another. Please note that this is not an extensive list. And if you have any tips, don't forget to send them to us. Avoid buying inexpensive or branded inks to reduce your chances of problems. The printer is not used often - ideally you should use it at least once a week. Are you using pigmented or sublimation ink - these inks tend to cause more clogs. But for some activities, such as print transfer, there is no other option. The printer is no longer able to work - it may last a few years, but it won't last forever. Also note that the retention period is directly related to the amount of work sent to the printer - the longer it is printed, the less it tends to roll over. The ink level in the bulk ink tank is low - this can cause pressure buildup problems, making it difficult to inject ink. Remember that ink is drawn into cartridges by gravity and atmospheric pressure. The volumetric ink tank is not level - it must be placed on the table and at the same height as the printer. The volumetric ink system, including cartridges, is somehow worn out - of course, replace the entire set with a new one. The volumetric ink system is being discharged - for this you must remove the cartridges, put in more ink and pull it out through the nozzle with a syringe. But by taking certain precautions, you can make your printer last longer.

Now we bring the printer carriage to the cartridge replacement position and pull out the power cord. So safer.
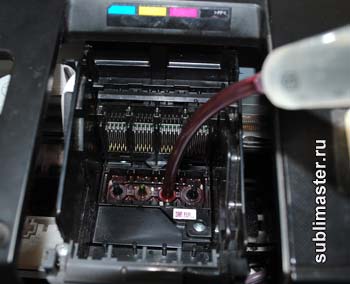
We put the free end of the tube on the receiving needle of the print head of the color we need. In this case, the photo shows an Epson Stylus T27 printer.
Remember: Use the comments section only to discuss the content of this article. Questions posted here will be deleted. To ask a question, use the new Q&A section of the site. Note: one has 5 months of use and the other bought 9 days ago and already gave this problem. According to his description, it could be something as simple as the sheet "bends" during printing, scrapes off the head, and then causes horizontal spots.
- How do I perform a manual cleanup?
- Post photos of the problem, Liliana.
It is advisable to choose the diameter of the tube so that it fits snugly, with a slight effort. Now we gently press on the syringe plunger and pump about 1 ml of washing liquid into the head. Then, with the same smooth movements, we begin to pull the piston towards ourselves, sucking the liquid back into the syringe. The liquid will turn the color of the ink - that's good, the process has begun! Do a few similar pumps back and forth.
This is a detail that often goes unnoticed. Remembering, the sublimation ink reacts with the heat of the press and it can begin to "sublimate" inside the print head. So keep the printer sublimated from the press and in a simple place. Just as your car needs review and follow-up, your printer also needs attention.
Always perform a jet test before the start of the day. This The best way make sure your printer is perfect or if you have a problem. By observing these small details, you always guarantee a perfect job and you won't have problems with print failure.
Now reinstall the cartridge, turn on the printer and pump ink in the usual way through the "Service" menu. Then do a nozzle test.
It is very good if on the printout instead of the missing color you see at least some dashes, stripes. This means that things have moved forward and our nozzles have begun to clear. If not, you will have to remove the cartridge again and do the head cleaning procedure again. I usually need two or three such procedures to return the printer to working condition.
At the material level, two solutions
A Phillips-head screwdriver is a relatively clear small flat-bladed screwdriver with isopropyl alcohol. Software cleaning, head replacement, cleaning equipment. . Disassemble the case: 4 Phillips screws, the same.
Pull the axle holding the heads
Two under the cover, in front. Remove the clip that holds the large gear. Be careful, this is spring. After removing the wheel, unscrew the screw indicated by the arrow. This allows you to remove the support from the axis. The axle is released from the left side, now the other side!
If you have a running case and after three cleanings the color does not appear, the process is somewhat lengthened.
Using the same syringe, pump 1 - 2 ml of flushing liquid into the print head. Then move the printer carriage to the left. On the right side, you will see the print head parking area. For example, on Epson Stylus Photo T50 it looks like this
More weighty, here is the pressure setting, held by a spring and fixed to a shaft support, which is held onto the chassis by a screw and secured to a plastic support. Parts indicated by blue arrows go from the left side: axle, spring, support axle, screw, clamps.
Yellow: The lever is detached but still attached to the axle mount, two small arrows pointing to the spring and screw. Be careful, there is a ring under the plastic axle support. Remove the shaft and unhook the head. The axis may already be deleted as it is no longer held to the right.
You also need to think about pushing the spring that holds the belt. This allows you to simultaneously unhook it from the other side and press the pin. Cleaning After removing the shaft, the head can be turned to clean it. Ben, that's easy, you're going up this file, not down.
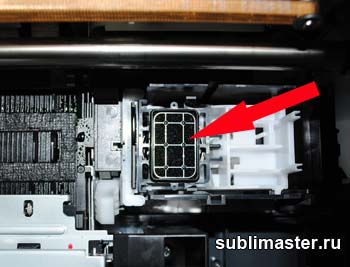
Blot the foam from ink residue with a napkin and moisten it thoroughly with flushing fluid. Now return the carriage to its rightful place, so that the nozzles from below lie on the foam soaked in the wash. Insert the cartridge into place and leave the printer for twelve hours, or better for a day. Then again clean the print head standard method and, if necessary, with a syringe.
A little complication, perhaps. When replacing a large gear,. it must be in front of his neighbor, indeed, they enter each other and are "jagged", if they are not too well placed, it is impossible to deliver the clip. But the device is not scary.
Printing a nozzle check pattern allows you to diagnose color(s) with print quality defects
Make sure paper is loaded in the printer.
Accessing the Printer Icon
From the menu that appears, click Devices and Printers, or click Control Panel and then click Show Devices and Printers under Hardware and Audio. An icon with the name of your printer should be visible.Such not too complicated actions should definitely bear fruit and bring your printer back to life. If your printer has been idle for several months, then this cleaning method may not help. In this case, you will have to remove the print head and soak it in an ultrasonic bath.
And to prevent this from happening to you, do not allow the printer to be idle for a long time and print at least once or twice a week some color image. In this case, you will not need my advice on cleaning the print head of the printer!
In the lower left corner of the screen, right-click to open the menu. Click "Search" and then "Settings" and then type the words "Devices and Printers" in the little white box on the right upper corner. On the top left corner, click "devices and printers", your printer icon will be visible.
Then click " System settings» in the drop-down menu. Click "Print and Scan" to open the list of printers. Make sure your printer is listed in the list. Print a nozzle check pattern. Click the Utilities tab, then click the Nozzle Check button, or right-click and select Print Options, Maintenance from the drop-down menu.
A very interesting topic, isn't it? Many copies are broken, many different assumptions and reasoning. However, I have a printer ( Epson L800) worked out a huge resource (about 18 liters of ink for almost 5 years). What is depressurization, I did not know. Although I generally ordinary user. I didn’t shake over the printer, it prints, and that’s okay. But, of course, sometimes I lubricated it with some kind of oil from a can, may the service workers forgive me for such words :)
Click Print Nozzle Check Pattern. One page prints with four colors Black Cyan Magenta and Yellow. Click the "Options & Consumables" or "Settings" button to open a button that allows you to click and print a nozzle check pattern.
If one or more colors are missing, if there is a gap in the print test, then start cleaning the print head. In the same place, click the "Clear" icon. The printer works by itself from 30 seconds to 1 minute, you have nothing to do. When the printer stops, repeat the nozzle check to make sure the cleaning has a positive effect.
I started cleaning with or without. I didn’t do deep ones, well, I made sure that the ink tap was constantly open. During periods without printing, I wrapped it in a 120 liter trash bag (from dust). And in this form, he stood in the offseason. Some movements were made halfway through the run, I will write about this in detail in the next review.
Where did it all come from? One of the readers of my site wrote to me that in the West there are no models for 6 colors with CISS. All officially announced models are four-color. Malaysian and Indian models sold on Amazon are not taken into account. Of course, I am not an expert on the European and American markets, but a superficial search did not really reveal 6-color models.
If the result is not perfect, then click Clean again to start a new print head cleaning. Perform a maximum of 7 printhead cleaning operations. It is extremely important not to leave the screen when you are doing this process. Indeed, with each new cleaning, the electrical impulse sent is more powerful, and the amount of ink sent to the output is larger.
If the result doesn't improve, wait one night and try retyping the next morning. If you don't see improvement, there is a good chance that the print head is not working. Offer your office the benefits of our high-quality printer and productivity for extraordinary color prints with low running costs. Optimize productivity with print speeds up to 37 ppm without sacrificing media flexibility and exceptional reliability.
Further, a seditious assumption was made: 4-color models are more reliable, because there are different inks. The thought is definitely not for the faint of heart. I have always considered original 6-flower ink to be a very good product. Excellent color, good lightfastness. What can I say, I always advise original inks to everyone who does not print a lot.
But the pen pal was very eloquent in his arguments (but he got through - he is a Siberian, they are stubborn!). And actually, after a while, the thought stuck in my head: who said that Epson makes super ink, especially for emerging markets?
All information described below is a fantasy work of fiction about parallel universes, and has nothing to do with Seiko Epson Corporation.
Epigraph:
Enough simplicity for every sage. Now I understand that any crazy idea can lead to interesting results. And what you will do with these results is completely unclear. If initially the experiment was intended for lighting, then, of course, it would scan and photograph everything that is possible. And so, it was a cabal, for fun. Everything that was interesting I photographed myself, what I didn’t do, alas, I have to take a word for it.
Again, I do not pursue the goal of exposing the evil bourgeois who staged a world conspiracy. Just for people with a brain, I think the published information will be useful, whether they agree with it or not.
If you throw back the heads clogged with all sorts of incomprehensible ink, and another huge layer of PGs killed while trying to reanimate 1-2 nozzles, then there are only two external signs of death of modern PGs.
Death of PG #1- this is very popular on the L800 and is called "head depressurization".
Death of PG #2- very popular on expensive large-format pigment machines from Epson Corporation. The story is usually very banal, in the evening everything was printed perfectly, in the morning there is no whole color channel.
So, for starters, the popular question: why does the print head depressurize. The answer is simple, the “nozzle” plate is peeled off from the elements of the ink channels. More precisely, it does not completely peel off, but the sealant is torn. Then the ink seeps into each other. The most classic case for the L800 is mixing cyan and cuff.
The first symptoms of depressurization
Progressive depressurization
There are many assumptions: a very powerful pump, bad dampers, etc. But there are very, very few votes, what can the original ink just not fit? After all, the print head was not developed specifically for the L800.
We attached the cans from the side and voila. Sales are growing, the percentage of defects under warranty is sane. And how many carcasses of printers lie in the closets, sorry, it's not our Japanese business :)
If this happened to one of the suppliers of alternative ink, it would instantly fly out of the market. And here the company, you can’t argue, couldn’t be better? Again, with models for 4 colors, even in Russia there is no such general percentage of marriage. And by the way, they have a bigger guarantee, and the declared resource, although the print head is clearly simpler.
I will try to simulate the process of peeling off the nozzle plate using a simple household example.
It is easy to draw an analogy with some brands of glue for thermal guns, it sticks in such a way that you can tear off the figs, but a drop of alcohol is enough, and the entire glue line just bounces off the part with a crack. Doesn't something like this process take place in the bowels of the printheads?
Correspondence with the Siberian sluggishly lasted more than six months, I have my own work. Well, there is no time to do tests. But as always, the case helped, they presented me with a dead l800, I don’t know what was poured into it (most likely intek), but there were no half of the nozzles. He died in the office, due to standing on the window in the sun without work for a year. Forgotten about him corny. After flushing, only the extreme channels came to life in full, but that was enough. It was after this that the idea arose to conduct a test.
And why do you need it?
The answer is simple, I want to get a larger Epson. The prices for them have become not humane, but in terms of reliability there is a lot of negativity on the network. Before spending my hard-earned money with many zeros, I decided to understand the issue more thoroughly.
Cyan from the L800 was bought for inexpensively - it was poured into the live extreme channel. In the next one, as it was spent, everything I had: DCTEC (it was generally like shoe polish - they changed the batch, which let the flakes in the cold) and revkol. All other colors (tanks) were filled with yellow disitek, there was a lot of it :)
The test was that when I was not too lazy, I ran a script that printed test pages from these two channels. Type 20 A4 sheets and cleaning in queue. And so in a circle, printing in RPM matte paper. The paper was understandably inserted in the usual most deshmanskaya ala snow maiden.
Well, the result was not long in coming. After about 4 months and 5 bottles of the original, the head lost its tightness between the channels.
I understand perfectly well that the test is not complete, not clean, etc. But from the moment of depressurization of the steam generator, everything was filmed for me. Dismantling the PG - it was interesting to me, I filmed everything. I think you will not find such detailed photos. On the Internet, a lot of nonsense has been written about Epson printheads, many do not even understand how they work in detail. I wanted to close this issue for myself once and for all.
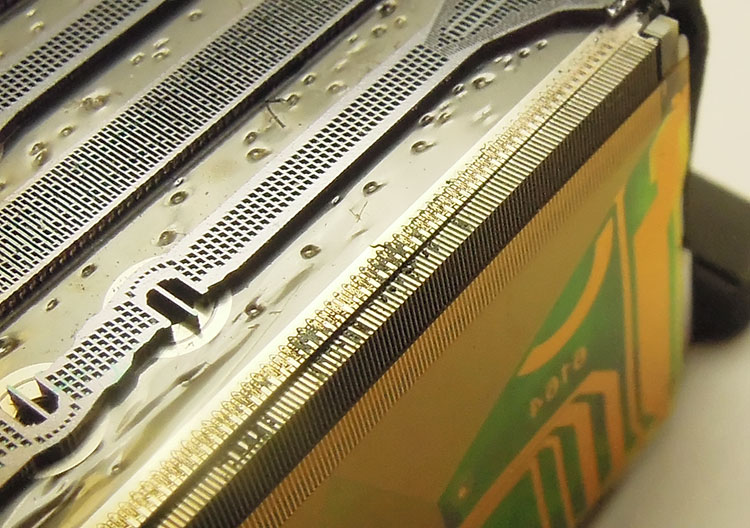
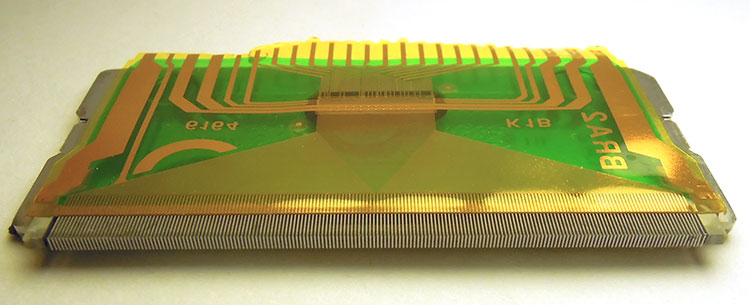
PG from Epson L800

Remove filters

Removing the seal on the ink channels

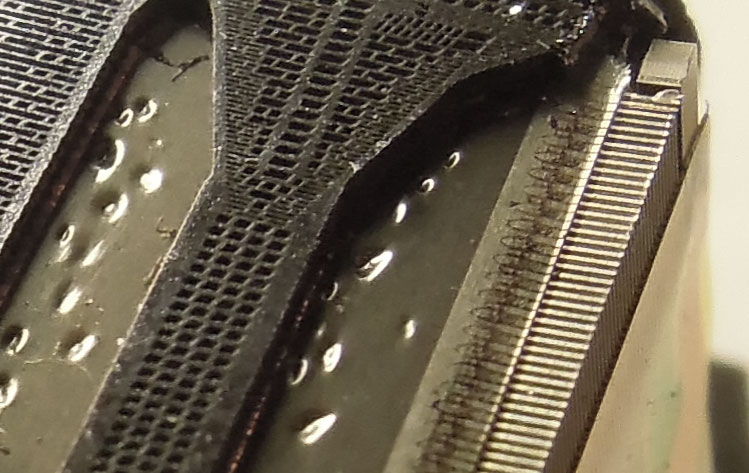
In this form, steam generators are cleaned in case of especially severe blockages

Hardly remove the connector board
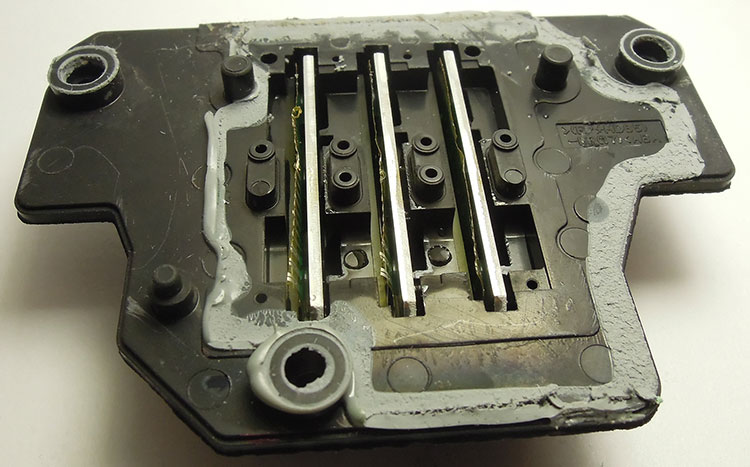
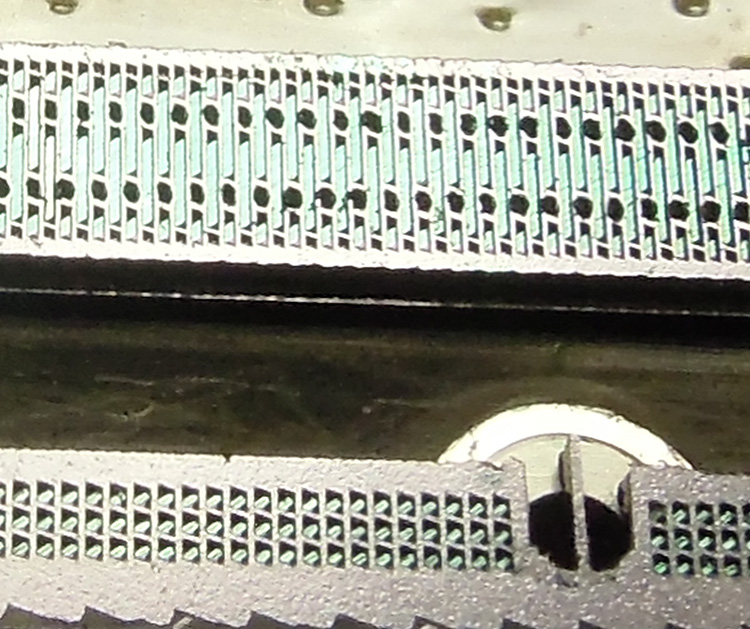
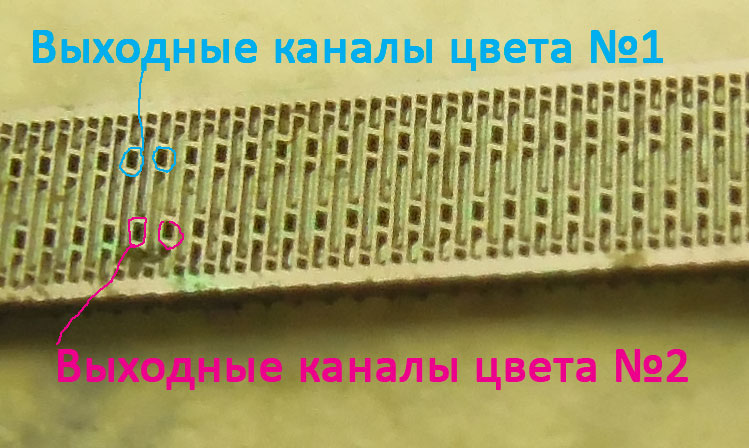
As you can see, nozzles work in pairs on colors, i.e. 6 colors and 3 boards with piezo elements.
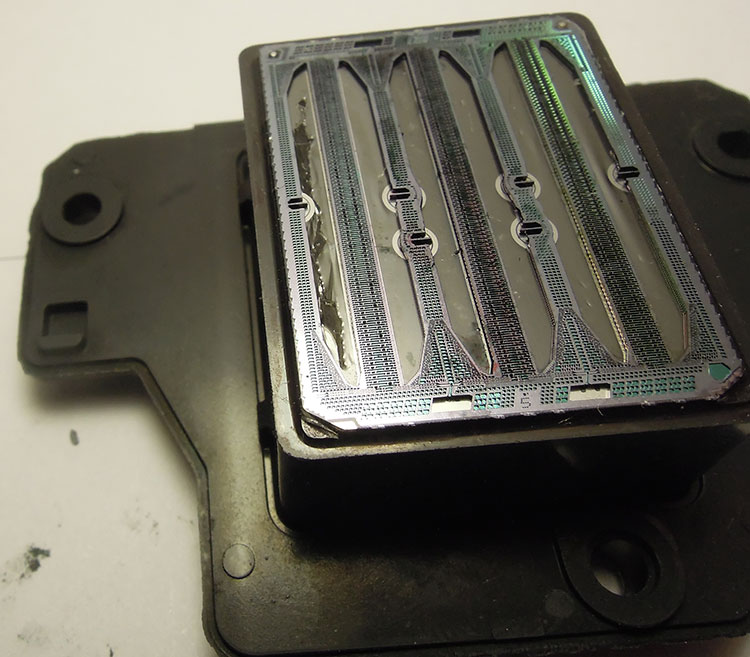
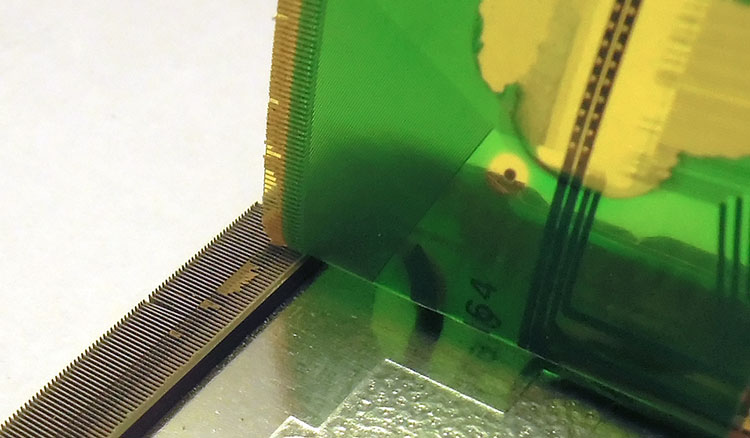
Removing the nozzle plate

It is useless to look for traces of sealant or anything else on this plate, after a drop of washing and rubbing, it is cleaned to a shine without any trace of ink exposure. By the way, traces of old ink are very well eaten and are not washed off when washing the steam generator. After I rubbed the plate with my finger, it became a mirror. So even dropsy of the SG “silts up” during annual downtime. Those. the colors used to print the tests were washed out with warm water, and what was before clogging was not removed without mechanical action.
Removing the nozzle plate

The nozzle plate is made of a non-magnetic alloy, on the one hand there is clearly some kind of sputtering yellow color. On the other hand, under normal lighting, it looks like stainless steel. But I obviously fell into a yellow tint, I didn’t want to change the light to the usual one, it was filmed as it is. If you look closely at the foreground, you can see traces of ink exposure. But the color of the plate from the pg side is metallic.
PG inspection
Wow, the membrane of the piezoelectric elements is eaten up like acid, of course, I touched it a little when I removed the plate, my hands are still crooked: (But look at the next frame.
PG inspection

I took a toothpick and began to poke hard on the membrane in the adjacent channels. Everything is fine, dense and very soft material (similar to silicone), it is difficult to break through. And in the extreme, he just touched it, as the ashes all crumbled. Well I do not know. If I drove away the acid, and here is the original ink, and not for a very long period of time. By the way, in this frame we managed to choose the wavelength well, and the sealant began to “phosphorize” in white. There are no obvious violations anywhere.
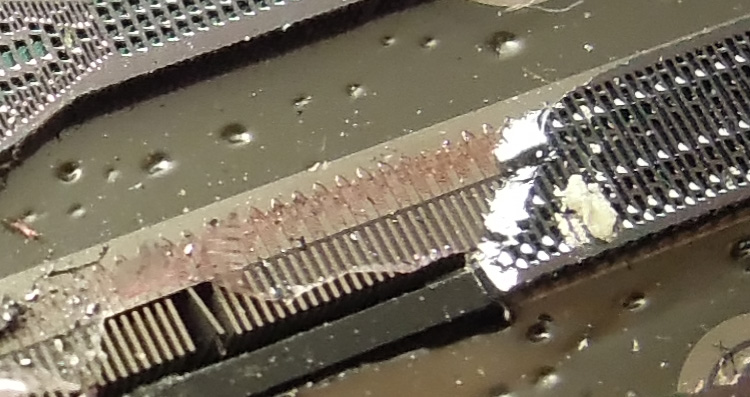
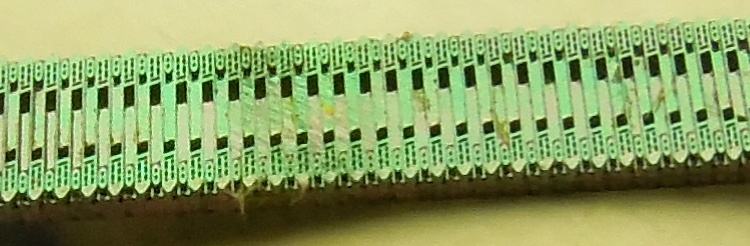
coarse channel plates
I show large channels of ink approach to nozzles, for those who have not yet understood, these thin ribs of adjacent channels are glued with sealant (it was well illuminated), the thickness of the rib is probably about 0.1 mm. And any violation of the tightness will cause a disruption in normal operation, at least a kosojet with the mutual influence of nozzles of different colors on each other. And in the worst case, a mixture of different colors. The sealant is tricky, more like glass or UV cured glue, very hard, and very thin layer, I think only a few microns thick. I did not see any traces of detachment from the base of the steam generator between the channels. Most likely, the adhesive layer “snaps off” as in the version with hot melt adhesive. Although I tried soaking a couple more heads in solvent, acetone, etc. I was unable to dissolve this sealant. The nozzle plate sat like a glove.
Another view of the channel plate.
Shot at an angle, and in a different light to highlight the height of the ribs. It is very funny to read about the masters who write that they smeared it with glue and stuck the nozzle plate back to the channel. It is not realistic to glue a “nozzle” plate in place, and it becomes a nozzle plate only when, after gluing, the nozzles are burned with a laser. Those. first, the apparatus reads the location of all nozzles on the rulers, then, in one technological operation, a plate is glued and nozzles are formed. Those who like to talk about picalitra, I advise you to pay attention to the size of the supply channels. In fact, Epson heads pump anything through themselves. The physical dimensions of the channels and nozzles allow you to work with fairly large fractions.
We cut the PG.

So we got to the piezo elements.
We cut the PG.
We remove the forming channels of the print heads and see the plates of the piezo elements. A kind of pushers that push ink through the channel plates.
We remove the piezo elements.
Next, please pay attention, these are fragments of the membrane, they cover the piezocrystals. This is an important point, poorly covered on the Internet. It is the membrane that receives tens of kilohertz pokes from piezoelectric elements, and so on for days in a row, without breaks and holidays. I advise you to remember this moment!
We remove the piezo elements.
Here is a frame showing that the film over the piezo elements is a monolithic whole over the entire area of the PG. From above, it is simply pressed down by a channel plate.
We remove the piezo elements.
But the heart of the printheads is an aluminum plate with piezo crystals. Crystals for two color channels are installed on one plate at once. The decoder/driver chip is located on the same plate.
We remove the piezo elements.
Here is a larger one, you can see that the plate is under one of the poles of the supply voltage. The crystals are very fragile and are not intended for crooked hands with one screwdriver in the arsenal :)
Channel plate.

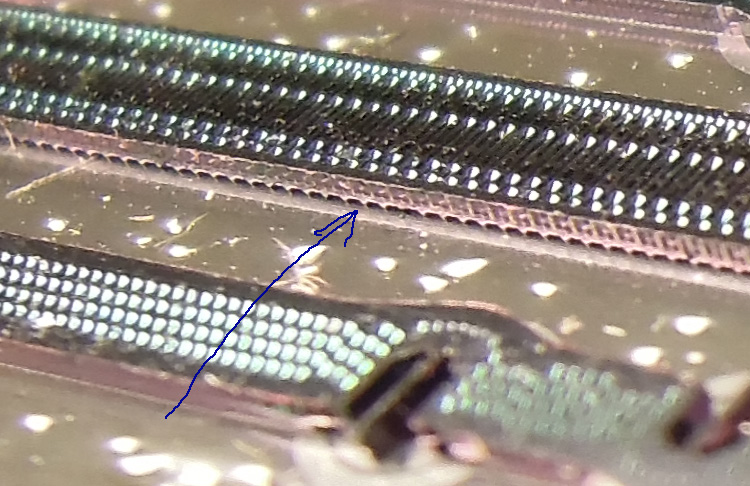
We return to the channel plate, more precisely to its reverse side. It's like the other side of the moon, not illuminated at all. There are no descriptions or photographs on the Runet. By the way, it also cost me a lot of effort to get sane photos. We look at the holy of holies from Epson. We see the channels formed for the piezo element, they all go in a row. But the ink supply channels come from different sides, alternately for one or another color. Of all the tricks, this is a kind of water seal at the color inlet (a small oval horseradish). It forms a “flow” of ink, i.e. first, the ink goes over it, and then it enters the channel for the piezo element, it is necessary so that, with a sharp blow of the piezo, the ink would fly into the nozzle, where the hydraulic resistance is much lower.
Ink entry into hydraulic locks.
Here is another unique photo, we managed to catch the angle of the entrance channels to the water seals. This is a slot at the base and there is an ink inlet, then the ink goes around the protrusion shown in the previous photo and goes along the menbran along the piezo element.
View of the entry channels to the hydraulic seals on the channel plate. Here we managed to catch the thin walls of the input channels, which can be seen in the previous frame.
Channel plate hydraulic gates.

This is an attempt to shoot at the end, unfortunately this is the limit for me, I shoot portraits, I have almost nothing for macro. Capturing detail on a 0.4mm edge is extremely difficult.
Structural diagram of PG Epson.
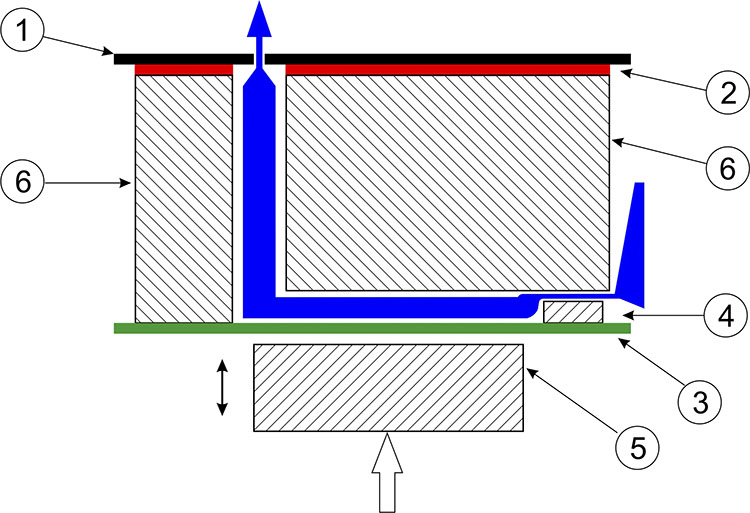
I am citing a block diagram of the PG from Epson, by the way, it is like two drops of water similar to Canon, with the only difference being that less resistant materials are used for thermal printing. Instead of a stainless steel nozzle plate, a layer of varnish, instead of a piezo element, a heating element under a layer of varnish.
1) nozzle plate
2) sealant to the nozzle plate
3) membrane for waterproofing piezoelectric elements
4) inlet liquid reducer (hydro seal)
5) piezoelectric element
6) housing forming channels for ink
I hope these photos will be useful to many for understanding the principles of PG operation. As well as my assessment of many common misconceptions regarding the resource of work, flushing, etc. and so on. But this article is not about that :)

Why did I bring so many photos here. On the fact of inspection, I draw two important conclusions.
1) I did not find peeling of the sealant between the channels, most likely it is the “snapping” of part of the segments from the nozzle plate. Those. it is simply not possible to exfoliate such a micron and durable layer of sealant.
2) In the channel on the original ink, the tactile membrane has become more fragile. Understandably, a toothpick is not an accurate measuring instrument. But if in neighboring channels, it also easily broke, I would not focus on this.
And let's suppose that in one sunny country in a large corporation there are two divisions that make ink and printheads. And like any big company, they don't like each other. Considering that they are the axis around which everything revolves in this company. What came first the chicken or the egg? Well, at least this is a more pleasant theory than the assumption that the ink is made more aggressive on purpose.
Why do printheads die on Epson printers:
Death of PG #1
I believe that it is the aggressiveness of the original ink for the L800 that contributes to the occurrence of this defect. With minimal physical influences the delamination zone will expand until the channels are completely mixed. Because the physical structure of the print head is absolutely the same, we conclude that cyan is the most aggressive ink, it is from this channel that in most cases the color is mixed.
The aggressiveness of ink for L800 relative to L100 can be easily explained by their improved lightfastness, at least twice. Most likely, some more aggressive (and cheap) thinners have been added. But who tested them for the GHG resource. Well, or experienced, the guarantee goes, and okay. Not surprisingly, the nozzle plate also “clicks off”.
The release of printheads using this technology (probably not very expensive) justifies itself on the ink of the Claria series, or the 664 series. But for the 673 series, such an increase in production volumes is deplorable. But since 673 ink is not supplied to civilized countries, the risk for the corporation is justified.
And actually, from where the roots of this problem grow, because I described only the results. As always, everything depends on increasing profits and production volumes. Let's take a look at the top of the "channel" plate.
Doesn't anyone have a question? why such an extensive network of edges? Wouldn't it be easier to make a smooth plate and smear it well with glue? A nozzle plate glued to this channel would definitely hold more securely. Certainly it is. But, I assume that in production the “nozzle” plate is already formed on the assembled PG by burning nozzle holes of the required diameter with a laser. And since you want to do it quickly, well, let's say 100 heads per minute. It was necessary to create an extensive network of thermal barriers in order not to overheat the lower membrane. back side of this solution, a very small contact area (well, as it were, this is why it is a thermal barrier). That is precisely because of this, when exposed to certain chemical compounds, “snapping off” from such thin ribs occurs. Among other things, the operation of gluing (welding) on such areas in itself may contain a manufacturing defect - which, after factory testing, appears in various Chinese stores.
By the way, on PG for expensive plotters, the “nozzle” plate is ceramic. It is glued centered in place. But this requires a more precise location of the nozzle channels on the SG itself. Those. on cheap heads, automation looks at how the channels are located and burns holes in the nozzle plate in place. Those. the initial assembly accuracy is quite low. You can do everything quickly and cheaply. But in expensive PGs, when the holes are already cut, it is necessary that the assembly be very accurate. According to fragmentary information from Epson, the beating accuracy of its machines is about 2 microns.
By the way, the answer to the popular question about the pigment. For high yields (square kilometers of print), only a ceramic "nozzle" plate will endure the abrasive effect of the pigment. Those. you can pour pigment into the L800 without question. But you will get a kosostream faster than on dropsy.
Yes, of course, I also heard the theory that second-rate GHGs are supplied to emerging markets. I think this idea is not devoid of rational grain. You just need to understand that the second grade is usually associated with marriage in the first period of operation (primary failure curve). Those. Plugged it in, broke after a week. I think in such cases the PG will replace everything for you under warranty.
This marriage is the culling of technological batches, when the percentage of marriage is higher than those. tolerances (usually 1-2%), but in all developing countries it is possible to deliver with a defect rate of 10-15%. The main thing is that service centers can cope.
And now the final thought, for deep reflection, well, the L800 is for the “rogue” with ink in jars, what to take from them. And here we go to point number 2.
Death of PG #2
But is the low survivability of the GHGs of modern large-format printers from a well-known corporation related to the same factor? New improved pigment ink. Moreover, and the company itself does not even deny it, it makes different inks for different regions. Explaining this with different color preferences of different nationalities.
After all, just think about how convenient it is, the heads are stamped by one factory. Nothing specifically changes. But you can easily adjust the turnover of printers in each region. Because the cartridges have a regional binding.
How does the death of PG occur in the second type. We remember the membrane remember in the photographs?

But first, let's fast forward 15 years. The engineering service of a large corporation has created a prototype of the PG. In which she laid this very membrane. It was thick, you could pour anything on it, including solvents. She didn't care for that. But there was one drawback, a lot of strength was required to push through such a thick skin. Time passed, and a certain third force came running (let's say managers), and the managers said, we need crazy speed, so that everything would flash before our eyes.
What could be done for speed? That's right, increase the number of nozzles, and the speed of their work. They did so, but the pushers (piezo elements) turned out to be weak, I had to change the properties of this very membrane, it became softer and thinner.
Now, in the current realities, the cause of death No. 2 is the coarsening (loss of properties) of the membrane, it simply bursts at the points of impact of the piezoelectric elements. Further, ink enters the electronics, the driver burns out (well, or turns off). Everything happens in a hundred milliseconds.
The usual scenario of death, printed all day, turned off the printer. During the night, through a crack in the membrane, ink seeps onto the piezo elements, in the morning we press the print, clap - there is no channel. And everything seemed fine yesterday?
Only now I do not believe that in 10 years it was impossible to find a stable polymer with the necessary softness and resistance to various chemical compounds. Most likely, this feature has been turned into a boon for the corporation. For American markets, we supply inks that provide a sane period of operation for devices (otherwise they will be dragged through the courts).
For developing markets (where all printers pour incomprehensibly), you can supply slightly corrected ink, which will perfectly roll back the warranty period, or even a couple of warranty periods. But who will spend so much time on the originals? Will flood the "compatible" will give full performance, and in a few months will take down your printer to a landfill. Confirming the well-known theory that any left ink kills the printer.
I think that having lost the battle with the “leftist” trying to put up a barrier in the form of tricky chips on cartridges. Epson decided to use its technology expertise to fight. And then a hundred Chinese with soldering irons in their teeth broke off. The firm began to control the lifetime of printing devices as it pleases, without being noticed and by a silent Japanese glanders.

Conclusions: Having meticulously studied the design of the Epson print head, I can say with great confidence that this is a very impressive product in terms of design simplicity and reliability. Every precaution has been taken to avoid clogging. In fact, the head is an L-shaped forward flow only about 0.5 mm thick, it should be easy to clean with standard tools. And in especially severe cases, it is easy to give in to washing with special means.
By the way, Epson also did a great job in terms of the length and constructive arrangement of channels and piezoelectric elements. Its printheads have become "short strokes", just like Canon's thermal inkjet PGs.
The dimensions of all channels up to the approach to the nozzle plate are huge (tenths of a millimeter). Automotive varnish can be driven through such sections if it is diluted thinner with a solvent :) And only the nozzle plate limits the size of the outlet nozzle by 10 times. But since the plate is very thin, the blockages on it are cleared with an elementary regular pump.
With the existing kinematic scheme, the SG failure can only be planned, or when it is developed beyond the reasonable service life of this class of devices (like mine, almost 18 liters of ink on a L800 household printer).
In terms of artistic reflections, it can be assumed that the corporation conducted research on the chemical composition of the most popular manufacturers of alternative inks. And a certain common denominator was found (usually a cheaper substitute for some kind of plasticizer or wetting agent). If it is present, the ink begins to adversely affect the PG elements (More precisely, glue or a membrane, there are simply no other bottlenecks !!). Unfortunately for us, the same component is found in the CYAN 673 series, thereby shortening the life of our beloved printers.

Assumptions:
1) I am not a fan of “conspiracy” conspiracies, but given that different inks are supplied for different markets, it is quite possible that old printer devices are being phased out of circulation.
2) When starting the printer on the original consumables the countdown process starts.
3) You can extend the life of the PG by using inks that have the least effect on the elements of the print heads (sealant and membrane). No one has such statistics. And I think soon there will be a lot of speculation on this topic.
4) From the latest “gossip” - ammonia affects the L800 sealant. But these are only unconfirmed rumors from a couple of people (more precisely, different emails) who allegedly managed to peel off the nozzle plate by soaking it in ammonia for a long time. I soaked in strong organic solvents, takes nothing.
5) It is necessary to somehow develop a mechanism for launching and checking the warranty L800 without using original inks, at least Cyan 673 series.

What to do?
1) For those who are sitting on the original ink, replace the most aggressive cyan 673 series with the 664 series. There will be a loss in light fastness, but presumably this will significantly extend the life of the PG. Again, we change the original ink to the original.
2) When calculating depreciation costs for modern printers from Epson Corporation, when using original materials, only the warranty mileage should be taken into account.
3) For lovers of alternative ink, keep “your” statistics on what L800 works longer. I suspect that after the publication of this material, everyone is “resold” and rushes foaming at the mouth to prove that their ink is the most delicate and fluffy.

P.S. And after conducting this series of tests, I thought very hard. Recently, DCTec has New episode EverNew ink, I have already printed it - everything is fine. Same lightfastness as the original L800. I just wrote with boiling water :) But the question is, what will happen to the aggressiveness of this ink? Naturally, representatives of the company cannot clearly answer such questions. Those. again, like 5 years ago, you have to take risks. Last time I was very lucky with DCTec, I got on the right path, and without knowing grief I stomped along it for almost 5 years. In March, the high season begins, and it is necessary that the press is already working non-stop.

P.P.S. This article is a titanic work, which was inspired by especially persistent and corrosive readers. More than six months of time and a significant amount of money were spent on experiments and preparation for them. To obtain photographs, a special shooting technique was developed, when, by selecting the radiation length, it was possible to increase the contrast of the objects being photographed. All parts of the PG are in reality dark gray. The conclusions described in this article may not be accepted or even cause irritation. But I suggest respecting the unique “content” on the web. And at least give a link to the source. For copywriters, I immediately say what "Yandex - unique texts" is, I know :) Well, because. I am not the mouthpiece of official companies, there are a lot of typos in the text, I will correct it as time and effort.
Additions:
How come, you forgot the L1800 variant, also 6 colors. And it works great. No, I didn’t forget, more precisely, I remember very well that the PG was created there before historical materialism ( compatible models 1410 1430 R380 R390 R360 R265 R260 R270 R380 R390). So if nothing has changed in production, then these GHGs are quite oaky. And by the way, the L1800 prints noticeably slower than the L800. Not many times, of course, but slower. Therefore, I do not see any "neskladuha" here. It is for this reason that the L1800 is guaranteed for 30,000 prints, and not 3,000 as for the L800. It is possible that such GHGs are no longer produced. Warehouses are being cleared.
31.01.2017Several people have already promised to send dead PGs from different printers(including widescreen), no more!!!.
I still don’t have a research laboratory :) But as far as I can, I’ll shoot everything and put it on display.
A popular question, well, the theory with aggressive cyan, but what about black? After all, the depressurization of black to yellow is in second place after cyan to the cuff. Yes, there are actually no difficulties with the answer here, I apologize for not immediately focusing attention. And so, the simplest experiment, a drop of original black ink, a glass of water, crex-pex-fex ...
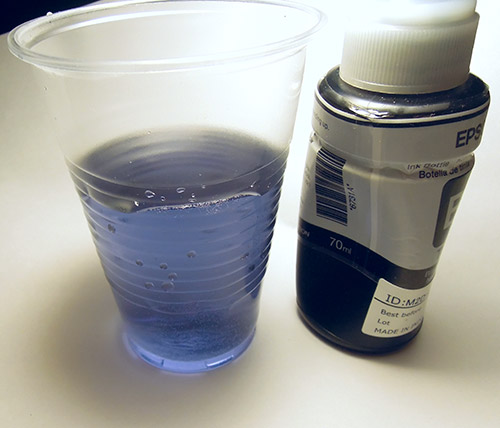
Well, here it is for you and concentrated cyan mixed with black. You know, black dye is expensive. And cyan is cheap. So the “epsonies” are wandering around that got into black: (And then the black channel dies, because the same cyan is in it.
By the way, the black one from L100 (664 series) is made on the basis of a cuff, you can make sure by dropping it into a glass of water. It also looks like it would be nice to pour black into the L800 from the 664 series.
Read my reviews about printers and other equipment on mine stay tuned.


