Love to read? But you got distracted and forgot which page you were on? Then you simply cannot do without a paper bookmark. Use the origami technique, because with its help a wide variety of crafts of any configuration, shape, volume, complexity, color are made. Similar bookmark-corner decorate, decorate with applications, rhinestones, stickers, beads, use paints, pencils and more. We will talk in detail about how to make a bookmark using the origami technique using the example of a unique master class..
Origami is a fun activity for both adults and children. Handmade products are especially beautiful and interesting. For a child, such an activity is not only a hobby, but also an opportunity to show their potential, talent, and imagination. Origami does not require much time and cost, however, it will bring a lot of pleasure to the kid from the assembly process and the result of the work. Just buy colored paper and stock up on desire.
Below are schemes and master classes with a step-by-step description of the work for beginners.
Origami bookmark corner
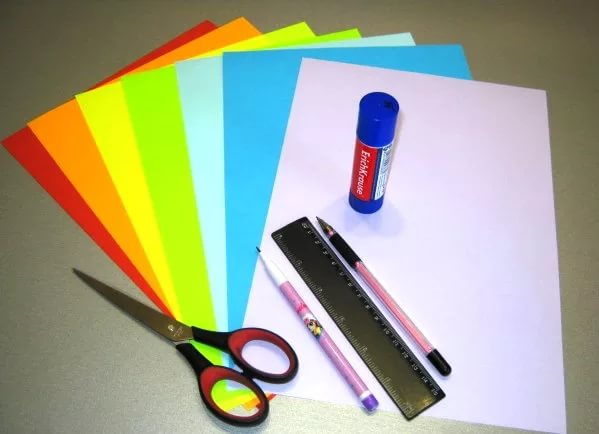
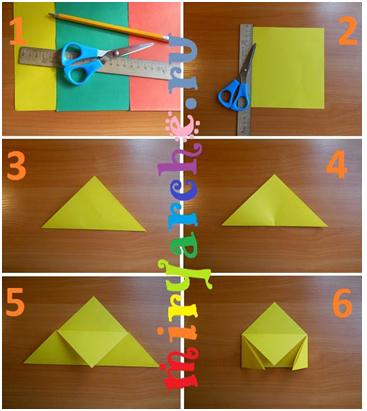
Necessary materials for bookmarking in the origami technique:
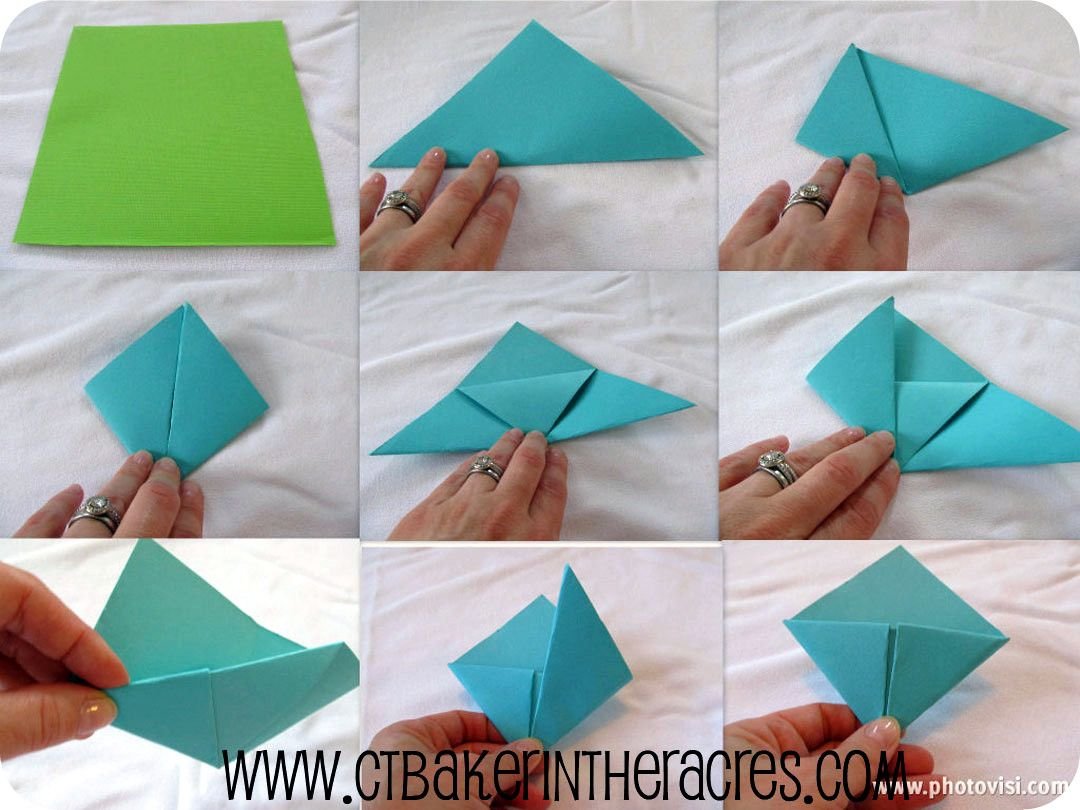
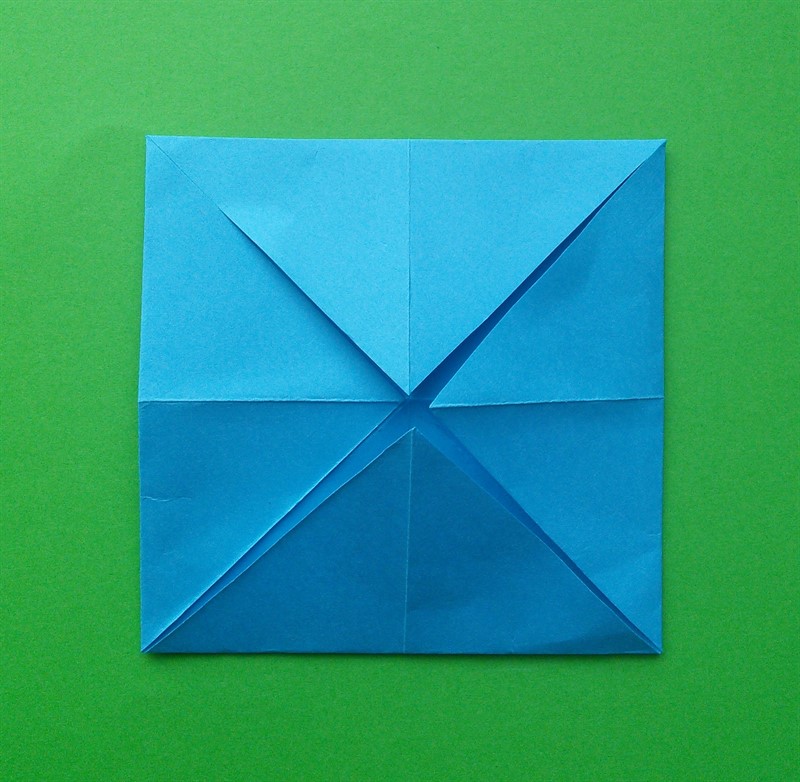
First, learn how to make a paper triangle that will serve as the base of the bookmark. Prepare workplace and necessary material. Then follow the steps described below.
Step by step photo instruction:
Video: origami corner bookmark
Origami bookmark with a modular flower
We continue to experiment with the corner bookmark. Now you need to collect paper modules that will serve as flower petals. For beginners, consider a detailed master class.
Description of work:
Origami bookmark - original corner with a bow
This option is suitable for the female half of the population. Folding it is quick and easy, and the colors can be any.
Description of work:
doll bookmarks
Print for kids ready-made templates, which they themselves will cut out, decorate with gel pens or pencils and glue the PVA. 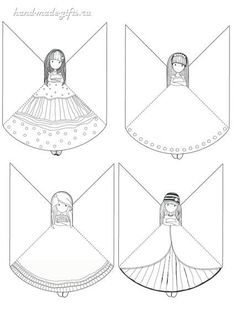
A cute bookmark for origami paper books will look like this. 
Butterfly bookmark
The peculiarity of this craft is that a rectangle is used in its manufacture, not a square. Consider interesting origami, how to make a bookmark in the form of a voluminous butterfly. If you take two-color paper with different shades, the result will be more contrast.
Description of work:
Video lesson: Butterfly - a bookmark for books
Despite the abundance of electronic gadgets for reading and surfing the Internet, there are still people who enjoy the rustle of pages and the smell of printing ink. In other words, those who still read paper books.
These "originals" are probably familiar with the problem of bookmarks firsthand - sometimes they get lost, then they fly out. In general, new ones are needed all the time. An original and cute solution to the problem will be origami bookmarks for books. Paper books - paper bookmarks. Cute animal faces, hearts, corners - just for fantasy, it's just limitless. A suitable figure will be found for themselves by lovers of strict classics, and creative nature, and children.

Making origami bookmarks is very easy, not only novice needlewomen can cope with this task, but also people who have never made anything out of paper in their lives. Children (and, of course, their parents) will especially like this process - the kids will fold the figures according to the proposed scheme with pleasure and complete concentration, giving parents the opportunity to finish reading the chapter.
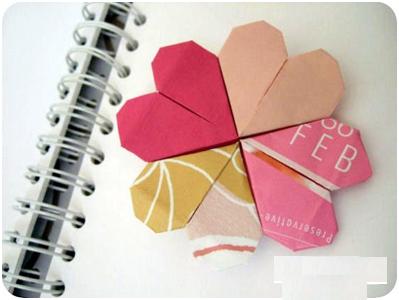
Heart shaped bookmark
One of the easiest paper bookmarks using the origami technique is a cute heart. It is so easy to make that both beginners and children can handle it. The step-by-step instructions are extremely clear, especially if you study the meanings of the symbols used to record the assembly scheme in the origami technique. Step-by-step photos will tell beginners to learn the art of origami how to make a bookmark in the shape of a pretty heart for their favorite books.
Materials for creating an origami bookmark:
- colored double-sided paper (you can use plain or special for origami);
- scissors;
- good mood.
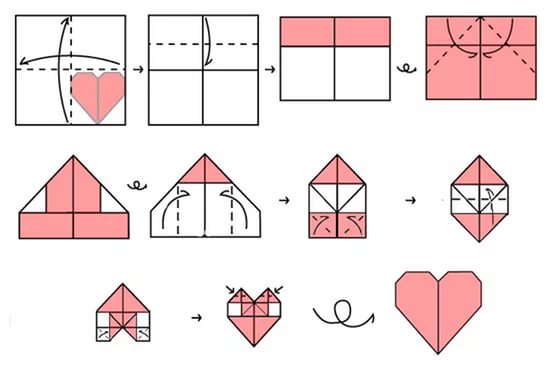
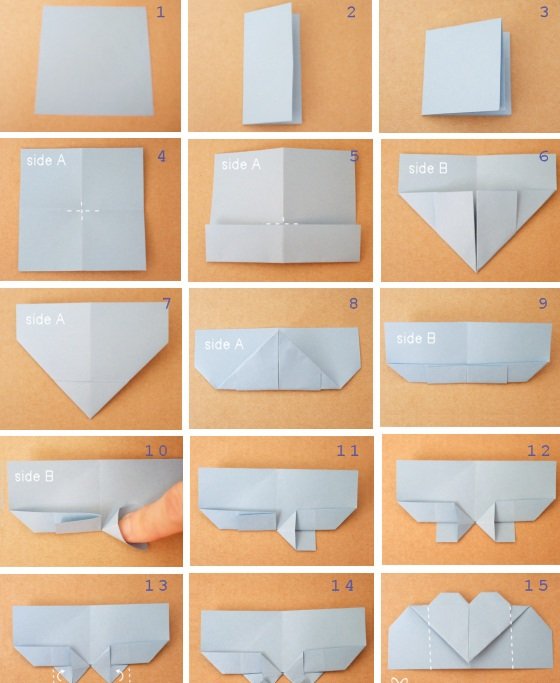
Description: for work you will need a square piece of paper of any color. Two-tone paper works best, although you can make a few test copies from ordinary office paper for practice. The leaf is folded in half. Then again to make a square again.
Unfold the resulting origami figure in the initial state. The bottom edge is folded inward to the horizontal fold line in the center of the square to outline new line fold. The sheet is turned face down, the lower corners are bent to a vertical line. Then the origami blank is again turned over to face itself.
The triangular lower part is folded up to the upper edge. Turn face down again. Using a finger, slightly open the fold, as in photo 10. Smooth out the resulting corner. Repeat the same steps with the left.
The triangular edges on the left and right need to be folded inward. Bend the lower triangle (it will be very tiny, so you have to be careful). For the last time, the origami bookmark blank is turned over to the front side, the excess is folded, following the hint of the dotted line (Fig. 15).
Bookmark for books in the shape of a heart is ready. This is one of the simplest options, which gives quite a lot of room for creativity. Ready-made origami hearts can be assembled into a flower or a clover leaf, you can decorate or pick up paper with patterns, drawings, prints. Using this master class as a template, you can translate your own ideas into paper.
 Especially for those who prefer to see once, a DIY heart bookmark master class is presented in video format.
Video: Origami hearts for books
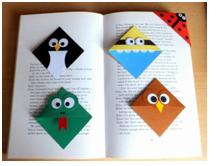
Bookmarks in the form of animals
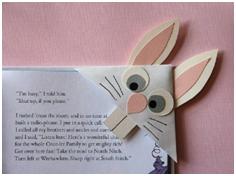
For those who love animals as well as bookmarks, paper origami allows you to combine your preferences by creating funny paper animals that will carefully ensure that the right place in the book is not lost in the everyday bustle.
 The cute faces of these origami crafts will not only serve their direct purpose, but will definitely cheer you up, both during the assembly process and during intended use. Making such bookmarks is very simple, especially if you have detailed instructions with photo and video tips.
Bookmark in the shape of a cat
For work you will need:
- a square sheet of paper, it is better to use colored one-sided;
- patience.
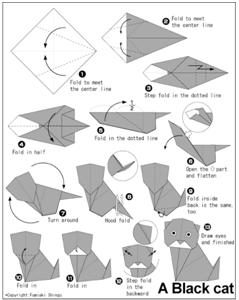 Bookmark assembly process step by step. For convenience, the sheet is folded diagonally, and then unfolded. The marked fold lines will help you navigate the work. The sheet is placed with an angle up, then folded to the horizontal fold line, as shown in figure number 1. Then the remaining "ears" are also folded to the center, connecting on the same fold line.
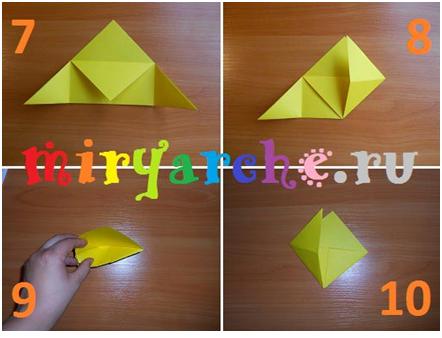
After that, the sharp nose is bent twice along the dotted lines, first inward, then outward. The resulting figure is folded in half along a horizontal line. Fold according to the dotted line indicated in the figure at number 5. The folded part is opened and leveled. The almost finished cat is turned a little.
Form a tail by bending the part outward. The triangles at the bottom, which does not allow the cat to sit straight, are bent inward. Now you can start folding the muzzle. The lower part is folded along the dotted line (Fig. 10). The tip of the bent part is bent back, a nose is obtained.
Ears are made with a double bend (first the triangles are bent back, then forward, forming a fold). The origami bookmark in the shape of a cat is almost ready. It remains to provide him with eyes - you can draw them yourself or use purchased ones.
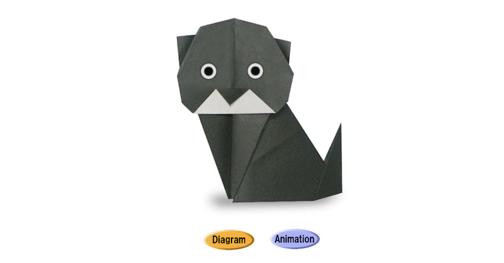
Another version of the bookmark in the shape of a cat, made using the origami technique, can be seen in the video.
Video: Origami cat bookmark
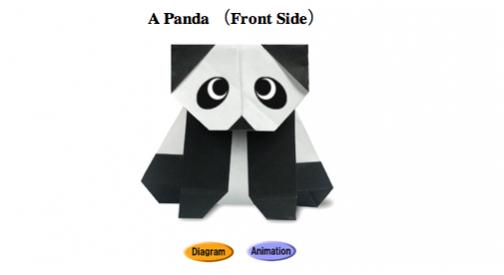
Panda origami bookmark
The materials used are the same as for the cat. The paper must be colored (black) and one-sided in order to get the correct color for the panda.
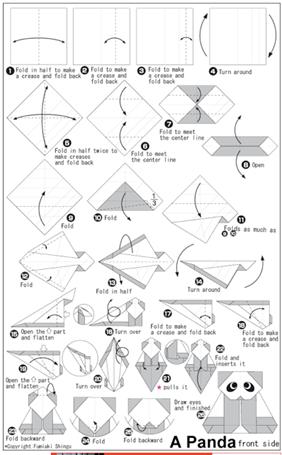 Bookmark assembly scheme: the sheet is folded in half, the crease is ironed, unfolded back. Then one half is also folded in half, ironed and unbent. And after that, a quarter of the sheet is folded in half again, the crease is ironed, unfolded back.
The sheet is rotated by placing the corner at the top. Fold in half, forming folds. The top and bottom corners are folded inward to the center fold line. And then fold again towards the center. The sheet is unfolded to its original position. Finally, the preparatory work is completed, the process of folding the panda itself begins. The bottom corner is folded along the third fold line.
Then the part is folded along the dotted line (Fig. 10) and the crease is ironed. The top corner is folded in the same way. The side parts are folded inwards by about 1 cm along the dotted line (Fig. 12). The blank is folded in half with the black side of the paper inward. Turn counterclockwise. The part marked with a white arrow is opened and ironed. The result is a panda's face.
The workpiece is turned face down (the muzzle is below). A fold is made along the dotted line and unfolded back. Again, the corner is bent along the dotted line, the crease is smoothed out and returned to its place. The part marked with a white arrow (Fig. 19) is opened and smoothed. The panda is turned face up again. The panda's legs are pulled out (in the place marked with red asterisks in Fig. 21). The lower "tail" is folded inward and hidden under the paws. The upper part of the head is bent back, forming a flat "crown".
It remains to make a muzzle for the panda: the triangle below is bent up and then inward, leaving the tip as a nose. They draw eyes (or glue ready-made ones, but it’s better to draw, plastic ones will interfere with the book closing) and the origami bookmark is ready!
 The whole bookmark assembly process can be viewed in detail on the video, everything is shown there very slowly, so that it is convenient to consider.
Video: Origami panda - bookmark
Bookmarks for books in the form of a corner
This origami bookmark option will appeal to those who do not accept excesses - a strict corner will not distract attention. Although it can be made bright and interesting using multi-colored paper or drawings on it.
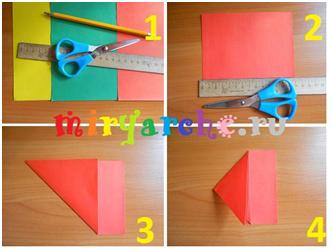
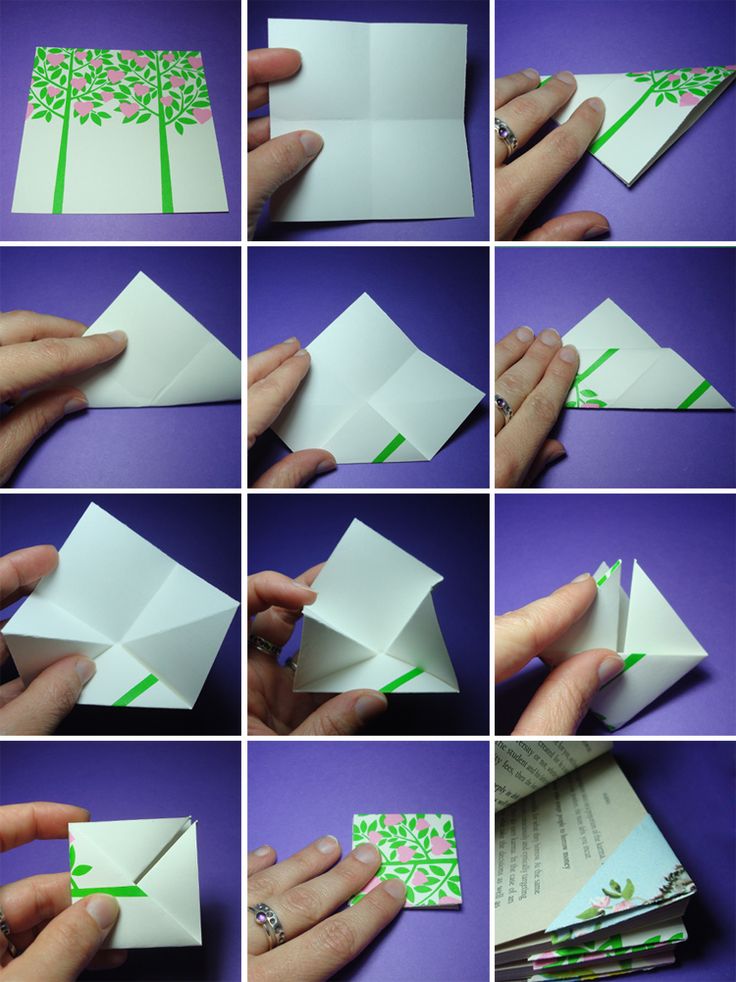
 You can make an origami bookmark in the form of a corner both from a square sheet and from a rectangular one. For work, you only need scissors and a ruler. Description. Origami bookmark option No. 1 - from a square.
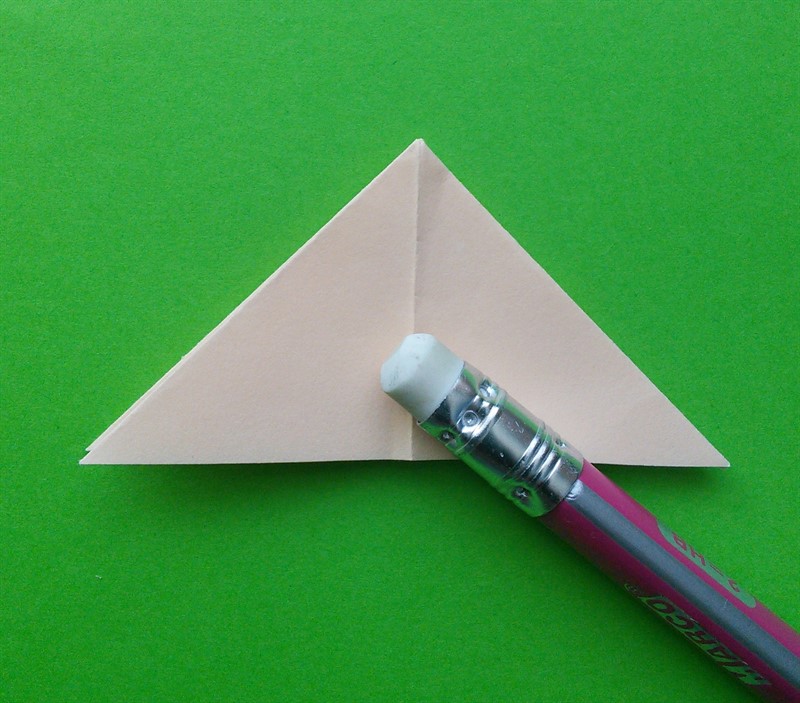
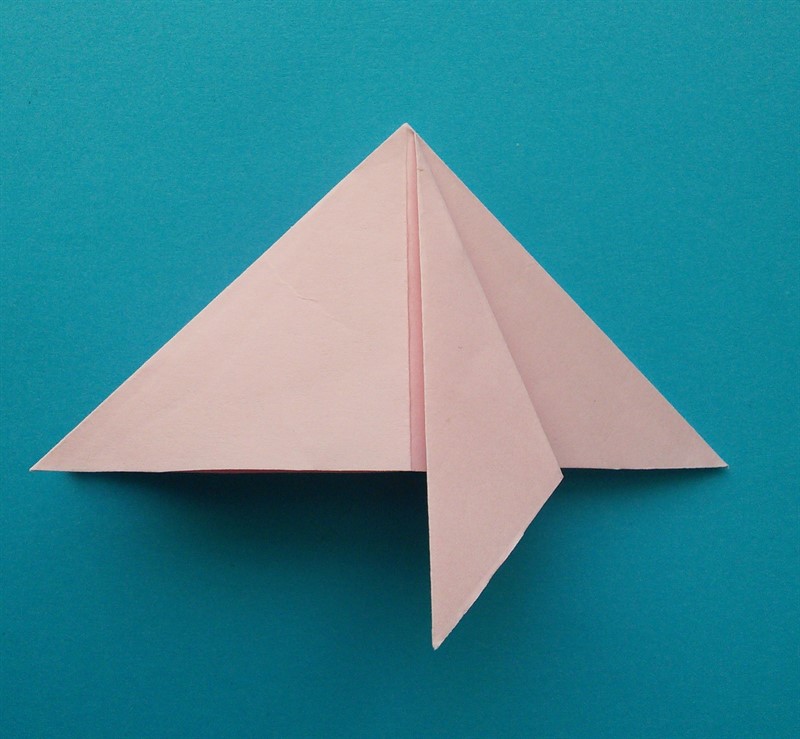
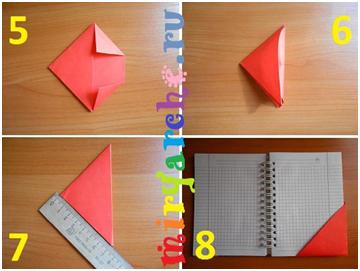
The size of the square for the bookmark can be taken as desired, in the MK the size 16 * 16 cm is used. The sheet is bent diagonally, obtaining a triangular figure. The triangle is bent in half, marking the place of the middle of the base (you can just make a pinch). The upper corner on the front side is folded down to the intended middle. The side corners are also bent to the center of the base, ironing the folds.
 Then they straighten them back. The right corner is folded to the top, carefully ironing the fold line. The upper part of the right corner is tucked into the formed pocket. Do the same with the left corner.
 The bookmark in the form of a corner is ready.
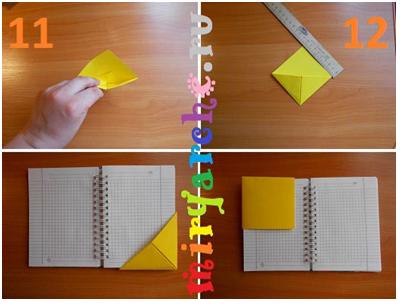 Origami bookmark option No. 2 - from a rectangle. A rectangle measuring 10 * 14 cm is cut out of paper (you can change it while maintaining proportions). One of the corners is folded over to form an origami right triangle (Fig. 3). The upper left corner is also folded down (Fig. 4).
 After that, the corners are bent on the lower, rectangular part, and hidden in the top pocket of the bookmark. All corners and folds are carefully ironed. Origami paper bookmark is ready!
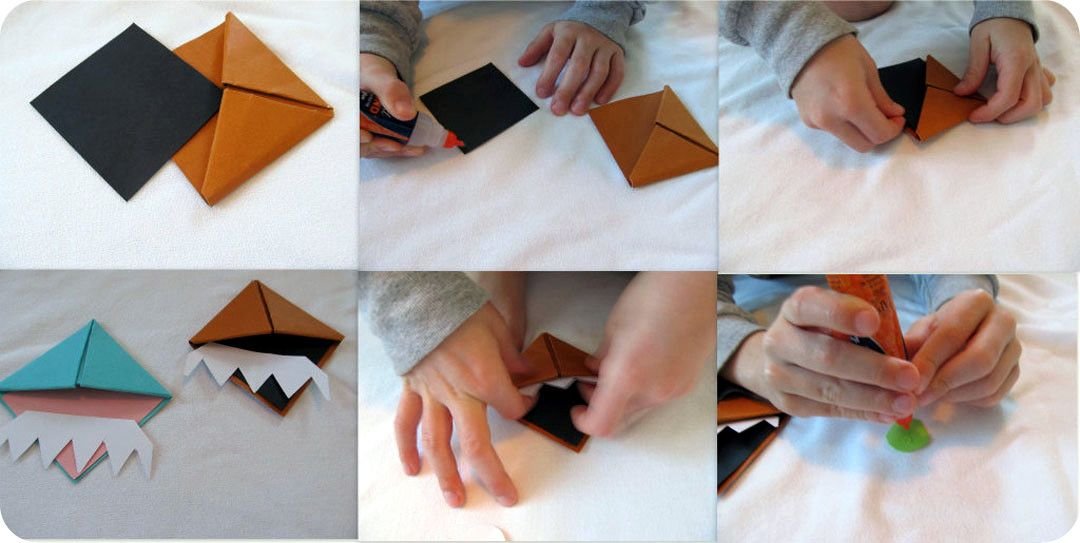
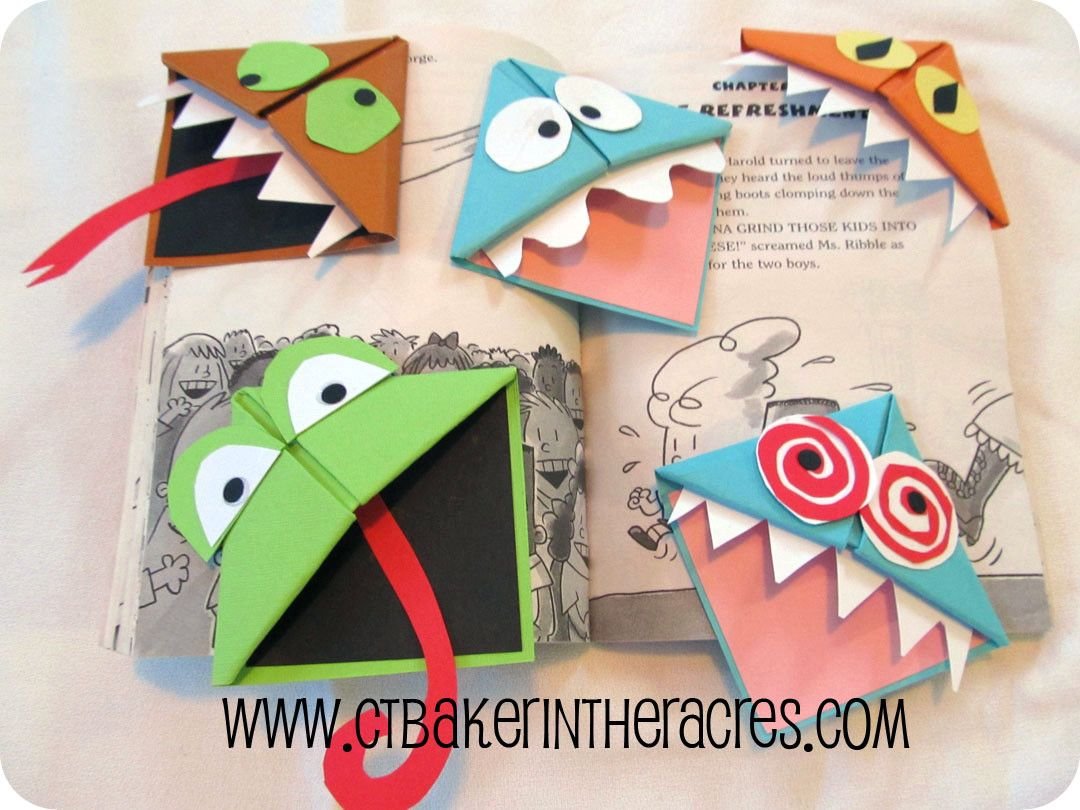
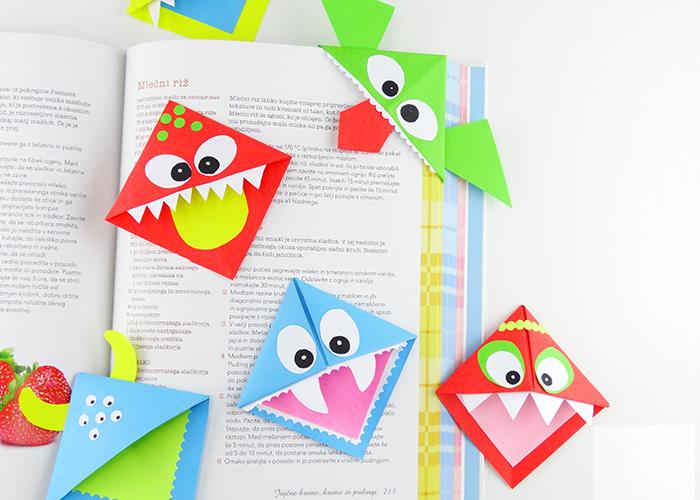
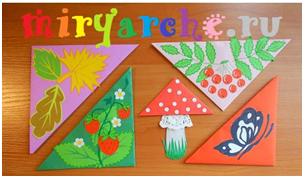
 You can decorate these corner bookmarks with appliqués to taste. Here are some ideas for inspiration:
Video: Smiley Bookmarks
A selection of schemes for folding bookmarks

Applied needlework knows no boundaries, craftsmen are ready to decorate with their own hands literally every, even the most insignificant household item. It would seem that you can invent with a simple bookmark for books, which sometimes serve as cards, calendars, ballpoint pens in notebooks, rulers or simple scraps of newspaper? That's right, for fantasy here is just the most space. Consider several original options for bookmarks made of paper with step by step instructions that can decorate a volume of your favorite poems or slightly enliven a cherished diary. A video on the topic "how to make a paper bookmark for a book" is at the bottom of the article.
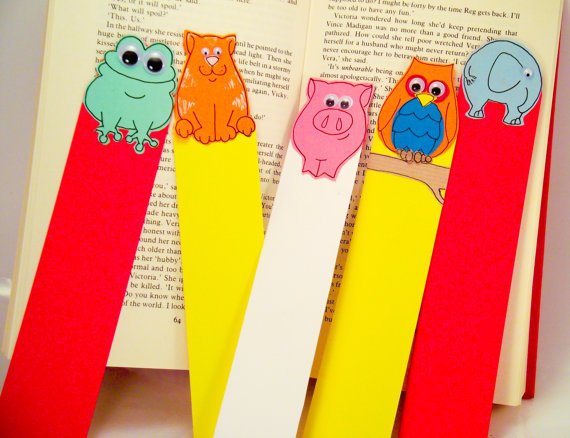
Applications
Everyone can decorate an ordinary strip of cardboard with a beautiful sticker. Animals, plants, catchphrases can be placed on strips of various widths. Children will love the appliqués and coloring crafts, which you can then show off to your peers, especially if adults help you make everything neat and beautiful. It’s not scary if drawing skills are not up to par, stencils and color stickers of the drawings you like can be easily printed on a printer and cut out.
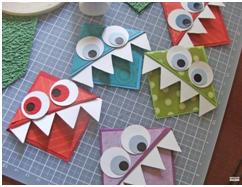
The art of origami in making bookmarks with your own hands
Few people will be surprised by the art of folding paper figures now, in order not to lose the desired page, any flat origami-style craft will do. With the help of felt-tip pens, paints, glue and color application, you can “revive” the corner bookmark a little. First you need to fold a simple main figure:
1. Cut out a square sheet of the desired size.
2. Fold it in half diagonally.
3. Attach the sharp corners of the resulting triangle to the right angle to get a square 4 times smaller than the original one.
4. Having turned the corners back, bend the edge of the top sheet down in the middle, this will be the corner pocket for the pages.
5. We return the sharp corners of the triangle along the early fold and wrap the ends inside the pocket.
The base is ready, you can start coloring and application.
6. Glue a square of colored paper a little smaller than the bookmark inside the pocket to contrast with the color of the entire craft.
7. Add eyes with felt-tip pens, paint or glue from colored paper
8. Glue teeth or tongue for visual effect"eating" the page
The “revived” bookmark-corner will delight children, and the manufacturing process will allow them to show their artistic talents.

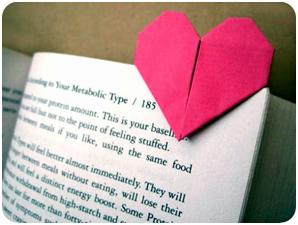
Romantic corner bookmark in the shape of a heart
A cute heart can fit on the corner of the pages of your book in just a few minutes, all you need is colored paper and a little patience.
- You need an even square of colored paper.
- Fold the sheet in half.
- Doubled again, it will be easier to navigate along the fold lines with the following actions
- Expand sheet.
- Align the bottom edge with the middle along the intended fold.
- Flip.
- Combine the two lower corners with the vertical middle, bending the same triangles.
- Flip.
- Combine the bottom vertex of the resulting figure with the center of the upper edge.
- Flip.
- Bend the bottom pockets with your finger and smooth.
- Fold corners of pockets inward
- Bend the bottom corners to round the figure.
- Turn over, the heart is already ready.
- Bend the back of the craft so that it does not stick out of the book.
- Can be used as intended.
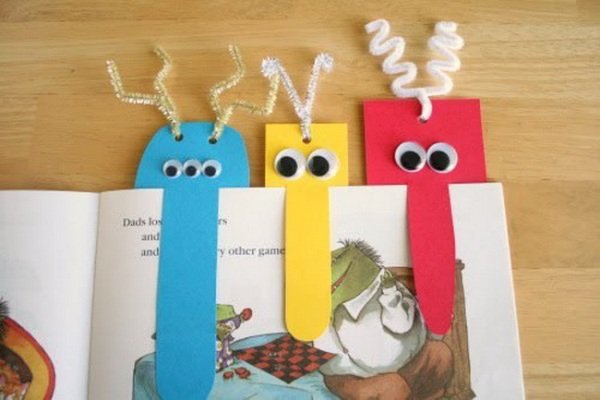
"Nosed" specimens
You will need a strip of thin cardboard 5-8 cm wide, glue, colored paper and a little imagination. The length of the bookmark is determined by the size of the book. Decorate the top of the strip with eyes, laces, sequins or a pattern. This part of the craft will be visible from a closed book and will help you quickly find the right page. The bottom of the strip can be cut into 3 equal parts or make a long cut with a knife. Now the craft will not fall between the pages and will decorate the bookshelf.
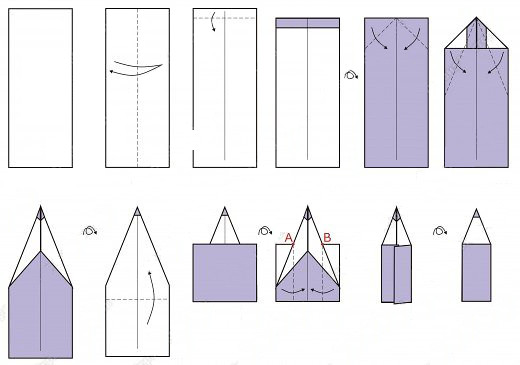
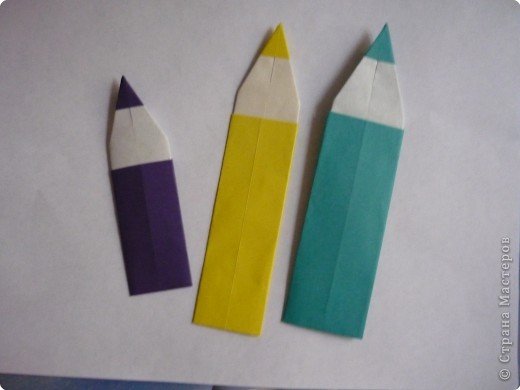
Pencil
It is easy to assemble a bookmark in the form of a pencil from one-sided colored paper.
1. You will need a strip about 20-30 cm long and about 10 cm wide.
2. First you need to bend the sheet in half along the length, the fold line will allow you to align the rest of the folds so that there are no distortions.
3. On top of the sheet, you need to bend a strip about a centimeter wide.
4. Turn over.
5. Bend over top corners to the middle, getting equal triangles.
7. Turn over.
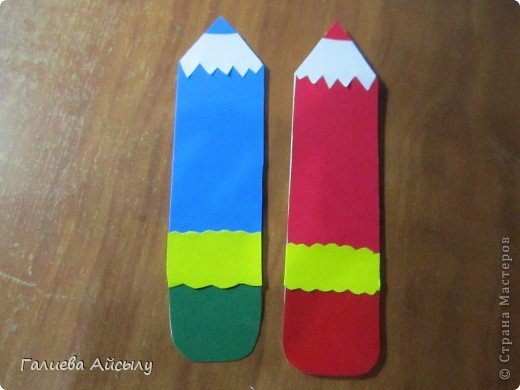
8. Tighten the bottom edge of the sheet, covering the craft with the colored side not completely.
9. Turn over.
10. Bend the right and left edges to the center, focusing on the intersection points of the sheet with the edges of the pencil tip.
11. Fix the resulting craft with glue or a stapler.
12. The pencil turned out to be a small pocket for storing several paper clips, a secret note or other stationery.
Video compilation
The considered options do not fully describe the possible paper crafts that are used as bookmarks. Turn on your imagination and create your own masterpieces of applied needlework. The video tutorials below can explain some of the nuances of the article you read or give you a few more ideas for creativity.
When reading an interesting fascinating book, it is useful to have a bookmark, thanks to which you can mark, and, if necessary, quickly find the desired page. In order to use the bookmark, it is not at all necessary to go to the store and buy it, because you can make an original little thing with your own hands from improvised materials.
This article will present master classes, after reading which it will become clear how to make a paper bookmark for a book in the form of a fox face, in the form of a heart and in the form of a corner.
A selection of training lessons
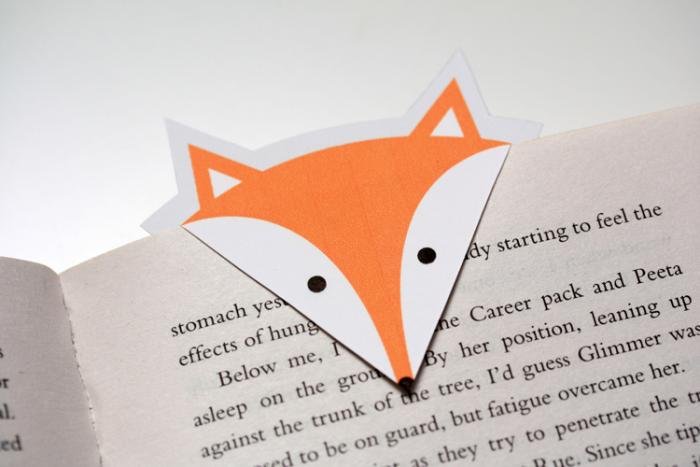
Fox muzzle
In order to make a bookmark in the form of a funny fox face, you will need a sheet of thick cardboard, sheets of colored paper, a pencil, scissors and glue.
First, on a sheet of cardboard, you need to draw a square with sides of ten centimeters, then you should draw a square with the same dimensions on both sides, as a result you should get a figure in the shape of the letter of the English alphabet L. Then you need to draw a diagonal in the upper square and shade it. Similar actions must be repeated with the opposite square, which is located to the right of the main square. Next, the shaded parts should be cut off, and thus a square and triangles adjacent to it should be obtained. The cardboard blank must be cut out. Then you should draw a line that will separate the triangles from the square.
Then, from orange colored paper, you need to cut out a square smaller than the square of the workpiece. Then the square cut out of colored paper should be glued onto the square of the workpiece, one of the triangles must be folded inward so that it covers part of the square, the second triangle must also be glued.
On final stage first you need to glue two large white circles, on top you need to glue two smaller circles of green color and, finally, you need to glue two small circles of black color. The mouth can be made from red colored paper.
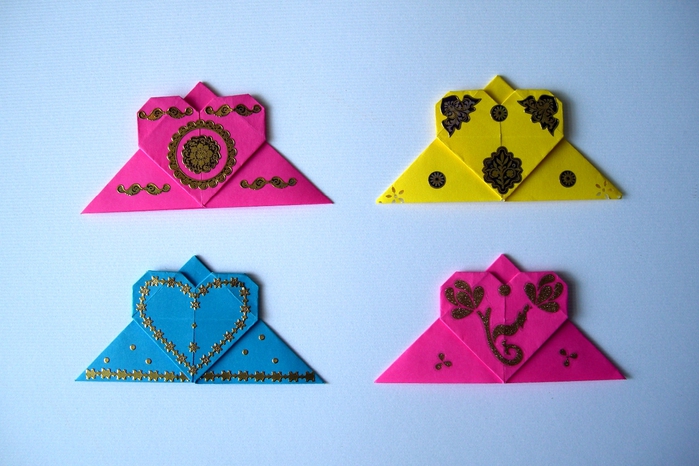
romantic heart
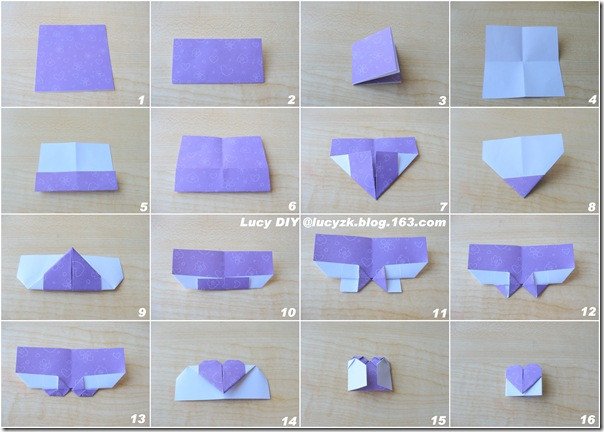
The next master class will describe the process of making a bookmark in the form of a heart. To work, you need a sheet of colored square paper.
First of all, a sheet of paper must be folded in half twice, then opened so that the fold lines are indicated. Then you should bend the lower part, then turn the workpiece over and fold the edges in the shape of a triangle. Next, the workpiece should again be turned over and bend the top of the triangle to the very top. After that, the workpiece must again be turned over and form two triangles. Then you need to fold the triangles from each vertex, then turn the workpiece over again and fold the side parts inward.
You can also make a bookmark consisting of several hearts.

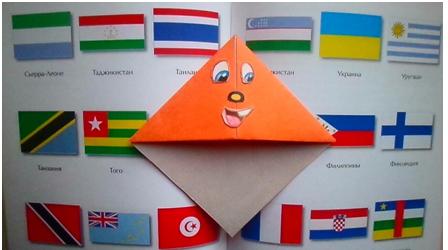
Toothy muzzle
In order to make a bookmark-corner, you will need sheets of cardboard and colored paper, scissors and glue.
First of all, you need to cut out a sheet of square shape with sides of six centimeters, then fold it in the shape of a triangle. Next, you should first bend the left, then the right corner to the center point. Then the workpiece must be unfolded and the top layer folded to the bottom. Next, you first need to bend the left, then the right corners into the pocket, so you get the base.
After that, you need to cut a square with sides of three centimeters, preferably contrasting color and glue it inside the workpiece. Then you should cut out the teeth, eyes, nose and mouth and glue the parts to the base.