In this article I will describe in detail how to synchronize data in Firefox. Preface: If you are using a browser Mozilla Firefox not only at home, but also at work or on other devices such as a laptop, netbook or tablet, you will need Firefox Sync data synchronization. Firefox Sync will help you keep your bookmarks, settings, additions at hand.
In the process of writing an article, I will use 2 computers. One under Windows management 7, the other for Windows 8.
Let's set up synchronization on our Mozilla Firefox.
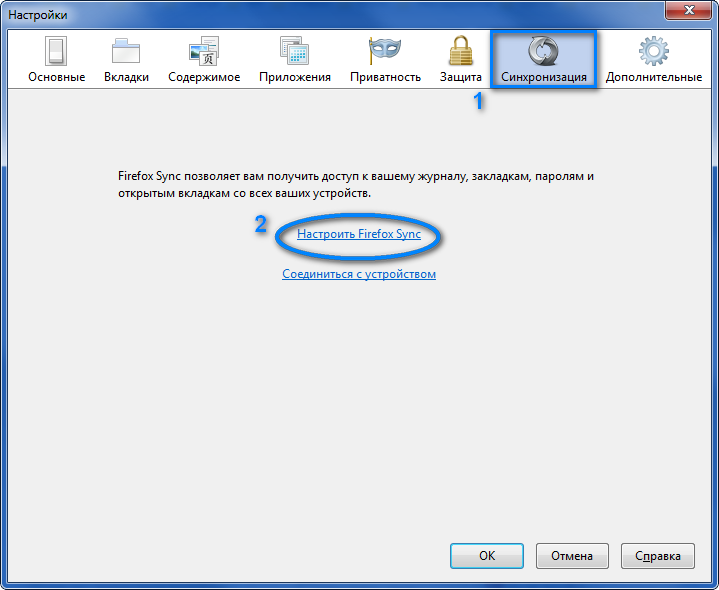
Step one: Set up Firefox Sync on your main PC
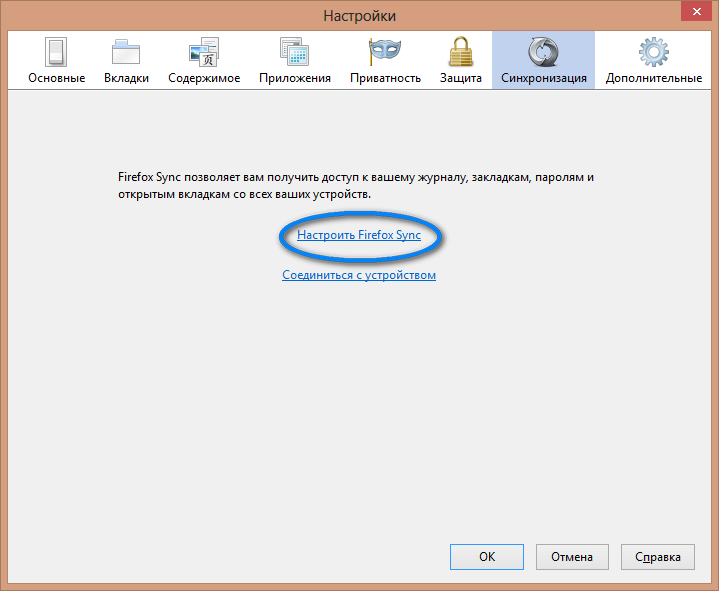
Open the browser, click on the menu Tools → Settings → Settings, go to the “Synchronization” tab. Next, “Configure Firefox Sync.”
In order to organize synchronization, you need to create a Firefox Sync account.
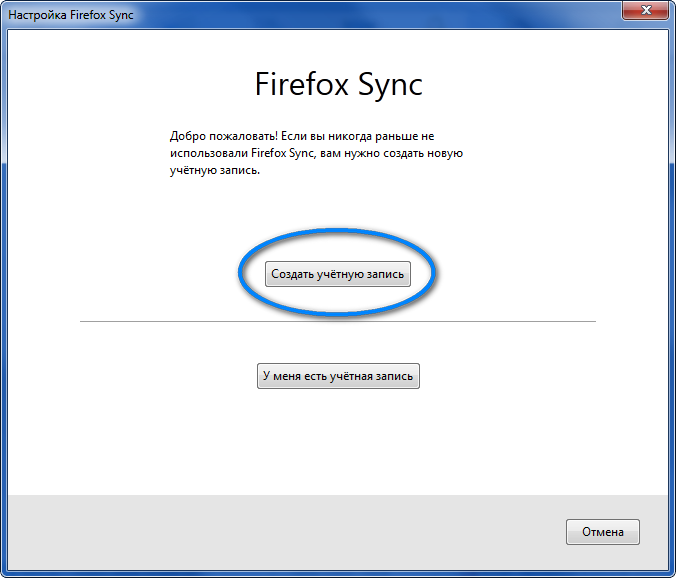
Click the “Create an account” button, then fill in all the fields: Email address. email, password twice and accept the terms of service and privacy policy. Click next.
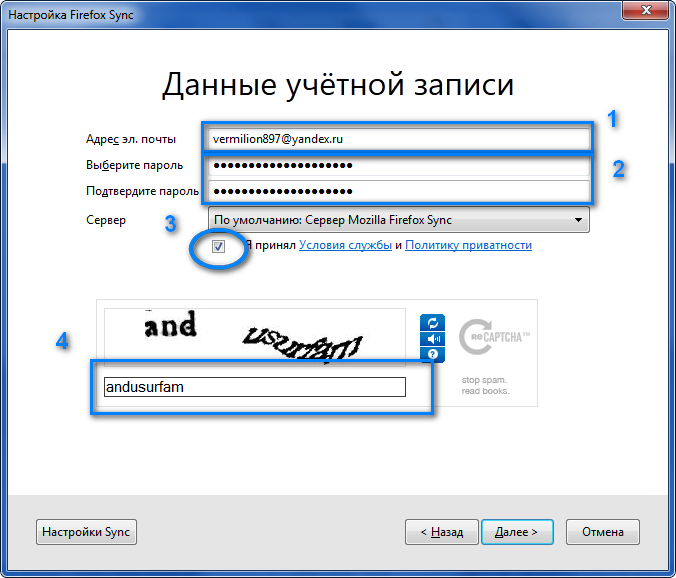
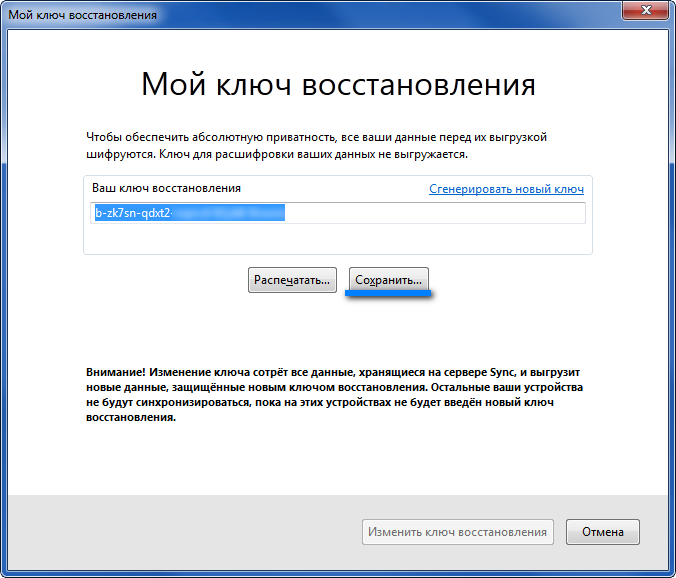
Very important! Be sure to write down your synchronization key in a safe place or save it; there is a special button for this.
Step two: We receive the installation code from another device.
Now we go to the second computer with which we want to synchronize. Open Firefox, click on the menu Tools → Options → Settings, go to the “Synchronization” tab. Next, “Configure Firefox Sync.”
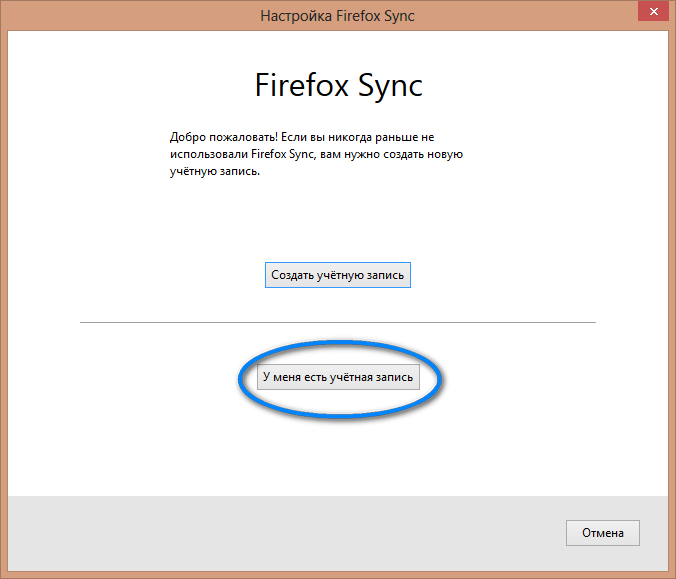
Then click “I have an account”
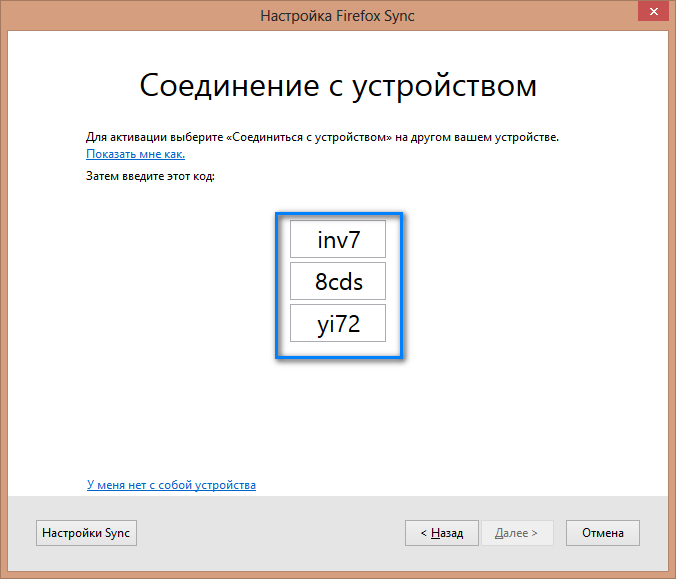
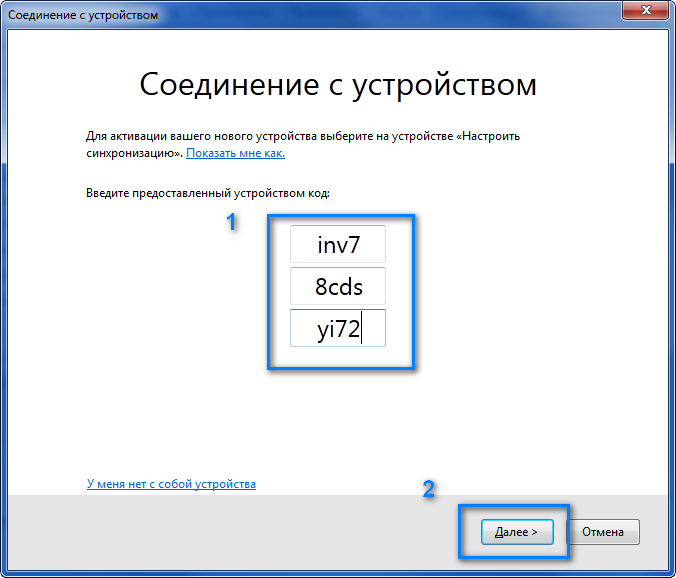
In this window we are presented with the keys. We write them down and go to the first computer.
Step three: Synchronizing browsers
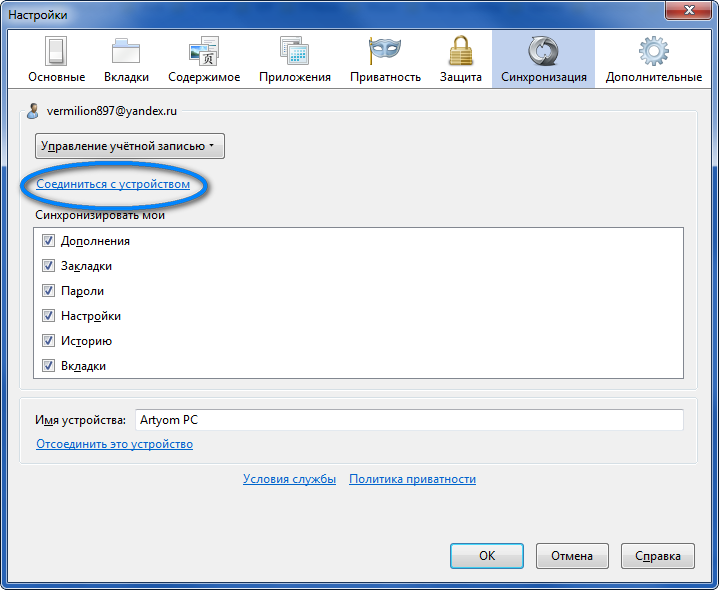
Open the browser, click on the menu Tools → Settings → Settings, go to the “Synchronization” tab. Next, “Connect to device.”
Synchronization is ready!!!
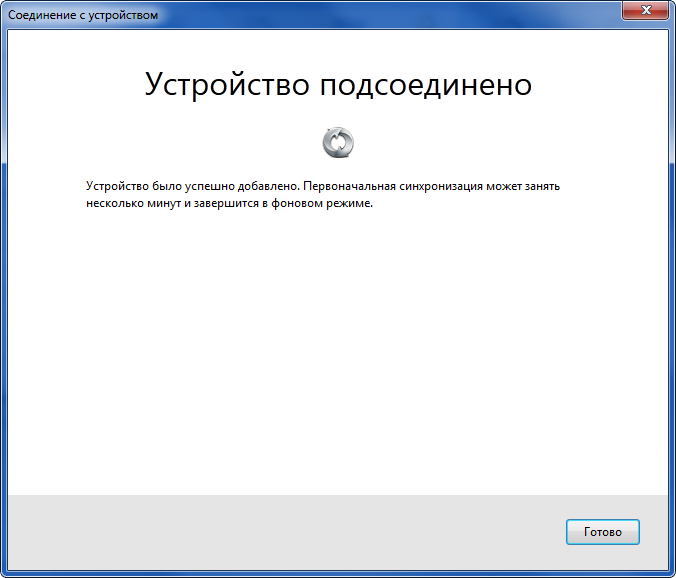
After 10-15 minutes, all your settings are synchronized with your second computer.
What if you are not near your main computer?
Go to Firefox synchronization settings. Click “I have an account” after “I don’t have a device with me.” Then we log into our account and additionally write our recovery key. Installation completed.
IN Mozilla browser Firefox uses a system of profiles, each of which saves its own settings and options. Changes made by users to browser settings are recorded in a file that is stored separately from the main program components. Even if Firefox is uninstalled and installed (you can read about how to install the Mozilla Firefox browser) again, all settings, bookmarks (you can read more about working with bookmarks) and other user data will remain available. The browser also provides a special component for account management, with which you can delete a profile in Firefox, which we will talk about today.
Account Manager
To launch the profile management component, you will need:
- Close the running copy of the browser by clicking on the menu button on the right top corner window and selecting “Exit FireFox”.
- Press the “Windows” + “R” key combination on your keyboard.
- In the window that opens, enter the command “Firefox.exe –p) and press the Enter key, as a result of which the account management component should open, from where you can delete the profile in Firefox.
Here's what the described procedure looks like in practice:
A list of available profiles will be displayed in the window that appears. If you click on the “Create” button, a new account will be connected with standard settings. By selecting it and launching the browser, you can configure the browser differently, and then quickly switch between settings using this window whenever you want. Passwords, history, tab display options and Homepage– all browser options will be pulled from the selected profile.
To make it easier to distinguish profiles from each other, you can assign names to them using the “Rename” button. If you want FireFox to open the profile manager every time it starts, you will need to click on each account in the list one by one and uncheck the “Launch the selected profile without prompting” checkbox.
Deleting a profile
And, accordingly, in order to delete a profile in Firefox, you need to use the “Delete” button, after which you will need to confirm the operation being performed in the following pop-up notification:
Important! Please read this warning carefully. You must understand that along with the profile, saved passwords, bookmarks and other data are also deleted, and it is not possible to cancel the procedure. Use profile deletion only in extreme cases.
If deleting a profile is done in order to, then it is better to use another function, which is called “FireFox setup” and is available from the “about: support” page. This function rolls back all changes made to the browser, but retains important user data.
So, today we looked at the basics of working with the Fox Explorer profile manager, thanks to which you can switch between settings on the fly without storing multiple copies of the same program on your computer. This is undoubtedly very convenient, and no other browser can boast of such a feature.
Today, dear readers, I will tell you how to create new profile in Mozilla Firefox. Why might you need this? The reasons may be different, I will give a few examples. For example, one computer and one account used by different users. They can use two profiles in Mozilla Firefox to avoid confusion. Another example: you need to completely clear your browser. This can be done using settings or third party utilities, or you can simply, in which there will be no information at all. In general, be that as it may, let's start creating a new profile in Mozilla Firefox.
Instructions for creating a profile
The example will be shown based on Windows 7, but it can be safely used on Windows 8 (8.1).
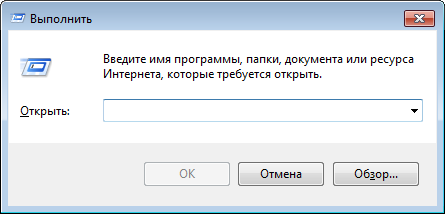
After you have closed your Internet browser, press the WIN+R key combination to display the “Run” window.
Enter the command in the window firefox.exe -ProfileManager, then press the OK button or the Enter key on your keyboard.
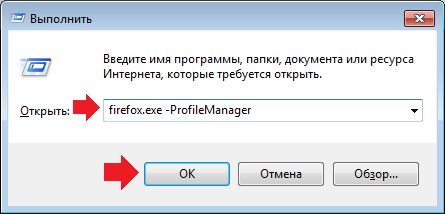
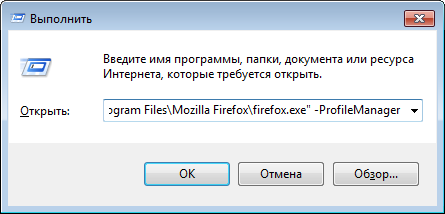
This must be done in order to launch the profile manager. It can be launched in another way. For example, instead of the command firefox.exe -ProfileManager enter "C:\Program Files\Mozilla Firefox\firefox.exe" -ProfileManager or "C:\Program Files (x86)\Mozilla Firefox\firefox.exe" -ProfileManager depending on the bit size of your system.
So, the profile manager is launched. This is what he looks like.
Click on the “Create” button, after which the profile creation wizard window will appear. Click "Next".
Here you will need to enter a name for the new profile and, if desired, choose where the data for the specified profile will be stored. If you do not want to change the location of the directory, simply click the "Done" button after entering the name.
A new profile has been created, as reported by the profile manager. Click on the new profile, then click on the “Launch Firefox” button.
A new profile has been launched. However, every time you launch the browser will ask you which of the current profiles to load. In order to always load the same profile, you need to check the box next to the item “Launch the selected profile without prompting”.

Now the selected profile will always be launched. You can change it if you launch the Mozilla managers profile using the command firefox.exe -ProfileManager.
The Mozilla Firefox browser profile includes all user settings for the browser. A Firefox profile includes browser settings, passwords, certificates, installed extensions, other user data.
During the installation of the browser on a computer, a user profile is created with the name “Default User” or simply “default”. This folder contains all user browser settings.
There are often situations when several people use the same browser. In this case, you can, of course, switch to another browser, but then you will have to abandon the browser you customized. In addition, one user can have two different profiles, for example, one for personal use and another for work use.
The Mozilla Firefox browser has a huge number of extensions (also called add-ons or plugins) with which you can customize your browser for comfortable use.
Users Firefox browser can use different settings and extensions. In order for each user to have their own settings when using one browser, you will need to create a new Mozilla Firefox profile.
You can create several different profiles in one Mozilla Firefox browser. Each browser profile will have its own settings, which the individual user will make at his own discretion.
In order to create a new Mozilla Firefox browser profile, you will need to launch the manager Firefox profiles.
Launching Firefox Profile Manager
To launch the profile manager on your computer, you will need to go to the “Start” menu, and in the search field you should enter the following expression - “firefox.exe -ProfileManager”, and then you will need to launch this application, or press the “Enter” button on your keyboard . There should be a space between the word "firefox.exe" and the dash sign.
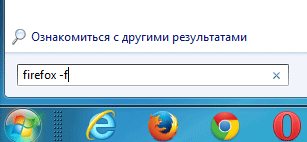
Also, in order to launch the profile manager, you can enter another expression “firefox –f” in the search field, and then press the “Enter” button on your keyboard. There should also be a space after "firefox".
You can also launch the Mozilla Firefox browser profile manager by entering the full path to the file in the search field:
"C:\Program Files\Mozilla Firefox\firefox.exe" -ProfileManager
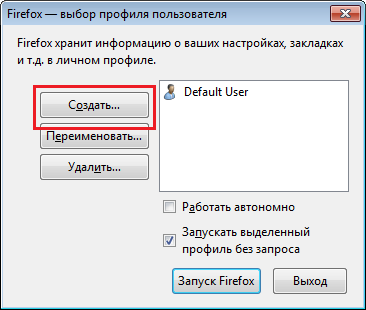
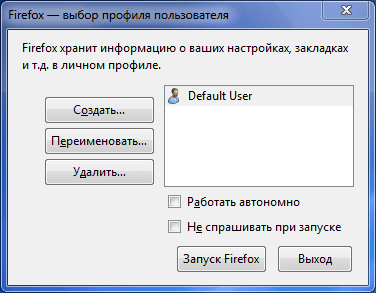
After this, the profile manager window will open. In the "Firefox - select user profile" window, you can create a new profile in the Mozilla Firefox browser. Here you can create more than one Firefox profile, but several more profiles, as many as you need to have in your browser.
How to create a new Firefox profile
To create a new Mozilla Firefox browser profile, in the Firefox profile manager window, you must click on the “Create...” button.
![]()
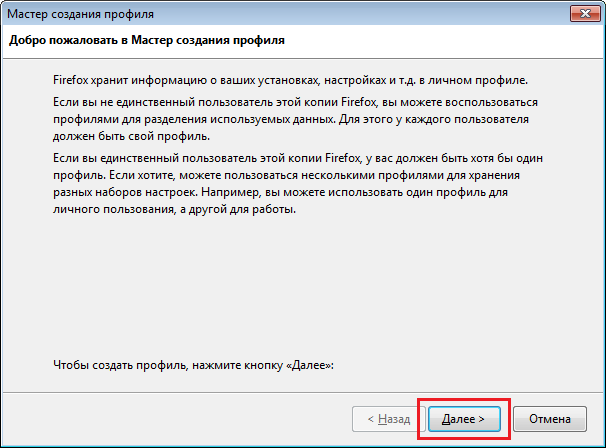
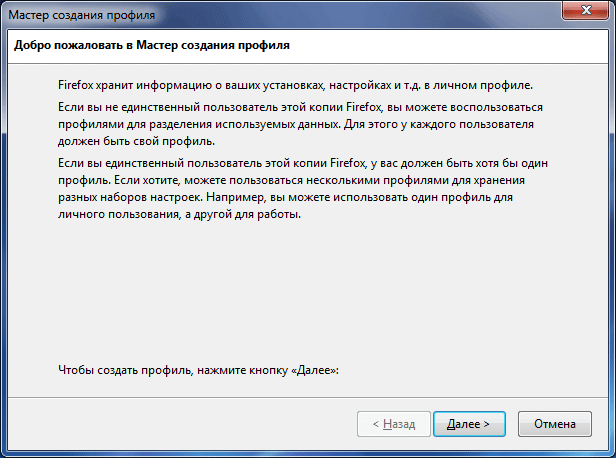
Then the “Profile Creation Wizard” window will open, in which you need to click on the “Next” button.
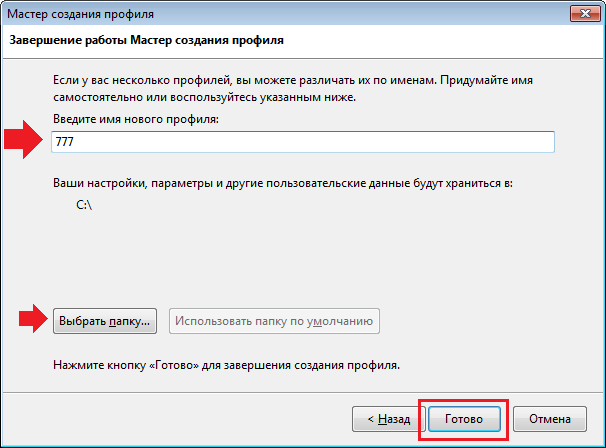
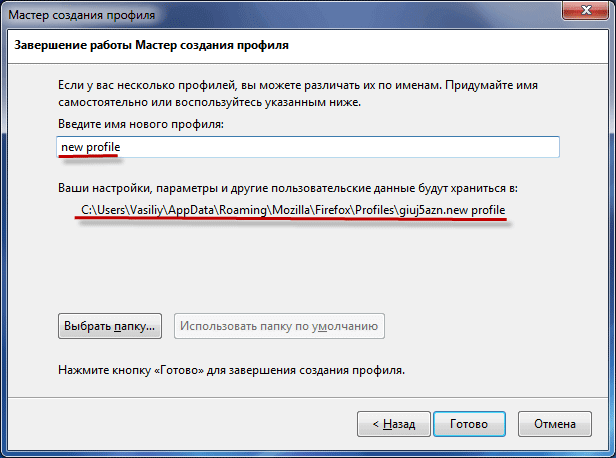
In the “Completing the New Profile Wizard” window, you will need to enter a name for the new profile. By default, the new profile is given the name “Default User.” But, usually, the already created profile that was created when installing the browser on the computer will most likely have exactly the same name.
Therefore, the new Mozilla Firefox browser profile should be given a different name. In this image, you can see that I have given the new profile the name “new profile”. You can give the new Firefox profile a name that you want to use.
During the process of creating a profile, you can select a different folder to store the new profile, but I think that this is not necessary.
After creating a new Firefox browser profile, you need to click on the “Finish” button.
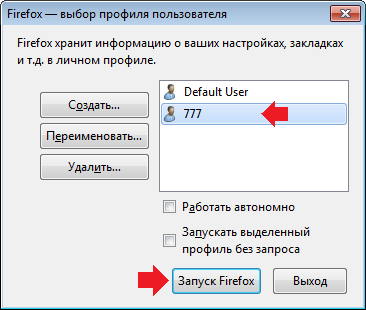
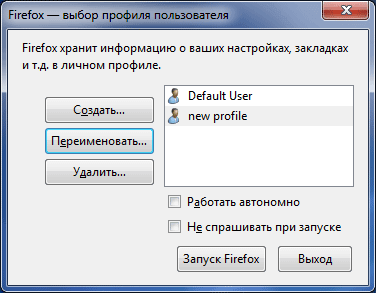
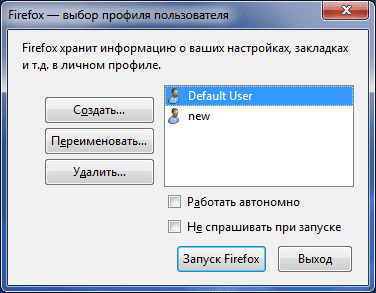
Now in the “Firefox - select user profile” window you will see two browser profiles - the old one (Default User) and the new one (new profile).
How to save and restore your profile in Firefox
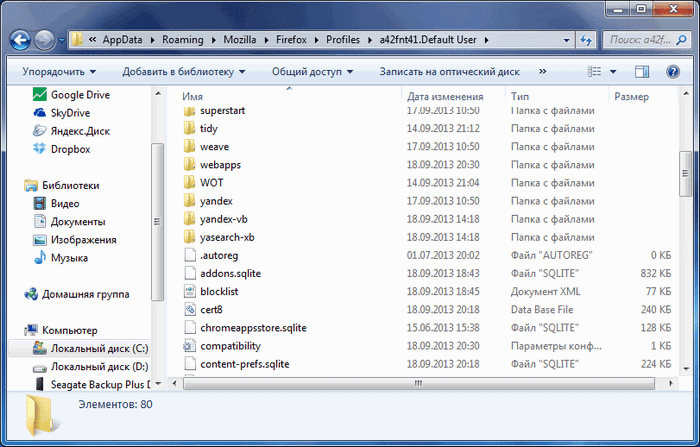
Firefox browser profiles in operating rooms Windows systems 7, Windows 8 and Windows 10 are located in this path:
C:\Users\User\AppData\Roaming\Mozilla\Firefox\Profiles\profile_name
Before the profile name there is a set of 8 letters and numbers, different for each profile.
You won’t be able to just get to the profile location, since the Mozilla Firefox browser profile, by default, is located in hidden folder. Therefore, you will first need to enable the display of hidden folders on your computer.
If you open the folder where the browser profile is located, you will see that there are various folders and files there.
If you need to save your browser profile to install it on another computer, or after reinstalling operating system, then the Mozilla Firefox profile can be saved and then transferred to a new or different Mozilla Firefox browser.
Renaming a Firefox profile
You can rename the Mozilla Firefox browser profile. To do this, in the profile manager window, you need to select the profile that will need to be renamed, and then click on the “Rename..” button.
In the new “Rename Profile” window, give the profile a new name, and then click on the “OK” button.
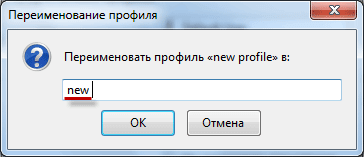
After this, in the Mozilla Firefox profile manager window you will see the already changed profile name.

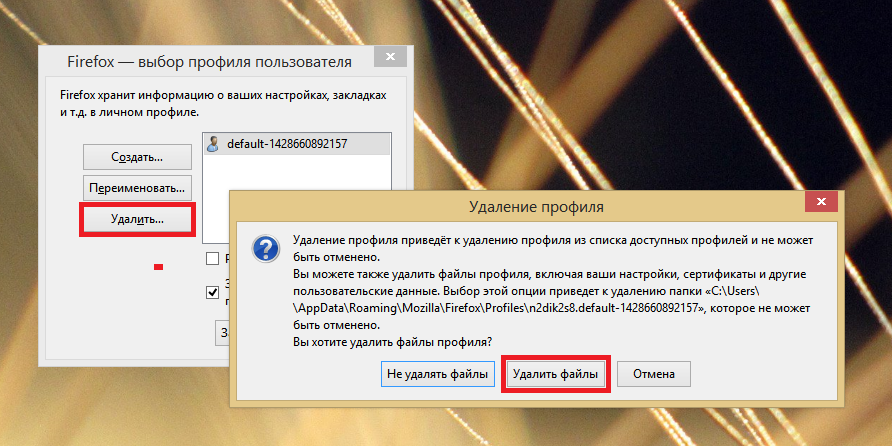
Deleting a Firefox profile
From the Mozilla Firefox browser profile manager window, you can delete a profile if for some reason you no longer need it. To delete a profile, in the “Firefox - select user profile” window, you will need to select the name of the desired profile, and then click on the “Delete...” button.
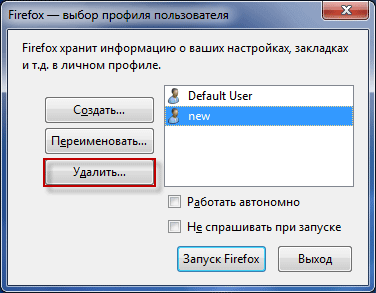
In the “Delete Profile” window, you will need to click on the “Delete Files” button.
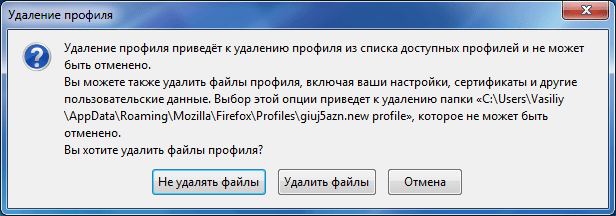
After deleting a browser profile, all settings and user data that were in this profile will be deleted.
Selecting a profile when starting the Mozilla Firefox browser
After adding a new profile, when you launch the Mozilla Firefox browser, the profile manager window will open. In the "Firefox - select user profile" window, you will need to select a profile to launch by highlighting it, and then click on the "Launch Firefox" button.
After this, a browser window will open with the settings of the corresponding profile. If you do not launch another Mozilla Firefox browser profile very often, then you can use only the Firefox profile that you regularly use when starting the browser.
To do this, you will need to select the main browser profile, then activate the “Don’t ask when loading” option, and then click on the “Launch Firefox” button.
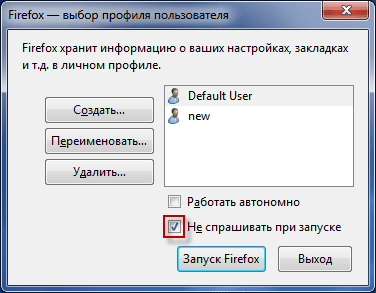
After this, the Mozilla Firefox browser will launch immediately in the selected profile, without launching the profile manager first.
If you need to launch a different profile, you will need to launch the Firefox Profile Manager to do so. To do this, you will need to go to the Start menu, then enter the expression “firefox.exe -ProfileManager” in the search field, and then launch the desired browser profile from the profile manager window.
Conclusion
In the Mozilla Firefox browser, you can create a new Firefox browser profile so that your computer can use one browser from different profiles. Using the Firefox profile manager, you can launch the desired browser profile, with your settings and user data.
Mozilla Firefox profile - creating a new profile (video)