If using password authentication:
- $ git clone https://username:password@gitsrv/opt/git/repository.git
Working with branches
Show all branches: - $git branch
- $git branch
- $git checkout
- $ git checkout -b
- $ git branch -d
- $ git push origin --delete
Working with commits
How to remove the last commit?
- $ git reset --soft HEAD^
Git How To. Chapter 17. Removing commits from a branch
Official Git documentation. Git Basics - Reverting Changes
How to change the last commit?
- $ git add new_file.txt
- $ git commit --amend
How to change the comment to the last commit?
- $ git commit --amend
- $ git commit --amend -m "New comment"
How to merge multiple commits?
- $ git rebase -i HEAD~3
An editor will open with a list of commits, with the oldest commit at the top.
- pick 1111111 Commit 1 comment
- pick 2222222 Commit 2 comments
- pick 3333333 Commit 3 comments
- pick 1111111 Commit 1 comment
- squash 2222222 Commit 2 comments
- squash 3333333 Commit 3 comments
How can I undo changes to a specific file and return it to the state it was in after the last commit?
- $ git checkout -- file.txt
How to undo all uncommitted (uncommitted) changes?
- $git checkout
How to hold some files for the next commit?
Let's say you want to commit changes in some files, and commit changes in other files in the next commit. Then you can temporarily remove them from the repository (unstage files), and then add them again.- $ git reset HEAD file.txt
If you cannot push to a remote repository because the current version of the repository is less than that on the remote repository
In this case, you can do a forced push.- $ git push -f origin master
Merging branches
How to take only some files from another branch?
- $ git checkout branchname -- path/to/file.file
Remote repositories
Displaying information about a remote repository
- $ git remote show origin
- *remote origin
- Fetch URL: git@gitsrv:/opt/git/test-project.git
- Push URL: git@gitsrv:/opt/git/test-project.git
- HEAD branch: master
- Remote branch:
- master new (next fetch will store in remotes/origin)
- Local ref configured for "git push":
- master pushes to master (local out of date)
Adding a remote repository
- $ git remote add origin git@gitsrv:/opt/git/test-project.git
Remote branches are references to the state of branches in your remote repositories. These are local branches that cannot be moved; they move automatically whenever you communicate over the network. Remote branches act as bookmarks to remind you where branches in remote repositories were the last time you connected to them.
We use the master branch as the source of the branch, it contains latest version. To get started immediately, we switch to a branch, activating the "Checkout" branch. The Branches page displays the local branch. The bold font and the output at the top of the window show that our files are on the same level.
Adding a remote repository
Now we can integrate the new feature. Therefore, in the "Untracked files" section, you should check if there are files related to the project. A message will appear with an important note stating that changes are only saved locally and must still be sent to the server. Now it's time to deliver the new feature to the rest of the team. Our local chapter needs to be published. On the Branches page, right-click an unpublished thread to select publish from the context menu.
They look like (name of remote rep.)/(branch) . For example, if you want to see what the master branch looked like on the origin server the last time you connected to it, check out the origin/master branch. If you and your partner were working on the same problem and he posted the iss53 thread, you might have your own local branch iss53 ; but that branch on the server will point to the commit in origin/iss53 .
How to resolve merge conflicts?
During code review new feature must be committed to the main branch. First, the source branch and the target branch are selected. The request can now be created. The group selected as auditors is notified and can now view the transfer request. Comments can be exchanged for a pull request. Each examiner can vote: approved, approved with annotations, rejected, etc. Particularly important is the fact that there are no merge conflicts. If the submitted changes are not compatible with the community's accepted status, the transfer requester must rewrite his changes.
This may all be confusing, so let's look at an example. Let's say you have your own Git server on your network at git.ourcompany.com. If you clone something from it, Git will automatically name it origin , take all the data from there, create a pointer to whatever the master branch points to, and name it locally origin/master (but you can't move it) . Git will also give you your own master branch, which will start at the same place as origin's master branch, so you have something to work with (see Figure 3-22).
In classic central version control systems, this work goes to the reviewer. After review, the auditor can perform the merge directly in the browser. The newly developed function is thus integrated. Local repository does not yet know the merge in the central repository. Additionally, there may be additional commits that we want to push as well.
The files have not been changed. The list of these commits for the main branch is now complete. Here you may need to first pull out the pull latest changes. Only then can commits be pushed. The outstanding sync button is push and pull into one. It downloads all changes from the server and sends its own message.
Figure 3-22. Cloning a Git project gives you its own master branch and origin/master pointing to the master branch in origin.
If you do something on your local master branch and in the meantime someone else pushes changes to git.ourcompany.com and updates the master branch there, your stories will continue differently. Also, until you contact the origin server, your origin/master pointer will not move (see Figure 3-23).
At the end, the state of the leading branch now transitions to the stable branch. To do this, a merge is performed. A new release can now be pulled from the stable branch state. You don't need a login and you don't need to register anywhere. At some point you will need it when you are working on multiple projects.
To do this, select “tools → options”. In the next dialog box, enter the desired name and address Email, which you want to use for version control. This information is only stored locally and is not used anywhere on the Internet.
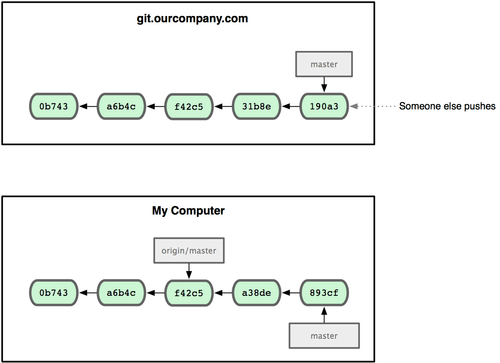
Figure 3-23. When doing local work and someone pushing changes to a remote server, each story continues differently.
To keep your work in sync, run the git fetch origin command. This command looks up which server origin corresponds to (in our case it is git.ourcompany.com); pulls out all the data you don't already have and updates your local data storage; moves the origin/master pointer to a new position (see Figure 3-24).
And create exactly one such repository now by clicking “add”. Now we assume that you have already started your master's thesis and placed it in a directory called "Masterarbeit". Specify the repository names, which must match the name of the existing directory, and a description of where the directory is located.
How to add an empty directory to the repository?
You will now see all the files in your directory in a view, which will show you any changes that are not yet synced. Specifically, you are now looking at which files you want to be versioned. You can exclude file types to avoid removing ticks from unnecessary files, which you don't want in the repository, every time. Select "tools → settings".
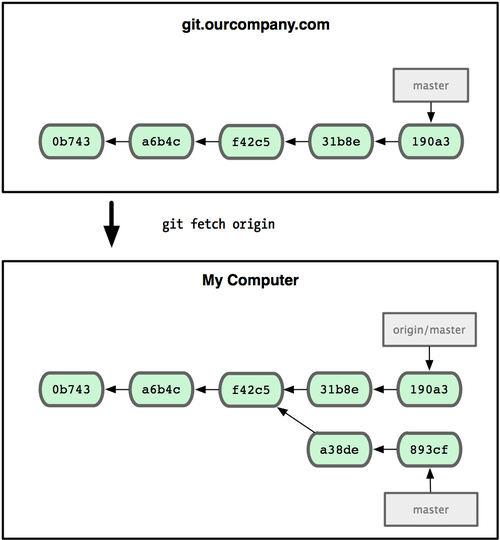
Figure 3-24. The git fetch command updates your remote references.
To demonstrate what remote branches would look like in a multi-remote server situation, let's assume that you have another internal Git server that is used for development by just one of your development teams. This server is located at git.team1.ourcompany.com. You can add it as a new remote link to the project you're currently working on using the git remote add command in the same way as described in Chapter 2. Name this remote server teamone , which is short for the full URL (see Figure .3-25).
Keep working and make changes
You should add them to your repository. To make sure you don't have to configure this every time, make the list globally known. Now select “tools → open shell here.” In the window that opens command line enter the following command. If you want you can also include more detailed description in the "Extended Description" field. You add additional parts, there are some graphic files or some raw data and notes that you would like to have versions of.

Figure 3-25. Adding an additional remote server.
Now you can run git fetch teamone to fetch everything that is on the server and not on yours. Since in this moment this server has only a fraction of the data that the origin server has, Git does not fetch any data, but pushes a remote branch named teamone/master , which points to the same commit as the master branch on the teamone server (see Figure 3 -26).
If you cannot push to a remote repository because the current version of the repository is less than that on the remote repository
By clicking on the file name or the checkmark to the left of it, you can select or deselect that commit. Either you want to commit certain changes to a commit, or you don't want to use certain files. Now you see all previous commits along with their brief descriptions, and that's why they are so important.
When you select from this list, you can see exactly what has changed. This creates a new commit that undoes your last actions. If you want to go to a further commit state, select "rollback to this commit" with the appropriate commit. This will change your files in the directory, so make sure you move everything to the repository before that you might need!
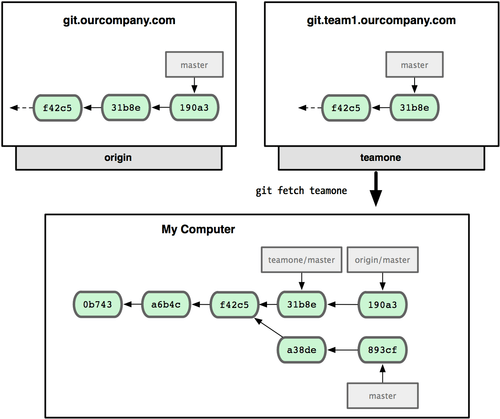
Figure 3-26. You now have a local link to the master branch on teamone.
Submitting changes
If you have a serverfix branch that you want to work on with someone else, you can push it in the same way you submitted your first branch. Perform git push (remote server) (branch):
Then you need to "fork" what is called a "branch" in versioning jargon. Everything is fine because Geet later helps reunite the branches. This dialog box is where you control branch merging. If you changed something in different branches in the same places, on the same lines, of course there is a conflict in the merge. You have to fix it yourself.
However, in this view, you can see the mess, but you don't fix it. Modify the relevant sections to suit your needs. Remove marking lines. You can then commit again and specify "Manual Merge" as the corresponding comment.
$ git push origin serverfix Counting objects: 20, done. Compressing objects: 100% (14/14), done. Writing objects: 100% (15/15), 1.74 KiB, done. Total 15 (delta 5), reused 0 (delta 0) To [email protected]:schacon/simplegit.git * serverfix -> serverfix
It's a shorthand in some way. Git automatically expands the serverfix branch name to refs/heads/serverfix:refs/heads/serverfix , which means “take my local serverfix branch and update the remote serverfix branch from it.” We'll discuss the refs/heads/ part in detail in Chapter 9, but it can usually be omitted. You can also do git push origin serverfix:serverfix - the same thing will happen - it says “take my serverfix and make it a remote serverfix”. You can use this format to push a local branch to a remote branch with a different name. If you don't want the branch to be named serverfix on the remote server, then instead of the previous command, run git push origin serverfix:awesomebranch . This will send your local serverfix branch to the remote project's awesomebranch branch.
Let's imagine a simple example of branching and merging with a workflow that can be represented in reality. Imagine yourself following these steps.
- You are working on a website.
- You create a branch for new topic that you want to work on.
- You are doing some work on this thread.
Basic branching procedures
Imagine that you are working on a project and you already have several confirmations. Record simple and short confirmations. You decide to work on issue #53 in the system your company uses to track issues. Since issue #53 is a specific and timely issue that you are going to work on, you create a new branch for it. Figure 3-11 shows the result.
$ git fetch origin remote: Counting objects: 20, done. remote: Compressing objects: 100% (14/14), done. remote: Total 15 (delta 5), reused 0 (delta 0) Unpacking objects: 100% (15/15), done. From [email protected]:schacon/simplegit * serverfix -> origin/serverfix
It's important to note that when you have new remote branches when you fetch, you don't automatically get local editable copies for them. In other words, in our case you won't get a new serverfix branch - just an origin/serverfix pointer, which you can't change.
Create a pointer to a new branch. You're working on a website and doing some confirmation of changes. Then you receive a call notifying you of another urgent problem with the website. A problem that you must solve immediately. It's best to always have a clean and clean working condition before jumping between branches. And for this we have some procedures that we will see later.
For now, since we have confirmed all the changes, we can move to the master branch without any problems. After this you will have work folder just like it was before you started working on the problem. # And you can focus on the new pressing problem. To make sure your working copy is exactly the same as the branch in the last commit of your changes. Return to the immediate problem. We will create a new hotfix branch to work on until resolution.
To merge these developments into your current working branch, run git merge origin/serverfix . If you want your own serverfix branch to work on, you can build from the remote branch:
$ git checkout -b serverfix origin/serverfix Branch serverfix set up to track remote branch refs/remotes/origin/serverfix. Switched to a new branch "serverfix"
This will give you a local branch to work on. It will start where origin/serverfix is.
Deleting branches on a remote server
Figure 3 is a patch branch based on the original master branch. You can run tests, verify that the solution is correct, and push the changes to the master branch to make them live. This is what is called "fast forward". Now the changes made are already in the commit snapshot marked by the master branch. And you can expand them.
After the merge, the master branch points to the same site as the patch branch. By solving the immediate problem that interrupted your work, you can get back to where you were. But first, it's interesting to delete the hotfix branch. Because we won't need this anymore since it points to exactly the same site as the master branch.
Branch tracking
Checking out a local branch using git checkout from a remote branch automatically creates something called tracked branch. Monitored branches are local branches that are directly linked to a remote branch. If you type git push while on a tracked branch, Git will already know which server and branch to push changes to. Similarly, running a git pull on one of these branches will first fetch all the remote references, and then automatically merge into the corresponding remote branch.
Basic Melting Procedures
And with that, you're ready to get back to working on issue #53. Let's assume that your work on issue #53 is now complete and ready to be merged into the master branch. This is slightly different from the previously performed hotfix merge. In this case, the development record diverged at an earlier point.
Major conflicts that may arise during mergers
We view this process as a “confirmed merger.” And it's different in that he has more than one father. It is worth noting the fact that it is Git itself that automatically determines the best common ancestor for the merge. And manually close the issue in your company's issue tracker. In some cases, merger processes are usually not fluid. For example, if in problem #53 you changed the same part that was also changed in the patch problem.
When cloning a repository, it will typically automatically create a master branch that tracks origin/master , so git push and git pull work for that branch out of the box and don't require any additional arguments. However, you can configure tracking of other branches of the remote repository. A simple example of how to do this, you just saw - git checkout -b [branch] [delete. server]/[branch] . If you are using Git versions 1.6.2 or later, you can also use the --track shortcut:
You may get a merge conflict to. Rather, he stops in this process, waiting for the conflict to be resolved. Anything that is contradictory and cannot be resolved is designated as “not merging.” Bookmarks to help you when you manually open files and edit them to fix them.
Revert all changes except those already added to the planned commit
The conflict file will contain. To resolve a conflict, you must manually select content from one side or the other. For example, you can change the block, leaving it like this so that. This correction contains a little bit of both parts. This will launch the corresponding rendering tool and allow you to resolve conflicts with it. If you want to use a tool other than the default one, you can select it from the list of supported tools shown at the beginning. Enter a name for the tool.
$ git checkout --track origin/serverfix Branch serverfix set up to track remote branch refs/remotes/origin/serverfix. Switched to a new branch "serverfix"
To set up a local branch with a different name than the remote branch, you can easily use the first version with a different local branch name:
$ git checkout -b sf origin/serverfix Branch sf set up to track remote branch refs/remotes/origin/serverfix. Switched to a new branch "sf"
Now your local sf branch will automatically push and pull changes from origin/serverfix.
Deleting branches on a remote server
Let's say you and your co-authors finished a feature and merged it into the master branch on a remote server (or some other branch where stable code is stored). You can delete a branch on a remote server using the somewhat obtuse syntax git push [delete. server] :[branch] . To remove the serverfix branch on the server, do the following:
$ git push origin:serverfix To [email protected]:schacon/simplegit.git - serverfix
Clap. There is no longer a branch on your server. You might want to bookmark the current page, since you'll need this command and you'll likely forget the syntax. You can remember this command by returning to the syntax git push [delete. server] [local. thread]:[deleted branch], which we looked at a little earlier. Omitting part [loc. thread] , you are essentially saying “take the nothing in my repository and make it so that in [deleted. branch] it was the same.”


