Important: Disassembling your device will void your device warranty. The site is not responsible for your device. If you are not confident in your abilities, contact a certified service center.
Instructions
1) Unscrew the 6 screws shown in the picture below
2) Unscrew the 4 screws. Disc number 1 extends to the left and disc 2 to the right

3) Remove the memory modules. Disconnect the two antenna cables and unscrew the two screws to remove the wireless card.

4) Unscrew one screw and remove the laptop drive

5) Unscrew 9 screws. The green circle marks the screw that secures the keyboard.

6) Unscrew two more screws that are located in the drive compartment

7) Lift up the speaker panel. For this you can use a guitar pick or this. Just don't remove the panel yet, it's still connected to motherboard laptop

8) Now lift up on the other side. Don't remove the panel yet. Pay attention to the cable, how to disconnect it will be shown in the next picture

9) Move the latch about 2 millimeters in the direction indicated by the arrows. The picture below shows the connector already in the open position

10) Now the panel can be removed

11) Unscrew the 4 screws to remove the keyboard

12) Lift the keyboard, under it you will see a connector that needs to be disconnected

13) Carefully move the latch about 2 millimeters in the direction indicated by the arrows. Be very careful when disconnecting the connector; if you damage it, you will not be able to connect the laptop keyboard

14) Unscrew the 3 screws to remove the speakers. The green arrow indicates the speaker cable that needs to be disconnected. Also pull out the wires wireless card

15) Remove laptop speakers

16) Disconnect the laptop video cable and remove the 6 screws to remove the laptop display

17) The laptop display can be removed

18) Unscrew the 12 screws and remove the laptop battery. The green circle shows the screw that is located in the drive compartment

19) Unscrew 11 screws and disconnect the touchpad cable indicated by the green arrow

20) Lift the top of the laptop case

21) Now the top part can be removed

22) Disconnect the USB and audio cable shown by the green arrows on the motherboard. The yellow arrow indicates the cooling system cable, disconnect it. Also unscrew the 4 screws

23) Lift motherboard and disconnect the power connector

24) Now the motherboard can be removed

25) On the back of the motherboard there is a processor and cooling system

26) On the back of the laptop case there is a fan, USB and audio board, and power board

27) To clean the fan from dust you need to unscrew two screws

Disassembly of the laptop is complete.
The laptop disassembly video consists of 6 parts. This is part one. The rest of the parts can be found at the link on youtube
If this is your first time starting to disassemble a laptop, we recommend that you pay attention to the article “”. This article contains recommendations that will help you avoid typical mistakes in the process of disassembly.
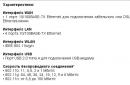
The HP Pavilion dv7 7000 Series is based on the same chassis as the HP Pavilion dv7-7000er, dv7-7001er, dv7-7002er, dv7-7002sr, dv7-7003er, dv7-7004er, dv7-7005er, dv7-7006er, dv7- 7010us, dv7-7150er, dv7-7160er, dv7-7161er, dv7-7163er, dv7-7170er, dv7-7171er - these models have the same disassembly process.
How to clean dust from HP Pavilion dv7 7000 Series laptop
If the laptop overheats during operation and suddenly turns off, this is most likely due to overheating of the cooling system. The reason for this is the accumulation of dust on the radiator. If you do not clean the cooling system in time, this will lead to damage to the motherboard in your laptop. You can fix this problem yourself by repeating all the steps shown in the video below. The information provided in our video instructions makes it possible to clean your laptop from dust yourself at home. The necessary tools for repairs can be purchased at the end of the page.
Reassembly of HP Pavilion dv7 7000 Series
Once disassembly and repair is complete, this video will help you reassemble your laptop to its original condition.
We disassemble the HP Pavilion dv7 series laptop.
More precisely, in our case, disassembly is carried out using the example of the HP Pavilion dv7t-1000 model, but the instructions should be suitable for all models of the Pavilion dv7 line of laptops.
This guide will show you how to get to the memory modules and hard drives When upgrading your laptop, remove most of the internal components and clean the cooling fan.
Warning
This article is not a guide to action! All responsibility for collecting and disassembling your device lies with you.
Many manufacturers do not bear warranty obligations if the device has been disassembled by the user. If you do not want to lose the warranty for your device, check the terms of the warranty in the documentation or with the device manufacturer.
Tools used
Before you begin disassembling, turn off the laptop and remove the battery.
Remove the 4 screws from the compartment cover hard drive and memory modules. Remove the cover.

Remove the 4 screws securing the hard drives (2 for each drive).
Slide HDD 1 to the left until it detaches from the motherboard. Remove hard drive 1.
Slide HDD 2 to the right until it detaches from the motherboard. Remove hard drive 2.

Remove both modules random access memory.
Disconnect the two antenna cables from the wireless network card. This laptop has three antenna cables, but only two are used.
One of the antenna cables is connected to the main pin on the wireless network card, and the second is connected to the auxiliary pin. All three antenna cables are marked.
Remove the two screws securing the wireless network card. Remove the wireless network card.

Unscrew the screw securing the CD/DVD drive.
Slide the CD/DVD drive to the left and disconnect it from the motherboard.
Remove the CD/DVD drive.

Remove all the screws from the bottom of the laptop, circled in the picture.
The green circle indicates the screw that secures the keyboard.

Don't forget to remove the two screws in the CD/DVD drive bay.

Start separating the panel above the keyboard (above the speakers) from the laptop body.
You can use a guitar pick to pry up the panel. Insert the guitar pick into the gap between the panel above the keyboard and the cabinet and slowly slide it along the edge of the cabinet.

Remove the panel above the keyboard. Be careful! The panel is still connected by a ribbon cable to the motherboard.

To disconnect the cable, you must first unplug the connector.
The following picture shows the cable connector in the unlocked position.

Now you can remove the panel above the keyboard.

Remove the 4 screws securing the keyboard.

Lift the keyboard to get to the cable underneath.

Carefully unplug the keyboard cable connector.
Slide the brown clamp approximately 2 mm in the direction indicated by the arrows in the picture. There is no need to remove the brown clip from the base of the connector.
Do not break the connector, otherwise the keyboard will not work after assembly!

In general... here it broke) You disassemble thousands of keyboards, and nothing happens, but then one day - and the connector breaks!
So, as you can see in the picture, the latch is missing a pin on the left.
Don't panic! A single pin retainer is still suitable for securing the connector.

Reach out antenna cables Wi-Fi through a hole in the case.
Remove the three screws securing the speaker module.
Disconnect the speaker cable from the motherboard (the green arrow in the picture points to it).

Remove the speaker module.

Disconnect the video cable from the connector on the motherboard.
Remove the 6 screws securing the monitor hinges (3 per hinge).

Start separating the monitor module from the laptop body.
In the next tutorial we'll look at .
By the way, to disassemble the display panel, it is not necessary to remove it from the case.

Disconnect and remove the non-volatile memory (CMOS)/system clock battery.
Remove all the screws from the bottom of the laptop, circled in the picture. The green circle marks a screw in the CD/DVD drive bay that is not visible.

Remove all screws securing the top of the case.
Disconnect the touchpad cable from the motherboard.

Start separating the top of the body from the bottom.
You can use a guitar pick in the same way as in step 6.

Remove the top housing.

This is what the top of the case looks like: reverse side:

Disconnect the USB board and audio card cables from the motherboard (indicated by green arrows in the picture).
Disconnect the cooling fan cable from the motherboard (indicated by the yellow arrow).
Remove the 4 screws securing the motherboard.

Lift the motherboard from right side as shown in the picture below, and disconnect the power supply connector cable.

Remove the motherboard from the laptop base.

On the back of the motherboard is the processor. To get to the processor, you must first remove the heatsink.

The easiest way to find a replacement motherboard on sale is by the serial part number. It is usually marked on a sticker in the memory module compartment. The HP serial part number is XXXXXX-001.
This is what the laptop case looks like without the motherboard:

The USB board, audio card, cooling fan and power supply connector are attached to the base of the laptop case. The power supply connector is attached to the wires.
To remove the cooling fan, you need to remove the two screws that secure it.
As you can see, the fan is dusty and needs to be cleaned.

Disassembly is complete. Reassemble in reverse order.

In today's article we will disassemble the HP Dv7 laptop: remove the battery, pull out the hard drive and RAM, remove the Wi-Fi module, pull out the keyboard, get to the cooling system. For disassembly we need: a screwdriver, tweezers, a plastic card, a dust brush, thermal paste (if there are plans to replace it).
You can see the disassembly instructions in pictures or at the end of the article:
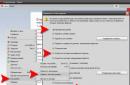
1. Latch to the side (in the direction of the red arrow) - pull out the battery in the direction of the green arrow

2. The RAM and hard drive are hidden from us by a cover; it is held in place by six bolts; we unscrew all the bolts pointed to by the red arrows and remove it.

3. To remove the drive- you need to unscrew the bolt near number one and pull it. To pull out the hard drive- unscrew the two bolts indicated by the red arrows and pull it out in the direction of the green arrow. To pull out RAM- move the latches to the sides in the direction of the green arrow

Disassembling HP Dv7 remove hard drive
4. To pull out the Wi-Fi module- unscrew the two bolts near number 1 and remove the wires. For further disassembly, unscrew all the bolts indicated by the red arrows.

5. Turn the laptop over and use a plastic card to pry up the top bar above the keyboard.

6. The bar above the keyboard is held in place by a cable, disconnect it and adjust the bar to the side

7. The keyboard is held in place by four bolts (red arrows) and a cable, unscrew the bolts and turn the keyboard over

8. Raise the latch and pull out the cable, adjust the keyboard to the side

9. We pull out the wires that go from the monitor to the Wi Fi module, green arrows point to them. Pull out one monitor cable and disconnect the touchpad cable. We unscrew the six bolts that hold the monitor (red arrows), adjust the monitor to the side

10. We unscrew the three bolts indicated by the red arrows, pull out the cable - green arrow, adjust the bar to the side

11. We unscrew all the bolts indicated by the red arrows, pull out the cable - green arrow

12. Place the laptop on its side, insert it between the top and bottom covers plastic card, move it in a circle, gradually disconnecting the latch, adjust the top cover to the side

13. We disconnect the board from the bottom cover - to do this, unscrew the four bolts (red arrows) and pull out the five cables (green arrows). The cable numbered 1 is located under the board, you need to turn the board over and pull it out

14.
We disconnect the cable, I wrote about it in paragraph 13 
15. We unscrew the four bolts indicated by the red arrows and remove the cooling system

16. We clean everything from dust, change the old thermal paste

That's it, the disassembly of the HP Dv7 laptop is over, we clean everything from dust and put it back together in the reverse order, if something is not clear to you - watch the video by TaMa_Ghazi Diagnose Reparatur und Service Laptops
First of all, unplug the laptop(disconnect the laptop from the power supply and remove the battery). On some laptops, this will require unscrewing 4 screws. For your convenience, place any removed screw on a piece of paper and sign where it was removed. For example (Fig. 1). In the designated segment, arrange the screws in the same order as they are in the laptop. For greater convenience, you can number the groups of screws according to the order in which they were removed. This will simplify the task of assembling the laptop.
Next, you need to remove the hard drive, wifi module and, in some cases, the Bluetooth module. On some models, disassembly will not work without removing the RAM sticks. All these manipulations are performed on back cover laptop.
Then you can carefully turn the laptop over.
Open the laptop lid and try extremely carefully use a pick or card to lift the bar covering the speakers (thin plastic frame located above the keyboard It is not available on some models). It should be pryed carefully and evenly along its entire length until it becomes possible to remove it. Sudden movements will lead to cracks in the frame.
On some HP laptop models, the next step is to remove the top of the laptop with the matrix.
Then you need to remove the laptop keyboard. Do this carefully, prying the latches with a pick. Remember that the keyboard is attached to the motherboard with a rather short and thin cable. It needs to be disconnected as soon as you have the opportunity.
Then remove the keyboard tray.
If at any stage you are unable to remove the part, make sure that there are no remaining screws in the way. By acting by force, you can simply break the fastenings.
So, here is a laptop motherboard with many terminals and cables. You can already see the cooling system, but access to it is only available from the back of the motherboard.
Disconnect all connections that prevent the motherboard from being removed and unscrew all screws securing the motherboard.
Remove the empty case and place the motherboard on a work surface with the cooling system facing up.
Next, unscrew the radiator fasteners. General rule removing the radiator - gradual unscrewing the screws crosswise. This uniformly reduces the load on the processor die. Once you remove the radiator, you will see the fan. The fan wings and radiator grille should be blown out with a vacuum cleaner, an enema, or a can of compressed air. The dismountable fan can be separated for better cleaning and the bushing can be lubricated with oil.
Next, take the time replacing thermal paste. This measure is no less effective in reducing the temperature of the laptop and maintaining its performance at the original level. The old (possibly dried) layer of thermal paste must be removed from the CPU and GPU chips. Pay attention to the chips themselves; it is not necessary to clean the paste from the surrounding surface. Apply a good layer of paste and make sure that when connecting the chip to the heatsink, the entire contacting surface is covered with thermal paste.
The success of the assembly directly depends on your care and accuracy when disassembling the laptop. Carry out all the steps in reverse order, making sure that the screws are used up smoothly.
If, after assembly, your laptop does not start, make sure that you did not forget to install any element, and that the power button was correctly connected to the motherboard.