Instruction
To clean the system registry and from unnecessary records there are a number of programs. The most popular ones have a Russian-language interface and are quite easy to use. Consider the process of deleting unnecessary records from registry and with the help of the free and powerful utility CCleaner. First of all, you need to download and install it on your computer.
During the installation process, select the Russian language. After installation, run the application and see the main window. In this window, on the left, select the "Registry" menu item. If not, put a checkmark in front of each menu item and click "Search for problems." The program starts scanning registry for errors.
Scan progress is displayed at the top of the main window programs, in the form of a filling bar. As the scan proceeds, items of erroneous entries begin to appear in the list below registry A. In this list you can see the error type and the program that made it. After the scanning process is completed, click the "Fix" button. After pressing this button, the program will prompt you to save backups the changes made. Click OK. Thanks to this, it will be possible to restore registry if, after cleaning, the computer will work worse.
In the next window, the program will offer you options for solving the problems found. Button "Fix" - corrects one item from the list. "Fix marked" button - automatically fixes all found errors marked in the list. By default, all list items are checked, you can change this if you wish. By clicking on the checkmark, uncheck those that you wish to leave unchanged. In the usual case, it is recommended to click the "Fix marked" button. When finished, click the "Close" button.
After the procedures have been completed, registry gets rid of redundant and erroneous entries, which improves system performance. When you're done, you can close CCleaner.
Windows Registry is a hierarchical database that contains information about system settings, hardware and software, user profiles, etc. When uninstalling a program, in theory, its settings should be removed from the registry, but this does not always happen - due to user errors or incorrectly written uninstaller utilities.
Instruction
Activate the registry editor. To do this, in the program launch window (called by the Win + R key combination or the Run option of the Start menu), enter regedit command. In the "Edit" menu, click "Find" and in the search box write down the name of the program from which you want to clear the registry. This window can also be called by the hot key combination Ctrl+F. Use the Find Next button to start searching.
If an entry with this name is found, right-click on this line and select the "Delete" option in the drop-down menu. You can also use the Delete key or choose Delete from the Edit menu. After the first found file, press F3 to find other entries related to this program, and delete them using one of the described methods.
This method can be time consuming if the remote program was a complex structure - for example, Adobe Photoshop. To speed up the process, you can use third party utilities to clean up the registry. Download and install the free RegCleaner program.
Select "Search" from the main menu. Enter the name of the application you want to get rid of in the search bar and click the "Search" button. If an entry with that name is found, a Delete button appears in the lower right corner of the screen. Use it to clean the registry of obsolete data.
Where are the remnants of uninstalled programs stored and how to remove them
According to Microsoft requirements, working program files must be stored in folders %appdata% And %localappdata% profile Windows user. Accordingly, it is necessary to look for the remains there.
You can stock up on a bottle of patience, sit down and figure out which folder belongs to which application. And you can do it much easier - create new profile and transfer all working files to it (documents, music, videos, photos). In the end, it remains only to delete the old profile, and with it all the remnants of the programs that were previously deleted.
This will save a significant amount of time. Plus, you will save yourself from accidental errors, because the system itself will create a profile in the desired form. Of course, it will delete the old profile correctly. Your task is to completely transfer personal files from one profile to another.
In a few days, only those programs that you already have installed and that you use will leave their settings in the new profile.
Removal of residues
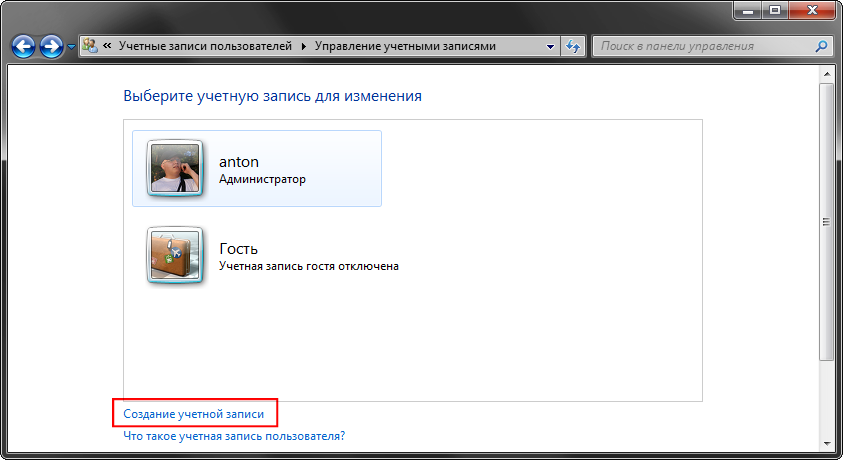
To start cleaning up the leftovers, you need to create a fresh account, which will not contain any settings. To do this, open the "Control Panel" and select the "User Accounts" item in it.
A window will open with a list of available accounts. In it, you need to click on the link "Create an account".
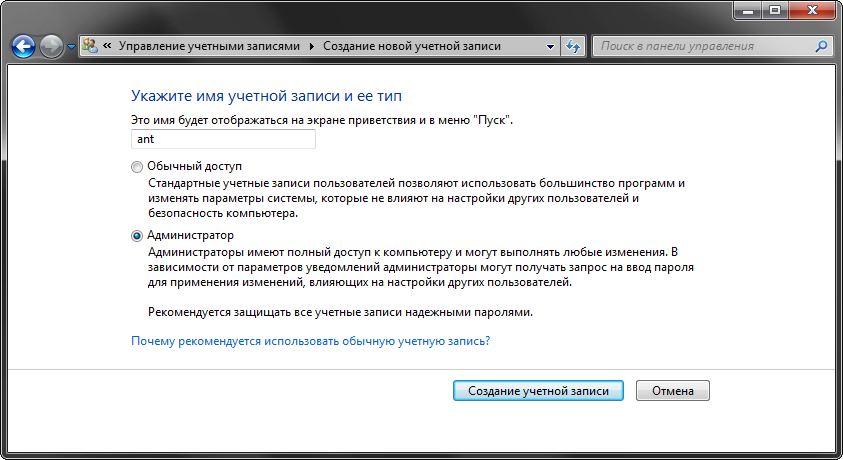
After setting a name for the new account, select its type (User or Administrator) and click on the "Save account" button.
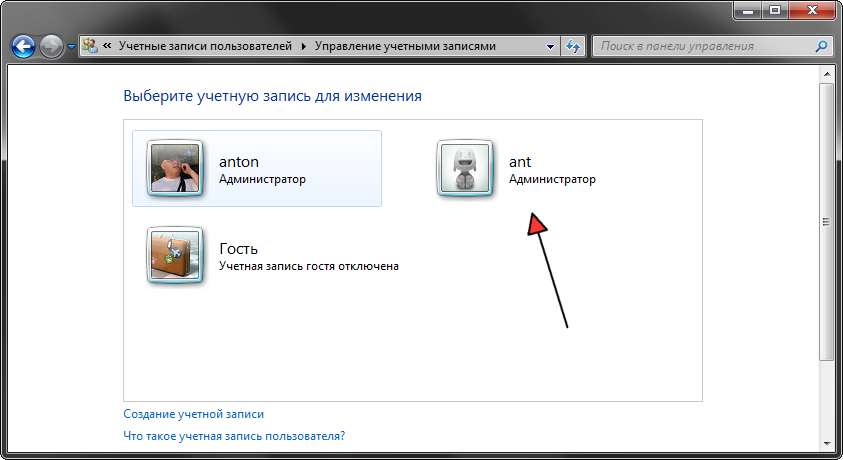
After that, the list of accounts will be replenished by one. You can proceed to the next step - data transfer.
Transferring data to a new account
You must switch to a new account before you can start migrating your personal data. When switching operating system will form a new profile from scratch and put all the basic elements into it.
To switch to a new account, click "Start" - the arrow to the right of "Shut down" - "Log out". In the user selection window, click on the new account.
To start transferring data between accounts, you need to open two File Explorer windows and place them next to each other. In the left window, open the folder with the old profile, and in the right window, open the folder with the new profile. The old and new profiles are located on system drive in the Users folder. It's hard to miss.
Sequentially transfer data from personal folders from the old profile to the new one. First "Documents", then "Images", then "Videos" and "Photos".
If you store personal data in other folders outside the user profile, then you do not need to transfer them.
To delete the old account, you must once again make sure that all data has been transferred to the new profile. After that we do the following:
- Open "Control Panel" - "User Accounts"
- Manage another account
- Selecting an old account
- Deleting an account
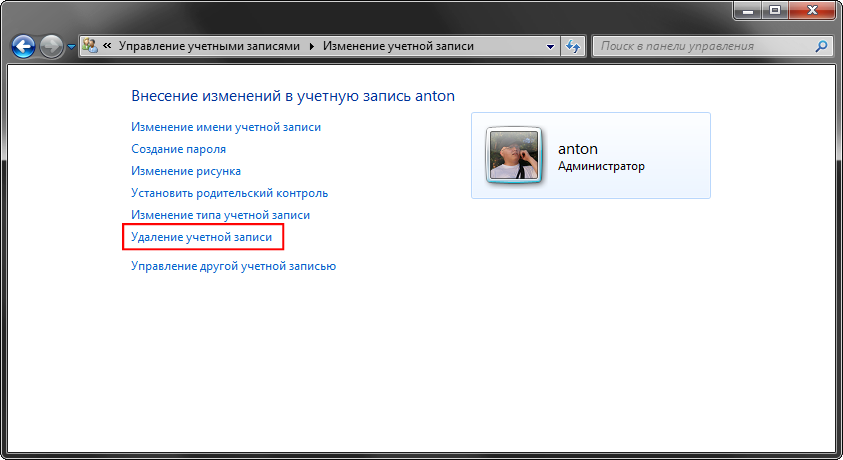
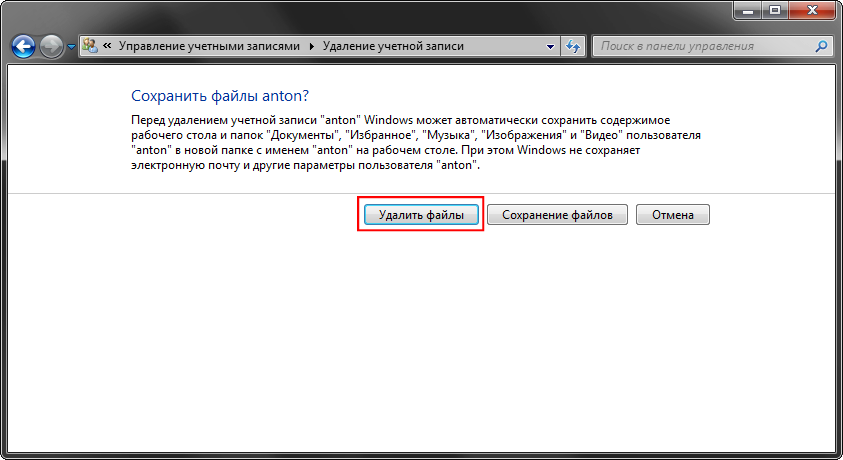
In the confirmation window, click on the "Delete Files" button
This completes the removal process. Now you need to set up a new profile for yourself and work in the same mode, but with a clean account.
What to pay attention to
When using this method of removing residues from remote programs Attention should be paid to a number of features that can be extremely important.
- Some programs (such as Dropbox) are installed in the folder %appdata% entirely, so they will have to be reinstalled.
- The settings of some programs may be reset or save data to the old profile. Therefore, it is recommended to check the settings and change the paths, indicating the path to the new account in them.
- After switching to a new account, you may need to additional setting switching layouts (if you do not use the standard version).
Otherwise, everything works as usual and no additional gestures are required.
Conclusion
After all the manipulations with my computer, I managed to free more than 20 GB of disk space which I am extremely happy about.
It is also worth noting that there is also an All Users folder, which stores application settings for all users (shared folder). To deal with the data in it, I had to sit down and sort through all the folders manually, deleting unnecessary ones. Saved by the fact that in my case there were very few of them.
Similarly, you can remove residues in other Windows versions(XP-10).


