Replaces the row of physical keys at the top of the keyboard. The panel is a full-fledged MultiTouch Retina display, which is additional panel tools for the active application that the user is currently working with. In this article, we offer 15 tips that will make working with the Touch Bar simple and effective.
How to display function keys F1, F2, etc.
To access the function keys F1, F2, etc., simply press and hold the Fn button located at the bottom left of the keyboard.
Always show function keys in certain applications

Some applications may require that function keys be displayed at all times. Users can configure their own this function. To do this you need to go to " System Settings» → « Keyboard» → « Keyboard shortcuts", choose " Function keys" and click the icon " + ", to add the right application. Now on startup this application Function keys will always be displayed by default. When you press and hold the Fn key on the Touch Bar, the Control Strip interface (the right side of the Touch Bar that displays the various macOS switches) will appear.

Quickly adjust volume level and display brightness
To adjust the volume or screen brightness level, simply press, hold and change the position of the slider in the Control Strip.
Customizing the Control Strip interface on the Touch Bar

Open " System Settings» → « Keyboard" and select the option " Set up Control Strip" The icons in the Control Strip will start to wiggle. In this mode, you can drag (delete, replace) selected switch icons from the display MacBook Pro to the Control Strip panel.
Access to advanced Control Strip features

Click the chevron (arrow) button to the left of the Control Strip interface to access an expanded list of system functions and controls.
Setting up an expanded Control Strip

Pressing the button in the form of a chevron (arrows) during the Control Strip setup process will allow you to access more full list system functions.
How to place the necessary tools of the selected application on the Touch Bar

In order to place the necessary tools of a particular application on touch panels Bar, launch the application whose tools you would like to place in the Touch Bar and go to the " View» → « Set up Touch Bar" It is worth considering that not all applications have this feature.
How to customize the Control Strip while changing application settings

When changing application settings, you can quickly move on to adjusting the Control Strip by simply tapping on the interface.
Escape key

The Escape key is located in the upper left corner of the touch control pad, but its placement is slightly inconsistent with the physical buttons below it. However, MacBook Pro owners who are used to touch typing need not worry—presses on the Escape key will be registered even if your finger doesn't make full contact with the button.
Sleep mode

The Touch Bar's backlight dims after 60 seconds of inactivity and turns off completely after 75 seconds to conserve your laptop's battery power. To return it to working condition, you can touch either the panel, the keyboard, or the trackpad.
Trackpad + Touch Bar

macOS lets you use your trackpad and Touch Bar at the same time. For example, you can add an object to Pixelmator and change its color or size at the same time.
Ability to take Touch Bar screenshots

With the release of macOS 10.12.2, users now have the ability to take screenshots of the Touch Bar (). The functionality is available to owners of MacBook Pro running macOS 10.12.2 or later.
Over the past couple of weeks, we've introduced you to several fun (or weird?) Touch Bar apps in new MacBooks Pro. During this time, there were even more of them, so it was decided to make a small but relevant selection of all sorts of utilities, toys and applications for the touchpad on MacBooks. Some programs you will definitely like, others you may not even want to install. Already interested?
1. TouchSwitcher (free download)
It's strange that the functionality of this little utility was not originally built into the Touch Bar function. It's so intuitive to switch between applications running on your Mac using the touchpad. This is exactly what TouchSwitcher does. After installing it, a special button will appear on the left edge of the sensor, which will display icons of running programs on a small display. They tapped on one and it instantly opened.
2. Rocket (free download)
Rocket is the same TouchSwitcher, only with a slightly redrawn interface and two important features. Firstly, after launch, the utility icon is always lit in the top bar, through which it can be updated or further configured. Secondly, with Rocket you can fully launch applications from the Dock. That is, those that have not yet been launched.
3.Doom
No, well, if you were once able to run the classic Doom game on the first iPhone, then why not try to do it on the most powerful MacBook Pro? Only they will play with you not on the Retina screen, but on the tiny Touch Bar. Yes, you can play Doom on such a narrow screen! The toy cannot be downloaded yet; apparently, its author Adam Bell is still finishing it.
4. Nyan Cat (free download)
Nyan Cat is a world-famous man who appeared thanks to a YouTube video that appeared in 2011. It depicts a cat running in space with a body made of cookies. Want something like this on your Touch Bar? Easily! Even with sound, which is very important.
5. KnightTouchBar 2000 (free download)
This is an entertainment utility for those who remember the 1991 film “Knight Rider”. After launching it, the Touch Bar screen will display the same animation as on the dashboard of the Pontiac car of the main character of this legendary film. And the sound design is the same, yes.
6.Lemmings
Who remembers Lemmings? This is a game from 1991, which over all this time has been ported to many gaming platforms. In it, funny little people walk around the level mindlessly, and your task is to guide them so that they don’t get into any trouble and successfully reach the end of the level. One of these levelers can now be on your Touch Bar. You can control the little people using taps on the small screen. By the way, author I decided not to share this toy yet, but we are all really looking forward to it.
Let me start with a confession: It never bothered me that Apple ditched the physical function keys on the MacBook Pro in 2016. I didn’t use the F-series hotkeys when touch typing, I always lowered my eyes and looked so as not to miss the volume switch. And I use the Escape key (as it turns out) surprisingly rarely.
But here is the ability to display Additional information, seemed useful to me from the very beginning. However, the standard capabilities of the Touch Bar are limited: in fact, it is a list of buttons for performing actions in the running program. So, several months after purchasing the MacBook Pro, I still haven't found a use for that under-screen touch strip.
When I realized that I wanted to expand the capabilities of the Touch Bar, I went to Google and came across a wonderful utility BetterTouchTool. It appeared long before the touch screen and allows you to create additional gestures for all input systems on Macs: keyboards, touchpads, mice - and even remote controls.
After the release of the new MacBook Pro, the creator of BetterTouchTool implemented a cool system for creating your own Touch Bar layouts. It is flexible and allows you to customize the small screen to suit your needs. At first I used the settings from vas3k for a long time, but recently I created my own layout, which I will talk about in this text. The file with my settings is duplicated at the end of the text.
My setup
When creating the layout, I wanted to make it easier to interact with multiple desktops and full-screen applications. Previously, I didn’t particularly use these features in Windows, Linux or macOS, but now I decided to enter 2019 with a new logic for working on a laptop.
On the left side of the Touch Bar there are buttons for switching desktops and applications:
- Main desktop. Here mail client(Spark), working with files, other little things;
- Job. My work software is Slack, Trello, Sketch, a package from Adobe;
- Web. Everything is simple here, this is Safari in full screen;
- Communication. Separate screen with instant messengers. Using BetterTouchTool, I positioned them at the edges of the screen (by default, application windows in macOS do not “stick” to the edges of the display);
- News. I read a stream of new articles through the RSS reader Reeder 3 and Tweetbot;
- Music. I listen to music and podcasts through iTunes. I placed the name of the active track just to the right of the button to switch to the player.
On the right is service information: weather, date and time. I also put a display there current layout keyboards. I implemented it by issuing query results to the xkbswitch console utility. Alas, the script’s every second “jerking” actively consumes battery power, but I use a laptop (mostly) when connected to the network. If this bothers you, you can manually adjust the request rate from 0.5 to 2-3 times per second - and if you just need to be aware of the active layout, one request every 10-20 seconds is enough. Alternatively, you can disable this widget altogether.

The Control and Option keys are not left idle. They show two sets of buttons that launch different programs- when Control is pressed, they are displayed system settings, terminal and activity monitor, and with Option I see a set useful programs, such as code editor CotEditor and Team Viewer.
To adjust speaker volume and screen brightness, BetterTouchTool has multi-touch gestures on the Touch Bar. I assigned two-finger swipe to adjust volume and three-finger swipe to adjust screen brightness. This is convenient, since you don’t need to allocate a specific place on the Touch Bar for them (it detects multi-touch gestures over its entire surface).
Other settings
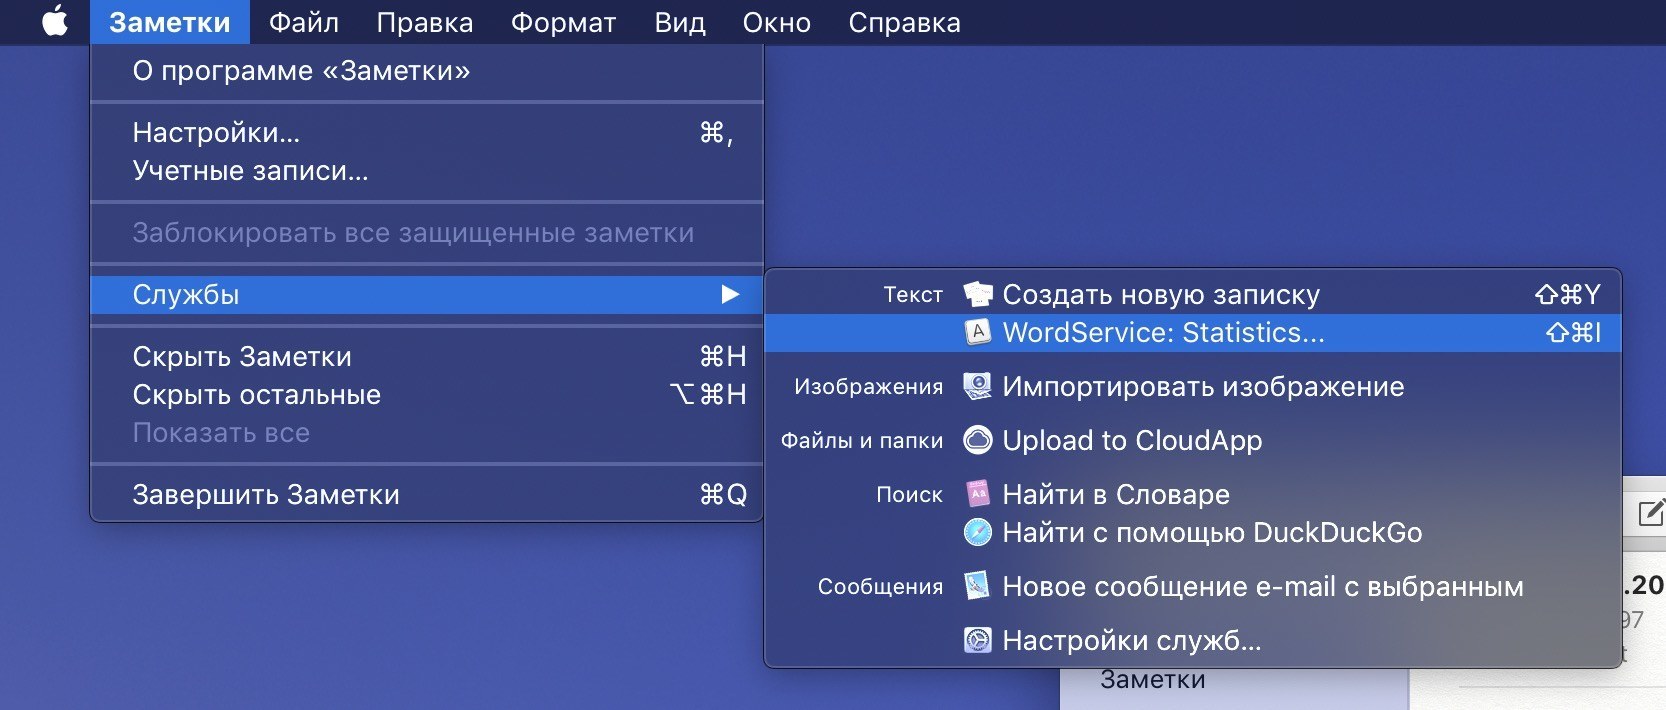
While I was writing this text, I wanted to see how many characters it contains. Unfortunately, Notes in macOS (where I do all my writing) doesn't show these stats.
After some googling, I found free application, which provides a set of ready-made scripts for working with text - they are built into the “Services” system menu and are constantly available there. This application can also show statistics on a selected piece of text, and I realized that I could make an additional button in BetterTouchTool that would be visible only when “Notes” is open and display statistics on the selected piece of text.
Every post I write on the BeardyCast telegram channel goes through a printing press. This utility corrects punctuation and adds non-breaking spaces. There are several web services with typography; I use the online version of Lebedev’s “Typographer”. But jumping between notes and the browser, copying and pasting text here and there is not the best effective solution. Moreover, the Lebedev studio service has a full-fledged API for connecting to third-party software.
After much searching, I discovered a script for Alfred (a fancy alternative to Spotlight search) that runs any selected text through Typograph and inserts an already edited version in its place. For this action, I also created an additional button in BTT, which appears on the TouchBar only when working with “Notes” and launches this script with one click.

In addition to the touchbar layout, I have a number of handy gestures and hotkeys that I use regularly:
- Escape "hung" on left click top corner touchpad. The chicano works. Plus, there is tactile feedback, which is so lacking in the standard virtual “escape” in the Touch Bar;
- Switching songs in iTunes is a three-finger swipe left and right on the touchpad. The three-finger gesture up is responsible for playing and pausing;
- To lock the laptop, I rotate two fingers counterclockwise. It sounds strange, but in fact I got used to the gesture very quickly - it is similar to closing a lock.
And finally, the menu. I have a lot of different icons there. To somehow navigate among them, I used to put things in order through the Bartender 3 application, but in one of the latest beta versions of BetterTouchTool, it became possible to hide icons by double-clicking on the menu bar. Very simple system, and it works great.
Conclusion
I honestly think Apple could have (and should have) improved the Touch Bar. Moreover, over the three years of the Touch Bar's existence, Apple has hardly developed its software at all. I hope this happens in one of the future macOS versions. Now, judging by the reviews online, the main rejection was caused by the rejection of the physical Escape button - if to the right of the Touch Bar there is a physical button with a Touch ID scanner, then why can’t you put the same button on the left? I do not understand this.
However, for me personally, the touchpad above the keyboard was more than useful. Thanks to BetterTouchTool, I distributed actions and applications across the Touch Bar, and hid the Dock and menu bar.
I recommend visiting the BetterTouchTool website. There is a forum where you will find answers to most questions, as well as other awesome Touch Bar setups - for example, AquaTouch and GoldenChaos.
Apple knows how to promote new services and technologies when it truly believes in them, but the Touch Bar is still somewhat of an experiment.
Utilities like BetterTouchTool demonstrate just how powerful a touchpad over a keyboard can be, but somehow Apple doesn't think so. How else can you explain that the MacBook Pro does not have truly flexible personal settings for the Touch Bar? Inside macOS there is an entire scripting language called Apple Script, which allows you to meticulously customize the operation of the OS, but the Touch Bar has not become a “necessity” over the several years of its existence.
In 2016, Apple seriously updated the MacBook Pro, adding a new element to it - the Touch Bar. According to the company's idea, the touch panel was supposed to simplify access to various functions, however, for many users the appearance of the Touch Bar was not a revelation. On the contrary, this design element is criticized to this day. But can the Touch Bar be truly useful in everyday use?
As it turns out, yes. To do this, you just need to download the Pock utility on the developer’s official website. The program can be downloaded for free.
What improvements does this utility bring?

The first option that is definitely worth mentioning is the ability to place a full-fledged Dock panel on the Touch Bar. According to the developer, this trick will increase the usable area of the main display, because now the strip with programs can simply be hidden. Of course, our application supports notifications, so any missed event will be reminded of itself with a red sticker.

Another, no less useful feature is a function that allows you to display the status bar and widgets. On touchpad You can display the current time, battery charge, level Wi-Fi signal, search - in general, everything that we are used to seeing in the menu bar. You can also add a third-party media player, such as Spotify, to the panel.
A big plus of the program is that the main functions of the Touch Bar remain in their original places, which means that the user does not need to switch to access the Escape key, brightness and sound buttons.


