ProfilePress is a plugin for adding forms to a WordPress site using shortcodes. With this tool you can create user registration forms, login forms and profile pages, and thus build an entire community around your site. It works with the existing system WordPress users and is compatible with any theme.
The plugin includes 5 different styles for forms, so you can choose the option that best suits your website design. There is also a set of themes available for the plugin that can help you change the style of your forms if necessary.
Description Demo Download
The plugin can be downloaded for free from the WordPress directory. A premium version is also available, which includes the following: additional functions like uploading an avatar for a user, registering through a profile in social network, Captcha, etc.

Functions
Features included in free version:
- Unlimited number of frontend login forms for users
- Unlimited number of frontend forms for user registration
- Unlimited number of frontend password reset forms
- Form Design Preview Window
- Multi-step registration forms
- Redirecting from default WordPress login page to custom frontend login page
- Redirect from default WordPress pages registration to a custom frontend registration page
- Redirecting from default WordPress password reset page to custom frontend password reset page
- Redirecting users to custom pages after logging in/out
- Built-in installer for installing themes for ProfilePress forms
If the above features aren't enough for you, consider the premium version, which includes the following features:
How to use the plugin
Once you download and activate this plugin, you will also need to install the Shortcake Shortcode UI plugin, which is designed to provide users with a convenient interface for adding shortcodes to posts, viewing and editing it in the content editor.

Once this is done, you must ensure that registration is open for users. To do this, visit the section Settings → General and check the box next to “Anyone can register.”

Finally, if you purchased the paid version, enter your license key so that you can get an update to the plugin.

When you activate the plugin, a number of pages will be added to your site: Registration, Login, Reset Password, Change Password, etc. These pages have special shortcodes for hosting forms. If you want to create new pages or change the ones on which they are displayed, you can do this on the plugin's main settings page.

Here you can also change the redirection parameters, choose which pages to redirect the user to after logging in/out, etc.

On this settings page you can also change the content of the emails that will be sent to users after registration, password reset, etc.

Working with the Form Builder
On the plugin settings page at the top there is a separate tab for each form type - login, register, user profile, and so on. When you select one of the options, you will see that the plugin offers 5 different styles for forms along with their shortcode. To choose a different style, simply update the corresponding shortcode on the page.

Then in the frontend of the site you can view the form:

If you want to make any changes, click on the “Edit” link. You will see a window with HTML and shortcodes for customizing the selected form.

The easiest way to edit the form is to click the “ProfilePress Shortcodes” button. A pop-up window will appear on your screen with all the available elements that you can use in your forms. To add an element, you just need to click on its button.

Below you can see a preview window of your form, which will instantly show all your changes. Below it is a CSS window where you can change the appearance of your form as desired.

Login via social networks
If you want users to be able to register/login through their social network profile, you will need to set API keys in the plugin settings in the “Social Login” tab. There you enter access parameters for Facebook, Twitter, Google, Linkedin and so on.

Appearance of the form
The plugin has 5 built-in standard themes, here are our favorite styles:


If you need some other option, you can always purchase the required theme separately. Here are some of the available options:
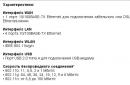
- Pinnacle is a calm and neat WordPress theme with a login, registration and password reset page, as well as a social login option.
- Montserrat is a beautiful theme for creating a one-page ProfilePress form that will include a login, registration, password reset and social login form.
- Stride is an elegant, customizable, multi-step WordPress registration form.
- Bash one-pager is a simple, beautiful, responsive one-page form with the ability to log in via a social network.
- Bash Edit Profile is a neat, responsive user profile form in WordPress.
- Parallel is a horizontal, responsive, impressive form for login, registration and password reset, with the ability to log in via a social network.
- Perfecto is a form for login, registration and password reset with two color accents.
Price
Pricing for the premium version of the plugin starts at $49 for a license for one site, $99 for 3 sites, and a developer plan with unlimited sites for $199. All plans include a year of support and updates. Additional themes cost from $5 to $10.
But don't forget that it is also available free version.

Addons
There are also 2 extensions: "Email confirmation" - before registering, users will need to confirm their email; "MailChimp" - adds a user to your mailing list. Each addon costs $29.

Conclusion
This is a good quality plugin that will help you create a real community for your site. All the necessary features to customize your registration forms to suit your needs are included here. The plugin's standard themes are really good, but if you need another option, you can always purchase the theme you need for a relatively low cost. The same goes for addons.
If you are looking for a plugin like this, be sure to check out this option. To test it yourself, you can always download the free version. It is worth noting that the paid version has a 30-day warranty period, so if you find that the plugin does not meet your needs, you can always get your money back.
In a word, download, test and create beautiful forms on your website.
Greetings, colleagues. In this article I will show you, how to make a registration and authorization form for a WordPress blog using one simple and at the same time sophisticated Profile Builder plugin. Using it, you can allow users to register on your blog in the admin panel.
However, you probably have a question: why allow visitors to crawl around your blog? After all, it can be hacked! Well, firstly, these are free articles that are not lying around on the road today and cost money, or at least time. Secondly, these users will not be able to browse your admin area as freely as you, but only write text in a draft, which you will later have to approve in order for it to be published on the blog.
In general, in my opinion, it’s a pretty cool idea; if, for example, you make something like mail.ru answers from a blog, then the site itself will be filled and promoted. By the way, I have already seen something similar, only with a catalog of articles. In it you also had to register on the blog, go to the console and leave your article for review. To be honest, I was so surprised at the time that someone allowed people to crawl around their site that I doubted for a long time - is this actually a catalog of articles or a simple blog, the author of which decided to collect articles for free? By the way, I completely forgot to say that the Profile Builder plugin can be installed not only on a regular blog, but also on a forum, store, message board made on .
Agree, on many forums registration is simply terrible, asking you to fill out almost all the data, while the Profile Builder plugin can be configured so flexibly that it will only require you to enter three fields: name, email and password. This is very convenient, because no one wants to fill out a whole dossier about themselves, and even fill out a mega complex captcha (set of characters) or answer an unrealistically complex question that a person would have difficulty answering.
I saw a couple of such forums when I was putting together my own, where questions were asked that could only be answered by those who were well versed in the topic on the forum. In short, it’s terrible, such registrations are needed in the furnace. So, let's start installing the Profile Builder plugin.
How to make a registration and login form on WordPress?
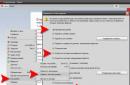
1 ) Before you start installing the Profile Builder plugin, you need to configure a few things on your blog so that it can allow users to register. So, go to the “parameters” “general” and put a tick next to the “membership” item, and in the “new user role” tab select “member”. This is someone who will be able to write articles, but will not be able to publish them.
2 ) Ok, now you can install the plugin. You can download it.
3 ) Once you install it, all you have to do is the user registration page. To do this, go to the “pages” “add new”, title it something, for example “Registration” and insert this shortcode in the “text” tab and publish the page. If something is unclear, look at the example below.

Ok, after this you will have a registration form like this on your blog.

By the way, you can also add it to blog widgets. To do this, go to “appearance” “widgets” and add a widget called text and in its content, paste the same code. In general, this shortcode is universal and can be inserted into any part of the blog. If you ever need it, then simply go to "appearance" "editor" and select the file you need.
Okay, we have provided you with a registration form, but what about authorization? There are other shortcodes for this, here is a list of them:
– registration form.
– form for editing a profile (for authorized users).
– password recovery form.
Just copy the code you need and paste it into the place on the site where you want to see the form you need.
Setting up the Profile Builder plugin.
4 ) As you probably already noticed, our form has a lot of unnecessary fields, let’s remove them so as not to frighten our users once again. So, to do this, go to “users” “Profile Builder” “standard profile fields”. Here you will see three columns: field name, status, required field.

The “status” column indicates the fields that will be displayed (displayed) for filling. I recommend that you set them all to “hide” status.
The “required field” column indicates required fields, without which user registration will not occur.
In the “field name” column, I think everything is clear.
5 ) Ok, and finally, go to “general settings”. Here you can, at your discretion, enable or disable registration confirmation by user email, as well as configure the method of authorization by login or nickname. By the way, I completely forgot to mention one more plugin - which also has an authorization function. I wanted to write about him at the very beginning, but, alas, I forgot.
You need the development of online stores, no ideas, turn to professionals.
Hi all. The moment came when I needed a registration form on WordPress, in earlier posts I described one code that facilitates the output, as time goes on WordPress is updated more and more often, I had to look for an alternative option and I settled on a plugin Profile Builder. Using this plugin, you can display all the information on your blog and thus isolate your admin panel from unwanted visits from registered users.
In this article we will look in more detail Profile Builder plugin And Login plugin Sidebar, and let’s learn how to create a registration form on WordPress
First you need to download the WordPress Profile Builder plugin and activate it. Next, in the admin panel, in the “Settings” -> “General Settings” tab, check the box for anyone can register.
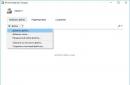
A new menu will appear in the Users tab “ Profile Builder", in which you can further edit the parameters. Believe me, there are not many of them there.
Let's move on to creating our form, for this we create new page, call it, for example, “Registration” and insert the shortcode into the page itself . For those who don’t know what a shortcode is, I’ll explain it briefly - it’s a short code - which contains a specific function, on this moment We have a registration form.

- Add a new page
- Name
- Insert the shortcode
- Save
You can create other pages using exactly the same methods:
- — Login form page
- — Page with a form for editing user data (the user must be authorized)
- — Password recovery form page
All these shortcodes can be found in the “Admin Panel” tab -> “Users” -> “ Profile Builder", here is the whole list, I have listed the main ones.
The plugin's settings are not large; all the work is done by short functions, let's move on to the main ones:

In the main settings, select a set of styles on the site, I still don’t understand for what purpose this tab is needed since I have “Default” and “None” available.
And confirmation by email, after the user registers on the site, he needs to confirm the registration.

Here you can choose which users to enable/disable the admin panel. For those who don’t know how to do this, I’ll describe it now. As an administrator, you have the right to assign roles to any user; each role has its own capabilities, for example, an author can write articles.
To add a role, open the “Users” tab, select the person you need from the list and set his rights, everything is easy and simple.

Standard profile fields, here you can simplify the registration form (than the easier it is better) and after the mark required fields, the user will have to fill them out. You can also display profile information through these settings.
Display Profile Builder in Sidebar
You can display a link, or you can display a registration form, again displaying it through the shortcode. Open the Sidebar file and install the code in the right place . After this, the user can enter a name, password and log into the site.
As you can see, there is nothing complicated here. I have prepared another alternative option for you, it is simpler than a plugin Profile Builder You just need to download and activate Sidebar Login plugin. And using the widget, drag it to the location you need. Plus, this plugin allows you to add links to it, which will be displayed to the registered user.
Initially, when you enter the site, it looks something like this:

At your discretion, you can place the necessary links, which will be available after registration:

For example, you can create rules on the site and they will be displayed to all registered users. Or allow the publication of news, but for this, we give the role of the author, I added several links and I got the following:

The result is a pretty good form, by the way, you can edit it and change styles, to do this, go to the “Plugins” section -> find the Sidebar Login plugin “Edit” to edit the style You need a file sidebar-login/style.css.
And here is a list of links that can be pulled out from the admin panel: But they are available for different roles:
- http://your - site/wp-admin/post-new.php - allow the user to add news
- http://your - website/wp-admin/users.php - list of all users
- http://your - website/wp-admin/edit-comments.php?comment_status=all - comments
- http://your - website/wp-admin/profile.php - Your profile
You can add the rest yourself, use your imagination and use the full capabilities of WordPress, if you have any questions, write? I will answer, I will help!!!
Hi all!. There are very few of these, and you can’t find them in Russian at all. The best plugin I tried was Profile Builder. It is simple and convenient, but it will take some time to Russify the registration form.
Let's start, as expected, by installing the plugin in wordpress - download Profile Builder, unzip the archive and upload the folder with the plugin files to the server in the /wp-content/plugins directory, using, for example, FileZilla. Immediately after activation, you will be transferred to the settings, which are located in the “Users” - “Profile Builder” section.
If you decide to use this plugin, then do not forget to allow users to register in WordPress: in the “Options” - “General” section, check the box next to “Anyone can register” and select “New user role” - “Subscriber” or “Participant” (can write articles and save them in drafts for review by the admin).
All the main settings of the plugin are concentrated in the Default Profile Fields item and are reduced to a list of fields that will be displayed in the registration form.
- Input Field Name - field name.
- Visibility - add/remove to the registration form.
- Required - required fields.
Name:

- Username—user name. A required field that cannot be hidden.
- First Name and Last Name - the user's first and last name.
- Nickname - nickname.
- Display name publicly as... - which name will be displayed on the blog.
Contact Info:

- Email - address Email. Always required field.
- Website - website.
- AIM, Yahoo IM and Jabber/Google Talk— instant messaging services via the Internet.
About Yourself:

- Biographical Info - a field for the user to enter information about himself.
- New Password - new password. Another required field that cannot be hidden.
After setting up the fields, you need to display the result of the Profile Builder registration plugin on your blog. This is done using the following shortcodes:
4. Password recovery:
| [wppb-recover-password] |
We just take it required code and insert it either into the text of a previously created and allocated registration/authorization form, or into the standard “Text”.
Unfortunately, all fields on English language, so you will have to Russify them manually. To do this, go to the “Plugins” - “Editor” section and in the right top corner select Profile Builder.
- — this file is responsible for the authorization form, which is displayed using code No. 1.
- profile-builder/front-end/wppb.login.php— registration form (code No. 2).
- profile-builder/front-end/wppb.edit.profile.php— editing profile (shortcode No. 3).
- profile-builder/front-end/wppb.recover.password.php— password change form obtained using shortcode No. 4.
Find English words and replace them with Russian equivalents.
That's all, thanks for your attention. All the best to you!