For many users inkjet printers Canon sometimes has problems with print quality. In most cases, the source of the problem is the print head. Here we will look at high-quality cleaning of the Canon printer head. Therefore, let’s take a closer look at flushing a Canon printer.
In this material, I will try to help you determine the reason for the deterioration in the print quality of your printer (or MFP) and ways to overcome the situation (if possible). What I can offer you is the result of my experience in inkjet repair Canon printers and the experience of other people who found a solution through discussion in other forums and conferences. This method is not the only correct one - I just came to this option through long experiments, trial and error, and discussion of washing options in different forums, in the end this method is more convenient for me and over the past 6-7 years I have not found a more convenient one ( for yourself) washing option. I’ll say right away: the problems that arise as a result of using CISS are not considered here - this is a separate “song”; let’s look at the problems that arise after refilling ink tanks, as well as when using both original and compatible ink tanks.
What causes heads to dry out?
In most cases, practical experience will tell you when a print head needs to be replaced, for example, a streak during printing or when cleaning the print head does not produce measurable results. In recent years, fewer and fewer printed publications have been made using inkjet printers than a few years ago. Unused heads dry out after a few weeks. They must be cleaned before reuse. Cleaning the printer head is possible using many devices that are always on.
I hope that I will not reveal a great secret if I say that ink that is sold “by the glass” and in any container (except for original ink tanks and cartridges) is, so to speak, compatible, and sometimes their properties differ significantly from the original ones, and when using such ink, the printer’s print head operates in a mode that is far from optimal (calculated by the manufacturer), which leads to premature wear of the print head and deterioration in print quality. But such inks have one undeniable advantage, compared to the original ones - they are cheap, which is why they are so popular, because it is no secret that for three or four refills of, for example, a set of CLI-8 ink tanks, the amount saved is comparable to the cost new printer.
Which printhead is suitable for my printer?
Cleaning is performed automatically at regular intervals. Additional Information: Cleaning the dry print head. Each print head is tailored to the specific requirements of the printer. Just select your printer model from the header of our website. After a few seconds the corresponding heads will be displayed.
How much does a print head cost?
The consequence of this technological solution is the need to simultaneously replace the cartridge and printer head. In this case, replacing the print head is much more difficult since the print head is only available as a spare part. Just select your printer model. The correct gear and their price will be displayed in a few seconds.
So, what are the most common causes of print quality problems that may occur during operation:
1. Print head failure Canon Pixma- characteristic manifestations: a blank sheet coming out of the printer (complete absence of traces of ink on the sheet), absence of one (or several) colors (complete absence of traces of ink of this color on the sheet), “striped printing” - stripes across the movement of the sheet, of the same width, with a clear boundary and the same interval... (washing the Canon print head can help)
Where is the printer head?
Printer operating instructions.
How quickly did the printer head fall?
This depends in particular on the ambient temperature, air humidity and frequency of use. After 3-4 weeks of surgery, the head may already be dry. What should I do if my head is dry? The dried head can be identified on the printed strips. In extreme cases, the ink becomes completely blocked. If the head is directly in the cartridge, the situation is not the worst. All you have to do is place the spatula in a flat dish filled with water.2. Clogged Canon print head - characteristic manifestations: thin white stripes across the movement of the sheet when printing photographs, stripes across the movement of the sheet, of different widths, with blurred boundaries.
3. Other malfunctions leading to distortion of the printed image.
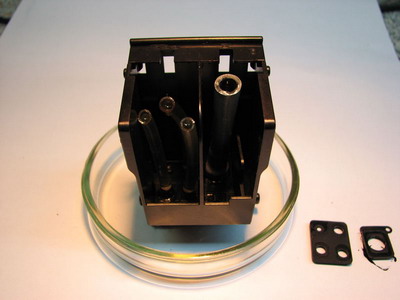
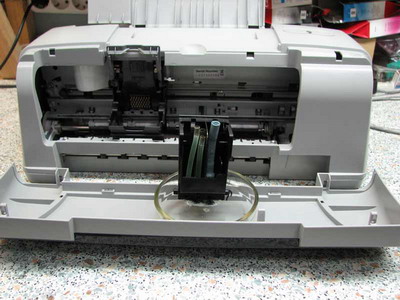
One way to flush the print head of a Canon printer
The water should only cover the head. This way you can soften the dried ink. In case of an emergency, you can purchase a new disposable cartridge. For printheads that are permanently installed in printers, the solution depends on the device model.
What happens when you cleanse your head?
If you use the printer accidentally, the head may dry out quickly. During cleaning, which can be initialized in the device also using a special software, the printer prints a certain amount of ink through the print head. The solvent contained in the ink removes buildup and rinses old and dry ink from the print head.
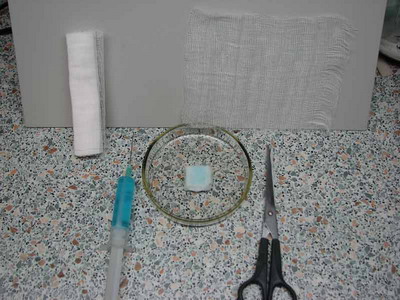
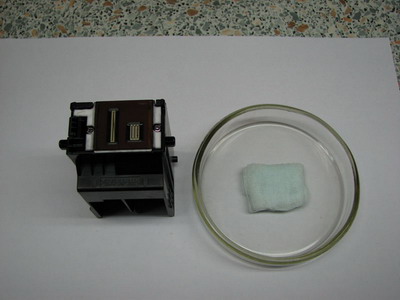
To flush Canon PG you will need:
A container made of waterproof material in which the head will fit (a plastic box with low sides, a bath for photo printing, a tea saucer), a regular bandage (or gauze), one or two disposable syringes (10 ml), in case of severe blockage - thin rubber (or soft plastic, vinyl chloride) tubes - I use medical droppers, the droppers have tubes suitable in diameter for almost all print heads, and of course, washing liquid - more about that more details:
- You can use special washing liquids, which are usually sold in the same stores as ink, but this is unreasonably expensive. You can use distilled water, which is usually sold in all auto stores, but in most cases this does not help much, and when trying to wash a pigment or ink mixture, it is generally useless. You can independently create a mixture for washing: 10% ammonia, 10% isopropyl alcohol, 10% glycerin, 70% distilled water (the resulting mixture must be shaken and filtered) - a washing liquid of this composition has been used for quite a long time (one of the first mentions of such a composition flushing liquid is here) and has proven itself, but with severe blockages (especially pigment) it will take a lot of time to flush the head (sometimes more than a week).
Is it also possible to clean the head with gasoline, turpentine, etc.
Simply pour 3 milliliters of distilled water into a dish and let the head dry for a few hours. Other substances listed are not the best solution. If desired, try isopropyl alcohol or a special head cleaner.
If one or more ink colors are not printing from the device, it may indicate that the nozzle in the print head is clogged, or that the ink cartridge is not installed correctly. To make sure the cartridges are installed correctly, follow these steps:
I would like to draw your attention to the fact that liquids containing ethyl alcohol (vodka, etc.) are not suitable for washing - ethyl alcohol tends to draw out remaining moisture from dried or curdled (due to mixing different types) ink, which in the future significantly complicates flushing, and in case of severe blockages makes further flushing impossible. It is also not advisable to use acid-containing liquids and mixtures to wash Canon print heads - this leads to destruction of the internal structures of the head.
If printing is still missing one or more colors, cleaning the print head may solve the problem. When cleaning the print head cleaning options, choose only black head, while three colors or four colors at the same time. If this problem occurs, it is recommended that you only clean the color head to which it relates. Follow these steps to clean the print head.
They are about 20 microns in diameter and form small round repeating dots with a diameter of 40 microns. This precision is especially important when printing clean text and fine lines. The piezo element generates a voltage that can determine in milliseconds whether the release is working.
Even if an acid-containing liquid flushes the head, it is still very likely to fail within two to three months. And if you really want to rinse the head with such a solution (the most commonly used mixture is 9% table vinegar with distilled water in a ratio of 1 to 9), then after that thoroughly rinse the head with distilled water, or even better with an alkaline solution (indicated above ) to neutralize the acid.
In this material, I suggest you do without extremes and use liquids from the arsenal of household chemicals, which are sold almost everywhere - this is Mister Muscle (MM) for washing glass with ammonia (most often it is green and blue) - another MM will not work, and Master Glitter (MB) for glass (sold only in the Magnit chain of stores) - I have not seen another type of MB other than the one indicated.
In fact, he can constantly monitor his work. This allows the use of more colorful inks containing higher concentrations of dyes and binders than in thermal printing systems and printing on the most different materials. 
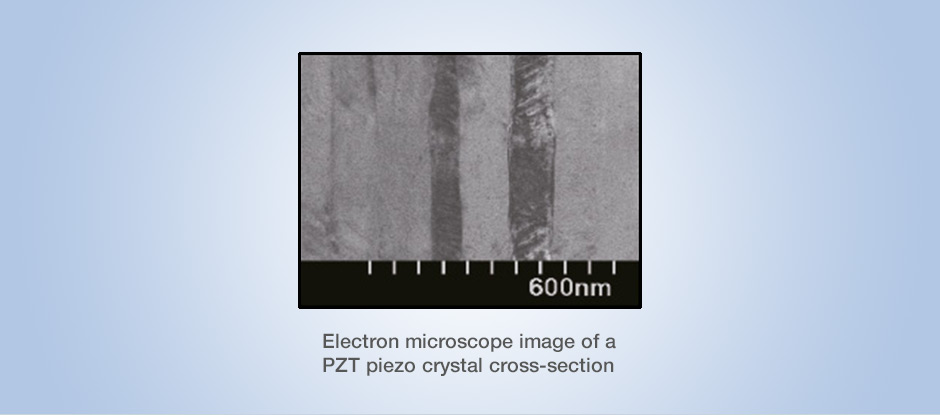
The piezoelectric crystal bends with electrical voltage. In conclusion, the smaller the piezo element, the more it bends. We invite you to familiarize yourself with our offer. Print head cleaning print head printer repair mechanics regeneration of toners and drums regeneration of rubber rolls replacement Supplies sale of consumables. The average printer repair time varies from 1 to 7 business days, depending on the availability of spare parts.
Advantages:
MM- this product has been widely used for washing print heads for several years now, the washing ability is higher than homemade mixtures (almost at the level of special washing liquids, but much cheaper), it is sold in almost all regions, over the years of use - no negative consequences of use have been noted.
Example of service cost
It is possible to obtain a replacement printer during the repair period. Acceptance of the printer, damage analysis and preliminary estimate repairs are free if it is repaired. The final cost depends on the amount of work and the cost of spare parts needed to run the printer. In some cases, replacing the print head remains an option.
All defects and repair costs are determined individually depending on the equipment, complexity and time we need to repair. During repairs, it is possible to obtain replacement equipment and printed materials directly from us, so that business activities do not have to be hampered due to equipment defects. We also provide service warranty service. Services we provide.
MB- in terms of flushing ability, it is somewhat better than MM (of course, this is how it feels when I compared the flushing speed of two print heads with almost the same blockage, but you understand, it is impossible to do a full-fledged comparative test), the price (at least in the Moscow region) is almost two - three times lower than MM.
How to get started with an inkjet printer
To avoid drying out the inkjet printer's print head, print a page with several lines of color text each time. This will allow you to clean the print head nozzles and enjoy longer. How is ink transferred to paper? Head and ink technologies in our printers.
In this article, we are not going to tell you the advantages and disadvantages, but we will tell you about the technology itself. We highlight several types of mascara. Solvents are also known as dyes or colloidally called "aqueous", pigment, solvent, latex, electrostatic. This article will focus on two types of heads and two types of carcasses.
Flaws- is sold only in Magnit stores, and they are not available everywhere. Well, the general advantage of these liquids (at least for those who do not wash heads professionally, but decided to put their printer in order on their own) is that the liquid that remains after washing the print head can finally be washed in house windows
Solvent-based ink is based on a homogeneous liquid with dissolved dyes of a given color. Paint is a light-transmitting substance, and the dye itself dissolves. This technology allows very small volumes to be achieved, but unfortunately produces light colors. The disadvantage is that it is susceptible to external factors such as weather conditions - rain, sun fading, any abrasion with damp cloth, however it greatly destroys the seal.
Pigmented ink is a solid substance that has finely divided solid particles, most often minerals, that are insoluble. They have the task of coloring surfaces such as paper that are highly water resistant so that, unlike dye inks, the print can be exposed on the outside. Of course, it all depends on the substrates we use for printing. Manufacturers of such inks often use pigmented polymer coatings, which further increase the service life of the print.
1. Select the liquid that we will use and draw it into a syringe - it is more convenient to use it from a syringe.
2. Cut two pieces of bandage, fold one approximately
According to the size of the bottom pad of the Canon print head, place it in a prepared container and lightly moisten it with washing liquid. We simply crush the second piece into a ball and also lightly moisten it.
Under the influence of an electrical impulse, two heating elements in the chambers heat the ink, which, by changing its volume, causes the gun to ignite through the nozzles, and the resulting pressure sucks further drops into the chamber and thus a dozen or so times per second. The temperature to which ink is heated, reaching even higher temperatures within one millionth of a second than the sun. The thermal head often has more nozzles than piezo, which makes the devices even faster.
The flight falls from the thermal head. Piezoelectric Heads - Piezoelectric ink is mechanically pushed out of the chamber using a high-strength ceramic element. The crystal has the ability to expand under the influence of an electrical impulse. Once the pulse is generated, enough pressure is created to extract the ink from the channel and capture the ink droplets. The process can be controlled very precisely, while the duration of the electrical pulse is very short. The voltage inside the head reaches a maximum level of 5 microseconds from the moment of voltage.
3. With this second piece of bandage we wipe the bottom of the Canon print head from dirt (sometimes it’s difficult to get by with just one piece)
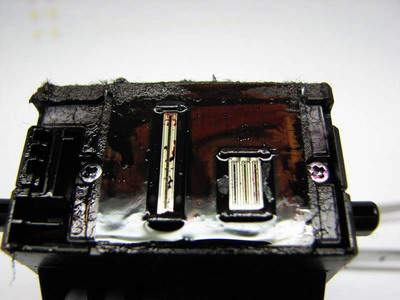
4. If you need to first check the head for a print to see if all ink colors pass through the head, it is advisable to wipe the bottom area of the head more thoroughly so that dirt does not affect the print.
If you wash the head right away, it is not necessary to wipe it clean; anyway, during the washing process, this piece of bandage changes as it becomes dirty.
To determine whether alignment needs to be set and to determine which head needs to be cleaned, print a quality check page and an alignment check page.
- Horizontal lines of text or graphics.
- Text text and blurred or removed images.
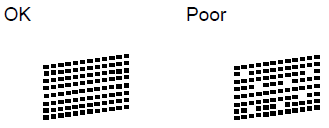
Cleaning the print head consumes ink. Cleaning the print head consumes more than 5 times unnecessary ink. If you don't see any improvement. Step 2: Check print alignment. If the print quality continues to be poor. To help us improve our support services, please let us know.
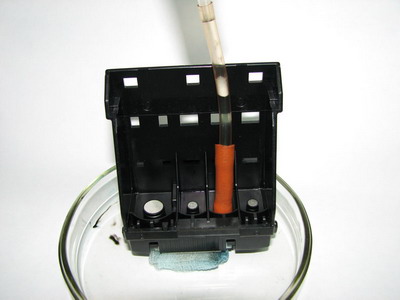
5. Place the Canon print head with the bottom pad on the wetted MM or MB a pre-prepared (2.) piece of bandage. Then we cut off a few more pieces of the bandage, crumple one of them into a ball again and, after slightly moistening it, wipe the grates of the intake holes (do not press too hard - they can be damaged)
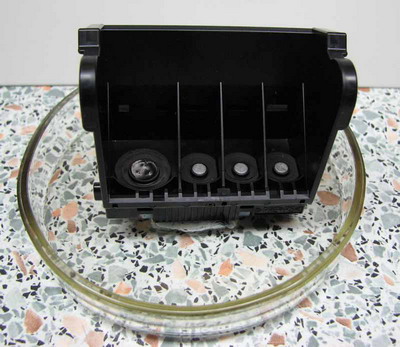
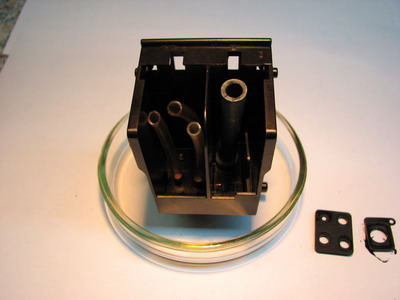
6. Remove the sealing rubber bands of the ink tanks (it is advisable to rinse them under running water - sometimes the dried ink on them solidifies into hard lumps and interferes with the sealing of the connection, which leads to air leaks and poor flow of ink into the head), it is also advisable to wipe the areas under the seals. We drip the washing liquid one drop at a time onto the ink intake grids.

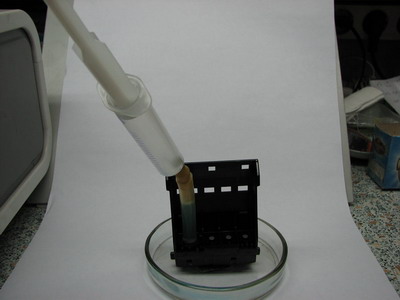
As soon as the liquid leaves (flows through the head), we drip more and more. As the piece of bandage on which the Canon print head sits becomes dirty, we replace it with a clean one. As soon as the bandage stops being stained by the ink and washing liquid flowing out of the head, the washing process is almost complete.
Take a clean piece of bandage, roll it up (2.), heavily moisten it with washing liquid and place the head on it for about an hour. If after an hour there are no bright traces of ink on the bandage, only faint stains, you can put the head in the printer and check the print quality (after cleaning it two or three times to remove any remaining washing liquid from the head).
If the washing liquid does not pass through on one or more flowers, but remains a drop on the mesh, wait two to three minutes (drip on the rest, let them wash), wipe off with a piece of bandage and drop again, and so on five to six times, as long as you have enough patience. If the drop on the grill no longer turns the color of ink, but also does not leak (and more than an hour has passed since the start of washing), proceed to the actions recommended for severe blockages.
For severe blockages
If you didn’t succeed in quickly rinsing, or you don’t have time to languish over the print head of a Canon printer and drip the washing liquid one drop at a time, move on to the next procedure - soaking.
After step 6, we select pieces of tubes (5 centimeters long), of such a diameter that they fit onto the ink receiving “pipes” with little effort, pour the washing liquid into them and go about our business, from time to time checking the liquid level in the tubes and If necessary, add more and replace the piece of bandage under the head with a fresh one as soon as it stops absorbing the liquid flowing from the head and forming a puddle in the container with the head.
If the liquid level in one or more tubes does not decrease, or decreases much more slowly than in the rest, change the bandage under the head to a fresh one, add liquid to the tubes and leave for several hours (I usually leave it overnight).
7a. This is what the tubes on the QY6-0054 head look like
7b. Flushing fluid filled
7c. It's time to add fluid
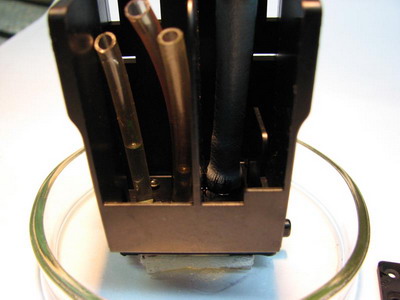
7d. General form
Usually, in case of severe blockage, after some colors have been washed out and do not leave any more marks on the bandage, and in the tube placed on the pipe of the problematic color the level of the flushing liquid does not decrease - I do this:
I remove the extra tubes, leaving only the color that needs to be rinsed. I select an adapter from the tubes from the head nozzle to the syringe (the syringe piston is in the lower position). I change the bandage under the head to a clean one, heavily moisten it with washing liquid (you can even pour liquid into the container with the head, but not too much - so that the bottom of the container just closes (liquid level - 2-3mm)). Pressing the head against the moistened bandage (so that air is not sucked in), I smoothly extend the syringe piston, trying to draw the flushing liquid through the nozzles of the head into the syringe.
I pour out the liquid that has collected in the syringe (it is not advisable to reuse it), add fresh liquid under the head and repeat the drawing, and so on two or three times, then let it soak for an hour so that the washing liquid that gets into the head properly dissolves the dried ink, then again I pull the liquid until it passes effortlessly (pay attention one last time so as not to draw in air - an air lock in the head will interfere with the normal passage of the liquid), then I put the tubes on all colors again, pour flushing liquid into them and control how much The liquid level decreases evenly on different colors (except black). If the level decreases approximately equally (it cannot decrease absolutely equally, due to the different lengths and bending of ink channels of different colors inside the head) - the difference is about five to eight millimeters - the head is washed.
Light extreme: drawing the washing liquid with one hand (into the camera with the other), I don’t recommend it - it’s more convenient to do it with both hands...
The flushing liquid drawn through the Canon print head is clean - you can check how well the liquid passes through the head by gravity.
I would like to draw your attention: If, when you try to draw liquid into the syringe, it does not flow at all, do the opposite, i.e. Trying to force the flushing liquid from the syringe through the nozzles is not worth it if you do not have sufficient experience in flushing heads. This can only be done if, when drawing in liquid, it flows at least poorly. And here you need to take into account that the permissible pressure at which the head will not fail depends on the type of head, the degree of blockage, the clogged color (black pigment nozzles can withstand greater pressure), the volume of the syringe (the larger the volume of the syringe, the less chance of damaging the head), ratio of liquid/air in the syringe (air serves as a shock absorber)...
If, after repeated drawing, the liquid still passes through with difficulty and you are absolutely sure that further soaking will not give anything (i.e. you soaked the head for more than two days, but there is still no change for the better), you can try to drive the liquid through the head in both directions (in the same position of the head - pressed by the nozzles to the napkin) - broaching / blowing; when blowing (pushing liquid from the syringe through the nozzles), it is not advisable to press hard on the syringe piston.
In practice, if you use a 10 ml syringe for purging, the syringe piston is in the upper position and there is an air gap (more than one division) between the piston and the liquid in the syringe - the piston can immediately be lowered (smoothly, not jerkily) by no more than three divisions, and as the liquid passes, add one division at a time - for almost all types of heads (except BCI-21), the pressure created during purging will not lead to destruction of the plate with nozzles. If there is no air gap in the syringe between the piston and the liquid, then the pressure on the piston must be very smooth - in this case, any sharp pressure on the syringe piston can create fatal pressure for the head. And in general, from personal experience: when purging the head, the air layer in the syringe between the piston and the liquid provides a more gentle mode, compensates for the uneven movement of the syringe piston when pressed and smoothes out pressure surges, so that even if the hand trembles, the head will remain unharmed.
If all of the above did not help, you still have nothing to lose, you will have to move on to extreme methods of cleaning the head. But before you move on to these methods, think about it: if with gentle washing methods the probability of damaging the head is minimal, then when using the methods indicated below - the probability damage to the head increases significantly.
Cleaning the print head requires patience and perseverance. According to statistics from the workshop where I work, 14 - 15 out of 20 print heads are washed using gentle methods, and most of the mechanical damage to the heads is the result of the haste of users trying to wash the head quickly. Heads with slight clogs are usually washed in one to three days; severe clogs can take up to a week to wash; from my experience, the longest wash of an eight-color QY6-0055 head lasted 18 days. Usually after the first hour or two of washing, a thorough inspection of the nozzle pads and test printing (the head has not been completely washed), you can determine whether it makes sense to spend time on further washing. In order to make it easier for you to diagnose, at the beginning we talk in detail about the most common faults of print heads, with examples of the resulting images, so that you do not waste time washing the head, which washing will no longer help.
And one more thing - after using the washing methods indicated above, drying the print head before installing it in the device is not required (if, of course, everything was done carefully), and after the methods that will be indicated below, it is advisable to dry the head with a hair dryer (being careful not to overheat, so that after warming up the head can be held with your hand without getting burned), or even better - dry it several times, let it cool for 15 - 20 minutes and dry it again... ... and after drying, it is advisable to drip it a little, so that when installing the head into the device, it does not turn out to be dry - it is better when there is washing liquid in the ink channels of the head.
Everything is the same as when blowing, only without an air gap in the syringe, between the piston and the liquid, and raise the head slightly above the container where the liquid will drain. The force on the syringe plunger is at your discretion. If you are not sure that you can feel the moment when it is better not to increase the pressure on the syringe piston, select a longer tube between the syringe and the head (10 - 15 centimeters), this will compensate for the excess pressure in the head, in addition, when the pressure is too high - the tube will simply fall off. Everything around will be splashed with flushing fluid, but the head will be intact. The final result of flushing can be determined by the streams of liquid flowing from the head.
Well, in general, the syringe must be completely filled with flushing liquid...
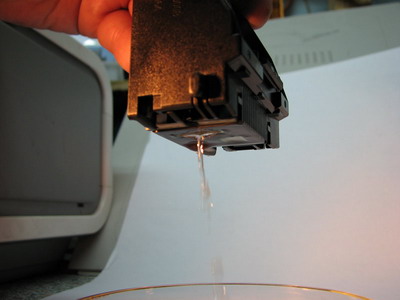
This is what a “stream” of liquid looks like, flowing out of the head when the blockage has not yet been washed out, or when the nozzles are destroyed (destruction of the nozzles is determined visually)
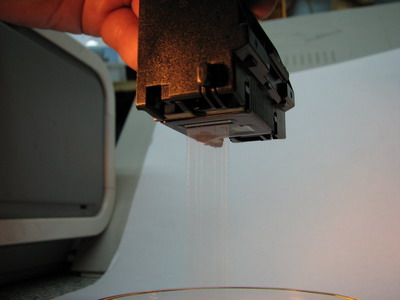
And this is what the shower looks like when the color is completely rinsed (in this case, black).
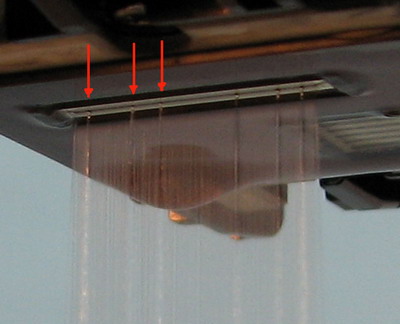
True, if you look closely, you can see that this head has six nozzles that are either destroyed (will not print) or worn out (will print crookedly). But, because These are pigment nozzles, and it is only used when printing text - it’s not scary. The loss of six nozzles when printing text, especially since they are not located in a row, but with a large gap, even in the “draft” mode, leads to such minor distortions that they can only be noticed with a magnifying glass, and if high-quality paper is used for printing ( not photo paper, but regular office paper, good quality), then this can only be seen on test print(grid).
From us you can purchase inkjet printers, CISS, ink:
This article is aimed primarily at users of printers and Canon MFP, in which the print head is separated (differentiated) from cartridges (more correctly called ink tanks), namely:
- PGI-425PGBk, CLI-426 Bk/C/M/Y (Canon iP4840, MG5140, MG5240, MG8140, etc.)
- PGI-520Bk, CLI-521 Bk/C/M/Y (Canon Pixma iP 3600, iP 4600, iP 4700, MP 540, MP 550, MP 560, MP 620, MP 630, MP 980 etc.)
- PGI-5Bk, CLI-8 Bk/C/M/Y (Canon Pixma iP 4200, iP 4300, iP 4500, iP 5200, iP 5300, iP4000, MP 500, MP 530, MP 800, MP 810, MP 830, etc. .)
Many Canon inkjet printer users sometimes experience problems with print quality. In most cases, the source of the problem is the print head.
In this material, I will try to help you determine the reason for the deterioration in the print quality of your printer (or MFP) and ways to overcome the situation (if possible). What I can offer you is the result of my experience in repairing Canon inkjet printers and the experience of other people who found a solution through discussion in other forums and conferences. This method is not the only correct one - I just came to this option through long experiments, trial and error, and discussion of washing options in different forums, in the end this method is more convenient for me and over the past 6-7 years I have not found a more convenient one ( for yourself) washing option. I’ll say right away: the problems that arise as a result of using CISS are not considered here - this is a separate “song”; let’s look at the problems that arise after refilling ink tanks, as well as when using both original and compatible ink tanks.
I hope that I will not reveal a great secret if I say that ink that is sold “by the glass” and in any container (except for original ink tanks and cartridges) is, so to speak, compatible, and sometimes their properties differ significantly from the original ones, and when using such ink, the printer’s print head operates in a mode that is far from optimal (calculated by the manufacturer), which leads to premature wear of the print head and deterioration in print quality. But such inks have one undeniable advantage, compared to the original ones - they are cheap, which is why they are so popular, because it is no secret that for three or four refills of, for example, a set of CLI-8 ink tanks, the amount saved is comparable to the cost new printer.
So, what are the most common causes of print quality problems that may occur during operation:
1. Print head malfunction - characteristic manifestations: a blank sheet coming out of the printer (complete absence of traces of ink on the sheet), absence of one (or several) colors (complete absence of traces of ink of this color on the sheet), “striped printing” - stripes across the movement sheet, the same width, with a clear border and the same spacing... Read more
2. Clogging of the print head - characteristic manifestations: thin white stripes across the movement of the sheet when printing photographs, stripes across the movement of the sheet, of different widths, with blurred boundaries.
3. Other malfunctions leading to distortion of the printed image.
One of the methods for cleaning the print heads of Canon inkjet printers
To flush the print head you will need:
A container made of waterproof material in which the head will fit (a plastic box with low sides, a bath for photo printing, a tea saucer), a regular bandage (or gauze), one or two disposable syringes (10 ml), in case of severe blockage - thin rubber (or soft plastic, vinyl chloride) tubes - I use medical droppers, the droppers have tubes suitable in diameter for almost all print heads, and of course, washing liquid - more about that more details:
- You can use special washing liquids, which are usually sold in the same stores as ink, but this is unreasonably expensive. You can use distilled water, which is usually sold in all auto stores, but in most cases this does not help much, and when trying to wash a pigment or ink mixture, it is generally useless. You can independently create a mixture for washing: 10% ammonia, 10% isopropyl alcohol, 10% glycerin, 70% distilled water (the resulting mixture must be shaken and filtered) - a washing liquid of this composition has been used for quite a long time (one of the first mentions of such a composition flushing liquid is here) and has proven itself, but with severe blockages (especially pigment) it will take a lot of time to flush the head (sometimes more than a week).
I would like to draw your attention to the fact that liquids containing ethyl alcohol (vodka, etc.) are not suitable for washing - ethyl alcohol tends to draw out remaining moisture from dried or curdled (due to mixing different types) ink, which in the future significantly makes flushing difficult, and in case of severe blockages makes further flushing impossible. It is also not advisable to use acid-containing liquids and mixtures to wash Canon print heads - this leads to destruction of the internal structures of the head.
Even if an acid-containing liquid flushes the head, it is still very likely to fail within two to three months. And if you really want to rinse the head with such a solution (the most commonly used mixture is 9% table vinegar with distilled water in a ratio of 1 to 9), then after that thoroughly rinse the head with distilled water, or even better with an alkaline solution (indicated above ) to neutralize the acid.
In this material, I suggest you do without extremes and use liquids from the arsenal of household chemicals, which are sold almost everywhere - this is Mister Muscle (MM) for washing glass with ammonia (most often it is green and blue) - another MM will not work, and Master Glitter (MB) for glass (sold only in the Magnit chain of stores) - I have not seen another type of MB other than the one indicated.
Advantages:
MM- this product has been widely used for washing print heads for several years now, the washing ability is higher than homemade mixtures (almost at the level of special washing liquids, but much cheaper), it is sold in almost all regions, over the years of use - no negative consequences of use have been noted.
MB- in terms of flushing ability, it is somewhat better than MM (of course, this is how it feels when I compared the flushing speed of two print heads with almost the same blockage, but you understand, it is impossible to do a full-fledged comparative test), the price is almost two to three times lower than MM .
Flaws- is sold only in Magnit stores, and they are not available everywhere. Well, the general advantage of these liquids (at least for those who do not wash heads professionally, but decided to put their printer in order on their own) is that the liquid that remains after washing the print head can finally be washed in house windows
1. Select the liquid that we will use and draw it into a syringe - it is more convenient to use it from a syringe.
2. Cut two pieces of bandage, fold one approximately
According to the size of the bottom area of the print head, place it in a prepared container and lightly moisten it with washing liquid. We simply crush the second piece into a ball and also lightly moisten it.
3. With this second piece of bandage we wipe the bottom of the print head from dirt (sometimes it’s difficult to get by with just one piece)
4. If you need to first check the head for a print to see if all ink colors pass through the head, it is advisable to wipe the bottom area of the head more thoroughly so that dirt does not affect the print.
If you wash the head right away, it is not necessary to wipe it clean; anyway, during the washing process, this piece of bandage changes as it becomes dirty.
5. Place the print head with its bottom pad on the wetted MM or MB a pre-prepared (2.) piece of bandage. Then we cut off a few more pieces of the bandage, crumple one of them into a ball again and, after slightly moistening it, wipe the grates of the intake holes (do not press too hard - they can be damaged)
6. Remove the sealing rubber bands of the ink tanks (it is advisable to rinse them under running water - sometimes the dried ink on them solidifies into hard lumps and interferes with the sealing of the connection, which leads to air leaks and poor flow of ink into the head), it is also advisable to wipe the areas under the seals. We drip the washing liquid one drop at a time onto the ink intake grids.
As soon as the liquid leaves (flows through the head), we drip more and more. As the piece of bandage on which the head stands becomes dirty, we change it to a clean one. As soon as the bandage stops being stained by the ink flowing from the head with the washing liquid, the washing is almost complete.
Take a clean piece of bandage, roll it up (2.), heavily moisten it with washing liquid and place the head on it for about an hour. If after an hour there are no bright traces of ink on the bandage, only faint stains, you can put the head in the printer and check the print quality (after cleaning it two or three times to remove any remaining washing liquid from the head).
If the washing liquid does not pass through on one or more flowers, but remains a drop on the mesh, wait two to three minutes (drip on the rest, let them wash), wipe off with a piece of bandage and drop again, and so on five to six times, as long as you have enough patience. If the drop on the grill no longer turns the color of ink, but also does not leak (and more than an hour has passed since the start of washing), proceed to the actions recommended for severe blockages.
For severe blockages
If it didn’t work out quickly to rinse, or there is no time to languish over the head and drip the rinsing liquid one drop at a time, we move on to the next procedure - soaking.
After step 6, we select pieces of tubes (5 centimeters long), of such a diameter that they fit onto the ink receiving “pipes” with little effort, pour the washing liquid into them and go about our business, from time to time checking the liquid level in the tubes and If necessary, add more and replace the piece of bandage under the head with a fresh one as soon as it stops absorbing the liquid flowing from the head and forming a puddle in the container with the head.
If the liquid level in one or more tubes does not decrease, or decreases much more slowly than in the others, change the bandage under the head for a fresh one, add liquid to the tubes and leave for several hours (I usually leave it overnight).
7a. This is what the tubes on the QY6-0054 head look like
7b. Flushing fluid filled
7c. It's time to add fluid
7d. General form
Usually, in case of severe blockage, after some colors have been washed out and do not leave any more marks on the bandage, and in the tube placed on the pipe of the problematic color the level of the flushing liquid does not decrease - I do this:
I remove the extra tubes, leaving only the color that needs to be rinsed. I select an adapter from the tubes from the head nozzle to the syringe (the syringe piston is in the lower position). I change the bandage under the head to a clean one, heavily moisten it with washing liquid (you can even pour liquid into the container with the head, but not too much - so that the bottom of the container just closes (liquid level - 2-3mm)). Pressing the head against the moistened bandage (so that air is not sucked in), I smoothly extend the syringe piston, trying to draw the flushing liquid through the nozzles of the head into the syringe.
I pour out the liquid that has collected in the syringe (it is not advisable to reuse it), add fresh liquid under the head and repeat the drawing, and so on two or three times, then let it soak for an hour so that the washing liquid that gets into the head properly dissolves the dried ink, then again I pull the liquid until it passes effortlessly (pay attention one last time so as not to draw in air - an air lock in the head will interfere with the normal passage of the liquid), then I put the tubes on all colors again, pour flushing liquid into them and control how much The liquid level decreases evenly on different colors (except black). If the level decreases approximately equally (it cannot decrease absolutely equally, due to the different lengths and bending of ink channels of different colors inside the head) - the difference is about five to eight millimeters - the head is washed.
Light extreme: drawing the washing liquid with one hand (into the camera with the other), I don’t recommend it - it’s more convenient to do it with both hands...
The flushing liquid drawn through the head is clean - you can check how well the liquid passes through the head by gravity.
I would like to draw your attention: If, when you try to draw liquid into the syringe, it does not flow at all, do the opposite, i.e. Trying to force the flushing liquid from the syringe through the nozzles is not worth it if you do not have sufficient experience in flushing heads. This can only be done if, when drawing in liquid, it flows at least poorly. And here you need to take into account that the permissible pressure at which the head will not fail depends on the type of head, the degree of blockage, the clogged color (black pigment nozzles can withstand greater pressure), the volume of the syringe (the larger the volume of the syringe, the less chance of damaging the head), ratio of liquid/air in the syringe (air serves as a shock absorber)...
If, after repeated drawing, the liquid still passes through with difficulty and you are absolutely sure that further soaking will not give anything (i.e. you soaked the head for more than two days, but there is still no change for the better), you can try to drive the liquid through the head in both directions (in the same position of the head - pressed by the nozzles to the napkin) - broaching / blowing; when blowing (pushing liquid from the syringe through the nozzles), it is not advisable to press hard on the syringe piston.
In practice, if you use a 10 ml syringe for purging, the syringe piston is in the upper position and there is an air gap (more than one division) between the piston and the liquid in the syringe - the piston can immediately be lowered (smoothly, not jerkily) by no more than three divisions, and as the liquid passes, add one division at a time - for almost all types of heads (except BCI-21), the pressure created during purging will not lead to destruction of the plate with nozzles. If there is no air gap in the syringe between the piston and the liquid, then the pressure on the piston must be very smooth - in this case, any sharp pressure on the syringe piston can create fatal pressure for the head. And in general, from personal experience: when purging the head, the air gap in the syringe between the piston and the liquid provides a more gentle mode, compensates for the uneven movement of the syringe piston when pressed and smoothes out pressure surges, so that even if the hand trembles, the head will remain unharmed.
If all of the above does not help, there is nothing to lose anyway; you will have to move on to extreme methods of cleaning the head. But before you move on to these methods, think about it: if with gentle washing methods the likelihood of damaging the head is minimal, then when using the methods indicated below, the likelihood of damaging the head increases significantly.
Cleaning the print head requires patience and perseverance. According to statistics from the workshop where I work, 14 - 15 out of 20 print heads are washed using gentle methods, and most of the mechanical damage to the heads is the result of the haste of users trying to wash the head quickly. Heads with a slight blockage are usually washed in one to three days, a severe blockage can be washed out up to a week; from my experience, the longest flush of an eight-color head QY6-0055 lasted 18 days. Typically, after the first hour or two of rinsing, a thorough inspection of the nozzle pads and a test print (not rinsing the head to the end), you can determine whether it makes sense to spend time on further rinsing. In order to make it easier for you to diagnose, at the beginning we talk in detail about the most common faults of print heads, with examples of the resulting images, so that you do not waste time washing the head, which washing will no longer help.
And one more thing - after using the washing methods indicated above, drying the print head before installing it in the device is not required (if, of course, everything was done carefully), and after the methods that will be indicated below, it is advisable to dry the head with a hair dryer (being careful not to overheat, so that after warming up the head can be held with your hand without getting burned), or even better - dry it several times, let it cool for 15 - 20 minutes and dry again... ... and after drying, it is advisable to drip it a little, so that when installing the head into the device, it does not turn out to be dry - it is better when there is washing liquid in the ink channels of the head.
Everything is the same as when blowing, only without an air gap in the syringe, between the piston and the liquid, and raise the head slightly above the container where the liquid will drain. The force on the syringe plunger is at your discretion. If you are not sure that you can feel the moment when it is better not to increase the pressure on the syringe piston, select a longer tube between the syringe and the head (10 - 15 centimeters), this will compensate for the excess pressure in the head, in addition, when the pressure is too high - the tube will simply fall off. Everything around will be splashed with flushing fluid, but the head will be intact. The final result of flushing can be determined by the streams of liquid flowing from the head.
Well, in general, the syringe must be completely filled with flushing liquid...
This is what a “stream” of liquid looks like, flowing out of the head when the blockage has not yet been washed out, or when the nozzles are destroyed (destruction of the nozzles is determined visually)
And this is what the shower looks like when the color is completely rinsed (in this case, black).
True, if you look closely, you can see that this head has six nozzles that are either destroyed (will not print) or worn out (will print crookedly). But, because These are pigment nozzles, and it is only used when printing text - it’s not scary. The loss of six nozzles when printing text, especially since they are not located in a row, but with a large gap, even in the “draft” mode, leads to such minor distortions that they can only be noticed with a magnifying glass, and if high-quality paper is used for printing ( not photo paper, but ordinary office paper, of good quality), then this can only be seen on a test print (grid).