Enabling and configuring AHCI mode is worth it for every user who wants to improve and expand the computer’s capabilities when working with SATA hard drives and, especially, SSDs.
The mode allows you to increase the speed of your computer due to the increased speed of data access, and to activate it you only need to perform a few simple steps.
Before considering options for enabling the mode, you should first familiarize yourself with its features and operating principle.
What is AHCI
The interface of modern SATA hard drives, supporting data transfer rates from 1.5 Gbit/s to 6 Gbit/s, is capable of operating in two modes:
- AHCI.
The first ensures compatibility with older devices (drives manufactured in 2000).
The speed of even the most powerful disks in this mode is not much different from those of the most outdated models.
The more modern AHCI mode allows you to fully enjoy all the advantages of the SATA interface.
For example, by disconnecting and connecting drives to the motherboard on the fly, without turning off the computer, or with the ability to minimally move the drive heads to increase operating speed.
By activating the mode, the user speeds up the launch of files, reading and writing information on disks and increases the overall performance of the computer.
And, although the increase may not be so significant (within 20%), for some tasks such an improvement may be important.
If you have SSD drives with the SATA form factor, this option is the only option for efficient operation of the device.
IMPORTANT: Should you enable AHCI on an SSD?
When using AHCI mode on an SSD, you will only get results if you have a SATA II/III interface; in other cases there will be no improvement in performance.
How to check if the mode is enabled
If you are going to enable AHCI mode, make sure that it is not already used on the computer.
Unless you're running high-performance applications and have a powerful processor and plenty of memory, you may simply not notice which mode you're in.
You can check whether AHCI is enabled or not enabled in this way:
- First, go to the computer properties (Start menu, Computer item, Properties sub-item in the context menu);
- Open device manager;
- Open the IDE ATA/ATAPI controllers section;
- If there is a device here that has AHCI in its name, the mode works. If such a disk is not in the list (and you do not have an outdated IDE hard drive, but a more modern one), you will have to enable the mode yourself.
The second way to check the operation of AHCI is to restart the computer and go to the BIOS menu (using one of the available options - it differs slightly for different motherboards and laptops, although most often it involves pressing the function keys - from Esc to F12).
Read also:
After entering the BIOS (or UEFI), make sure what mode SATA is operating in by finding the SATA Mode or SATA Configuration item.

Tip: If IDE mode is installed, do not immediately switch it to AHCI and save it - especially if you have Windows 7.
How to enable AHCI mode
Enabling this mode on your computer can be done directly from the BIOS.
At the same time, if you have Windows 7, after trying to boot the system, a message like 0x0000007B INACCESSABLE_BOOT_DEVICE will most likely appear on the screen, indicating the impossibility of working with the disk.
Sometimes the same situation occurs with Windows 8 and 10, but the likelihood of a message appearing is less - most often the computer starts up or begins to reboot constantly.
The situation will be completely different if you select AHCI mode before installing the system.
This will allow the software from the installation disk to recognize the parameters of the HDD or SSD during the installation process, and there will be no problems starting the mode.
Difficulties begin only if the system is already installed on the drive, and the user is going to change the IDE parameter to SATA and enable NCQ (Native Command Queuing, an extension of the SATA protocol, which significantly increases the speed of working with information by optimizing the order in which commands are received).
In this case, you will have to use either the registry editor or safe mode, depending on the operating system.
If none of these actions provide the required result, all that remains is to enable AHCI and reinstall the system.
For Windows 7
One of the currently most popular operating systems, Windows 7, requires the use of the registry or a special utility to switch to AHCI mode.
The first option includes the following steps:
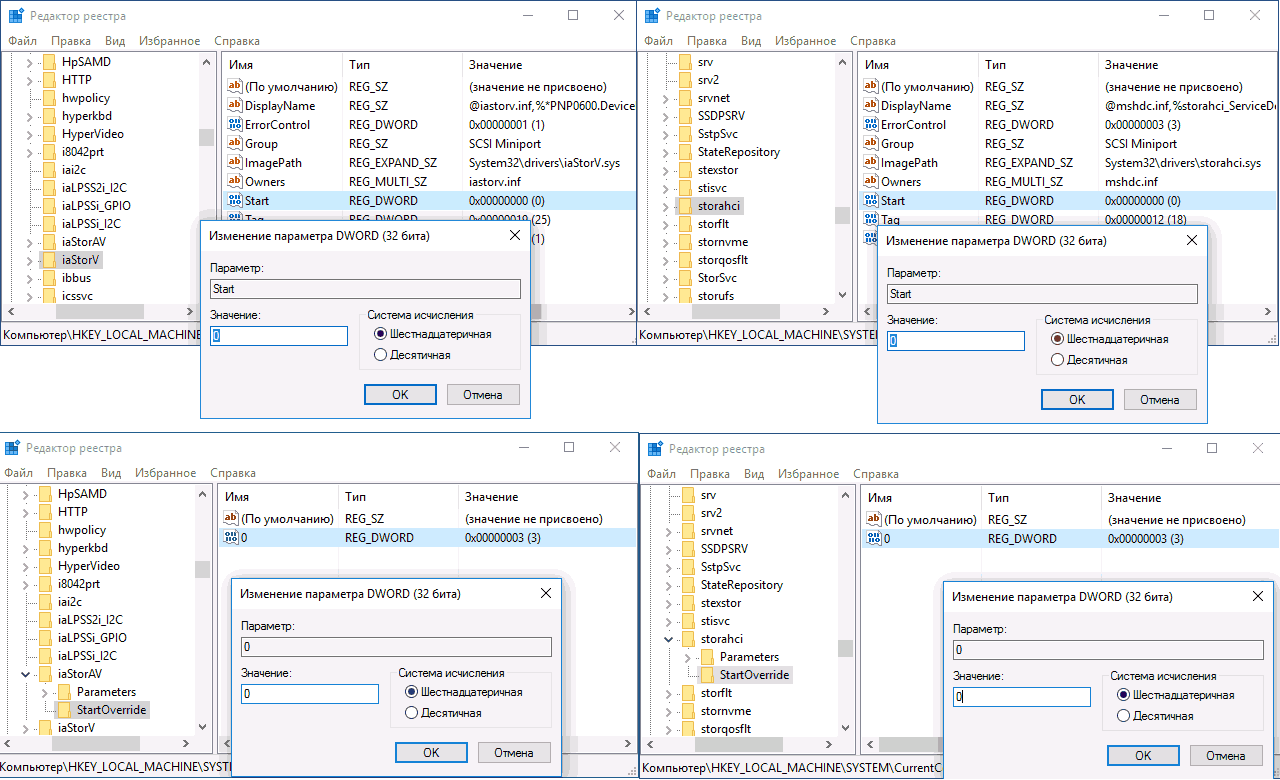
- Launch the Registry Editor (Win + R to open the Run menu, enter the regedit command and confirm the changes);

- Go to section HKEY_LOCAL_MACHINE\SYSTEM\CurrentControlSet\services\msahci;
- Go to the Start item, whose default value is 3, and change it to zero;

- Go to the same subsection from msahci to IastorV and search for the Start parameter;
- Changing three to zero;
- Closing the editor.
Now all that remains is to restart the computer and enable the desired AHCI mode in the BIOS menu.
After the system boots, Windows 7 will begin to automatically install drivers for all drives connected to the motherboard, and then require another reboot to make changes.
The last stage of setting up the mode is to check whether write caching mode is enabled in the disk properties. If it is not enabled, the function should be launched.
Another option is the Microsoft Fix it utility, which allows you to get rid of errors after enabling the new mode (you can download it from the official Microsoft website).
Once you launch and select the appropriate troubleshooting action, the application will automatically make any necessary changes and the error message will no longer appear.

For Windows 8 and 8.1
If Windows 8 or 8.1 is already installed on your computer, you can use Safe Mode to configure AHCI mode.
To do this, if an error occurs:
- Return IDE mode to BIOS;
- to restart a computer;
- Run the command line as an administrator (“Start”/“All Programs”/“Accessories”);
- Enter the command bcdedit /set (current) safeboot minimal

- Press the enter button;
- Restart the PC and enter the BIOS;
- Enable AHCI mode;
- Run the command line again;
- Enter the command bcdedit /deletevalue (current) safeboot;
- Reboot the system again, after which Windows should stop displaying the error message.
If your system runs on an Intel processor, there is an additional option to enable AHCI using a utility from this manufacturer (this method does not work for AMD).
To use it you should:
- Download the f6flpy file (mode driver) from the official Intel website, selecting the appropriate version (x32 or x64);
- Download the SetupRST.exe file from the same resource;
- Open the device manager and manually install the new f6 AHCI driver instead of SATA in the properties of your hard drive;
- Restart the PC and enable AHCI in the BIOS (UEFI);
- Run the SetupRST.exe file, which should automatically resolve the problem.
For Windows 10
To fix the error when switching modes, Windows 10 also allows you to use the utility for Intel processors, reinstall the system and safe mode.
But the most effective option is to use the Registry Editor, which is slightly different from the similar method in Windows 7.
To use this method you need:
- Log in as administrator;
- Launch the Registry Editor using one of the available methods (the easiest way is through the “Run” window and the regedit command);
- Go to the HKEY_LOCAL_MACHINE\SYSTEM\CurrentControlSet\Services\iaStorV section and find its Start parameter, changing its value to 0;
- Find in the adjacent subsection Services\iaStorAV\StartOverride a parameter named 0, setting a zero value for it as well;
- Go to the Services\storahci subsection, reset the Start parameter;
- In the Services\storahci\StartOverride subsection, set the value zero for parameter 0.
- Close the editor and restart the computer;
- Enter the BIOS during system boot and enable AHCI mode.
Tip: It is recommended that you run Windows 10 for the first time in safe mode, for which you enable this option using the Run menu (Win + R) and entering the msconfig command to display the system configuration window. Here you need to select the “Boot” tab and check the safe mode box, indicating the “Minimal” option.

If you have a UEFI interface, you need to troubleshoot through the system menu:
- Enter the side menu (Win + I);
- Select the update and security tab;
- Go to “Recovery”, and then to special boot options;
- Go to the Troubleshooting menu, Advanced Options tab and finally UEFI Software Settings.

For the standard BIOS interface, you can access its settings by pressing the corresponding function key during boot.
For example, F2 or F12, depending on the motherboard or laptop model, if the settings are made for it.
Read.
After the first boot, Windows 10 will install all the necessary drivers to work with AHCI, and will not produce any errors in the future.
At the same time, the speed of working with data should increase - especially if the drive has a SATA III interface.
Other mode features
For outdated Windows XP there is no option to install AHCI mode. This option was not even contemplated during its development.
If you really want it, the required driver can be easily found on the Internet and integrated into the system. Instructions for the process can also be found on the Internet, but we do not recommend performing such actions.
First of all, because installing the AHCI mode is unlikely to significantly speed up the processor and the entire computer, which only supports Windows XP.
Secondly, significant differences between drivers increase the likelihood of an error, after which data from the disk may be lost.
For Windows Vista, the process of enabling the mode is the same as for the 7th version of the system - that is, using the registry or utility.
There are driver options for other systems - from Unix to MacOS, since SSD drives and SATA are gaining popularity among users of any system.
conclusions
In most cases, after performing the appropriate actions on the system, AHCI mode starts working normally and the system runs a little faster.
If you cannot achieve any results, you can try to reinstall the system after changing the mode - this may take more time, but it guarantees results.
Advanced Host Controller Interface (AHCI) technology is a standard proposed by Intel that allows you to increase the read/write speed for hard drives connected to a computer via the SATA interface. If your computer has a modern hard drive (for example, an ssd or a regular sata hdd), and the motherboard supports AHCI mode, you may have wondered how you can increase the performance of your PC.
Windows Vista/7/8/8.1 operating systems already have built-in support for the AHCI standard, so if during installation Windows detects that the computer supports AHCI, the AHCI driver will be installed automatically. Windows XP does not have built-in support for this standard, but it is possible to make them friends; look for material on this topic separately.
In older motherboard models that have AHCI support at the chipset level, AHCI mode is disabled at the BIOS level. But what to do in a situation where the Windows 7 operating system is already installed? I think many who have encountered this problem know that by changing the IDE mode to AHCI in the BIOS, Windows simply will not start. And you will most likely get a BSOD (blue screen of death). The option that suggests itself is to change the BIOS mode from IDE to AHCI, then reinstall Windows. BUT! In this case, you lose all the data on the C drive, which can be painful if you have many applications installed there and valuable information stored there.
I propose a way to switch to AHCI mode without reinstalling the system and losing data on Windows 7. For users. Remember, you perform all actions at your own peril and risk, and no one except you is responsible for them.
Attention! The following sequence of actions must be performed BEFORE enabling AHCI mode in the BIOS settings. Otherwise the system will stop booting!
1. Press the Win+R key combination and in the window that opens, type the command regedit to open Registry Editor. For those who find this difficult, you can type regedit directly in the Start menu bar.
2. On UAC, the request “Do you want to allow the following program to make changes on this computer?” We answer “Yes.”
3. In the registry editor, go to the desired branch: HKEY_LOCAL_MACHINE\SYSTEM\CurrentControlSet\services\msahci
4. In the right pane, find the option Start and edit it ( Change)

5. Set the “Start” parameter to0 , and click OK.

Default value (AHCI support disabled): 3 .
6. Close Registry Editor.
7. Restart your computer.
8. While the computer is restarting, go to the Bios menu and enable AHCI support. Press the F10 key, save your changes and restart your computer again.
9. After downloading, Windows 7 will automatically install AHCI device drivers. After installation is complete, Windows will reboot one more time.
10.That's all! After loading Windows, the hard drives will support the AHCI standard and therefore work faster. Visual increase in productivity is a very subjective point! Yes, your computer will become faster, but besides the hard drive, there are many other things in your computer that can slow it down, so it is possible that you will not see a clear increase in speed.
P.S The performance index of my SSD, after switching to AHCI mode, increased from 7.0 to 7.6. Thank you all for your attention! If you have questions or comments, I will be glad to read them in the comments.
Hello dear readers! Today you will find out how to enable AHCI mode in Windows, and what it is in general.
The article promises to be voluminous and not useless for almost all computer users, if you don’t take into account the very pro techies :).
AHCI (Advanced Host Controller Interface AHCI translated from English Advanced Host Controller Interface) - mode of connecting drives using the protocol Serial ATA. This mode allows the computer to take advantage of advanced features and functions when connecting hard drives, which leads to increased performance.
Modern drives (HDD and SSD) are connected to the computer motherboard via an interface (connector) SATA(Serial ATA), which replaced the legacy interface PATA(Parallel ATA). In picture No. 1, the PATA connector is shown on the left, and the SATA connector on the right.  displaying IDE mode and AHCI mode in device manager
The SATA interface can operate in 2 modes:
- IDE(Integrated Development Environment from English parallel interface for connecting drives) - old mode, which is used for compatibility with older software and hardware.
- AHCI(Advanced Host Controller Interface) - a new mode that expands connectivity and allows you to take full advantage of the SATA interface. For example:
- Hot-swappable hard drive, that is, the drive can be changed without turning off the computer. This feature is mainly valuable for server administrators.
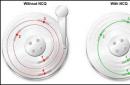
- NCQ(Native Command Queuing from English - built-in command queuing) - a function that allows you to reduce the number of movements of the HDD read head, which leads to optimization of data reading speed when using the drive by several programs simultaneously.
Enabling AHCI leads to faster reading and access to data on the drive and, accordingly, increases the overall performance of the computer.
Now that we know what it is AHCI mode, then it's time to think about how to turn it on. You may already have it turned on. You can check it like this:
- Press our favorite combination of Win+R buttons on your keyboard and enter the command mmc devmgmt.msc. Then press the Enter button. Will start Windows Device Manager.
- In Windows Device Manager, expand the section IDE ATA/ATAPI controllers. If you see a device that has the word AHCI in its name, then the mode we need is activated.
If you don’t see the word AHCI, it means it’s disabled. You can enable it in BIOS"e. But its inclusion may be accompanied by some problems, which I will discuss below.
Enable AHCI. Activation features and possible problems.
To enable AHCI mode and find the item there SATA Mode or something very similar to it. The name of the item may differ slightly in different versions of Bios. In this section you can switch the mode SATA from IDE V AHCI and vice versa. If you have IDE, then do not rush to switch to mode AHCI, since for it to work correctly you need a special driver Windows AHCI. In Windows 7/8/10 and Vista, this driver is built into the OS itself. When this driver is automatically installed on the system. If the system is already installed and you want to switch the SATA mode from IDE to AHCI, then you will have to dig deeper into the system registry. But I will write about this in other articles, separately for Windows 7, Windows 8 and . I recommend that you wait for these publications. Here you just need to know that you can’t just turn it on. If you simply switch the BIOS mode to AHCI, you will get a non-working OS.
On Windows XP I don’t recommend even trying to enable it, because the AHCI driver for this OS differs depending on each computer.
Proper operation of a computer is possible only with coordinated interaction between the hardware and the operating system. Technology is evolving, and lately this has been most noticeable in the field of storage. Modern hard drives and SSD drives are many times faster than those used in computers 5-10 years ago. For data transfer, the SATA interface is used, through which the drive is connected to the computer. The SATA interface is capable of operating in two modes: IDE and AHCI, and if you have a modern hard drive or SSD installed, you can speed up your computer by enabling AHCI mode. WHAT IS AHCI MODE As noted above, AHCI is one of the data transfer modes over the SATA interface. As you know, through the SATA interface you can transfer information at speeds from 1.5 to 6 Gigabytes per second. The maximum speed is supported in AHCI mode, which should be used with all modern drives. As for the IDE mode, it is supported in the SATA interface for compatibility with older hard drives. By default, AHCI mode is not always enabled in the Windows operating system, even if the drives are connected to the motherboard via SATA. Because of this, the user loses in computer performance, since the disk speed is limited by software. By setting the AHCI mode, you can increase the speed of the drive by 20-30%, which will affect the overall experience of the computer. HOW TO FIND OUT IF AHCI MODE IS ENABLED IN WINDOWS Most often, users do not even suspect that it is necessary to enable AHCI mode in order to improve computer performance. At the same time, Windows by default does not always work with HDDs and SSDs, even the most modern ones, in AHCI mode. To check whether AHCI mode is enabled in Windows, you must do the following: 1. Right-click on “Start” and select “Device Manager” from the drop-down menu; 2.Next, expand the list of devices “IDE/ATAPI Controllers”; 3.View the list of devices. If none of them have AHCI mode in their name, most likely it is not enabled in the system.
Please note: Also, the absence of devices operating in AHCI mode in the list may be due to the fact that old drives that are not capable of operating in the new mode are connected to the motherboard. You can also check whether the SATA interface works in AHCI or IDE mode through the BIOS. To do this, you need to restart the computer and press “Del” or F2 during the boot process. The BIOS will launch, where you will need to find the SATA Mode item and see whether the AHCI or IDE option is installed.
Important: If you notice in the BIOS that the SATA interface is set to work in IDE mode, you do not need to switch to AHCI mode, since this will not be of any benefit. HOW TO ENABLE AHCI MODE IN WINDOWS Microsoft began supporting AHCI mode in Windows operating systems with Windows 7. However, you can enable it in Windows XP if you download the necessary drivers on the Internet, made by enthusiasts, and install them. However, it is worth noting that this method does not always provide a performance boost, and on Windows XP it is better to abandon the idea of using AHCI mode and work with drives through a standard IDE. To enable the AHCI mode itself, just set the appropriate setting for SATA in the BIOS. But this must be done before installing the Windows operating system, otherwise when booting the computer will display error 0x0000007B INACCESSABLE_BOOT_DEVICE or go into a constant reboot state. Therefore, to switch the IDE mode to AHCI when Windows is installed, you need to make some changes to the registry; below we will look at what actions to perform for each version of the operating system. HOW TO ENABLE AHCI MODE IN WINDOWS 10 In the modern Windows 10 operating system, Microsoft did not offer a setting that would enable support for AHCI mode on the fly if the SATA interface previously worked through the IDE. To correctly switch to AHCI mode, you will need to do the following: 1. Launch the registry editor by pressing the Windows + R key combination on the keyboard, and in the window that opens, enter the regedit command; 2.Next follow the following path in the registry: HKEY_LOCAL_MACHINE\SYSTEM\CurrentControlSet\Services\iaStorV
3.Select the Start option in the specified folder and double-click on it with the left mouse button. In the “Value” column, set it to 0, then click “OK”; 4. Also set the value of 0 for the Start parameter in the section: hkey_local_machine \ system \ currentControlset \ SERVICES \ Storahci 5. Pose this set values 0 for parameters 0, located in the following two sections: hkey_loocal_machine \ Syste M \ CurrentControlset \ SERVICES \ Storahci \ Startoverride Hokey_local_machine \SYSTEM\CurrentControlSet\Services\iaStorV\StartOverride
6.Having set all the necessary parameters, you can restart the computer and enter the BIOS. Set it to AHCI mode to work with the SATA interface. After the computer boots, the Windows operating system will prompt you to install the necessary drivers to work with AHCI mode; be sure to do this. HOW TO ENABLE AHCI MODE IN WINDOWS 8 AND WINDOWS 8.1 To switch the Windows 8 or Windows 8.1 operating system to work with AHCI mode, you need to do some work on the command line. You will need to do the following: 1.Run the command line as an administrator, to do this, right-click on “Start” and select the appropriate item; 2.Next, enter in the command line and apply the following command: bcdedit /set (current) safeboot minimal
3.Restart the computer and at startup, open the BIOS, where switch the SATA interface to IDE mode in AHCI; 4.Reboot the operating system and launch the command line. Enter and apply the command: bcdedit /deletevalue (current) safeboot 5. Reboot the computer again. It is worth noting that if the computer runs on an Intel CPU, then you can use the company’s standard utility, which allows you to make the necessary settings to switch Windows to work with AHCI. This is done as follows: 1. The following files are downloaded from the official Intel website: f6flpy – this is the driver; SetupRST.exe is an executable file that will be required for setup. 2.After this, you will need to right-click on “Start” and select “Device Manager”. In the list of devices, go to the "Disk devices" section and right-click on the drive on which the Windows operating system is installed. In the drop-down menu, select “Update drivers”;
3. A driver installation utility will appear, you must select the “Search and install drivers manually” option and install the downloaded f6flpy driver; 4.After this, the computer restarts and AHCI mode is enabled in the BIOS; 5.When the Windows operating system is loaded, run the SetupRST file to configure the computer. Please note: The above method is only suitable for computers with Intel processors; there is currently no such solution for AMD. HOW TO ENABLE AHCI MODE IN WINDOWS 7 In the Windows 7 operating system, the method for enabling AHCI mode is close to that used in Windows 10. Here you will also need to make some changes to the registry as follows: 1. Launch the registry editor, to do this, press the keyboard shortcut Windows + R, enter the regedit command in the “Run” window and click “OK”; 2.After this, follow the following path in the registry editor and set the Start parameter to 0: HKEY_LOCAL_MACHINE\SYSTEM\CurrentControlSet\services\msahci
Technology Advanced Host Controller Interface (AHCI) is a standard proposed by Intel that allows you to increase the speed of reading/writing operations from hard drives connected via the SATA protocol by using advanced features of SATA technology, such as integrated command queuing (NCQ), in addition, the standard supports hot-swappable hard drive technology disks (hot swap). The Windows 7 and Windows Vista operating systems already have the ability to support AHCI, and if during the installation of Windows 7 the system detects that the computer supports AHCI, the AHCI driver is installed automatically.
In older motherboard models, despite the fact that the chipset supports AHCI technology, its support is disabled at the BIOS level. Therefore, if, when installing Windows 7 / Vista, the installer did not determine the presence of ACHI support on the chipset, then the AHCI device driver will not be installed. As a result, if in such a system, after installing Windows, you activate ACHI support in the BIOS, the system may stop booting or will crash into a blue BSOD screen.
Therefore, if after installing Windows 7, you find that your motherboard supports AHCI mode, but this function is disabled in the BIOS, then these instructions will help you activate AHCPI support in Windows 7/Vista.
Attention! This sequence of actions must be performed BEFORE enabling AHCI in the BIOS settings, otherwise the system will stop booting!
How to check if it is enabledAHCI inWindows
If you are not sure whether AHCI support is enabled or not in your Windows 7, then following these instructions you can determine this fact.
- Open Device Manager (from the Start menu, type DeviceManager).
- When the UAC request appears “Do you want to allow the following program to make changes to this computer?” answer Yes.
- Open section IDE ATA/ATAPI controllers .
- If the AHCI driver is installed on Windows, then the list of devices will contain something like Standard AHCI 1.0 Serial ATA Controller or Intel(R) 5 Series 6 Port SATA AHCI Controller.
If you cannot find anything about AHCI Controller, then you should assume that AHCI support is disabled on your system. And you can activate AHCI in Windows (following the instructions above), and after that enable AHCI in the BIOS.