To create a bootable flash drive, we will use programs from both a third-party manufacturer and the built-in Windows command interpreter. Each method is different and has its own specifics, but I think that a simple end user will be able to cope with creating a bootable flash drive using any of the proposed methods:
- how to make a bootable USB flash drive using the command line
- how to make a bootable USB flash drive using UltraISO
- how to make a bootable USB flash drive using Windows7 USB/DVD Download Tool
If you are interested in information about creating a bootable USB flash drive for the Linux operating system family, then you can read the information at this link “bootable USB flash drive for Linux”.
So, I propose to start creating a bootable flash drive in order, as defined in the above list, accordingly we proceed to the first method.
BOOT FLASH DRIVE using the command line (method I)
Next, we will use only those commands that we need when creating a bootable flash drive. Therefore, the figure below shows the sequential entry of commands to create a bootable USB flash drive. And please pay attention to the fact that the commands you enter are indicated by a red underline!
Graphical representation of command input on the command line
Now let's describe the previously entered commands:
DISKPART- launch the program, a text-mode command interpreter that allows you to manage objects (disks, partitions or volumes) using scripts or directly entering commands from the command line.
list disk- display a list of disk drives connected to a personal computer.
select disk 1- select disk number “1”, since in our case it is a removable flash drive.
clean- clears all data from removable media - flash drive.
create partition primary- create a primary partition.
select partition 1- select the created section.
active- make the section active.
format fs=NTFS- format the flash drive in the NTFS file system.
assign letter=T- if necessary, you can assign a letter for the flash drive in this way.
Exit- exit the DISKPART program.
BOOTABLE FLASH DRIVE CREATED!
NOTE: Once you have created a bootable USB flash drive, you need to transfer the operating system files to this removable media. Files must be transferred in unpacked form, do not under any circumstances simply add an operating system image, for example one *.ISO file, it WILL NOT WORK!!!
You can see the complete list of Diskpart program commands in the following table:
Table of commands of the "DISKPART" program
| TEAM | EXPLANATION |
| ACTIVE | - Mark the selected section as active. |
| ADD | - Adding a mirror to a simple volume. |
| ASSIGN | - Assign a name or mount point to the selected volume. |
| ATTRIBUTES | - Working with volume or disk attributes. |
| ATTACH | - Attaches a virtual disk file. |
| AUTOMOUNT | - Enable or disable automatic mounting of basic volumes. |
| BREAK | - Splitting the mirror set. |
| CLEAN | - Clear configuration information or all data on the disk. |
| COMPACT | - Attempts to reduce the physical size of the file. |
| CONVERT | - Convert disk formats. |
| CREATE | - Create a volume, partition or virtual disk. |
| DELETE | - Delete an object. |
| DETAIL | - View object parameters. |
| DETACH | - Detaches the virtual disk file. |
| EXIT | - Shutdown DiskPart. |
| EXTEND | - Expand volume. |
| EXPAND | - Increasing the maximum available space on the virtual disk. |
| FILESYSTEMS | - Displays the current and supported file systems for the volume. |
| FORMAT | - Formatting a given volume or partition. |
| GPT | - Assigning attributes to the selected GPT partition. |
| HELP | - Display a list of commands. |
| IMPORT | - Import a disk group. |
| INACTIVE | - Marking the selected section as inactive. |
| LIST | - Display a list of objects. |
| MERGE | - Merging a child disk with its parents. |
| ONLINE | - Transferring an object marked as "offline" to the "online" state. |
| OFFLINE | - Transferring an object marked as “online” to the “offline” state. |
| RECOVER | - Update the status of all disks of the selected package. Attempting to rebuild disks of the wrong package and resynchronizing mirrored and RAID5 volumes with outdated plex or parity data. |
| R.E.M. | - Does not perform any actions. Used to comment scripts. |
| REMOVE | - Deleting a drive name or mount point. |
| REPAIR | - Recovering a RAID-5 volume with a failed member. |
| RESCAN | - Search for disks and volumes on your computer. |
| RETAIN | - Placing a service partition on a simple volume. |
| SAN | - Display or set the SAN policy for the currently loaded OS. |
| SELECT | - Setting focus on an object. |
| SETID | - Changing the partition type. |
| SHRINK | - Reduce the size of the selected volume. |
| UNIQUEID | - Display or set the GUID Partition Table (GPT) code or Master Boot Record (MBR) signature of the disk. |
BOOT FLASH DRIVE using the UltraISO program (II method)
The UltraISO program is designed for creating and editing disk images. When creating a bootable flash drive, we will use the built-in functions of this program.
Open the program with administrator rights, as shown in the figure:


Select the required operating system image to create a bootable USB flash drive, for example, the Windows Vista disk image is selected here:


A pop-up window appears where you need to make sure that the removable media, the image file to be recorded and the recording method are correctly specified (it must be set in USB-HDD+ mode) and click the “burn” button

After clicking the "Write" button, a "Hint" window will appear, prompting you to erase all information on the flash drive. Agree!

Then the data will be written to the flash drive...

And finally, after a certain time, the operating system image will be written to a newly created bootable USB flash drive for future installation.

BOOTABLE FLASH DRIVE IS MADE!
NOTE: Do not forget to set the BIOS input/output system to boot the primary device, that is, make sure that the computer boots from removable media - the bootable flash drive you created.
BOOT FLASH DRIVE using Windows7 USB/DVD Download Tool (III method)
The Windows7 USB/DVD Download Tool program created by Microsoft for burning operating system disk images to optical and removable media. When creating a bootable flash drive, we will sequentially follow all the instructions of the program.
First, you need to download this program from the official Microsoft website. Then you need to install the program following the installer's instructions. After installing the program, a shortcut will appear on the desktop, as shown in the figure:
Run it with "Administrator rights", right-click on the shortcut and click on the line "Run as administrator". The program will start, click the "Browse" button and select the operating system image *.ISO

After you have selected the image of the system to be recorded, click “Next”, another window will appear where you will be asked to select the type of media - optical or removable. Since we have a removable storage device - a flash drive, select "USB device"

We select our removable media from the proposed list, i.e. flash drive and press the "Begin copying" button

After clicking the above button, the process of formatting the flash drive will begin...

After some time, the process of writing the disk image data to the flash drive will continue.

We wait some time for the image to be recorded, and eventually we will get 100%, and here we are The bootable flash drive is created!
NOTE: Do not forget to set the BIOS input/output system to boot the primary device, that is, make sure that the computer boots from removable media - the bootable flash drive you created.
Every time the operating system needs to be reinstalled, the user creates a bootable USB flash drive with clean Windows. After installation, many people think that they can continue to use such a flash drive by simply erasing all the image files from it, but this is not the case. During operation of such a drive, various errors may occur. Either the system refuses to see the connected device, then reading/writing data fails, and so on. The cause of such troubles is the flash drive from which the boot drive was made. Today we will tell you how to turn a bootable flash drive into a regular one.
Someone will probably say that for further use, the flash drive with the operating system image must be formatted. But, as practice shows, this is not always enough. The above problems may also occur after formatting using standard Windows tools. To avoid any problems with the drive, you will need to resort to specialized utilities.
HP USB Disk Storage Format Tool
A very simple proprietary utility from HP that performs deep formatting and rids the drive of all kinds of errors. The software is a portable version and only supports English, but this is not scary, because the interface is very simple and the functionality is highly specialized. You need to run the utility as an administrator, otherwise you will see an error when you try to format the flash drive.
After launching the program, you will see a small window. In it, in the “Device” column, you need to select one of the connected drives. Then specify the type of file system you want after the recovery process. In the “Volume label” column, specify the name of the device that will be displayed in the operating system. It is advisable to perform careful formatting, leaving the “Quick Format” item empty.
After all the specified settings, click “Start”. You will see a warning indicating that all data on the drive will be erased. Therefore, copy all the files you need from the flash drive in advance.

The completion time of the operation depends on many factors and usually ranges from 5 to 40 minutes. Quick formatting (the checkbox next to the “quick format” item) speeds up the formatting process, but does not guarantee that the drive will no longer conflict with different software and hardware. The scale showing formatting progress may stop in place. Don't be alarmed and wait for the process to finish in any case. In some cases, the HP USB Disk Storage Format Tool does not save the drive from errors. Therefore, we recommend trying other utilities that are aimed at restoring the flash drive to its original state.
Rufus utility
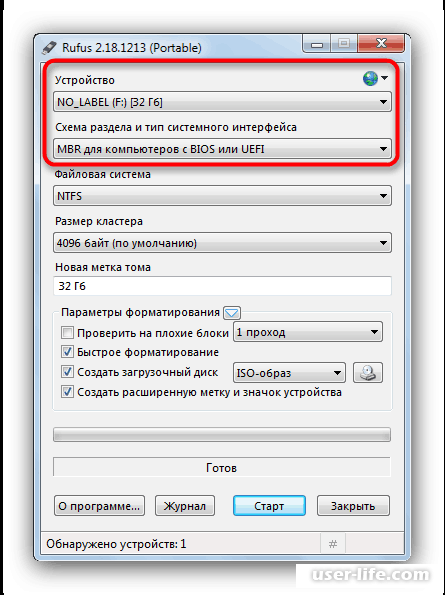
Rufus is a popular bootable media creation utility that has a very simple interface. As paradoxical as it may sound, using a program to create a bootable flash drive, you can also return the flash drive to its original state. The software fully supports the Russian language and is available in a portable version. According to the developers, Rufus works faster than its analogues, and in particular faster than: UNetbootin, Universal USB Installer and Windows 7 USB download tool. In general, the capabilities here are the same as those of the previous utility, with the exception of a couple of options. Usage algorithm:
- In the "Device" section, select the desired drive. You can focus on the assigned letter (for example, “F”).
- In order for you to open the formatting settings, you need to select either “Non-bootable drive” or “FreeDOS” in the “Boot method” column. By default, it is set to "Disk or ISO Image", which will not allow you to do formatting.
- There is no need to touch the “Select” button. It is needed in order to select the files that are required to create a boot device. But that’s not what we’re here for.
- The “Partition scheme” and “Target system” items can be left untouched; this concerns the creation of bootable media.
- “Volume label” is the name of the drive displayed in the system.
- Select the file system (NTFS, FAT32, UFD, exFAT).
- It is better to leave the cluster size at default.
- Just like in the previous utility, it is better not to touch the “Quick Format” item and leave it empty to achieve 100% results.
- Check the box next to “Create an extended label and device icon.”
- If you wish, you can check the media for the presence of bad blocks. However, keep in mind that this will take a very long time (depending on the number of passes and memory type).
- Start formatting by clicking the "Start" button.

If you refuse quick formatting and decide to check the flash drive for bad blocks, then get ready for the fact that the process may take several hours. In our case, an 8 GB drive was formatted within 40 minutes without checking for bad sectors. Also, the larger the volume of the device, the longer it will take to complete the operation.
diskpart utility
The capabilities of the Windows operating system are very wide. Below we will tell you how to make a bootable USB flash drive normal using standard tools. Diskpart is a console utility for managing hard drive partitions.

The complete list of commands is as follows:

These are not all the methods by which you can return a bootable flash drive to its original state, but there is no point in talking about all the methods. As a rule, any of the three utilities described copes with its task and after that the drive works flawlessly.
Without exception, all laptop manufacturers are looking for the perfect balance between ergonomics and performance, cutting down on features that are not in demand today, such as the presence of a CD-ROM. It may well happen that you do not have an external reader at hand, and you will need to urgently reinstall the operating system. This is where a bootable USB flash drive will come to our aid. How to make a bootable USB flash drive? We'll tell you in this article
What is a bootable USB flash drive?
Flash The disk on which the operating system image is loaded is called a bootable USB flash drive. There are at least two ways to turn a regular flash drive into Boot device how to use standard tools Windows and through third-party utilities. Using Components Windows the method is the simplest and fastest, and therefore we will consider it first
Creating a boot disk using the command line
You'll need basic command line skills here, but even if you don't have them, follow the detailed instructions: 
- Go to “Start” -> Run, in the dialog box that opens, write cmd.
- We need to enter certain commands in the empty fields of the command line in a strictly specified order, which you can see in the screenshot.
- Diskpart a program that allows you to manage volumes and disks using scripts and command line values
- list disk - displaying those connected to your computer HDD and disk drives. The same as the visual viewing mode through “My Computer”, only in text mode cmd.
- Select disk - capture an object for work, set the value corresponding to the number of the connected device
- Clean – command that formats all data on the selected media
- Create partition primary – command to create primary partition
- Select partition selecting a section with an arbitrary value, select the newly created one
- Active – activate the section
- Then we assign the drive a file library type with the command Format fs=NTFS or Format fs=FAT
- Assign Letter - assigns a letter to the drive, which in standard mode is set arbitrarily or by the manufacturer
- Exit completes image creation and closes the program.

After all steps are completed, move the files from the operating system to the boot disk (flash drive). VERY IMPORTANT! We move all components of the new system to a flash drive in an unpacked(not ISO) form, otherwise the system will not be able to read data from the drive. In addition, on the recipient computer, be sure to BIOS set the correct parameters Boot Device in the boot device menu we indicate primary Flash- drive so that the system does not boot from HDD, and from the connected device. Done, you can start working
Boot creation sectors using the utility ULTRAiso
Let's say you don't have a boot disk image, but you have new system components that you want to create an image of. The UltraIso program will help us with this, with which you can rivet and modify disk images. Thanks to its wide user functionality, we can create a boot disk using the program's graphical shell, which simplifies and speeds up the process of obtaining the desired tool, unlike the command line method

If the files are successfully copied, the program will inform you that the installation disk image has been downloaded. Click "OK". Now we can use USB as a boot disk exactly the same as in the first case
Mounting the boot disk in the program USB/DVD Download Tool
In it we can create a boot disk from Flash- carrier, and with DVD. Due to the fact that we are considering situations where there is no disk drive, we will show you how to make an image for Flash memory.

As you can see, everything is still simpler here than in the case of the ULTRAiso program, but the functionality of the USB/DVD download tool is correspondingly not so wide. You can use any of the proposed methods for creating a boot disk, limiting yourself only to the presence of components for mounting the image and a list of pre-installed programs.
If an error occurs when loading the system installer from a Flash drive, most likely you did something wrong in one of the image creation steps, or you simply forgot to assign the boot Flash drive as a priority in the computer's BIOS. In cases where the boot interpreter does not see the boot disk, try changing the port of the connected device or burning the image to another boot disk. We hope that our article will help you install Windows on a new computer correctly and quickly.
If you are reading this, it means you were interested, so please subscribe to our channel on , and for one thing, give it a like (thumbs up) for your efforts. Thank you!
If you want to install or reinstall an operating system on a computer or laptop, then it is quite natural that you have a question: how to create a bootable USB flash drive with Windows. In this article we will look at three ways that will help us with this.
Using the first and second, you can make a bootable USB flash drive for Windows 7, Windows 8 or Windows 10. Using the command line or the WinSetupFromUSB program, you can make a bootable USB flash drive for Windows XP.
Select a flash drive with more memory than the operating system image you have on your computer. Save all the information on it to a hard drive or other external storage device, since the flash drive will be formatted and, accordingly, all data from it will be deleted.
Via command line
To create a bootable USB flash drive using the command line, you do not need to install any third-party applications on your computer. To launch the command line, press the key combination Win + R, the “Run” window will open. In the "Open" field, write cmd and click "OK".

Let's display a list of all devices - enter list disk.

In this case, two devices are connected to the laptop: Disk 0 and Disk 1. From them you need to select a flash drive, which we will make bootable. I took a 4 GB flash drive, so we look at the “Size” column, it corresponds to Disk 1 - 3.9 GB. Enter the following command – select disk 1. If your flash drive corresponds to another device, for example Disk 2, enter the command select disk 2 - only the number at the end changes.

Enter the clean command.

Using the create partition primary command, we will create a primary partition.

Select it – select partition 1 .

Let’s make it active – active .

Let's format the flash drive in NTFS format – format fs=NTFS. Wait for the process to complete.

After that, select a letter for the section, for example R - enter assign letter=R .

Exit the diskpart program - enter exit. To close the command prompt, type exit again.

The bootable USB flash drive has been created. Now you need to copy the files to install Windows. If you have them stored in an archive or in an image, extract all the files from them onto a flash drive.

To install Windows from a flash drive, in the BIOS we change the boot priority; we need to boot from the created flash drive. You can read detailed articles about installation by following the links at the bottom of the article.
Using the Rufus program
This program does not require installation on your computer, takes up very little space, is free and easy to use. Download the Rufus program by following the link.
We launch it on the computer. In the “Device” field, select the desired flash drive. Make sure the box is ticked "Create a boot disk". Then click on the floppy disk to select the operating system image.

Through Explorer, look for the image on the computer and click “Open”.

A line will appear at the bottom "Using an Image". Click Start. The program will warn that all data from the flash drive will be destroyed, click “OK”.

Wait until the flash drive is formatted and the ISO image files are copied to it. Then click "Close".

A bootable USB flash drive with the Windows operating system has been created. We change the boot priority in the BIOS and install the new OS on the computer.
Using WinSetupFromUSB
First, download the program WinSetupFromUSB, for this you can follow the link. We insert the USB flash drive, which will be bootable, into the computer or laptop and launch the program.
In area "USB disk selection and format" select the desired flash drive and press the “Bootice” button.

In the next window, in the “Destination Disk” field, select the flash drive from the list again. Here you can navigate by memory capacity. I took a 4 GB flash drive, so USB 3.9 GB is suitable for me. Click "Perform Format".


In the "File System" field, select the NTFS file system and click "OK".

In the following windows there will be warnings that the flash drive will be formatted, all data will be deleted, etc. Click "OK". In the last window, click “Yes” and wait for the process to complete.

A window will appear indicating that a bootable USB flash drive has been created and you can write the necessary files to it. Close the “BOOTICE” window by clicking on the red cross.
In the main program window, in the “Add to USB disk” area, check the box "Windows 2000/XP/2003 Setup". Click on the rectangle opposite the field and select the folder in which you store your operating system files.
If Windows installation files are stored on your computer in an archive or image, you must first extract them.
Click “GO” and wait for the files to be written to the flash drive.

Using the WinSetupFromUSB program, you can easily make a bootable USB flash drive with the Windows XP operating system.
And now it’s time to find out how, if necessary, to make this flash drive normal, that is, return it to its original state.
Conventional formatting cannot work here, since a service file is integrated into the flash drive, which you cannot get rid of so easily. We will solve this problem in different ways.
Method 1: HP USB Disk Storage Format Tool
This program specializes in returning flash drives to a working state, so in our case it will work great.
1. Connect the USB flash drive to your computer and run the previously installed program. In point "Device" select the connected flash drive.
2. In chapter "File System" select the file system into which the drive will be formatted.

3. "Volume Label" is responsible for changing the name of the flash drive.

4. Next, check the box to the left of the inscription "Quick Format", this will speed up the process and minimize the risk of formatting problems.

5. After specifying the settings, you can proceed to format the disk using the corresponding button:

The process will take approximately 30 minutes, so don't expect quick results.
6. In some cases HP USP Disk Storage Format Tool may not recognize the flash drive, so you will have to use another method.
Method 2. Rufus
We have already become acquainted with this popular utility, which allows you not only to create bootable flash drives, but also to return them to their original state.
1. Run the installed program, then in the column "Device" select the connected flash drive.
2. We also indicate the following points, as shown in the figure below:

3. The volume label is responsible for changing the name of the flash drive (English letters only).

4. In the next section, check the boxes as shown below:

5. Make sure the settings are correct and start the process using the button "Start".

6. Once the process is complete, remove the device from the computer, then reinsert it to check the changes.
Rufus may also have difficulty recognizing low-quality flash drive models, otherwise you will have to use the method below.
Method 3. Diskpart command
In this case, we use a built-in operating system tool, namely the command line.
1. Launch the command line by holding down the hotkey Win+R, then in the window that appears, enter the command "cmd".

2. Enter the command at the command line list disk .

3. The list that appears will show the memory storage devices on your computer. Find the name and size of the flash drive, then use the command select disk and add the drive number after the space. For example select disk 1.

4. Enter the command clean to completely clear the previously selected drive.

5. Using the command create partition primary you will recreate the correct markup on the flash drive.