Hello friends. As you understand from the title of the article, today I will talk about how to add the ability to insert emoticons in comments on WordPress blogs no plugins.
For a long time there were no emoticons on my blog, because I simply never used them. Over time, I caught myself thinking that emoticons add some kind of liveliness and emotionality to communication on the blog. The standard emoticons that are built into the engine did not suit me, as they are too small and inexpressive. I began to look for a suitable solution in the form of a special plugin, but everywhere only disappointment awaited me - either the plugin was crammed with unnecessary functions, or it worked crookedly :)
In the end, I decided to use the standard WordPress feature by changing the emoji icons themselves to my own.
So, if you want to be able to insert any emoji into comments on your blog, and do not want to use plugins, follow the instructions below.
First, you need to download the emoticons you like to replace the standard ones. There are emoticons for every taste on the Internet, but out of all the abundance, I like the standard koloboks, which are now installed on my blog. Below you can download them:
Mini koloboks ()
Koloboki ()
So, after you have downloaded the new icons, you need to replace the standard ones with them. Standard emoticons are located in the folder wp-includes/images/smilies/. Just make sure that the names of the old icons match the names of the new ones, and that their contents also match.
Now, after you have replaced the icons, you need to add the ability to insert them into comments. In principle, if this feature is enabled in the blog settings, emoticons should already be converted into pictures if you type them in symbols.
In order to display a list of emoticons, there is a special function:
function addsmile($smile)( document.getElementById("comment").value=document.getElementById("comment").value+" "+$smile+" "; ) just after the place where we have written the shape of the button in In my case, as I already wrote, “send”.

All plugins work! You don't need to configure anything else.

Initially, any blog already has emoticons for comments, but they look straight out of the last century, so to speak, so we will replace them with beautiful gothic emoticons. First, go to “appearance”, “writing” and check the box next to “convert emoticons into pictures”. Then download the plugin, load it, activate it.
Now we need to change the regular emoticons to gothic ones. To do this, first download gothic emoticons. Then open the program, enter your details and connect, go to the httpdocs folder (or public_html, www, domains,) => wp-includes => images, and delete the smilies folder.
Now we take the smilies folder from the downloaded archive and upload it to the images folder, that is, to the same place from where we deleted the old smiles. We are all happy that we have these smiley faces.
If they are not there, go to the comment (comments.php), as with the plugin Qip smiles and paste this code under the comment form. Everything is the same as with the Qip smiles plugin, just change the code.
Ok, remember I mentioned that the Wp-smiley plugin has convenient function compared to Qip smiles. So, the fact is that emoticons from the Qip smiles plugin must be inserted into the article, manually entering the emoticon code each time, this is quite inconvenient to be honest. But with the Wp-smiley plugin, when you write your article, a black smiley icon will appear when you click on it, which you can immediately select the smiley you like from the entire list without remembering what code each of them has.

Also, if you don’t like black emoticons, you can download emoticons from Vkontakte. The installation is the same as with black emoticons.

By the way, if you change the emoticons in the Wp-smiley plugin, never again, otherwise the black emoticons will disappear, and those old emoticons will take their place again. That's all, good luck (I seem to have re-optimized it for the word emoticons -_- ).
Hello again!
I don’t remember exactly what gave me the idea to install emoticons on this site. It seems like an acquaintance gave me an analysis of emoticons in the “QIP infium” messenger, which I have been using for several years now, and I was eager to add emoticons here.
After searching a bit for a suitable plugin for WordPress, I came across this one and decided to use it, but that was not the case - I wanted a different output, and I wanted to simplify the check for replacing symbols with emoticons. Also, I didn't need so many emoticons. Of course, I could realize all my desires by editing the above-mentioned plugin, but somehow, almost by accident, I started writing my own code, which eventually turned into a plugin, which seems to be quite successful
About the emoji plugin for WordPressWhat the plugin does:
- replaces standard WordPress emoticons with emoticons from QIP.
- adds a list of emoticons to the comment field. Which emoticons will be included in the list is indicated in the settings.
- adds emoticons to the admin panel, where you can easily insert them when replying to comments or writing a post.
- makes it easier to find and replace emoticon codes in text.
I'll tell you a little about the settings
Manually inserting a block of emoticons into the comment formThe plugin automatically adds emoticons to the comment form (textarea). However, it may turn out that the plugin will not be able to embed the list normally. In this case, you can insert the emoticon block manually anywhere in the template. To do this, leave the "Auto-insert emoticons" field in the settings empty, this way you will disable auto-insertion, and using php code insert the block where you want in the template (usually somewhere in the comments.php file):
This code will output a block of emoticons.
HTML tags exceptionsIn this setting, you can specify HTML tags, the text in which will not be processed by the plugin. For example, if you specify code there, then the following code will not be processed by the plugin:
smile :) .
Tags must be separated by commas.
Special emoji designations (exception emoticons)By default, emoticons are identified in the text by the code (:emoticon_file_name:), but there are exceptions. For example, a smiley is denoted as:-) or:) or =), and its native code is (:smile:) . By default, there are 3 such exceptions: :) :(:D . This limitation is due to a small optimization... Such exceptions can be configured in the plugin.
Editing the appearanceIf you are not satisfied with how the list of emoticons looks, then you can edit it, provided that you know the css, for this you need to change CSS rules in field " CSS styles". To prevent styles from being stored in settings, styles can be copied to your own styles file and removed from the settings.
Installing your own set of emoticonsIf you don't see the emoticons you would like to have on your blog, don't be upset. You can easily add/replace emoticons with your own.
To supplement the list, all you need to do is create the kama-wp-smile-packs folder next to the plugin folder and add your set of smiley pictures to it. Those. As a result, you should end up with a folder with pictures of emoticons like this: /wp-content/plugins/kama-wp-smile-packs/mypack/*.gif. After creating such a folder, you need to go to settings and select the new package of emoticons that appears.
The text of the entry will use the construction (:file_name:) . For example, if you add an emotion.gif image in the text, this emoticon will be inserted as (:emotion:) .
Only lowercase Latin characters are allowed in file names letters a-z, numbers 0-9, signs - and _. If the file has any other characters, it will not work.
Filtering - removing emoticon code from textIf you need to filter the text somewhere (not show the emoticon code), then apply the following filter:
$text = "Test text (:good:)"; $text = preg_replace("/\(:(0,15):\)/", "", $text); echo $text; // return: Test text
How to embed the plugin in other fields, for example in BbPress, Quick ChatThe default plugin only works for comments and posts. If you need to “screw” it somewhere else, then the following functions and a little knowledge of CSS will be useful to you:
- kws_get_smiles_html($textarea_id) - displays a block of emoticons for a textarea
- kws_convert_smiles($content) - processes the output content to make pictures from smiley codes
In case of sudden problems, glitches, bugs and “other things”, or if you just want to write something like this - write in the comments
Hello, friends! I haven’t published new articles about WordPress for a long time. The fact is that my blog is already established - the main plugins are installed and configured, something somewhere is done purely in code, and there is no need to change or add anything new. All that remains is to finish some little things, mainly related to appearance blog. One of these little things is WordPress emoticons. That's what we'll talk about today.
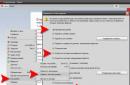
WordPress has emoticons by default, but many people don’t even know about them, because they still need to be enabled in the settings. Go to the “Options” - “Writing” section and enable the option:
A complete list of all available emoticons is not listed in the settings, but it can be found in the WordPress codex. Here he is:

Just use the symbols indicated in the table when writing an article. After publishing the post, they will be automatically replaced with the corresponding picture. Hand on heart, it’s worth saying that the faces are not very beautiful. After all, I’m used to the animated koloboks that are used in Qip and are so often found on various forums.

You can change emoticons manually, fortunately it’s not difficult.
- with new emoticons to your computer and unpack it.
- All icons are located on the server in the /wp-includes/images/smilies directory. We need to manually replace the standard files with new ones. WP doesn't care what image it displays.
- If you need to add a new emoticon, which has no analogue in WP, then you still need to register it in the /wp-includes/functions.php file. By default, you can see the following code:
function smilies_init() ( global $wpsmiliestrans , $wp_smiliessearch ; // don't bother setting up smilies if they are disabled if ( ! get_option( "use_smilies" ) ) return ; if ( ! isset ( $wpsmiliestrans ) ) ( $wpsmiliestrans = array ( ":mrgreen:" => "icon_mrgreen.gif" , ":neutral:" => "icon_neutral.gif" , ":twisted:" => "icon_twisted.gif" , ... ":!:" = > "icon_exclaim.gif" , ":?:" => "icon_question.gif" , ) ; ) Just add a new line in which you indicate the key characters and the corresponding icon. To delete an emoticon, erase the line related to it and remove the icon from the folder.
To be able to select emoticons in WordPress comments, open for editing the comments.php template from your WP theme and before the code (depending on the theme, it may vary slightly):
| < textarea name= "comment" id= "comment" cols= "65" rows= "10" tabindex= "4" > |
paste the script:
| function addsmile($smile)( document.getElementById("comment").value=document.getElementById("comment").value+" "+$smile+" "; ) |
Hello, dear readers of the Internet Cabbage blog!
A new day has come. I start it on a positive note, and I try to always do that.
So, on this note, I would like to immediately ask you a question:
How often do you start your morning with a smile and can we call you a cheerful person? Do you have a sense of humor and when was the last time you laughed heartily?
Are there too many questions? But I ask these questions for a reason. As you know, positivity gives us more strength, and laughter prolongs life. You have already heard all this more than once, and no matter how hackneyed these phrases are, they work and work perfectly if you take them seriously.
I created a website to teach beginners how to create their own websites and give them motivation to make money on the Internet in all available ways! You can smile now if you don’t believe that you can really make money on the Internet.
You just have to learn and try different methods and analyze. The most important thing is not to despair if it doesn’t work out right away. You just need to be able to laugh at mistakes and failures and remember that after sunset there always comes dawn.
So you read my next article and wanted to write a comment, but in order to fully express your emotions, you understand that something is missing.
Yes, yes, there are not enough emoticons! Those small and funny koloboks that usually help us show our emotions to the fullest.
What are emoticons and why are they needed?
Emoticon (English smiley - “smiling”) or happy face (☺/☻) - stylized graphic image smiling human face; traditionally depicted as a yellow circle with two black dots representing the eyes and a black arc representing the mouth. Emoticons are widely used in popular culture, and the word “emoticon” itself is also often used as a general term for any emoticon (depicting an emotion with punctuation marks rather than graphics).
We need emoticons to express our emotions. They are very funny and add a bit of dynamics to simple text.
How to install emoticons on a website?In order to install emoticons on a website, and in this case we have a website on the WordPress engine, there are unique helper plugins.
Today we will look at one of the plugins that will automatically and easily add emoticons to your website and thereby decorate it with a variety of emotions. This plugin is called wp-Monalisa and you can install it on your website in two ways.
The first way is to log into the admin as usual. panel of your site, in the Plugins section – Add New and enter the name of the plugin in the search bar. The installation is standard.
The second way is to download it from the official website at:
http://wordpress.org/plugins/wp-monalisa/
And, having downloaded it to your computer, check it with an antivirus and then go to the site administration panel: Plugins – Upload – Select file – Install – Activate.

After installing this plugin, an admin section will appear. Site panels: wp-Monalisa.

When you log in for the first time after installation, you will see that you have this line:

It translates as: Please turn off Settings -> Writing -> Emoji Conversion in order to use the WP-Monalisa emoji plugin).
Let's do that now.
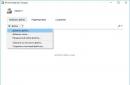
Let's go to Settings (Options) – Writing – And uncheck the box: Convert emoticons like and: -P into pictures.


We refresh the plugin settings page and see that the line has disappeared.
Now let's look at the settings of the WP-Monalisa plugin.
Item – Iconpath– this is the path where the icon pictures are located. You can experiment and write your own path where the emoticons will be located. First you need to upload your folder with a set of necessary emoticons to your hosting, and the plugin itself will determine these emoticons.
Next item Show smilies on edit– show emoticons in the editor, that is, show emoticons in the editor of your posts.
Show smiles on comment – this point means that emoticons will be displayed in comments.

If we go to edit the post, a new field will appear with emoticons that can be inserted into the text of the article.
How now to configure the plugin?
Let's take a closer look at the settings.
Replace emoticons with html-images– indicates how emoticons will be displayed in the comment field.
For example, I click on a face to insert into the text, and a long link code appears, like this:

It is advisable to disable this item so as not to frighten your commentators. To do this, uncheck this box.

Let's check how it works. We click on the face in the comments and now we see that it looks prettier than a large piece of the link.

Next point: Replace emoticons with html-images– means exactly how you want to display emoji: icon, text, or both. Try different options, but it seems to me that it would be preferable to leave only the meaning of the icon.
Show smiles in a table – This is the ability to display emoji in a vertical table. Everyone’s tastes are different and so is the design of the site, so you can choose this item by checking the box or leave the default horizontal arrangement of emoticons. You can also set the number of columns.
Show smiles as Pulldown – show emoticons as a drop-down list. Here you can set the number of the most popular emoticons so that they are displayed in the quantity that is most favorable to you. I don’t have a check mark on this item and all the emoticons are displayed. But whoever likes it! If you have a lot of them, then it is advisable not to clutter up the space and activate this point.
Show tooltip for icons – show hints for emoticons. That is, if the fad is activated and you hover your mouse cursor over an emoticon, a hint of the emoticon’s emotion will be displayed. This is also at your discretion. I have a hint, so you can rate it right now on my website in the comments.
Don't forget to click save for all changes to take effect.

You can use the arrows to change the location of the emoticons. For example, by simply moving the arrows up or down, you move the emoticon itself and thereby determine its place in the hierarchy of emoticons when displayed on the site.

Now let's look at how to add a new emoticon to our database. To do this, you need to go to the hosting, to the root folder of the plugin, which is located in the following path.
If you have Springhost hosting, then follow the following path:
Additionally – File manager- public_html - site (here is the name of your site) - wp-content - plugins - WP-Monalisa - icons.
In folder icons all the emoticons of your plugin are there. And here you can upload any emoticon you want.

To do this, you need to download an archive of interesting emoticons to your computer in advance.
That's all. We figured out how
How to install emoticons on a website? wp-Monalisa plugin.The plugin works great and I hope it will give you pleasure and diversify your emotions when writing text.
If you found this article interesting and useful, then do not forget to share the information with your friends - click on the buttons social networks!!!
Sincerely, the author is Larisa Mazurova.
Watch a wonderful song about a smiley face performed by Verka Serduchka: