Despite the fact that Apple gadgets have seemingly filled the entire planet, the number of new iPhone users is only growing every day. Despite the ideology of simplicity pursued by the company from Cupertino, new owners of Californian smartphones need help with the initial setup: what to do when starting up, how to activate the device, what pitfalls should be expected at the initial stage. Let's look at everything using the example of how to set up an iPhone 5s.
What is an iPhone?
In this section we will not talk about the history of the device or what operating system it runs on, we will talk about the phone itself and the controls on it. First, you should understand the keys. Being a device with a Multi-Touch screen focused on touch control, the iPhone 5s (original) has a very small number of hardware buttons. On the front panel there is a Home button (also a Touch ID fingerprint sensor). On the top end is the power/lock button (the first one you will use). On the left side there is a sound control, on the right there is a tray for a SIM card.
First start
As soon as you launch the “fresh” gadget, you will be greeted with a proposal to start setting up. In principle, the built-in assistant guides you through the setup process quite intuitively, but it’s still worth considering a number of points.
- Selecting a language and connecting to Wi-Fi. The language will be suggested automatically based on where the device was purchased, but the user has the right to choose any other. A password may be required to connect to a Wi-Fi network. Alternatively, you can use the mobile network, if supported. To do this, you should initially insert the SIM card into a special tray.
- The next step is to connect an Apple ID account, if you already have one, otherwise create a new one (Apple ID allows you to use a lot of phone functions, including data synchronization, iMessage services, Apple Music and others).
- Create a short password to lock your smartphone (or scan your fingerprint).
- Initial setup of iCloud storage and Keychain Access (storage of passwords and credit card data).
- Enabling geolocation detection and the “Find iPhone” function (the “Find iPhone” function allows you to protect and possibly find your missing phone).
- Activate your smartphone with your telecom provider.
This is how you set up an iPhone 5s from scratch; for those who have already used such a gadget, it will be enough to restore from a previously created copy of the device.

Getting to Know iTunes
It is not always possible to activate a device via the Internet; sometimes this requires using Apple's multimedia center, called iTunes. This application allows you not only to activate the gadget, but also to manage the data stored on it.
To activate, you need to connect your iPhone to your computer using the included USB cable and press the “Trust” button on your phone. This is all that is needed to activate the iPhone 5s; settings and further improvements can be made already on the device.

iTunes can also be used to install applications on a smartphone and synchronize multimedia content (music, movies, books).
Setting up iTunes on iPhone 5s is done together with Apple ID. As soon as it is created, all content distributed in the iTunes Store will become available.
You can find a wide variety of content on iTunes. You can purchase music, films, books, and download podcasts there. You can even buy ringtones for iPhone there.
Interface
After activating the device, the first thing a new user will encounter is the start screen with applications. The phone has pre-installed programs such as a web browser, email client, notes, phone, and so on.
Applications on the screen can be moved, deleted and organized using folders; to do this, just hold your finger on one of the icons, and then move it to an empty position, to another program (to create a folder). To delete, just click on the cross to the left of the icon. Applications can be located on several screens (depending on their number).

There are also a number of gestures that work on the start screen. “Swipe” (swipe) to the right opens a screen with suitable contacts and applications. A “swipe” from the top edge opens the “Notification Center” (notifications from applications, incoming mail and missed calls will be collected there), as well as a screen with widgets. A “swipe” from the bottom brings up the “Control Center” (it opens quick access to the player and other useful functions). A swipe from top to bottom in the center of the screen opens Spotlight, Apple's search service, which allows you to search for content both on your device and on the Web.
iPhone 5s Features: Touch ID Settings
One of the signature features of this is its configuration does not take much time and usually occurs before activation. During the setup process, the phone will require you to put your finger on the “Home” button (it is advisable to wash your hands before doing this) a dozen times in order to capture every angle at which you can touch the scanner (this is done for the most accurate data processing and quick unlocking of the phone).
The smartphone is capable of storing up to five fingerprints at a time (you can add the fingerprints of your loved ones if you want them to be able to use the device).

Communication
An iPhone is primarily a means of communication, therefore it has all the necessary tools for communication. The Phone and Messages apps are classic methods of communication. Apple also has tools for connecting over the Internet, such as iMessage (a tool for sending messages between devices) and FaceTime (video calls similar to those you can make using Skype).
In addition to already built-in applications, you can also use third-party ones, which means that any social networks (Twitter, Facebook, VKontakte) and instant messengers (Viber, WhatsApp, Telegram) will migrate to the iPhone along with the user.
Getting in touch using other VoIP services is not prohibited, that is, you can download and start using Skype on your iPhone.

Multimedia
The operating system on which the iPhone runs is fundamentally different from other systems. The main difference between iOS and other platforms is its closed file system. Because of this feature, the iPhone received many haters who were deprived of the ability to freely download any content to the phone. Apple sells multimedia content: they sell movies and TV series in the iTunes Store, applications in the AppStore and music through the Apple Music service. If you are willing to pay and be content with these services, then there will be no further problems, all three services work great and are full of content.
If you plan to download your own movies and music, then you will again have to deal with iTunes and the synchronization function. In order to add media content to your iPhone, you first need to add it to your iTunes library, and then sync it with your phone.
Users will immediately encounter another problem - ringtones. Ringtones for the iPhone have long been a source of ridicule, because while Android users download and cut ringtones directly on the phone without any problems, Apple users must do this on the computer, and then add them to the phone’s library using the synchronization method (it works on the same principle as adding audio, the main thing is that the track lasts no more than 15 seconds).
AppStore
A special feature of Apple's platform is the application store. One of the main applications that distinguishes the original iPhone 5s is the AppStore. At first, the AppStore icon on the desktop will be the most frequently clicked, as you can find all the necessary applications there: clients for social networks, replacements for standard applications, navigation services, tools for increasing productivity.
Setting up an Apple ID
We should also consider the process of creating an Apple ID with and without an account. If you are ready to buy applications and pay for various services built into the system, then you should provide your payment information (credit card). If you are ready to make do with free programs and services, you should skip this step when activating the device, and try to download a free application from the AppStore after activation (if you do this, the “Missing” item will appear in the menu for attaching payment information, which is what you need , who do not want to assign their credit card to their Apple ID).
Optimizing battery life
One of the features of all modern smartphones is working with GPS. This function allows you to determine the location of the device, which helps you navigate the area, calculate the route to work, or find devices in case of loss.
The disadvantage is a significant reduction in the operating time of the gadget on a single charge. Therefore, although the geolocation function is necessary for the iPhone 5s, settings to optimize its operation are still worth making. First of all, go to “Settings>Privacy>Geolocation Services”, here you can disable all unnecessary programs that require access to GPS, as well as system services, such as compass calibration, collection of diagnostic data and frequently visited places.
Another way to reduce power consumption is to disable background updates; to do this, go to “Settings>General>Content Update” and disable unnecessary programs (those that, in your opinion, can do without constantly running in the background). These two simple procedures for optimizing the operation of the iPhone 5s, setting up the geolocation and disabling background services, will significantly extend the life of your smartphone.

Reset and recovery
In this part of the article we will talk about how to reset the settings on an iPhone 5s. Despite stability and reliability, any technological product has imperfections, and the smartphone from Cupertino was not without them.
With prolonged use, installing updates and downloading a large number of programs from the AppStore, problems often arise related to the gadget’s performance, autonomy, or the operation of some system functions. To fix them, you can contact service support or try to clean the system manually, but the best method would be a global cleanup and return to the original settings. Before restoring your iPhone 5s to factory settings, you should make a copy of all important data and also disable the Find My iPhone feature. Next, go to “Settings>General>Reset”. Select the desired item and enter the password. After a few minutes, all settings will be returned to those that were on the phone by default (when purchased), the setup will have to be done again (in this case, all basic data will be saved in the cloud or in your copy on iTunes, after which you can restore everything).
Bottom line
As you can see, setting up an iPhone 5s from scratch does not take much time and does not involve any difficulties. Moreover, this is the only more or less complicated procedure that the owner of this gadget will encounter. That's all you need to know about how to set up an iPhone 5s.
When purchasing in a store, sellers offer to turn on and run iPhone 5 for free. But for some reason I didn’t want this service.
The fact is that when other people do similar work for you, the question of how to set up iPhone 5 remains a mystery to you. Until, say, you buy a new gadget. But when else will this happen?!
You can turn on and set up iPhone 5 for the first time in three ways:
- Recover from iCloud copy
- Recover from iTunes copy
- Set up like a new iPhone
But this is in theory, and in my version, when you purchase a device for the first time, and there is no data saved anywhere from previous similar gadgets, there is only the third option from among the above to set up iPhone 5, as they say, from scratch.
True, after such an initial launch, I then had to manually copy all the contacts from the address book of the old Nokia into the new iPhone. But that’s a completely different story, that was later.
1 We decisively turn on the new iPhone 5
Let's return to the initial launch of the iPhone 5. First, connect the charger to it and make sure that the device's battery is not completely discharged. Otherwise, you need to charge it first, preferably up to 100%. When you connect the iPhone to the charger, an image of the battery appears on the screen, and the numbers show the charge level - an intuitive picture that does not require much explanation.
And now, turn on the power, press the power button on the iPhone. The initial “Hello” prompt appears (Fig. 1).
Note. This is not the greeting that the baby elephant lost and did not convey to the monkey in the famous cartoon “Hello to the Monkey”:
- “When I say hi, I’m sending you a good mood,” the boa explained.
- And now Monkey has a “hello” and a good mood.
- Oh, if only two more “hellos”…”
The iPhone has a completely normal hello, which means that the device is starting to prepare for the initial setup.

Rice. 1. The initial greeting is not in Russian after turning on the iPhone for the first time
The greeting “Hello” now appears again, but in understandable Russian (Fig. 2).

Rice. 2. The initial greeting is in Russian after turning on the iPhone for the first time
Again, tap on the intuitive “Configure” inscription at the bottom of the screen (Fig. 2).
A warning appears that we do not have a SIM card in our iPhone (Fig. 3). Here we answer “OK”, and we don’t have any options for choosing an answer - this is the only possible option: tap on “OK” (Fig. 3).

Rice. 3. Warning about the need to insert a SIM card into the iPhone to connect to a cellular operator
The SIM card, which the iPhone initial setup program warns us about, is needed so that the iPhone can be immediately connected to the cellular operator’s network.
To be honest, I didn’t want to do this right away without understanding the initial settings of the device. Because you can rashly, without understanding it, inadvertently download something from the Internet during the settings, and then receive and pay a decent bill from the mobile operator. Why do this if, which can distribute, say, a laptop, and which in turn is connected to unlimited wired Internet - download as much as you want without restrictions!
2 Understanding languages and countries
After refusing to connect the iPhone to the cellular operator’s network, we select the language for communicating with our device. I suggest doing this in Russian, unless, of course, you want to learn another language, for example, Chinese, at the same time as working on the iPhone! Tap on the inscription “Russian” (Fig. 4)

Rice. 4. Selecting the language for communicating with iPhone
Next, in the device settings, we are asked to select the country and region where we are located. It would seem why, since we have already indicated the language in which we will work with the iPhone. But not everything is so simple and obvious. After all, you can, for example, be abroad of the Russian Federation, but at the same time consider Russian the preferred language for communicating with the iPhone. Therefore, selecting a language and selecting a country and region are separate device setup operations (Fig. 5).

Rice. 5. Selecting the country and region where we are located
In Fig. 5 it is clear that Russia is not in the selection menu. Of course not, because Russia is spelled with the letter “R”, and we see in Fig. 5 only countries starting with the first letter of the Russian alphabet, the letter “A”. Therefore, we swipe up the country and region selection menu until we reach countries starting with the letter “P”. There we will see Russia, and tap on the name of our Motherland.

Rice. 6. Selecting Russia as the country and region for initial iPhone setup
By the way, I wonder how the choice of country is made if you select Chinese as the language of communication with the iPhone. After all, this language does not have an alphabet, so it is unclear how the countries are located there, in what order?
As far as I know, the organizers of the 2008 Summer Olympics, which took place in China, faced the same problem. After all, on the opening day of the Olympics, countries must pass one after another in the strict sequence of the alphabet of the language of the country where the Olympic Games are taking place. But this is also a completely different story. We are returning to the initial settings of the iPhone 5.
And now a warning about the absence of a SIM card appears on the screen again (Fig. 7). And there is no Wi-Fi, that is, the device is not connected to the Internet, and therefore cannot be configured further. As they say, we have arrived...

Rice. 7. Repeated warning about the absence of a SIM card because there is no connection to Wi-Fi
3 Connecting iPhone to the Internet via Wi-Fi
We put the iPhone aside for a while without turning it off. And we start working on the Wi-Fi network - we try to start Wi-Fi distribution using a laptop. But here an unexpected problem arises. My laptop's Internet access point has a very complex and long password. This was done by the laptop manufacturer to protect the access point from unauthorized connection. And I did not change this password.
But entering this password manually is simply impossible. No one has ever been able to do this without making mistakes. The password can only be copied and transferred, say, inside a file, to a mobile gadget. But transferring any data to our brand new iPhone is not yet possible, because it has not yet been launched.
What to do? The idea of creating an access point using another gadget, using a smartphone, comes to the rescue. Fortunately, a smartphone can become an Internet access point for other devices. And here we can easily, let’s say for a while, make the password for accessing the Internet network simple and easy to enter using the iPhone’s virtual keyboard.
Of course, now we have to agree that we will use up the mobile traffic of a smartphone connected to a cellular operator. You could immediately insert a SIM card into your iPhone. But we will be consoled by the fact that we will still try to operate the device from the Wi-Fi network, and not directly from the SIM card of the cellular operator. Let's practice, if I may say so.
After a few minutes of waiting, the iPhone screen comes to life. And the first proposal to launch geolocation services appears (Fig. 11).

Rice. 11. We refuse the offer to launch a geolocation service
There is no need to start these services during the initial setup; it is never too late to do this later, when the iPhone is configured and starts working. Therefore, we will refuse to launch this service, for which we will tap on the inscription “disable geolocation services” at the very bottom of the screen (Fig. 11).
5 Create an iPhone password
The next step in the initial setup of the device is to create and enter a password to access the iPhone. From the moment this password is created, the device cannot be “reached” without this password. Therefore, you need to be responsible when creating a password. On the password entry screen you will be prompted to enter this password for the first time using a telephone keypad with numbers and Latin letters below them (Fig. 12).

Rice. 12. Entering the iPhone password
It is better to make the password only from numbers alone, since using letters will complicate the entry. If someone is confident in using a telephone keypad, they can also include Latin letters in their password. I repeat, I created a password of only 6 digits. And that’s a lot, it was possible to make a shorter password, for example, from 4 digits like a PIN code.
The password is then required to be re-entered to ensure that the password is entered correctly (Figure 13).

Rice. 13. Re-enter your iPhone password
The entered password now needs to be remembered or even written down! Remember forever, for the entire time you use your iPhone.
6 Setting up programs and data on the new iPhone
Now it is finally time to customize the software and data of our iPhone. You will be asked to configure them in several ways (Fig. 14).

Rice. 14. Selecting options for setting up iPhone programs and data
We choose the “Set up as a new iPhone” option, as we decided, since this is our first device and we don’t have any old copies in either iCloud or iTunes. And there is no need to transfer them from Android, which regularly distributes Wi-Fi to us, since neither programs nor contacts are needed from it, since this is not my personal device.
So, select the “Set up as a new iPhone” option, tap on this inscription and wait until all the necessary settings are completed. But this is not the end of our “torment.” We will continue to configure the iPhone and prepare it for work.
7 Opting out of setting up an account to access Apple services
What a strange thing! For some reason, developers consider their users to be very advanced. Once upon a time, at the dawn of personal computers, when setting up Windows, quite meaningful questions were asked, understandable to a Russian person, and at the very end of the setup a question suddenly arose about a certain page 866. Where does it come from, what is it? There are no explanations, but for the life of me, out of the blue, I need to configure it. And no reasonable explanations.
Then it becomes clear, after some time, that we are just talking about consent to the use of the Russian alphabet when working with Windows. Well, then why not just ask, do you want Russian letters on your computer, or do you not need them? It is absolutely clear that we must answer this question, of course, “Yes, yes, yes, and yes again!”
So for some reason, the developers of Apple devices are sure that everyone in the world knows what an account for accessing Apple services, or “Apple ID,” is. And in the next step of the initial setup of our gadget, they offer to set up this account (Fig. 15).

Rice. 15. Proposal to set up an account for access to Apple services, Apple services
The most remarkable thing is that all these settings can be done quite easily later, when our iPhone is working. When setting up the gadget, you don’t need to enter accounts or anything like that.
We need to start the device, and not try to configure a lot of things on it instead. Therefore, let’s refuse this “attractive” offer and tap on the inscription “Configure later in Settings” (Fig. 15 - here they even explain to us where we can make the missed settings)
Despite the possibility of refusing the Apple ID settings, our gadget will be “surprised” at this reckless decision of ours, in the opinion of the iPhone. And we will be asked again about refusing to use this option (Fig. 16).

Rice. 16. Repeated offer to set up an account to access Apple services
And here we firmly answer “no!”, for which we tap on the inscription “Do not use” (Fig. 16).
8 Acceptance of terms and conditions
Abroad, in countries of developed capitalism, actions related to legal rules and restrictions are very developed. Citizens of these countries are almost never too lazy to read a dozen pages of small, close, tooth-breaking text about what can and cannot be done with anything:
- with a microwave: is it possible to dry a cat in it?
- with a washing machine: can you wash dogs in it?
- etc.
I agree that it is important to know this, to know exactly what is possible and what is not. Know what the manufacturer guarantees and what it doesn’t. But for some reason not yet in our country. Well, we don’t read these agreements! Perhaps someone is reading, I won’t talk about everyone. But the majority of our citizens are still not interested in legal subtleties.
I will not comment on this or define it. That's it, that's all. But our iPhone is clearly not Russian. Therefore, before starting to work with it, we are asked to read the terms and conditions, and. If you do not agree with these provisions, the device will not operate. Therefore, we have no choice as such. Regardless of whether you have read or not read the terms and conditions.

Rice. 17. Acceptance of terms and conditions
9 Refusal from Siri
It would seem that this is happiness, we have accepted the terms and conditions - we can begin work. But it was not there. We will now be asked to enable Siri.
Siri is an interactive system that allows you to control your phone using your voice, first introduced in the iPhone 4S. This means that it is also on our fifth model. But, again, Siri can easily be turned on later, once our iPhone is working. Therefore, let us also refuse this invitation by tapping on the inscription “Turn on Siri later (Fig. 18).

Rice. 18. Refusal to turn on Siri
A reasonable question arises: why are we offered all this during the initial setup of our gadget, if all these settings can be done later. The answer looks quite simple - these are just marketing moves by the iPhone manufacturer or its partners developing software for its operation. No more.
The manufacturer believes that we are poorly informed about the capabilities of the device, and perhaps the manufacturer is right in this. But the manufacturer does not understand or does not want to understand that it is not so easy for us to master everything right away. Everything needs to be done in order. First set up iPhone 5, and only then explore all its limitless possibilities.
However, the manufacturer thinks differently, and thus we have to refuse various options again and again, leaving their launch and study for later.
10 Sending diagnostics
The hardware and software of mobile gadgets is constantly being improved. Manufacturers sometimes install new elements and new programs into these devices at their own peril and risk. And they do not always have time to test all this in the quiet conditions of their research laboratories.
This is due to competition. If you test for a long time and do not bring the product to the market, you may be late, and the market will be occupied by “foreign” products. So you have to take risks.
And since there is a risk, it means that there may be malfunctions in the operation of the device. To fix these failures, iPhone developers also “fix” special programs. These programs “catch failures”, somehow systematize them a little, and can send information about them to the manufacturer.
Modern manufacturers are very fond of the information they receive about all the failures that occur, as this allows them to constantly improve their hardware and software. Therefore, we are offered to set up either automatic sending of information about any failures in the iPhone to the manufacturer, or refuse this option.
Here you can advise both sending information and not sending it. It is better not to send to those who will use the iPhone on mobile networks and spend limited and rather expensive Internet traffic. You can send to those who will use the gadget more often, working via Wi-Fi and unlimited traffic.
Skeptics may argue that sending diagnostic messages over mobile networks does not consume significant amounts of money. Yes, of course it is. Until one day you receive an invoice from a mobile operator and see very unusual figures, say, the cost of the Internet when roaming abroad. After this, most often there is no desire to AUTOMATICALLY send or receive any unnecessary messages via the mobile Internet.
Therefore, in this case, we will refuse (just in case) from automatically sending diagnostic messages to Apple. To do this, tap on the “Do not send” inscription at the very bottom of the screen (Fig. 19).

Rice. 19. Opting out of automatic sending of diagnostic messages
11 The long-awaited start to work on iPhone 5
And now, after all our numerous consents and refusals to enable/disable certain options of the new iPhone, we get the opportunity to start working on it. The message “Welcome!” appears on the screen. and the “Get Started” invitation.
We tap on this “Get Started” inscription (Fig. 20)

Rice. 20. Initial settings are completed, we are asked to start working on the iPhone
That's what we've been waiting for! Patience and a little effort. We can start working on the iPhone, install a SIM card in it, enter data into the address book, make calls, send SMS, etc. The question “how to set up iPhone 5” was successfully resolved, hurray!
You'll see icons on the screen that let you do a lot of things on your iPhone. But that's a completely different story...
How to activate iPhone via iTunes
For those who are ready to activate their new iPhone through iTunes, we can advise you to do the following.
First, you need to download iTunes software (the latest version) from the official developer website. Download the application according to the installed software on your computer.
Install the application, connect the iPhone to your computer (a cable for this is included with the phone).
The phone must be fully charged, and the SIM card must be in its place (in the appropriate compartment).
Connect the Internet on your computer.
Accept the terms of the license agreement, then continue the device activation process. Now proceed to filling out the required data. Double check them and click on “Submit”. The program will then automatically send the entered information to Apple. This activates both the warranty and the phone.
It is better to buy iPhone mobile phones in Apple stores or in special electronics stores to avoid problems with further activation of the device. Avoid dubious retail outlets, do not buy a phone second-hand or over the Internet from little-known sites.
A modern smartphone differs from the first mobile phone like a machine gun from a slingshot. Apple products are considered one of the best in terms of the use of advanced technological solutions. For this reason, every owner should know how to set up an iPhone if he does not intend to use it as a regular “dialer” at the Nokia 3310 level.
The basis of the entire Apple ecosystem is the unique Apple ID. The user creates it the first time he turns it on, when he sets up a new iPhone from scratch. This requires a valid email account. By setting up security questions and indicating your date of birth, you receive an Apple ID, which is used in the future to access all Apple services that require authorization.
In the future, this data can be used to restore the smartphone after resetting the settings or to activate a new iPhone with data transfer. If in iOS 10 and earlier all this had to be done manually, then in version 11 of the operating system Apple introduced a quick start function.
Data transfer from your old device is performed automatically after you enter your account password. All actions are performed in Russian, which is selected at the initial stage when you indicate the country of your current residence.
iCloud, App Store and iTunes Store
Once an Apple ID has been set up, each user receives 5 GB of iCloud cloud storage on a permanent basis and the ability to make purchases or download free applications from the App Store. On older models, which include iPhone 4 and 5, each such action will require entering a password.
Since 5S, the user can confirm his decision using a fingerprint. The scanner is built directly into the Home button and is installed on all iPhones 6, 7 and 8. In the iPhone X, the fingerprint sensor replaced the front sensor, which performs a 3D scan of the user’s face.
In addition to the application store, Apple ID gives the user access to the iTunes Store, which contains a rich collection of music and films.
Purchased content is automatically synced between all devices using the same account.
Account Setup
If for some reason the iPhone was not activated correctly at startup, this misunderstanding can be corrected on an already working device. For example, a person may not have an email address, therefore, it will not be possible to create an account right away. The steps below will help you add it to your iPhone at any time.
- Open settings and scroll down to find the marked item.
- Go to the section for adding new accounts.
- We need the top line with the inscription ICloud, surrounded by a frame. The rest of the list is for setting up email.
- There are several options available to us here. You can enter existing account data in the fields marked “1”. The item marked with a two is intended to create a new Apple ID. The arrow from the number “3” points to the section that allows you to restore a previously created account if you have forgotten your password.
Thus, using the appropriate item for the situation, we get access to the App Store and other cloud services.
Phone menu
Of course, no matter how technologically advanced a smartphone is, its main function has not yet been canceled. Below the considered item there is a whole block that allows you to configure the behavior of the iPhone during voice calls, activate video calling and the messenger built into iOS.
Let's take a step-by-step look at all three parameters marked with a frame.
Telephone
Voice call management is collected in one place. Below those visible in the screenshot are the menu items built into the SIM card. The services of each mobile operator are different and few people use them. If you ever need them, you'll know where to find them.
- On the main tab at the top the subscriber number is indicated. The arrow below marks a switch that allows you to automatically insert prefixes when dialing a number. For Russia, this will accordingly be +7. Let's look at the top three Calls menu items that can be considered useful.
- Here we can specify in which cases an incoming voice call will be identified by voice. For example, if you select “Headphones,” then when a call comes in, the music will pause and the iPhone will read who is calling by selecting their phone book information.
- Some programs, in this case the 2GIS mapping service, can access incoming calls to identify them. If you turn on the slider indicated by the arrow, a call from a company or store whose data is in the application database will be identified. The program logo and identification information will appear on the smartphone screen along with the phone number. The framed menu makes it possible to add any annoying contact to the “black list”. In this case, the caller will constantly receive a busy signal and even an automatic dialer will not help him get through the blocking.
- This item will be useful for those who have several Apple products. By turning on the switch taken in the frame, we activate the “Continuity” function. When an incoming call is received, the call will be forwarded to the devices selected from the list below. In this case, you can answer from your iPad or Mac without picking up your phone. Of course, all devices must work with the same account and be on the same Wi-Fi network.
Messages
Apple's mobile operating system has a built-in messenger called iMessage. For its operation, just like other similar programs, you need to be connected to a wireless or cellular data network.
- The main window with settings first of all offers to activate IMessage. By default, this feature is always disabled. The required switch is shown in the screenshot with an arrow. Upon activation, a paid SMS is sent to Apple servers, after which the fee will no longer be charged. Messages are transmitted only between two iPhones. It is not possible to send iMessage on Android. The parameter marked “1” allows the owner of an Apple smartphone to stay in touch even without the Internet, sending regular text messages. An item marked with a two opens another Continuity option.
- Here, by moving the sliders, you can choose which devices will receive SMS messages other than the iPhone. To do this, you again need to be connected to the same Wi-Fi network.
- There are quite a lot of settings for messages, so let’s go even lower on the main screen. The number “1” hides the settings for iMessage addresses. The two indicates an option that regulates the storage period of text data.
- Since iMessage works not only by number, but also by Apple ID, the user can determine which address notifications should be sent to. In the first paragraph, both options are selected, and in the second it is noted that the priority for subscriber identification will be the use of a telephone number.
- The storage option allows you to delete old SMS after a month, a year, or store it in the smartphone’s memory indefinitely. You need to be careful with this setting if you don’t want to delete something important.
Even lower on the main window, a similar option is available for voice messages. The minimum period for them is limited to 2 minutes, and the maximum is one year.
For its users, Apple has implemented the ability to communicate via video using the Internet. The settings here are almost identical to those discussed for iMessage. At the top of the window we see a slider that activates the service.
The call can be made either with or without the camera. In the second case, only voice communication is implemented without the participation of a cellular operator. At the bottom of the window, an arrow indicates another switch. On the latest iPhone models, it allows you to take a photo of the subscriber during a video conversation.
In terms of communication quality, FaceTime easily outperforms Skype, but this communication option will only work between Apple devices.
Keyboard
The development of the Internet and instant messengers has led to the fact that people write much more than communicate by voice. Therefore, it is impossible to ignore the keyboard settings.
- Let's open a blank iMessage. A similar setting can be made in any other messenger, but they are not installed by default in the new iPhone. In the screenshot, the mode switching areas are framed. There is a camera logo at the top. By clicking on it, you can send a selfie to your interlocutor. Nearby is the AppStore icon for messages. In the lower frame, pressing “123” switches the keyboard to display numbers and symbols, and pressing “globe” allows you to switch layouts and use emoji.
- In the application store, you can install animated emoticons or connect integration with applications installed on your smartphone.
- By clicking on the globe, we open the menu for selecting keyboards and their settings. To do this, click on the item indicated by the frame. The arrow indicates display modes. Currently, the keyboard is deployed to the entire bottom of the screen, but can be shifted to its right or left edge for ease of typing with one hand.
- The settings menu contains a variety of options that make it easier to enter symbols and punctuation marks. By default, only Russian language is installed in accordance with the region of residence specified at the initial stage.
- Using the marked item, we correct the situation. You need to add at least the English layout and a set of emojis included in the operating system.
basic settings
Most of the options aimed at fine-tuning the iPhone are concentrated in the group below the “Basic” item. Let's go through this block from top to bottom to look at the main parameters.
Screen
The switch indicated by the arrow activates the adaptive display backlight function in accordance with external lighting. Above it is a slider for manually changing the brightness. With True Tone enabled, auto-brightness is launched, which previously had a separate control unit. The night mode is framed. In it, the tonality of the display changes from cold to warm shades. The switching time is determined by the system based on the user's geolocation data.
Wallpaper on iPhone can be set separately on the desktop and lock screen. The operating system already has preinstalled ones, but if desired, the user can install his own pre-saved image.
- From the main settings window, open the item marked with a frame. He's the only one here, so it's impossible to get confused.
- The selection is available in three preset categories. Below are folders with photos located on the smartphone itself, a photo stream or an iCloud media library.
- Having completed the selection, we get the following final menu. The numbers indicate installation options.
An important element of personalization is the choice of sound scheme. You can meet people who have a default ringtone set at every turn, and at times it’s annoying. At the top of the screen, the items responsible for vibration are marked with a frame. The optimal scheme is selected by switching the sliders.
The arrow indicates the volume control for calls and system alerts. Below it are the parameters of the sound scheme preinstalled in the operating system. A separate selection menu opens for each item. The sound of event reminders can be selected only from the preset ones, and the ringtone can be added independently.
This item contains settings related to personalization. Radio broadcasting can be turned on in the Music application, and song playback is adjusted to user preferences using standard equalizer schemes. The alarm clock melodies to which you will wake up in the morning are also configured separately.
Touch ID or fingerprint sensor is activated after entering the iPhone security code specified by the user. The settings block indicated by one activates functions in which Touch ID will take part. In most cases, unlock and contactless payment systems are chosen.
The remaining points during the initial setup are not so important. By looking at the “Battery” section, you can enable the display of percentages next to the charge indicator. “Siri and Search” controls the settings of the voice assistant and its integration with search. Communication with Siri in English is more productive than in Russian, so in our region it remains an interesting toy, and not a real assistant, as in America.
When purchasing in a store, sellers offer to turn on and run iPhone 5 for free. But for some reason I didn’t want this service.
The fact is that when other people do similar work for you, the question of how to set up iPhone 5 remains a mystery to you. Until, say, you buy a new gadget. But when else will this happen?!
You can turn on and set up iPhone 5 for the first time in three ways:
- Recover from iCloud copy
- Recover from iTunes copy
- Set up like a new iPhone
But this is in theory, and in my version, when you purchase a device for the first time, and there is no data saved anywhere from previous similar gadgets, there is only the third option from among the above to set up iPhone 5, as they say, from scratch.
True, after such an initial launch, I then had to manually copy all the contacts from the address book of the old Nokia into the new iPhone. But that’s a completely different story, that was later.
1 We decisively turn on the new iPhone 5
Let's return to the initial launch of the iPhone 5. First, connect the charger to it and make sure that the device's battery is not completely discharged. Otherwise, you need to charge it first, preferably up to 100%. When you connect the iPhone to the charger, an image of the battery appears on the screen, and the numbers show the charge level - an intuitive picture that does not require much explanation.
And now, turn on the power, press the power button on the iPhone. The initial “Hello” prompt appears (Fig. 1).
Note. This is not the greeting that the baby elephant lost and did not convey to the monkey in the famous cartoon “Hello to the Monkey”:
- “When I say hi, I’m sending you a good mood,” the boa explained.
- And now Monkey has a “hello” and a good mood.
- Oh, if only two more “hellos”…”
The iPhone has a completely normal hello, which means that the device is starting to prepare for the initial setup.
Rice. 1. The initial greeting is not in Russian after turning on the iPhone for the first time
The greeting “Hello” now appears again, but in understandable Russian (Fig. 2).
Rice. 2. The initial greeting is in Russian after turning on the iPhone for the first time
Again, tap on the intuitive “Configure” inscription at the bottom of the screen (Fig. 2).
A warning appears that we do not have a SIM card in our iPhone (Fig. 3). Here we answer “OK”, and we don’t have any options for choosing an answer - this is the only possible option: tap on “OK” (Fig. 3).
Rice. 3. Warning about the need to insert a SIM card into the iPhone to connect to a cellular operator
The SIM card, which the iPhone initial setup program warns us about, is needed so that the iPhone can be immediately connected to the cellular operator’s network.
To be honest, I didn’t want to do this right away without understanding the initial settings of the device. Because you can rashly, without understanding it, inadvertently download something from the Internet during the settings, and then receive and pay a decent bill from the mobile operator. Why do this if, which can distribute, say, a laptop, and which in turn is connected to unlimited wired Internet - download as much as you want without restrictions!
2 Understanding languages and countries
After refusing to connect the iPhone to the cellular operator’s network, we select the language for communicating with our device. I suggest doing this in Russian, unless, of course, you want to learn another language, for example, Chinese, at the same time as working on the iPhone! Tap on the inscription “Russian” (Fig. 4)
Rice. 4. Selecting the language for communicating with iPhone
Next, in the device settings, we are asked to select the country and region where we are located. It would seem why, since we have already indicated the language in which we will work with the iPhone. But not everything is so simple and obvious. After all, you can, for example, be abroad of the Russian Federation, but at the same time consider Russian the preferred language for communicating with the iPhone. Therefore, selecting a language and selecting a country and region are separate device setup operations (Fig. 5).
Rice. 5. Selecting the country and region where we are located
In Fig. 5 it is clear that Russia is not in the selection menu. Of course not, because Russia is spelled with the letter “R”, and we see in Fig. 5 only countries starting with the first letter of the Russian alphabet, the letter “A”. Therefore, we swipe up the country and region selection menu until we reach countries starting with the letter “P”. There we will see Russia, and tap on the name of our Motherland.
Rice. 6. Selecting Russia as the country and region for initial iPhone setup
By the way, I wonder how the choice of country is made if you select Chinese as the language of communication with the iPhone. After all, this language does not have an alphabet, so it is unclear how the countries are located there, in what order?
As far as I know, the organizers of the 2008 Summer Olympics, which took place in China, faced the same problem. After all, on the opening day of the Olympics, countries must pass one after another in the strict sequence of the alphabet of the language of the country where the Olympic Games are taking place. But this is also a completely different story. We are returning to the initial settings of the iPhone 5.
And now a warning about the absence of a SIM card appears on the screen again (Fig. 7). And there is no Wi-Fi, that is, the device is not connected to the Internet, and therefore cannot be configured further. As they say, we have arrived...
Rice. 7. Repeated warning about the absence of a SIM card because there is no connection to Wi-Fi
3 Connecting iPhone to the Internet via Wi-Fi
We put the iPhone aside for a while without turning it off. And we start working on the Wi-Fi network - we try to start Wi-Fi distribution using a laptop. But here an unexpected problem arises. My laptop's Internet access point has a very complex and long password. This was done by the laptop manufacturer to protect the access point from unauthorized connection. And I did not change this password.
But entering this password manually is simply impossible. No one has ever been able to do this without making mistakes. The password can only be copied and transferred, say, inside a file, to a mobile gadget. But transferring any data to our brand new iPhone is not yet possible, because it has not yet been launched.
What to do? The idea of creating an access point using another gadget, using a smartphone, comes to the rescue. Fortunately, a smartphone can become an Internet access point for other devices. And here we can easily, let’s say for a while, make the password for accessing the Internet network simple and easy to enter using the iPhone’s virtual keyboard.
Of course, now we have to agree that we will use up the mobile traffic of a smartphone connected to a cellular operator. You could immediately insert a SIM card into your iPhone. But we will be consoled by the fact that we will still try to operate the device from the Wi-Fi network, and not directly from the SIM card of the cellular operator. Let's practice, if I may say so.
After a few minutes of waiting, the iPhone screen comes to life. And the first proposal to launch geolocation services appears (Fig. 11).
Rice. 11. We refuse the offer to launch a geolocation service
There is no need to start these services during the initial setup; it is never too late to do this later, when the iPhone is configured and starts working. Therefore, we will refuse to launch this service, for which we will tap on the inscription “disable geolocation services” at the very bottom of the screen (Fig. 11).
5 Create an iPhone password
The next step in the initial setup of the device is to create and enter a password to access the iPhone. From the moment this password is created, the device cannot be “reached” without this password. Therefore, you need to be responsible when creating a password. On the password entry screen you will be prompted to enter this password for the first time using a telephone keypad with numbers and Latin letters below them (Fig. 12).
Rice. 12. Entering the iPhone password
It is better to make the password only from numbers alone, since using letters will complicate the entry. If someone is confident in using a telephone keypad, they can also include Latin letters in their password. I repeat, I created a password of only 6 digits. And that’s a lot, it was possible to make a shorter password, for example, from 4 digits like a PIN code.
The password is then required to be re-entered to ensure that the password is entered correctly (Figure 13).
Rice. 13. Re-enter your iPhone password
The entered password now needs to be remembered or even written down! Remember forever, for the entire time you use your iPhone.
6 Setting up programs and data on the new iPhone
Now it is finally time to customize the software and data of our iPhone. You will be asked to configure them in several ways (Fig. 14).
Rice. 14. Selecting options for setting up iPhone programs and data
We choose the “Set up as a new iPhone” option, as we decided, since this is our first device and we don’t have any old copies in either iCloud or iTunes. And there is no need to transfer them from Android, which regularly distributes Wi-Fi to us, since neither programs nor contacts are needed from it, since this is not my personal device.
So, select the “Set up as a new iPhone” option, tap on this inscription and wait until all the necessary settings are completed. But this is not the end of our “torment.” We will continue to configure the iPhone and prepare it for work.
7 Opting out of setting up an account to access Apple services
What a strange thing! For some reason, developers consider their users to be very advanced. Once upon a time, at the dawn of personal computers, when setting up Windows, quite meaningful questions were asked, understandable to a Russian person, and at the very end of the setup a question suddenly arose about a certain page 866. Where does it come from, what is it? There are no explanations, but for the life of me, out of the blue, I need to configure it. And no reasonable explanations.
Then it becomes clear, after some time, that we are just talking about consent to the use of the Russian alphabet when working with Windows. Well, then why not just ask, do you want Russian letters on your computer, or do you not need them? It is absolutely clear that we must answer this question, of course, “Yes, yes, yes, and yes again!”
So for some reason, the developers of Apple devices are sure that everyone in the world knows what an account for accessing Apple services, or “Apple ID,” is. And in the next step of the initial setup of our gadget, they offer to set up this account (Fig. 15).
Rice. 15. Proposal to set up an account for access to Apple services, Apple services
The most remarkable thing is that all these settings can be done quite easily later, when our iPhone is working. When setting up the gadget, you don’t need to enter accounts or anything like that.
We need to start the device, and not try to configure a lot of things on it instead. Therefore, let’s refuse this “attractive” offer and tap on the inscription “Configure later in Settings” (Fig. 15 - here they even explain to us where we can make the missed settings)
Despite the possibility of refusing the Apple ID settings, our gadget will be “surprised” at this reckless decision of ours, in the opinion of the iPhone. And we will be asked again about refusing to use this option (Fig. 16).
Rice. 16. Repeated offer to set up an account to access Apple services
And here we firmly answer “no!”, for which we tap on the inscription “Do not use” (Fig. 16).
8 Acceptance of terms and conditions
Abroad, in countries of developed capitalism, actions related to legal rules and restrictions are very developed. Citizens of these countries are almost never too lazy to read a dozen pages of small, close, tooth-breaking text about what can and cannot be done with anything:
- with a microwave: is it possible to dry a cat in it?
- with a washing machine: can you wash dogs in it?
- etc.
I agree that it is important to know this, to know exactly what is possible and what is not. Know what the manufacturer guarantees and what it doesn’t. But for some reason not yet in our country. Well, we don’t read these agreements! Perhaps someone is reading, I won’t talk about everyone. But the majority of our citizens are still not interested in legal subtleties.
I will not comment on this or define it. That's it, that's all. But our iPhone is clearly not Russian. Therefore, before starting to work with it, we are asked to read the terms and conditions, and. If you do not agree with these provisions, the device will not operate. Therefore, we have no choice as such. Regardless of whether you have read or not read the terms and conditions.
Rice. 17. Acceptance of terms and conditions
9 Refusal from Siri
It would seem that this is happiness, we have accepted the terms and conditions - we can begin work. But it was not there. We will now be asked to enable Siri.
Siri is an interactive system that allows you to control your phone using your voice, first introduced in the iPhone 4S. This means that it is also on our fifth model. But, again, Siri can easily be turned on later, once our iPhone is working. Therefore, let us also refuse this invitation by tapping on the inscription “Turn on Siri later (Fig. 18).
Rice. 18. Refusal to turn on Siri
A reasonable question arises: why are we offered all this during the initial setup of our gadget, if all these settings can be done later. The answer looks quite simple - these are just marketing moves by the iPhone manufacturer or its partners developing software for its operation. No more.
The manufacturer believes that we are poorly informed about the capabilities of the device, and perhaps the manufacturer is right in this. But the manufacturer does not understand or does not want to understand that it is not so easy for us to master everything right away. Everything needs to be done in order. First set up iPhone 5, and only then explore all its limitless possibilities.
However, the manufacturer thinks differently, and thus we have to refuse various options again and again, leaving their launch and study for later.
10 Sending diagnostics
The hardware and software of mobile gadgets is constantly being improved. Manufacturers sometimes install new elements and new programs into these devices at their own peril and risk. And they do not always have time to test all this in the quiet conditions of their research laboratories.
This is due to competition. If you test for a long time and do not bring the product to the market, you may be late, and the market will be occupied by “foreign” products. So you have to take risks.
And since there is a risk, it means that there may be malfunctions in the operation of the device. To fix these failures, iPhone developers also “fix” special programs. These programs “catch failures”, somehow systematize them a little, and can send information about them to the manufacturer.
Modern manufacturers are very fond of the information they receive about all the failures that occur, as this allows them to constantly improve their hardware and software. Therefore, we are offered to set up either automatic sending of information about any failures in the iPhone to the manufacturer, or refuse this option.
Here you can advise both sending information and not sending it. It is better not to send to those who will use the iPhone on mobile networks and spend limited and rather expensive Internet traffic. You can send to those who will use the gadget more often, working via Wi-Fi and unlimited traffic.
Skeptics may argue that sending diagnostic messages over mobile networks does not consume significant amounts of money. Yes, of course it is. Until one day you receive an invoice from a mobile operator and see very unusual figures, say, the cost of the Internet when roaming abroad. After this, most often there is no desire to AUTOMATICALLY send or receive any unnecessary messages via the mobile Internet.
Therefore, in this case, we will refuse (just in case) from automatically sending diagnostic messages to Apple. To do this, tap on the “Do not send” inscription at the very bottom of the screen (Fig. 19).
Rice. 19. Opting out of automatic sending of diagnostic messages
11 The long-awaited start to work on iPhone 5
And now, after all our numerous consents and refusals to enable/disable certain options of the new iPhone, we get the opportunity to start working on it. The message “Welcome!” appears on the screen. and the “Get Started” invitation.
We tap on this “Get Started” inscription (Fig. 20)
Rice. 20. Initial settings are completed, we are asked to start working on the iPhone
That's what we've been waiting for! Patience and a little effort. We can start working on the iPhone, install a SIM card in it, enter data into the address book, make calls, send SMS, etc. The question “how to set up iPhone 5” was successfully resolved, hurray!
You'll see icons on the screen that let you do a lot of things on your iPhone. But that's a completely different story...
How to activate iPhone via iTunes
For those who are ready to activate their new iPhone through iTunes, we can advise you to do the following.
First, you need to download iTunes software (the latest version) from the official developer website. Download the application according to the installed software on your computer.
Install the application, connect the iPhone to your computer (a cable for this is included with the phone).
The phone must be fully charged, and the SIM card must be in its place (in the appropriate compartment).
Connect the Internet on your computer.
Accept the terms of the license agreement, then continue the device activation process. Now proceed to filling out the required data. Double check them and click on “Submit”. The program will then automatically send the entered information to Apple. This activates both the warranty and the phone.
It is better to buy iPhone mobile phones in Apple stores or in special electronics stores to avoid problems with further activation of the device. Avoid dubious retail outlets, do not buy a phone second-hand or over the Internet from little-known sites.
When I was about to buy my first a couple of years ago iPhone 4s, then of course I was interested in everything related to this device. And before purchasing it, I asked many questions to Yandex, Google and my friends who already had it. I even wrote something down at that time.
And recently, while flipping through my notebook, I came across these entries and decided to save them on the blog.
Today’s article can hardly be called relevant: anyone who has an iPhone most likely already knows all this. However, let my “ unofficial iPhone user guide” will remain here.
If you need it then official iPhone user guide you can view on your iPhone via browser Safari, opening the “iPhone Guide” tab:  You can also go to the application iBooks and download the guide for free from the iBooks Store.
You can also go to the Apple website from computer and there find the required manual for your version of iOS.
So, my questions before and after buying an iPhone and the answers to them:
1. Will my regular SIM card work for iPhone?
No. For iPhone 4S you need Micro-Sim, for iPhone 5 and 6 – needed Nano-Sim: You can try to make an iPhone SIM card out of your regular SIM card yourself by cutting it with scissors. But it’s better not to risk it, but simply contact your mobile operator’s service center and they will give you a new one. They charged me 50 rubles for this, and they also credited it to my account. After they give you a new one, the old SIM card will stop working.
2. What should I buy to protect my iPhone from scratches?
Personally, immediately after purchasing an iPhone, I purchased it in a store protective film for him. A set of two films (for the front and back of the smartphone) cost me 400 rubles. The thing is that I didn’t want to immediately buy either a book case or a protective cover for the back wall for the iPhone. But if the smartphone is not protected in any way, then micro-scratches will appear on it very quickly (especially on the back side). That's why I bought a protective film, stuck it on and am happy.
Gluing the film is not at all difficult: just read the instructions for it (or watch a video on YouTube) and do everything slowly. If you are afraid that you won’t stick it carefully yourself and “there will be bubbles,” then you can turn to specialists (I was offered to do this right in the store for 200 rubles). 
3. What to do with your iPhone immediately after purchase?
First you need to insert a SIM card into it and then turn on the device itself. Turns on iPhone 4S And 5
by holding the button on top: 
On iPhone 6 this button is located on the right side edge: 
4. Where to insert the SIM card in iPhone?
The iPhone box contains a special clip. Take it and insert it into the hole on the side of the device. A small tray will slide out from the body. We insert the SIM card into it and push the tray back.
By the way, you can install and remove a SIM card from an iPhone without turning off the device itself. 
5. What should you do with your iPhone immediately after turning it on?
After turning on your iPhone for the first time, you need to activate. There is nothing complicated about this: follow the instructions on the screen - the iPhone is smart and will tell you everything. The only thing that may confuse you is the offer. Don't be afraid of anything - just create it.
For full setup you will need internet access. Therefore, at this moment it is better to be within the coverage area of some Wi-Fi network.
6. What is Apple ID?
Apple ID- This is your account, which allows you to use all Apple services. Namely, this is a link: email + password, which you specify when registering your account.
Having an Apple ID, you can install games and applications from the App Store, buy media content in iTunes, use iCloud cloud storage and use it to synchronize your mail, contacts, notes, and more. In general, if you own an iPhone or iPad, you cannot do without an Apple ID.
7. How to activate iPhone?
After turning on the iPhone for the first time, you will need to activate it. First we will be greeted by a welcome screen. Swipe it from left to right to unlock your device: 
Then select the language (in our case, Russian). Next, the country of location (Russia):

Then select Wi-Fi network(You won’t be able to activate your iPhone without the Internet). Next you need to enable or disable geolocation service. Geolocation determines your location (needed for maps and navigation, for geotagging photos). It can be enabled later for individual applications:
 There are two ways to set up your iPhone: like New, And restore backup from the iCloud cloud service or computer using iTunes. If this is your first iPhone, then feel free to select the “ Set up like a new iPhone”.
On the next screen, click “ Create an Apple ID for free”:

Further enter your email(I entered my mailbox address, which I always use anyway), Create a password(it must be at least 8 characters long and contain at least one capital letter and one number).
Be sure to remember or write down the password you created - you will now have to enter it and your e-mail often when accessing Apple services. The specified e-mail and password are your Apple ID.
Next, to ensure the security of your account, you will be asked several additional questions, asked to provide a backup email address - we do what they ask. A letter will be sent to you at the email address indicated above. You can open it later (for example, I logged into my email from my computer a few hours later) and follow the link in the email to complete creating an Apple ID.
Next you will be asked if you agree to use various Apple services. You can agree or not - in any case, all this can then be turned on or, conversely, turned off in the smartphone settings.
At the last point we will be asked if we want to send diagnostic data to Apple. You can refuse to help the company.
That's all. The iPhone is finally ready to go! 
8. What operating system is on iPhone?
Operating system: iOS. At the time of writing, the current version is: 8.4
9. How can I check that my iPhone is original (not fake)?
Each original device has own serial number. You can find it on the box below, on the smartphone itself on the SIM card tray, or look in the settings:
Click the “ icon Settings” on the iPhone home screen – then select “ Basic” – “About this device" Scroll down the screen and find your serial number.
The numbers must match everywhere (both on the box and in the settings).
Once we have found the serial number of the device, you can check it on the Apple website. On the page that opens, enter the iPhone serial number and click “Continue.”
If we have entered all the letters and numbers of the serial number correctly, the name and model of our device should appear. If it appears, it means our iPhone is original and officially released. If you just bought a new iPhone and have not yet activated it, then when checking on the website you will see the following message: “You need to confirm the date of purchase of the product”:  If nothing is found, then you have a fake in your hands.
10. I’m calling from a new iPhone, but I can’t hear the other person well. What's the matter?
You will laugh: immediately after the purchase, I checked the quality of the connection and called a friend from my iPhone - I couldn’t hear him well. I was already upset, but then I noticed that did not peel off the protective film from the screen, which covered the speaker :) When I took it off, audibility became excellent.
Not to be confused with the film that I specifically bought to protect against scratches.
11. How to copy photos and videos from iPhone to computer?
Connect your iPhone to your computer using a USB cable (it comes with your smartphone). Windows will automatically detect the device.
Open it by double clicking - then open “ Internal Storage” – go to the folder DCIM. Here we will see a folder (or folders) whose name contains letters and numbers. It contains photos and videos taken on an iPhone. Select the necessary files and copy them to your computer.
I described this process in more detail and with screenshots.
12. How to copy music from computer to iPhone?
To transfer songs or, for example, audiobooks from a computer to an iPhone, you need to install the program on this computer iTunes. All manipulations for copying any files to Apple devices are performed only through this program.
Because The instructions for copying music from a computer to an iPhone turned out to be quite voluminous, I put it in the form of a separate article - you can.
The iPhone already has a built-in official application for reading books - it’s called iBooks. This “reader” can open formats PDF And ePub. I talked about how to copy books from a computer to an iPhone.
14. How to install applications on iPhone?
On the iPhone home screen, click on the icon App Store. The application store will open. There are both paid and free applications. Press your finger on the word “ Top charts” at the bottom of the screen – then at the top we go to the “ tab For free" We will see a long list of applications that can be installed completely free of charge. Click the button to the right of the application you like Download" After " Install”:
Next we will be asked to enter the password for our Apple ID. Let's introduce it. Then we wait for the application loading indicator to make a full circle. That's it - the application is installed. It appeared on our main screen, we can open it: 
15. How to delete an application from iPhone?
Press your finger on the icon of any application and do not lift your finger for several seconds. Suddenly everything on the screen begins to shake: applications begin to rattle. A cross will appear on the icons of applications that can be deleted in the upper left corner. Click on it and select “Delete”. 
16. How to turn on Wi-Fi on iPhone?
You need to go to “ Settings” – “WiFi" Here you can not only turn on Wi-Fi, but also select the network to connect to.
You can also swipe up from the bottom of the screen– an additional menu will appear in which you need to click on wifi icon:
17. How to close applications on iPhone?
Press the button twice Home on your smartphone (it's a round button in the center). The multitasking panel will open with running applications. Use your finger to swipe up the rectangle with the app you want. The screenshot of this application will fly off the screen. This means that the application was closed successfully.
It is impossible to close all applications at once, but you can close three at a time by swiping them up with three fingers.
You don't have to close the app every time. There is nothing wrong with it hanging in the multitasking bar (in this state, applications practically do not consume the resources of your iPhone).
18. How to disable mobile Internet on iPhone?
Many applications on iPhone periodically access the Internet. And if you want them to do this only via Wi-Fi networks, then be sure to disable your iPhone’s access to the global network via EDGE and 3G. Otherwise, you risk facing a situation where money will be debited from your account for unknown reasons.
Go to “ Settings” – “cellular” and deactivate the switches here “ Cellular data" And " Enable 3G”:
19. How to remove the password to unlock an iPhone?
If you set up an unlock password when you initially set up your iPhone, and now you’re tired of entering it every time, do the following:
Go to “ Settings” – “Password” – then enter your password – click “ Turn off password” – and enter the password for the last time. The iPhone will no longer ask for it. 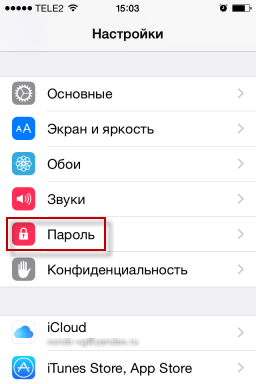
20. How to turn on the flashlight on iPhone?
Swipe up from the bottom of the screen and an additional menu will appear, in which you need to click on the flashlight icon in the left corner. It turns off in the same way.
21. How to put iPhone into silent mode?
Click the switch Ring/Silent” to put your iPhone on silent mode:  In this mode, the iPhone does not play a call signal (only vibration), sound warnings and other sound effects; However, alarms, audio apps (such as Music or YouTube), and some games will still play sound through the built-in speaker.
22. How to turn off the iPhone camera sound when taking photos?
To do this, simply switch your iPhone to silent mode using the switch located on the left side of the case.
23. How to cancel an incoming call on iPhone?
If your iPhone is locked and you receive an incoming call, there is no “Reject” button on the smartphone screen - only “Answer”. How to reject a call or at least turn off the sound of an incoming call?  You can turn off the sound of an incoming call by pressing the iPhone's Power button once:
  Pressing the Power button again will reset the incoming call, and the caller will hear short beeps.
24. How to take a screenshot on iPhone?
To do this, you need to simultaneously press the round Home button and the iPhone’s Power button:  The screenshot will automatically be saved in the same place where all your photos are saved. Go to the “Photos” application and see the screenshot taken.
25. How to set your own ringtone on iPhone?
On an iPhone, setting your own ringtone is not so easy. To do this, you need to do certain manipulations. In short, the procedure is as follows:
1. Add the melody we need to the program iTunes on the computer.
2. From this melody we cut out a musical fragment with a duration no more than 38 seconds. This will be our ringtone, which we will then set for the call.
3. Convert the ringtone to the format A.A.C..
4. After conversion, change the extension of the resulting file to .m4r.
5. Copy the finished ringtone from iTunes to iPhone
6. On the iPhone, set our ringtone as a ringtone for a specific person, or for everyone.
Although the list of actions turned out to be impressive, in fact it all gets done quite quickly. If you’re not scared, then go on, in which I described everything in more detail.
26. How to group several applications into one folder on the iPhone screen?
Press your finger on the icon of any application and do not lift your finger for several seconds. Suddenly everything on the screen begins to shake: applications begin to rattle. Drag the selected application icon onto another icon. A folder will be automatically created containing both of these applications. The folder name can be edited by going into it.
The folder will be deleted automatically if you remove all application icons from it.
27. Which browser do you use to access the Internet on iPhone?
iPhone already has a built-in browser Safari, which is great for surfing the Internet. If you want to experiment, you can install a third-party browser (Google Chrome, Yandex Browser, Opera). Personally, I'm quite happy with Safari.
28. How to copy video from computer to iPhone?
This can be done through the program iTunes. But there is one important point here: in order to add a video to iTunes, it must be converted using the codec h.264 and have a format .mp4, .mov or .m4v. If your video is in a different format (for example, .avi), then it must be converted to the required format. You can read more.
29. How to transfer files via Bluetooth on iPhone?
The iPhone does not have the ability to send or receive files using Bluetooth technology. On the iPhone, Bluetooth is needed to synchronize with various external devices: headsets, sports accessories, monopods. To be honest, when I first became the owner of an iPhone, I was very surprised by this circumstance. However, over time I became convinced that this is not what I really need :)
You can transfer a file from one iPhone to another using AirDrop technology. But both of these iPhones must be at least version 5 (so I’m flying with my 4s :)).
Please note that iPhone owners with an iPhone can transfer a file via Bluetooth to another smartphone (not iOS). Jailbreak. To do this, you will need to download a special extension in an alternative application store Cydia(like the App Store).
30. What is Jailbreak on iPhone?
Jailbreak (Jailbreak) is a software operation with mobile devices running the iOS operating system, which allows various software to access the file system. In simple terms, Jailbreak gives you access to the system as an Administrator, not as a User.
You can do this operation yourself: the Internet is full of iOS jailbreak programs and instructions for them.
The main advantage of jailbreaking is the ability to install third-party applications that Apple for some reason has not approved for downloading in the App Store.
After jailbreaking your iPhone automatically Cydia program will appear. This is an alternative application store for iPhone - similar to the App Store. Just like the App Store, you can download various apps from Cydia (most of them are free).
Also, after jailbreaking, you will be able to download paid applications from the App Store for free.
Although jailbreaking is not an officially supported operation by Apple, it is not a violation of the company's copyrights. True, after the jailbreak procedure, the device loses the Apple warranty and is not subject to warranty repair. But you can restore your iPhone to factory settings through iTunes and no one will prove that you have ever jailbroken this device.
Be aware that if your iPhone is jailbroken and you decide to update iOS to the latest version, this will remove the jailbreak from your iPhone. Every time there is a firmware update for iPhone, you have to wait for some time for enthusiasts to release a new Jailbreak.
Is it necessary to jailbreak? Personally, I think that there is no particular need for this: only if for the sake of interest, just to “play around”. But I believe that Jailbreak can be harmful. The software available in Cydia, unlike the App Store, is not tested for reliability and security, and therefore can damage your data on the device or cause it to become unstable.