Before you begin this tutorial, make sure your photos are good quality. Of course, you can create a photo collage in Photoshop using your personal photos.
Formulation of an idea on paper and a rough sketch
First, I made a sketch that showed what I wanted to create.
I came across a photo of a charming little girl, which I decided to use as a basis. Then I found some more images.

Then I created a rough sketch in Photoshop from the found images.

Let's get started
Step 1
Create a document with a canvas size of 2000x2200 pixels, resolution 300 dpi.
Fill the canvas background with light blue #eef3f6.

Step 2
Open Bird1.jpg. Use the "Magic Wand Tool" (key

Invert selection (<Сtrl> +
Press top panel Tool settings button “Refine Edge” and set the following values:

Let's place the bird on another layer (<Сtrl> +
Select this layer in the layers palette, and right-click and select “Convert to Smart Object”. I use smart objects for all images without exception. This method gives us many possibilities when working in Photoshop.

Then drag the bird into the BirdGirl.psd document, rotate it horizontally: click<Сtrl> +<Т>, and right-click, select “Flip Horizontal”, scale to 75%, to do this, enter the appropriate value in the field in the top toolbar settings.

Step 3
Now let's prepare the image of the girl.
Outline the girl's head using the "Pen Tool" pen (key
), create a selection (<Сtrl> + <Еnter>).
Click
Click<Сtrl> +

Place the little girl's head in our document. Let's call the layer with the head “Head”.
Use<Сtrl> + <Т>to scale and rotate the layer. The image at this stage should look like the picture.

Step 4
Let's make the eyes bigger.
Select the area around the left eye using the "Lasso Tool" (key
Press combination<Сtrl> +

For the right eye, repeat the same. Give the layer a name “Right Eye”.

Make the left eye layer active, click<Сtrl> + <Т>, enlarge and rotate it as shown below. Repeat the same with the right eye.

Create a layer mask "Right Eye" by clicking on the mask icon at the bottom of the layers palette.
Using a large soft brush, paint on the mask with black where you want to erase the excess areas around the eyes.
Repeat the same for the “Left Eye” layer.

This is what you should get.

Step 5
Make the “Head” layer active and go to Filter>Liquify. Using the "Forward Warp Tool" with a 200px brush, slightly change the shape of the face, increasing the distance between the eyes, raising the mouth and nose. Click OK. Well, we're done with the shape of the face, now we can play a little with the colors.

Step 6
Create a new layer Ctrl+Shift+N.
Add mask: holding<Аlt>, click between the layer named "Head" and the new layer.

On this and the next few layers we will use a brush, changing its hardness, size and opacity. We will take the colors from the photograph itself to give the face a smooth and painterly effect. I'm using one of the standard Photoshop brushes with the following settings.

Select a brush ( ), set the Hardness to 0%, Opacity to 20% and Size to 70px.
To quickly and easily select the colors you want, with the Brush tool selected, press the

Add some blush to the cheeks and use a 7px brush to paint the mouth. For each new color, don't forget to create new layers and use clipping masks.

Step 7
Using a large soft brush with an opacity of 20%, paint the pink color taken from the cheeks, the area of the nose and around the eyes, as in the picture. Change the blending mode to Overlay.

Step 8
Let's add some highlights. Using a clear, hard brush, paint pale pink over the light areas of the face. Using a smaller brush, paint white on the teeth and whites of the eyes.

Step 9
Using a small soft brush with an opacity of 20%, color blue, paint over the eyes as in the picture. Change the blending mode to Overlay and reduce the layer opacity to 60%.

Step 10
Take a brush with a diameter of 2px, opacity - 100%, hardness - 100%. Draw the eyelashes and eye outline with dark brown. You can add shadows to the eyes by taking the same color and a softer brush with an opacity of 10%.

Step 11
Let's draw the girl's eyebrows. Let's take them from another image. Open Boy.jpg. Using the "Lasso Tool" (

Add a layer mask "Eyebrow right" by clicking on the mask icon in the layers palette. Using a soft brush, paint on the mask with black to remove any unwanted areas around the eyebrows. Repeat these steps with the "Eyebrow left" layer.

Add a “Levels” adjustment layer for the “Eyebrow right” layer by clicking on the corresponding icon in the layers palette or by running Window> Adjustments. Change the values as shown in the picture. In the settings palette, click on the Clipping Mask icon to apply this effect only to the current layer. Repeat the same for the "Eyebrow left" layer.

Create a new layer. Using a 2px brush with 20% opacity, draw hairs on the eyebrows.

Step 12
Now let's get to the hair. Let's give them a little volume. Using a large soft brush with an opacity of 20-30%, make strokes with the main color. You can take colors from the photo or choose others. Gradually reduce the diameter of the brush to draw details. Don't forget to paint each color on a new layer. In this case, it will be easy to correct if something was done wrong. You should end up with something like this.

I don't like the shape of the girl's bangs, so we'll change them. Using a 15px brush, 80% hardness and 80% opacity, paint over part of the hair.

Using a 4-6px brush, paint the ends of the bangs.

Step 13
Select the bird layer and add adjustment layers as shown.

Select the bird layer and all adjustment layers and convert them into smart objects.

Step 14
Open Bird2.jpg. Using the Magic Wand Tool (
Invert selection (<Сtrl> +
Click "Refine Edge" and set the values as in the picture.
Cut out the bird onto a new layer (<Сtrl> +

Then drag the bird into our main document.

Add a mask to the "Bird Body" layer. Using a large, hard brush, erase the unwanted areas.

Do the same with the “Bird Legs” layer.

Step 15
Open Bird3.jpg. Cut out the bird's tail and move it to the main document.

It should look like this:

Step 16
Create a layer above the bird body layer. Fill the blue wing with cyan and set the layer opacity to 20%.

Now use the same technique for the wing as for the hair: using short strokes, emphasize the texture of the feathers.


Select the "Bird Body", "Bird Legs" and "Bird Tail" folders and convert them into smart objects.

Step 17
Create another layer above the body of the bird, paint the body brown and set the layer opacity to 20%.

Draw the feathers the same way we drew the wings. Add a dark brown outline to the legs.

Paint the tree a little in the same way.

Step 18
On a new layer, fill part of the tail with blue color, change the blending mode to “Soft Light”. Draw the feathers.


At this stage the image looks something like this.

Step 19
Open the Flowers.jpg file. Using "Pen Tool" (<Р>), select two flowers.

Create a selection (<Сtrl> + <Еnter>). Click

Move the flowers to the main document.

Create a layer under the colors layer, set the blending mode to "Multiple". Using a hard brush with 20% opacity, paint the shadow of the flowers.

Fill the flowers with purple and change the blending mode to Soft Light.

Accentuate the petals by adding white in the highlights and dark purple in the shadows.

Make a copy of the "Flowers" folder and place it behind the girl's head, delete the shadow layer.

Draw some shadows on the petals.

Step 20
Open the file Feather1.jpg. Select the background around the pen with the Magic Wand Tool (

Move the pen as shown below.

Warp the image: click<Сtrl> +

Add a “Levels” adjustment layer.

Double-click the layer icon to open the Styles window. Select "Color Overlay".

Apply a Gaussian blur: Filter> Gaussian Blur with a radius of 1px.

Step 21
Transfer the second feather (file Feather2.jpg) in the same way as the first. Deform it and apply the same layer styles: with the “Feather1” layer selected, right-click and select “Copy Layer Style”, then select the “Feather2” layer, right-click and select “Paste Layer Style”. Create a Levels adjustment layer above the Feather1 layer and hold<Аlt>, move it above the “Feather2” layer. The black and white arrows mean that you are making a duplicate of the adjustment layer. 
Select the Feather2 layer and adjustment layer and convert them into smart objects. Make a duplicate of the current layer and move it as shown below. Apply a Gaussian Blur filter with a radius of 2.5 pixels and reduce the layer opacity to 80%.

Step 22
Open Feather3.jpg. Separating the image from the background will be a little more difficult here because we see a lot of small fluffy feathers. Therefore, we will use channels for this purpose.

Open the Channels panel, select and copy the blue channel. Click<Сtrl> +

Holding<Сtrl>, click on the “Blue copy” channel. Click<Сtrl> +

Now go back to the layers panel and click<Сtrl> +

Use the "Lasso Tool" (

Step 23
Move the pen and add a Levels adjustment layer.

Add a Photo Filter adjustment layer to get a more realistic pen color.

Blur it a little using the Gaussian Blur filter.

Step 24
The last thing we'll add are some rose petals. Using "Pen Tool" (<Р>), select 3 petals, press<Сtrl> +

Click

Place the petals. Copy and size some of them to create better compositions.

Blur them a little using the Gaussian Blur filter with different radii, as shown below. Select all petal layers and convert them into smart objects.

Add a “Hue / Saturation” adjustment layer and make the color of the petals more saturated.

Step 25
Draw some purple and light pink dots around the bird.


Paint a few dots of white on the face, body and flowers to add a subtle sparkle and shimmer effect.

And finally, let's draw freckles for the bird girl. Make them on a new layer and change the blending mode to “Multiple”.

Step 26
The last step is to make color correction. Merge all layers except the background and add adjustment layers as shown in the image below. Add a "Gradient Map" layer using the colors #ffcdb2 / #fdc084 / #6f022b. Blending mode - "Color", opacity 20%.

Add a Gradient Map adjustment layer with colors #f1ffb2 / #ff5571 / #000b2f. Blending mode - "Multiply", opacity 20%.

Add a “Color Balance” adjustment layer. On the mask, paint the face area black so that its color does not change.

Add a Sepia photo filter.

Add a "Gradient Map" adjustment layer with colors #ffd8c0 / #eb0042. Blending mode - "Light", opacity 20%.

This is what we ended up with:

Creating a collage in Photoshop is complete. The image of a bird girl in a fantasy style is ready! You can play with adjustment layers to achieve different shades. I hope you enjoyed my lesson.
Create a document with dimensions 1000x1100 px and fill it with black. Click Cmd/Ctrl+Shift+N to create a new layer. Activate the tool Brush Tool (B) with color #4e1502 and size 1200 px. Draw in the center of the black canvas:
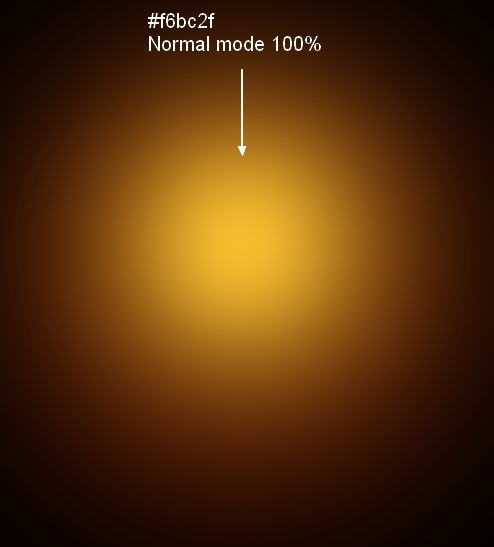
Step 2
Create a new layer and change the brush color to #f6bc2f. Draw inside the dark red area and change the mode to Color Dodge 100%:

Step 3
Use the same brush to paint again on a new layer and change the mode to Overlay 70%:


Step 4
Open the image of the Nebula. Using the tool Move Tool (V) to drag it onto our canvas:

Step 5
Click on the second button at the bottom of the Layer Set to add a mask to this layer. Use a soft black brush with an opacity of about 40-45% to reduce the hazy effect on some parts. You can see how we did this in the layer mask and the result in the image:


Step 6
Duplicate this layer and erase some parts using a layer mask to get the result as shown below:


Go to the filter Filter-Blur-Gaussian Blur and select a radius of 2 px:

Step 7
Open the image of the girl. First we use the tool Polygonal Lasso Tool to create a selection around the girl (no need to be too careful with the hair):

Double-click on the background layer to unlock it.

Click on the layer mask button to hide the background part:

Step 8
Right-click on Layer 0, select Refine Mask:

Using the tool Refine Radius Tool with a size of about 100 px to draw around the head and show more hair.

Here is our result after cleaning (we used a red background to show you this more clearly):

Step 9
After extraction, we place the girl on our main canvas, above all layers:

Step 10
I want to reduce the brightness on the bright parts of the model, so create a new layer above the model with Clipping Mask:

Use a brush with color #e6e2e9 to paint over the bright hair, face and parts of the hands and change the mode to Multiply 100%:


Step 11
We continue to reduce the brightness of the model’s face and hands using a new layer ( Clipping Mask) and the same brush. We have changed the mode to Multiply 50%:


Step 12
We would like to add more detail to the model's hair, so on a new layer we used a brush with the color #5a595b and a size of about 20 px. This is the result we got:

Step 13
To add some red color to the model, we used an adjustment layer with Clipping Mask. Let's go to Layer-New Adjustment Layer-Hue/Saturation:


Step 14


Step 15
Create a layer Curves to darken the model:

In a layer mask Curves we used a soft brush to remove and reduce the intensity of the shadows.


Step 16
Create a new layer and use a brush with the color #f66e2b to paint over the hair and hands. Change the mode to Color 100%:


Step 17
On a new layer, use a brush to add more bright red to the hair and body outline. Set the mode to Overlay 100%:


Step 18
We used a brush with the color #f5c25f to re-shade the outlines of the model and add some orange tint. Change the mode to Hard Light 100%:


Step 19
Create a new layer and use the same brush to paint over some ends of the hair and change the mode to Overlay 100%:


Step 20
Create a new layer, we used the color #f66e2b to paint inside the eyes and then change the mode to Dodge mode 100%:

Step 21
Click on the brush menu and select Reset Brushes to activate default brush settings. Now on a new layer change the foreground color to #f66e2b and click on the brushes Fuzzball:

Reduce the brush size to 80 px and create spots inside the eyes. We changed the mode to Linear Dodge 100%:

Step 22
To enhance some of the facial features, we created a new layer, changed the mode to Overlay 100% and filled with 50% gray:

Using the tool Dodge and Burn Tool (O) with setting Midtones Range, Exposure about 20-25% to brighten the effect on the eyes, edges of the face and nose, darken the eyebrows, bridge of the nose. You can see how we did it in the mode Normal and the result in mode Overlay:

Step 23
Create a new layer at the top and use a soft brush with the color #bd5733 to paint over the bottom of the image:

Step 24
To get a stronger effect here, we used a soft brush with the color #f6bc2f and changed the mode to Overlay 100%:


Step 25
On a new layer, use a brush with the color #f6bc2f to paint on both hands. We have changed the mode to Hard Light 100%:


Step 26
Move the fireworks image onto our canvas and set the mode Color Dodge 100%:


We named the layer “sparks 1”.
Step 27
Add a mask to this layer. Use a brush to remove and reduce the intensity of the fireworks on some parts shown below:

Step 28
On the sparks 1 layer go to the filter Filter-Distort-Twirl:


We apply Gaussian Blur by 2 px:

Step 29
Duplicate this layer and use Cmd/Ctrl+T to rotate it and get the result shown below. You can use a layer mask to remove unwanted parts:

Step 30
Open the flame images. We chose the first two images to work with:

Using the tool Restangular Marquee Tool (M) to create a selection for part of the fire in image1:

We place it in the lower part of the girl’s body, change the mode to Screen 100%:


Step 31
To remove the white edges remaining after changing the blending mode, double-click on this layer, select Blending Options. We hold Alt/Option and move the black slider This Layer until the white edges disappear:


Step 32
We take the other parts of the flame and place them around the model's hair and her body. We applied the same settings Blending Options to all these layers and used a layer mask to remove unnecessary parts.


For the effect we used 14 layers.
Step 33
Select all layers with flames, then click Cmd/Ctrl+G to group them. Changing the group mode from Pass Through(default mode for groups) on Screen 100%. On layer 14 go to the menu Layer-New Adjustment Layer-Curves:

In a layer mask Curves use a brush to erase in the area of the arms, hair and bottom, since we don't want to make these parts too light:

Step 34
Final step: click Cmd/Ctrl+Option/Alt+Shift+E to merge all visible layers. Go to the filter
We should get approximately this result in the final:
For work we will need:
1. Two third-party plugins for Photoshop: Imagenomic Portraiture and Nik Color Efex Pro 3.0. It's very easy to find them online. Naturally, you can do without them using Photoshop itself, but in my opinion they make life a lot easier
2. Original photo, preferably not telephone quality and not matchbox size

3. Photo to create the background. This could be an image of a forest, a flower garden, nettle thickets, etc. In general, something plant-based, with quite a lot of details and a transition of tones. It doesn't even have to be of high quality. I used the following stock image:
4. A couple of cliparts: grass in PNG format and a snail for creating horns:


So:
1. Open the original photo. It is clear that in order to substitute a new background, you first need to remove the old one. We will do this in the most convenient way for us. Usually I prefer to simply erase the background around an object with a hard eraser while zooming in too much, but this time I used the Magnetic Lasso tool, selected the shape and transferred it to a new layer using Layer via Copy:

Let's hide the background layer, most likely we won't need it anymore.
2. When using the Lasso Tool, most often some extra details remain, pieces of the old background, dark unnecessary contours, and therefore take a hard eraser and carefully go over the edges of the figure, cleaning up this disgrace:

3. In some places closer to the edge the figure is still a little dark, for example the hair, but we need it to fit better into the future, rather light background, so we take the Dodge Tool with Exposure equal to 15-20% and lighten the edges:

4. Now you can substitute the background. We transfer it to our picture, place it as the bottom layer and blur the Gaussian Blur quite strongly until it is almost uniform:


5. Let’s leave the background for now and start retouching the face (in general, this is always the most painstaking part of the work). First, let's remove all the defects (just the defects, not the entire texture from the face) using the Clone Stamp Tool and Healing Brush Tool:

Now we can soften the texture of the face somewhat; this is where the Imagenomic Portraiture plugin comes in very handy. Let's duplicate the layer with the figure (now there should be three of them, not counting the hidden background one). We can apply the plugin to the top layer, but it’s advisable not to overdo it with the settings so as not to end up with a completely plastic skin:

And then we will reduce the opacity of the top layer to 60-70 percent (but in general this is all done by eye and depending on the size of the source) and with a soft eraser we will erase the areas around the eyes, mouth and other strategically important details of the face that should not become blurry. They will appear from the bottom layer:

6. Let's give the eyes a little shine and color saturation. To do this, copy the irises of the eyes onto a new layer, usually I roughly select them with the Rectangular Marquee Tool, place them on a new layer using Layer via Copy and apply the Color Dodge blending mode to the layer. Unnecessary parts are simply removed with a soft eraser of small diameter:


Let's saturate the eyes a little with color (or we can change it altogether). Go to Hue/Saturation (the layer with the irises should be selected) and move the sliders to taste. When we are satisfied with the result, click ok and we can merge the top two layers. To add even more shine and some glow effect, you can lightly walk along the lower arc of the iris with the Dodge Tool:

7. Now let's do the painting work) Let's touch up areas of the face. To do this, select a flesh-pink color with a soft brush with low intensity (5-7%) and on a new layer with the Overlay blending mode go over the forehead, cheeks, nose and chin, especially intensely along the cheekbones:

We treat the lips in the same way:

8. I got a little involved in the makeup process by using the Clone Stamp Tool with a soft brush and Opacity = 25-30% to slightly soften the wrinkles under the eyes, uneven spots above the lips and the areas of the chin and tray (the tray is not the tray on which brought, but what is under the nose):

9. Continue coloring Personally, I wanted to add shadows to the eyelids and definitely some fresh spring-summer colors, and light green fits perfectly here. The same principle as in point No. 7:

10. What I thought was appropriate to add here are freckles. I really love freckles, but I don’t have enough of my own. Here a brush helped me, which is very easy to make, and you can find it on the Internet. In the form of a scattering of irregularly shaped dots. I chose a black brush color and applied the freckles on a new layer, all with the same Overlay blending mode:

11. Let us now pay attention to the fact that the contours of the figure contrast strongly with the background, because it is blurred, and the contours are very clear and generally look unhealthy. Therefore, we will take the Blur Tool and blur them, more strongly on the shoulders and hair and without being too zealous - on hands:

12. The time has come for third-party details. Open the file with the grass, drag it as the top layer onto our document, place it as convenient for us and simulate defocus by blurring it using Gaussian Blur. To match the tone of the grass, since the original one is a little dark, I think I used Photo Filter, adding yellowness:

You can not limit yourself to grass, add leaves, flowers, whatever your heart desires, the main thing is not to completely turn the foreground into a smeared vinaigrette
13. Finally, I decided to turn myself into a complete snail-type ram using the shell of that same snail. Drag the image of the snail and adjust it so that the shell forms a horn, and then use a soft eraser with a little transparency to remove the snail itself (poor thing " src="http:/ /planetaphotoshop.ru/images/smilies/swoon.gif" />) and part of the base of the shell so that it blends as smoothly as possible into the temples (I must admit that this moment is somewhat lame for me). We slightly blur the snails, because they should be not very clear:

The snail is too dark, so it was necessary to lighten it a little and make the whole thing worse with the Dodge Tool with range - Highlights:

14. I tried to combine the temples (TEMPLE - m. side part of the head... (c) Dahl) and the horns with some semblance of hair, but it didn’t work out very well, maybe you can do better Select the Smudge Tool, and use a soft brush with a very small with a diameter of 2-3 pixels (if the photo is very small, then generally 1 pixel) we connect the horns with the hair and vice versa:

You can flatten layers.
15. In my opinion, there is a lack of some kind of mishmash, as one friend put it - pseudo-fairytale highlights
I create highlights in the following way: on a new document with a transparent background, we randomly place blurry white spots of various sizes. It looks like this kind of falling snow is out of focus:

We place this snow on top of our work and set the blending mode to overlay (again this overlay " src="http://planetaphotoshop.ru/images/smilies/nea.gif" />). The snow turns into yellow highlights, but very bright, so slightly reduce the opacity of the layer and use a soft translucent eraser to erase the highlights from the face area so that they do not create the impression of some kind of exotic skin disease:

16. The picture is almost ready, but it could use some final processing that summarizes all the elements. This moment is my favorite. For this I use the Nik Color Efex Pro plugin. I can tinker with it for an hour, selecting settings and effects to suit my taste:

Our review of the main types and styles of photo processing in Photoshop with examples.
List of styles that will be discussed in this review.Glamour, Fashion, Vogue, Beauty, High Key, Low Key, Instagram, Grunge, Swag, Club style, Pop-Art, Esquire, Pin-up, Retro style, Vintage, Fantasy, Vanil, Street photography, Golden photo, Black and Red, Noir, Sunlight, Dunhill, Habana, Deep Blue, Pencil drawing.
The first in our group will be very fashionable, glamorous and similar ideas and photo processing options, but they also have significant differences.
Brilliant and luxurious style - for placement in a fashionista’s personal photo album, and for publication in an expensive glossy magazine. The best parts of a model in a photograph are usually effectively highlighted, and all the flaws - scars, moles, redness, folds and incorrect proportions - are hidden. Very similar to the Fashion style.

These are photographs about fashion and for fashion. That is why the main task of Fashion photographs is to highlight and show clothes, accessories and other objects related to fashion in the pictures. This style is used to create a sophisticated look. Delicate pastel shades, highlights, light natural range of shades, etc. The value of fashion photographs is that they show not only clothes and accessories, but also the general image of the model: poses, facial expressions, makeup, hairstyle, emotions and belonging to the era and time of creation. Very similar to Vogue style.

"Vogue"
Basically, this is a photograph taken as if for the cover of a fashion magazine. Soft colors and shades emphasize the femininity and beauty of the model. Men almost never wear this style.
The Vogue style is very similar to the Beauty style.

This is a close-up photograph that focuses on the eyes and lips, mainly on the model's makeup. The main difference between such photography and portrait photography is the gloss that must be present. It is widely used by models to create their portfolio.

Special photography processing techniques that result in delicately gradated, almost ethereal photographs. These images are almost entirely "white" with very light gray undertones.
In this style of processing, the bright areas of the photos should far outweigh the dark areas.

Photos taken this way tend to have a lot of black tones, and shadow detail often disappears completely. There is very little light in these photographs. These works are usually very contrasting. They often highlight only the silhouette and the brightest areas of the photo.

Next, we have highlighted the most modern and popular types of photo processing.
The distorted color scheme in the photograph is the “calling card” of this style. Using a ton of color filters allows you to add different shades to these photos.
The Instagram editing style is a fail-safe technique that helps turn any bad photo into an original one.

Grunge is a photography style with a “rebellious spirit”. The appearance of this style in photography is mainly associated with rock music. Such photographs are characterized by soft, muted shades, blurred contours, dirty textures and backgrounds. These spectacular techniques make photography more expressive, stylish and original.

"Swag"
Typically suitable for working with young people. These are incredibly luxurious and bright images that highlight not only the style of clothing, but also gold jewelry, outfits from the most famous designers, luxurious cosmetics and expensive perfumes - all this adds up to “Swag”
These photographs perfectly convey the mood; they are literally defiantly full of movement and emotion.

"Club style"
The photographs, in a club style, are bright and positive. Often these are photos from parties and nightclubs. The application of special effects perfectly conveys the atmosphere of a noisy holiday.

Pop Art style is a stylization of the works of famous artists who worked in the popular art style. The image loses small details. The emphasis is on color spots and large details - with the help of this technique the main idea of the photograph is emphasized.

These are mostly portraits. They became the calling card of the magazine for successful gentlemen. It was this magazine that gave the name to the new style “Esquire”. Slight blur, glare of light reflected in the pupils, unusual shades make the photo different from the rest.
In a portrait, they try to highlight the iris of the eyes to give volume, shine and expressiveness.

The next group in our review is - what should we call it - unusual styles of photo processing or “antique”.
We added the “Fantasy” style to them, since it didn’t fit anywhere else.
The best method for working with female portraits in the style of once popular Pin-up postcards. After correction, the photo takes on a completely new advertising look.

This is a stylized photo to resemble an old one. They contain soft colors, often black and white or sepia, the presence of small scratches and harmoniously located artificial spots, making the photo look like an antique one.

This is nostalgia for the past, a fashionable and very specific trend in photo processing, which is based on the revival of certain trends of past generations and entire eras. This style is usually characterized by the presence of elements of romance and refined luxury, such as elegant hats, lace and unusual antiques. Vintage style is increasingly popular among celebrities and top models.

Basically turns a photo into a fantastic picture. Uses all kinds of effects, creating fabulous images and landscapes. The image undergoes significant artistic retouching and color correction, but does not lose touch with reality.

We included the remaining processing styles in this group because some of them are already outdated, and some are still relevant, but not so popular or are simply standard.
"Vanilla"
This image processing gives the photo some blurriness and adds warm, soft and delicate “vanilla” tones. Often used for romantic and wedding photographs.

These are street photographs of ordinary passers-by surrounded by the city. The main differences between this style and the others are the naturalness and emotionality of the models.

The style of this treatment is to give the photo a golden or bronze tint.
The entire photograph looks like a single detail in gamma and color, but with clear midtones and shadows.

Photo processing was very fashionable in the past. This is a black and white photograph with some elements highlighted in red or scarlet. For example, a black and white photo in which the scarlet petals of a rose are highlighted, or the contours of the lips are emphasized - this gives the photo greater expressiveness.

"Noir"
When processing photographs in this style, they are made black and white. In them, the main criterion of expressiveness is the play of light and shadow. Examples: water on glass, autumn rain in an old black and white film, contrasting reflection in water, outlines of old buildings in cloudy weather. Mainly used in landscapes.

The opposite of the “Noir” style.
Light, golden sunny shades, dawn morning, watercolor.

The essence of this type of photo processing is “texture”, volume, and the use of coffee colors. They are based on the atmosphere of autumn and rain.

The main distinguishing feature of these photographs are the colors of Cuban rum, ocean breeze and bright, very contrasting images.

Using watery, cool shades when processing photographs. Sea, north, diving.

Photo processing in the style of “pencil drawing”, artistic style of sketching, sketching.

There are many more different and interesting styles of photo processing that are not included in this review, but we hope that we could help you learn something new and begin to understand these areas.
The photo of the balcony that I used in this tutorial has been removed from the file hosting site. Therefore, look at my screenshots and perform similar operations.
Open the photo of the balcony in Photoshop. Using the Pen Tool (P) in Paths mode, draw a path along the fence and grab the top part of the image. As a result, the outline should be drawn around the background of the balcony. Right-click on the path and select Make Selection (or use the combination Ctrl + Enter). After that, click Delete to remove the background.
Go to Image > Canvas size and change the canvas size to 2000x1500 pixels. Open the background image provided at the beginning of the tutorial in Photoshop and use the Move Tool (V) to drag it into the first document. Place this layer below the balcony layer, keeping the original size.
Step 2
Open the photo of the girl in Photoshop and use the Pen Tool (P) to extract her from the background. You can also use the method of selecting the girl through channels or the Magic Wand Tool (W). Paste the girl into the main document above the balcony layer. Using the Free Transform tool (Ctrl + T), change the size of the girl layer to 43% (this can be specified in the tool parameters at the top of the program).

Step 3
Before continuing work, we will make color correction of the balcony and sky. Color corrections are needed to ensure that all colors match the color of the sky. We need to increase the amount of blue on the balcony. I always recommend using adjustment layers as they don't harm the main layer.
Above the balcony layer, create a Hue/Saturation adjustment layer (Layer ? New Adjustment Layer ? Hue/Saturation) and increase the Saturation value to +25. Then create a Levels adjustment layer (Layer ? New Adjustment Layer ? Levels) and enter the value of the left slider 176. Finally, create a Color Balance adjustment layer (Layer ? New Adjustment Layer ? Color Balance) and set it up as shown in the screenshot below.
To improve the edges of the brick fence, make a copy of the balcony layer (Ctrl + J) and go to the Filter ? Stylize? Glowing Edges. Set the Blending Mode of the balcony copy to Screen and lower the Opacity to 50%.

Step 4
For the girl, you also need to make several color and light corrections. All this needs to be done using adjustment layers. Make two copies of the girl layer, right-click on them (one at a time) and select Create Clipping Mask. One copy is for sharpening and the other is for softening the skin.
To one of the copies of the layer with the girl, apply the Unsharp Mask filter (Filter ? Sharpen ? Unsharp Mask): Radius - 0.3 pixels, Amount - 215%, Threshold - 3 levels. To the second copy, apply the Surface Blur filter (Filter ? Blur ? Surface Blur) with a Radius value of 2 pixels. Then apply a layer mask to the second copy, which will hide everything. To do this, go to the Layer menu? Layer Mask? Hide All. Select the Brush Tool (B) with soft edges and paint white only on the girl's skin.

Above the layers with the girls you need to create several adjustment layers, and apply Clipping Mask (Ctrl + Alt + G) to each one. Create the following adjustment layers (by clicking on the black and white circle icon at the bottom of the layers palette, you will see a list of adjustment layers):
- Levels
- Photo Filter
- Color Balance
The adjustment layers settings are shown below:

Step 5
Extract the crow, owl and rose into the main document. Using a Color Balance adjustment layer, change their colors to match our painting.

Step 6
The main element of all photo manipulations is shadows. The right shadows can make an ordinary painting look very impressive. There are several ways to create shadows.
In our case, we will create a soft shadow, since there is no specific light source, and there are no other shadows in the picture that would tell us the direction of the light. Select the Brush Tool (B) with soft edges and low opacity. Draw a shadow under the girl, owl and rose.
You can see the detailed drawing process in this video.

Step 7
It's time to use the dodge and burn tools to bring out every detail of the objects. Create a new layer (Ctrl + Shift + N) on top of all layers and go to Edit > Fill, select the color 50% Gray. Set the layer's Blending Mode to Overlay.
Use the Dodge Tool (O) and Burn Tool (O) to draw light and dark areas. Use a low Exposure value for both tools (10%).
This is what the layer should look like with the Blending Mode set to Normal.
And this is the result before and after working with the lightening and darkening tools.
Step 8
Combine all layers into one separate one (Ctrl + Shift + Alt + E) and name it “Final”. Right-click on it in the layers palette and select Convert to Smart Object. Now all the filters we apply to this layer will not harm the pixels of the layer itself. Make this layer (Ctrl + J) and name it “Final Adjustments”. Set the Opacity of this layer to 70%.

Step 9
Select the “Final” layer and go to the Image menu? Adjustments? Shadows/Highlights. Enter the values shown below.

Then go to the Filter menu? Render? Lighting Effects and configure as shown below.

Since we've converted the layer to a smart object, we can change the filter settings at any time.
Step 10
Select the “Final Adjustments” layer and go to the Image menu? Adjustments? Variations: Select More Cyan and click OK.

While on the same layer, go to the Filter menu? Distort? Diffuse Glow. Use these settings:

Step 11
Finally, create a Gradient Map adjustment layer (Layer ? New Adjustment Layer ? Gradient Map): adjust the colors of the gradient as shown below. The Blending Mode of this layer is Overlay and Opacity is 15%.

Conclusion
When doing photo manipulations like this, I recommend doing a few things:
- Use the Dodge Tool (O) and Burn Tool (O) to soften the skin and improve the highlights and shadows on parts of the body. Shadows are very important, don't forget about them.
- Use methods that do not harm the main pixels of the image (adjustment layers, smart objects, etc.).
- Use the Lighting Effects filter. It improves the picture by 99% in most cases.
- Don't be lazy about organizing your layers palette. Group layers and give clear names. With a large number of layers, it will be easier for you to figure out where and what is.
Final result:

Share the lesson
legal information
Translated from the website www.psdbox.com, the author of the translation is indicated at the beginning of the lesson.


