So we have our original image:
2. First you need to select the text on the image that we want to remove, and duplicate it on a new layer 
3. Now we try to apply some other type of blending to see if we get a color similar to what it would have been if there were no inscription.
We have found that by mixing
Multiplication || Multiply 
The colors on the face almost match...
Then select an area that is close to the original image. 
Now duplicate it on a new layer
Layer--Duplicate Layer || Layer--Duplicate Layer || Ctrl-J
We make the layer from which we duplicated it invisible for now, and set this new one above the image layer and merge it with it.
Layer--Glue to Bottom || ctrl-e
Now let's work a little with the finger and blur to smooth out the sharp transitions. 
4. Now again select the layer with the inscription and gently erase with an eraser the part that we no longer need, that is, leave only the part that does not yet match the color of the source.
Next, experiment with layers.
Now it turned out that the wing area can be adjusted in the mode
Linear combustion || Burn 
Here I had to work a little with brightness and contrast (Ctrl-U), because color balance did not quite match, then again we take it with our finger and blur the sharp edges. 
5. On the remaining text layer, apply the Burn style again and edit the color a little. (Ctrl-U)
Again eraser and finger and here is the result: 
Today a small article on how to remove the inscription from the photo in Photoshop. To do this, you do not need to be an advanced user of Photoshop, everything is done easily and quickly. I will show 3 ways with which you can remove any inscription. They are ideal for non-professional, but fairly high-quality photo editing. I will be using Photoshop CS6 though previous versions are also excellent at this task.
Method 1: Filling
This method is well effective in cases where the inscription is on a fairly uniform background.
Open the desired photo. Select the tool "Rectangular area" and select the place where the inscription is located. Then, right-click to bring up an additional menu.
In the window that opens, select “use: content-aware”, click ok.

Everything, the inscription has disappeared.

Method 2: Spot Healing Brush
This method also does an excellent job of removing the inscription from the photo with a homogeneous background.
Select the Spot Healing Brush tool. Use the “[” and “]” buttons to set the optimal brush diameter, then hold down the left mouse button and select an editable area with text or date.
After that, release the button. The inscription will disappear.
Method 3: Combined
If the background in the photo is diverse and the first 2 methods do not help, you need to use a combination of several Photoshop tools.
We will use the Lasso, Spot Healing Brush, and Patch tools.
Part of the inscription is removed with the help of a dotted healing brush.

Another part using the patch tool. You need to select an area with text and drag it to a similar background.

As a result, the selected area will be replaced. The photo is ready.

Please note that in this article I used only a couple of simple ways to remove the caption from the image. In fact, the functionality of Photoshop is much wider and allows you to use more opportunities to remove any inscriptions and objects, depending on the task.
For those who want to see everything more clearly, I suggest watching the video.
video1
Captions and extra text can greatly spoil the impression of the picture. Quite often, it is necessary to remove an inscription in Photoshop from a picture, from billboards or from clothes so that it does not distract the viewer's attention.
Here it is worth making a small reservation - do not remove watermarks and copyright lines from other people's photos. By doing so, you are violating copyright law. If you really want to use someone else's photo, look for photos under the CC0 license or contact the author and ask permission.
Let's first figure out how to cut out the inscription in Photoshop. This method is suitable if the inscription is on a fairly uniform background without pronounced details, object borders and color transitions.
Consider an example of how to erase an inscription in Photoshop without damaging the background (we added it on purpose).
Choosing a tool Lasso Tool and circle the inscription with the mouse.

A line of alternating white and black stripes appears around the word, sometimes referred to as "running ants".

After that, right-click on the selected area and select the menu item Fill / "Fill".

In the dialog box that appears, in the Contents parameter, set the value Content-Aware/Content-Aware. This setting instructs the program to automatically fill in the selected area based on what is shown in the photo next to it. In the case of homogeneous surfaces or some textures, the result is of high quality.

After that, click on the button in the dialog box Ok and we see that our text is gone, and Photoshop "finished" the area as similar as possible to the environment.

This simple and fast way allows you to remove text in Photoshop from an image when it is written on uniform surfaces.
For more complex situations, a method based on the use of Clone Stamp Tool / "Healing Brush Tool".
Let's look at how to remove the inscription in Photoshop using the example of the photo below.

If you use the previous method, you will not be able to accurately restore the structure of tree branches. You can, of course, select one letter at a time, but even here it is not a fact that a decent result will turn out.
Therefore, we choose the tool Spot Healing Brush Tool.

IN top panel tools, we set the size of the tool and be sure to specify that the parameter type set to value Content Aware/Content Aware. The meaning of this parameter is the same as described in previous method- Photoshop will try to restore the affected area, taking into account the structure of the image.
The size must be chosen depending on the size of the inscription, its font and the thickness of the letters, as well as the size of the image itself. The best result can be achieved if you choose the thickness of the tool approximately equal to the thickness of the font line.
After we have decided on the size of the tool, we draw it along the contour of the letters by pressing left key mice. The affected area will be highlighted in grey. As soon as you release the mouse button, Photoshop will replace the caption with the background and image elements. This allows you to retouch in small increments. For example, you can delete one letter at a time and control the result.

We continue to “circle” the letters until the entire inscription is removed from the photo.
These two methods, based on the principles of filling taking into account the background, allow you to very carefully, without traces, remove the inscription on the picture in Photoshop. Choice specific way and parameters of the working tool depends on the original image and the size of the inscription.
Good day to all, my dear friends. This is tin. Yesterday I got under such heavy rain (downpour) that I got soaked all over, like I don’t know who. The rain poured down like a wall. People almost swam in puddles. Although it seemed the heat was during the day and did not portend anything. This is probably so lucky for me, because just the other day I wrote an article about. So I got caught in the rain in warm weather))). Okay, I'm kidding.
You know? I am constantly looking for some images, and it often happens that I seem to have found a suitable one, but for some reason some kind of left inscription flaunts on it, or an unnecessary date and time. And these scribbles spoil the whole photo. And what then to do? Yes, everything is simple. And today I will just show you how to remove the inscription from the picture in Photoshop in order to enjoy a normal image.
I’ll tell you right away that the methods below are very simple and will not require special skills from you, but the process itself may seem long and drawn out for many. You just need a little patience. Today we will work with a couple of images for different occasions, so turn on your smart heads, take the mice in your hands and let's go!
The easy way
If some kind of inscription interferes with you only somewhere in the corner, for example, the date or the address of the site, then there is nothing complicated at all.


All. And were you expecting something more? Well, this is the simplest case. Now let's take a more complicated case.

Combined use of tools
Let's take this wonderful cat with some text on his skin. Yes, here we will not be able to crop. Well, that's okay. We will go the other way. Let's try to remove extra text from the photo of this wonderful kitten.

- Take any selection tool, but I would still advise you to take it, and a rectangular one is better.
- Now carefully begin to allocate space around the inscription. Just try to do all this as close to the letters as possible so that there are fewer inaccuracies when performing this operation. I would even say that it is better to select one word at a time, and therefore we first circle "I".

- Done? Well done. And then, without removing the tool "Lasso", right-click inside the selection and select the item "Perform fill". No, this is not the fill with which we paint over the area, so we will not paint anything with you.

- Well, after the window appears, select the item "Content Aware". What do we see now? Not a trace of the inscription remains. Of course, it is best to do this when the background is more or less uniform, or close to it.

- So, and then we do all this with the rest of the words, namely "I miss", "Very very" And «...»
. Happened? Great. But as you can see, there are some kosyachki. We will correct them now.
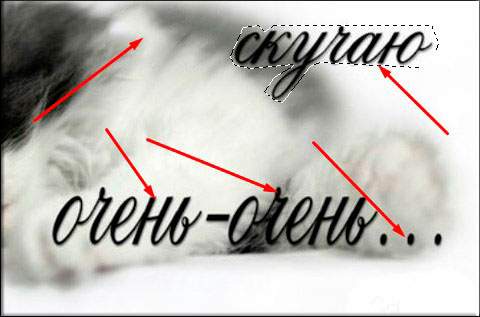
- We take the tool "Healing Brush", and set the hardness to be less so that the transition is less rough, and don't forget about the size of the brush too. We have already used this tool when, so you should not have any problems with it.

- Do you see we still have some points from the previous processing? That's where we're going to cover them up. To do this, press the key ALT next to any of the flaws and start pointwise or with a little pressure to click on them.
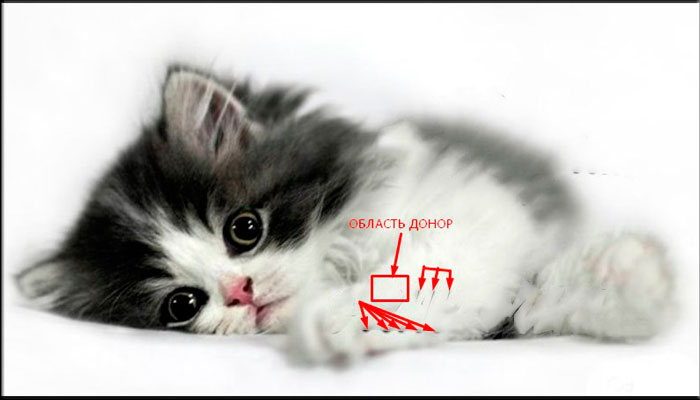
- Now, without removing the healing brush, we clamp again ALT and select the donor area in the area of the dark spot below. And then we just need to enlarge this area a little to give it a more original look.

- And we also have a bald spot at the top of the back, which remained after we removed the letter. For good reason, we should take wool as a donor, which is located just to the right of the bald spot itself.
 Therefore, we now take the tool "Stamp" (I talked about how to use it) and immediately set the size (which corresponds to the width of the donor area, for example 50
) and put the stiffness of the order 35-40
percent, no more.
Therefore, we now take the tool "Stamp" (I talked about how to use it) and immediately set the size (which corresponds to the width of the donor area, for example 50
) and put the stiffness of the order 35-40
percent, no more. 
That's all. I think it turned out well. Now we have a cool cat without any sign of the inscription.

And by the way, back to the first example. If you want to remove only the date, but without cropping a part of the photo, then you can also simply select it with at least a rectangular area and fill it in the same way. And remove all micro-defects with the same restoring brush or stamp.

Of course, there are situations more difficult, where you have to sweat, and specifically. There, the text climbs into more complex and heterogeneous areas of the image. To do this, simply work in combination with all the tools that we have used here today. The process will be long and you will have to work on every piece. For example, see the image below.

Here the inscription goes to different folds and other areas. The top part is easy to make, but the bottom part is quite difficult. So experiment. First, remove the inscription on a uniform background with a fill, then go to the repair brush and stamp, while not forgetting to change the size and hardness.
For example, I showed you this picture with a seal, and as you can see, it has not been fully finalized yet, since the folds turned out to be a little unnatural. So in a good way it still needs to be brought to a more normal form, but I hope that the very essence is clear to you.
And of course, if you want to know Photoshop well, then look great video tutorials on this topic. This video course has everything you need and is told just great. Look at everything in one breath.
And with that, let me digress. I hope that the article was useful and interesting for you. So don't forget to subscribe to my blog updates and share with your friends in in social networks. See you in new and previous articles. Bye bye!
Sincerely, Dmitry Kostin.
How to remove caption from image graphics editor paint. Master Class
Ryabichenko Nadezhda Vladimirovna, primary school teacher, MKOU "Mikhailovskaya OOSh", Kikvidzensky district, Volgograd region
Description: I bring to your attention a master class on preparing images for insertion into a presentation. This material will be useful for teachers elementary school, mid-level, educators, teachers of additional education, schoolchildren, students.
Target: preparing an image for insertion into a presentation
Tasks:
- Familiarize yourself with the technology of working in graphic Paint editor;
- develop creative abilities.
When compiling a presentation for a lesson or any event in the PowerPoint program, we use the appropriate illustrations. Often pictures come with inscriptions. In my master class, I want to show how you can remove the inscription from the background of the picture (the background is white or colored, but plain) in the Paint graphics editor different ways.
Progress:
1. Select the appropriate image. Open the image by right-clicking on it. In the window that appears, select To open with, Further Paint

2. The following image will appear in front of us.

3. To see the whole picture, and not part of it, reduce Scale, while clicking on the sign "minus" in the lower right corner

Or on a tab View click Decrease

4. In the left upper corner pictures on a white background we see the inscription.

Work to remove the inscription:
1 way:To remove the label, Lente tabs home V Tools use Eraser by clicking on its image with the left mouse button. Holding the eraser with the left mouse button, erase the inscription.

2 way:
On Lente tabs home V images click Highlight, then select the rectangle labeled area and click Cut.

3 way (suitable for pictures with a background of not only white, but also of a different color, the background is plain):
On Lente tabs home V images click Highlight, then select any rectangular area in the background.

After that click Copy, then Insert. You will see a selected rectangle in the upper left corner of the picture. By clicking on it with the left mouse button (holding), move the rectangle to the desired location, close the inscription with it.

After removing the inscription in any of these ways, close the program and save this image.

Our image is ready for further use.

This is how you can easily remove the inscription from the background of the picture.
Thank you for attention!


