This is one of the most popular questions “how to password protect a folder”. After all, anonymity is simply necessary and it doesn’t matter for what or for whom. There are times when children use your computer, and work is stored in a certain folder. This work needs to be protected, and in general, each person has his own case and we will not tell who and why.
How to put a password on a folder
This cannot be done using the standard Windows set, so we need to download the FlashCrypt program - http://fspro.net/flash-crypt/. After you downloaded and installed it, when you right-click on any folder, a new option “Protect with FlashCrypt...” appears.
As you already understood, this is the function that is necessary to password protect a folder. Select the required object and open this menu.

Enter and confirm your password, then click Protect. Those. We save the result and no one else will open this folder except you.
In fact, this is a very convenient solution, and I don’t understand why it wasn’t included in the operating system right out of the box. It allows you not only to hide personal information, but also to protect you from stupid users who, without knowing it, can ruin your work, for example...
Now, when someone else tries to open the folder, they will need to enter the password you specified and no other will work.

If for some reason it is not clear to you, I suggest you consider other options for putting a password on the folder.
Alternative Methods
Password protect using the archiver:
The easiest and most reliable way to password-protect a folder on a computer is to use any archiver (7-Zip, WinRar). Each of them has a built-in ability to enter a secret code when creating an archive file. The algorithm of actions is very simple:
- Right-click on the desired directory (right mouse button).
- In the menu, find the “Add to archive...” item.
- On the "General" tab, find the "Set password..." button.
- In the window, enter the same code twice (be sure to remember it).
- To open this packaged file, you will need to enter your password.
Set your password using Password Protect:
Password Protect. It is a shareware program and works with all known modern operating systems. The utility sets a password and hides the necessary directories from users who do not know the code to open it. The program has a Russian interface, which simplifies the process of working with it. The algorithm for using the application is as follows:
- Download and install the utility.
- Click “Lock Folder” and select the desired directory.
- Enter the password you created twice. In case you suddenly forget the code, you can leave a hint for yourself. Click "Lock".
- You can open the necessary files like this: open the utility, select the necessary elements, click “Unlock”.
Password for a folder without archiving and programs:
The easiest way to hide a directory is to make it hidden. This feature is available in all Windows starting from version 7. To do this, right-click on the element (mouse, right-click), click on “Properties”. At the bottom of the “General” tab there will be an “Attributes” block. Check the box next to “Hidden” and click “Apply”. From now on, you can see such a file if you set the display of hidden files in the Explorer properties on the “View” tab.
For the other option, you must have multiple users created for the operating system. For example, your child will have his own account, and yours will have a password. To restrict access to certain directories from his account, follow these steps:
- Right-click on the desired element, go to the “Properties” item, go to the “Security” tab, and make changes in the “Groups and Users” block.
- Add those for whom access will be restricted in the Select window. Check that the account names are written correctly.
- In the “Group Permissions” section, you can set the rights to the directory; for example, you can only view it, but you cannot delete or save anything.
How to password protect a folder - video
And so that this article is certainly useful, I suggest watching another video:
When two (or more) people use a PC, the issue of information privatization arises. Agree, it’s not very nice when someone gets into your personal belongings?! Now we will clearly tell you how to password-protect a folder on your desktop, hide your secrets from prying eyes and never worry about it again.
Unfortunately, Windows did not provide such a function when creating the operating system, so desperate users resort to a variety of solutions to the problem.
If the standard OS interface does not have the function we need, then the creators of the archiver knew exactly what the user needed.
Adding information to the archive
To do this, right-click on the object we need and select the “Add to archive...” button in the menu that opens.
Select the “Add to archive” button.
A menu opens before us to set the name and parameters of the future archive. In the lower right corner, click on “set password”, as in the screenshot.
 Find the “Set Password” button.
Along the way, you can set the document name, its format, compression method, dictionary size, update method and many additional parameters.
Setting a password
In the window that appears, you can set any password convenient for you. In this case, you can activate the function of displaying symbols as you type to reduce the risk of errors, or set the option to encrypt file names. Without it, a third-party user will have access to a list of your files, but he will not be able to familiarize himself with them in detail. This function completely restricts access to any information in the folder.
So, when you try to open “Our Folder” the following window will appear:
 View of a password-protected winrar archive.
Protect your data with Hide Folders 2012
Today there is a simple and accessible software for setting a password on a Windows folder - Hide Folders 2012. The developers made their creation paid, but you can fully and truly appreciate all the functionality within 30 days of free use. So, first of all, download the program to official website.
To get started, click “Add” and in the window that opens, click on the function for selecting the position of an object, as in the pictures below.
 Click “Add folder”.
  Using Explorer, we look for our folder.
Using the explorer, select the location of our object and wait for “Ok”. Double-click on the folder with the left mouse button, then click on “Properties” in the top menu and get the following result.
 Choosing a protection method.
Let's go through each point
Do not protect - any user will be able to open, read, change and delete your data.
Hide – the object will be completely hidden (even enabling the display of hidden files in the system will not produce results).
Block – documents will not be hidden, but you will not be able to log in.
Hide and block – the folder will be hidden and have restricted access status until this is changed in the program.
Read only – allows you to only view files: they will not be modified, copied or deleted.
Setting a password
To do this, we choose a means of protection.
 Selecting a data protection tool.
 Go to the “password” tab.
 Open the “password” folder in the program.
 In the dialog box that appears, you must enter your password and confirm it by clicking “Ok”. The program is controlled by two “On/Off” buttons. At any time, you can activate or deactivate the parameters applied to an object. It looks like this:
 Enable/disable buttons in Hide Folders.
 Now you know how to password-protect a folder on your desktop, and you can more confidently save your confidential information on local PC storage. These two methods are quite sufficient to solve the problem.
There are many methods you can use to create a password folder. Most of them require the use of some kind of program, but we have a neat method to put a password on a file without third-party programs. The program may be accidentally uninstalled, resulting in data loss. With our method, you can return everything back, even if you forgot the password for the file and cannot find your data. .
I advise you to look at other methods:
Create a folder with a password on Windows 10 without programs
Before creating a password folder, create a simple folder anywhere. It will contain another folder with a password protection and your personal data that you want to protect. Come up with any name, it doesn't matter in this case.
Create a new text document inside this folder by right-clicking on an empty space in the created folder. Select New > Text Document.

Open the new text document you created. Copy and paste the following code into this document:
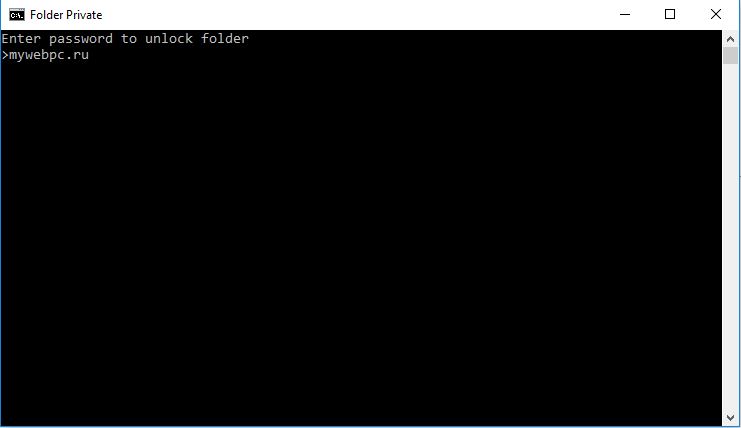
cls @ECHO OFF title Folder Private if EXIST "HTG Locker" goto UNLOCK if NOT EXIST Private goto MDLOCKER:CONFIRM echo Are you sure you want to lock the folder(Y/N) set/p "cho=>" if %cho% ==Y goto LOCK if %cho%==y goto LOCK if %cho%==n goto END if %cho%==N goto END echo Invalid choice. goto CONFIRM:LOCK ren Private "HTG Locker" attrib +h +s "HTG Locker" echo Folder locked goto End:UNLOCK echo Enter password to unlock folder set/p "pass=>" if NOT %pass%== website goto FAIL attrib -h -s "HTG Locker" ren "HTG Locker" Private echo Folder Unlocked successfully goto End:FAIL echo Invalid password goto end:MDLOCKER md Private echo Private created successfully goto End:End
Change the line if NOT %pass% website to your password that you want to set, where is the value website password. Then you need to save the file as a batch file. From the "File" menu, select "Save As".


After the file is saved as a batch file, delete the original text file.

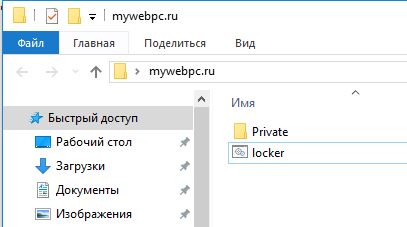
Launch the "locker" file by double-clicking on it. The first time you run the script, it will create a folder called "Private" in the same folder as the batch file. In this “Private” folder you will store your personal data for password protection. Add your files that need to be password protected to the "private" folder.
After adding your personal files to the folder, run the "locker.bat" file again. This time you will be asked to lock your data with password protection. Press "Y" if you agree.

Notice that your personal folder, where you added your personal files, quickly disappears. Only the bat file will remain.

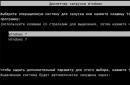
After running the script again, you will be prompted to enter the password that was changed in the script. In this case, my password is the name of the site. If you type it incorrectly, the script will simply stop working and close; you will need to re-run it.
If something went wrong and you want to get back your files that were hidden and protected with a password, then we’ll look at how to get them back in simple ways.
How to see password-protected hidden folders again
Most people don’t know how to set up showing hidden folders in Windows 10, but those who know will figure it out quickly. Read the topic here on how to enable it on all types of Windows. All you need to do is enable “show hidden files” and uncheck “hide protected system files”.

A warning will appear that scares ordinary users. Click "Yes", don't be afraid. Once you find your data, return the settings back.

How to remove the password from the bat folder if you forgot
A very simple method, but not safe for programmers. Users who know what they're dealing with will quickly figure out what's going on and how to view your hidden files. For example, I would never have thought to look clearly at the “locker” file; it attracts little attention. You need to know this purposefully, that there is such a script on the computer, with such a bat file, a hidden folder and a password. The body file itself can be hidden in the attributes and a shortcut can be created for it. The shortcut, in turn, can also be hidden by first assigning a key combination to it.
Right-click on the executable bat file, select "Change" ..ru password from the drop-down menu.

Using this method, you can create a folder with a password without programs, thereby protecting your files. It turned out to be easier than ever to password protect a folder in Windows 10 without third-party programs. If a program can be deleted accidentally and all the data under its password can no longer be found, then the methods given in the article can be easily restored.
The question of how to put a password on a folder in Windows arises at a time when information appears on your computer that is not for everyone. It doesn’t matter what it will be - secret documents that should be hidden from competitors and employees, or materials that should not be shown to children - the methods of concealment are the same.
In the article I will look at six ways to block directories, one of which is based on operating system capabilities that not everyone knows about, the rest work using programs:
How to set a password using Windows
There is a widespread belief on the Internet that it is impossible to set a password for a directory without programs using the standard capabilities of the operating system - this is a misconception caused by the fact that the computer literacy of users and many “woe bloggers” is at a low level.
In terms of security, each new version of Windows is better than the previous one; you need to learn how to use these features.
Folder password protection is based on user accounts. In order to close a directory with a secret key, you must do the following:
- Create separate accounts for yourself and for other users. By default, only your administrator account, created when installing the operating system, is valid.
- Set a password for your account.
- Specify which documents and directories are shared and which are accessible only to certain users. To access such objects, everyone except you will need a password.
As a result, access to your personal data will require administrator account access. The rest of the information on the computer (general) will be available to everyone.
Now let's look at how to install and configure all this in detail.
Create a shared account
- Go to “Start” -> “Control Panel” ->
- Select the “Create an account” item. Come up with a name there, if there are any specific users, then you can make them by name (wife/husband, children), or something general, like “Regular User”.
From now on, you will have an administrator - this is you, and everyone else is other accounts.
Put an access code on your account
To begin with, select yourself from the list of users. After you have created an additional account, you will have several users (minimum 2). If you forgot how to get to this choice, then again “Start” -> “Control Panel” -> “Adding and removing user accounts”
Then click on the “Create a password” link and set it. There will be an opportunity to add a hint; if your password is complex, I recommend doing it so as not to forget and not block your access to your own computer.
From this moment on, the administrator functions will be available only to you, everyone else will lose them, but they can use the machine, including all its folders and files, except for those that we will prohibit later.
Lock the folder with a password
User accounts belong to different groups, you are the administrator, the rest are users. In order to set limited access to certain folders, just remove the read permission for these folders for all users and leave it to the administrator (you).
This is done as follows:
- Click the edit button on the desired folder and select “Properties”;
- Open the “Security” tab (this tab contains the rights of all groups and users in relation to this folder);
- Under the list of groups, click the “Change” button;
- Selecting groups and users one by one (usually these are the “Users” and “Verified Users” groups), check the prohibited boxes next to changing, reading, reading and executing, the list of folder contents (total).
Applying the changes will automatically deny access to this folder to anyone else. To gain access, they will need the password of the account that is allowed access.
Closing an archive with a folder with a password
The second way to put a password on a folder is based on packaging the desired directory in an archive using a special archiver program and setting an access code for the archive. It is not entirely correct to call this method setting a password on a folder, since it ceases to be a folder and turns into a RAR or ZIP file.
But, nevertheless, in terms of the ease of use of this method of protection, the method is excellent, since the WinRAR program, necessary for working with archives, allows you to work with files and folders inside the archive directly, without reverse unpacking. That is, you added data to a password-protected archive. In the future, you will have access to them only when you enter the key. And all changes inside the archive are automatically added inside by the archiver himself.
I described in detail how to use WinRAR and how to archive a file in . The instructions there are very detailed, there is even a video tutorial, but here I will summarize everything briefly:
- Install the WinRAR archiver
- Select the folder you want to put a password on and right-click
- In the context menu, select “Add to archive”
- In the archive settings window, click the “Set password” button
- Enter your password
- Create an archive by clicking the “OK” button
I’ll add just one nuance - if the folder is large and there is no goal of compressing it, but you just need to protect it with a password, then when setting up the archive, set the “no compression” option - this will significantly save time.
Programs for setting a password for a folder
The disadvantage of this method is that it requires the installation of additional special software (third-party programs), which is no longer used for any purpose. In general, I recommend using special utilities only when absolutely necessary, when other methods are not available.
DirLock password setting program
There is no need to study multi-page instructions in order to use the DirLock utility, since it is intuitive even for an inexperienced beginner. Using it to set an access restriction will take 10 seconds.
Download the program here, you need to install it on your computer.
After installing and configuring the program, the “Lock/UnLock” item will appear in the context menu that appears when you right-click on a folder - this is the option to set a password.
If such an item does not appear automatically for you, then run the utility and select “File” in the menu, then “Options” in it. A window will open where such a menu is added using the “Add ‘Lock/Unlock’ context menu” button.
After this, you can put a password on any folder and when you try to open it, a message will appear stating that access is denied.
It will be possible to reopen the folder only if the ban is lifted through the same “Lock/UnLock” context menu.
Unfortunately, you won’t be able to gain permanent access to a folder locked in this way and you will have to set and remove the password every time.
Locking folders with Anvide Lock Folder utility
Another program designed to password-protect folders on a computer. It is no more difficult to handle than the previous one, just with a slightly different approach.
Download the Anvide Lock Folder program here and install it.
In this utility, closing folders is done through the interface of the program itself.
- Launch the program
- Use the built-in explorer (+ button) to find the desired folder,
- Press the closed lock in the panel,
- Enter your password twice and click the “Close access” button
- You can enter a password hint (if you wish)
- The folder will become invisible.
How to remove a password
- Launch Anvide Lock Folder,
- Select a password-protected folder from the list,
- Click on the open lock icon
- Enter the password and click “Open access”.
As in the previous utility, to work with the content you will have to install and uninstall the code each time.
Set the password using Lim LockFolder
This utility is 100% the same as the previous version. All buttons and operating algorithms are the same, only the appearance of the buttons (design) is different. It won't be difficult to figure it out.
Download Lim LockFolder here and start the installation.
You launch the program, select the desired folders through Explorer, set passwords, then remove them using the open lock button - everything is the same as in Anvide Lock Folder.
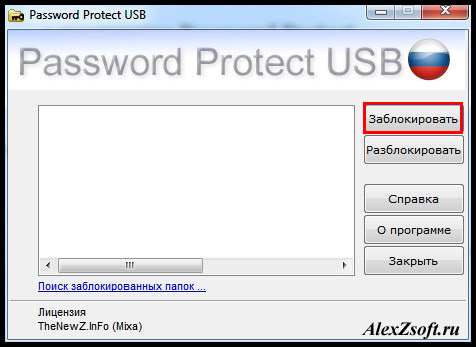
Password Protect program
The last option discussed in the article is the Password Protect program. It differs from previous utilities in that it does not require installation on a computer.
The second plus is that it is in Russian.
You can download the program here.
To put a password on a folder:
- Open Password Protect
- Click the “Lock folders” button
- Select the desired element in the explorer and click “OK”
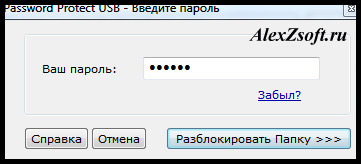
- Enter the access code twice and, if necessary, a hint
- We see a message about successful closing - the folder becomes invisible.
To work with the contents of this directory, you will need to remove the password by launching the utility and the “Unlock folders” button.
Similar to all previous options, you will need to constantly remove and set passwords - this is the main drawback of all programs, which is why I advise you to use standard Windows features.
Summary
We looked at six possible options for password protection of directories on a computer today. Each of them has its own pros and cons, so everyone must decide for themselves what to give preference to - should you trust third-party software or use the capabilities provided by the Windows operating system?
Hello beloved readers, sometimes a question arises how to put a password on a folder. In this article I will show you how to do this quickly and easily, and most importantly for free, using 2 simple programs that put a password on a folder and prevent it from being deleted. I have updated the article, now everything is definitely working and fresh!
How to put a password on a folder Windows 7, 8, 10?
1 Password Protect program
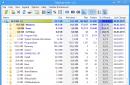
We install it, Russification is included in the kit, we install it too. You can set a password for a folder either in the program or by clicking on any folder. In the program, click simply block.
Select a folder to block.

Set a password for the folder.

All folders are locked.

To unlock it, you need to do the same steps.

Enter the password for the folder.
Click unlock and you will remove the password from the folder. You can also block a folder without going into the program. Right-click on it and select Password Protect USB.

And by entering the password, access to the folder will be blocked. If you try to enter the folder, the following error will appear.

2 Protected Folder program
During installation, it will ask you to enter a password for the program (password and hint). We do it for safety. Click Options to set the language to Russian.
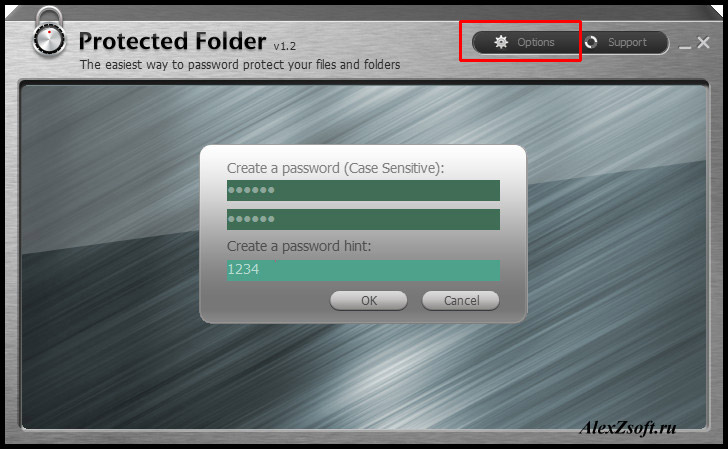
Go to User Interface and select Russian language.

You can also uncheck the hide folder box. We only want to put a password on it, and not hide it.