Hello, dear reader.
This is the eleventh lesson in learning CSS. In this lesson we will look at just two simple but important properties. These properties control the height and width of the block.
Before studying this lesson, go through the previous lessons:
Theory and practice
In the last lesson we looked at what the block model is, internal and external margins. In this we will look at only two properties: the height and width of the block. Height in CSS is set by the property height , and the width is the property width . Let's take a look at the code using a real example (let's take an example from the last lesson):
| 1 2 3 4 5 6 7 8 9 10 11 12 13 14 15 16 17 18 19 20 21 22 23 | <html > <head > <title > home</title> <meta http-equiv = "Content-Type" content = "text/html; charset=utf-8" > <link rel = "stylesheet" type = "text/css" href = "style.css" > </head> <body > <div id = "content" > <div class = "firstPar" > <p> Aliquam malesuada tellus justo, eget lacinia nunc rutrum a. Phasellus dictum tempor eleifend. Nunc ut magna non purus fermentum egestas ac eu nulla.</p> <p> Fusce est tellus, mattis quis nisl et, egestas posuere libero. Donec scelerisque tellus porttitor massa dictum pulvinar.</p> </div> <div class = "secondPar" > <p> Cras</p> <ul > <li > amet condimentum</li> <li > aliquam volutpat</li> <li > elementum interdum</li> </ul> </div> </div> </body> </html> |
And in CSS for each block
Let's see how it looks in the browser:

As you can see, we have set a certain height and width. If we set the height to be smaller than the text fits, then the text would extend beyond the block. Experiment with height and width. At first it will be difficult to determine the required size in pixels by eye, but over time you will get used to it.
This is a small and simple lesson. Try resizing the block yourself and see what happens. Practice is the most quick way learn something!
In the case of HTML documents, tags work more to mark up content than to indicate how it should be presented. Greater control over presentation is achieved with styles. In this article I will look at those styles that are associated with paragraph formatting in HTML.
Tag
In HTML, you can specify paragraphs, and the align attribute aligns them left, right, center, or justified. In addition to them, we will use the global style attribute.
Paragraph alignment
You can align a paragraph using the align attribute with the following values:
text-align: left|right|center|justify|initial|inherit;
Copy the following code into your .html file.
This paragraph is center aligned
This paragraph is right aligned
This paragraph appears justified in the browser window. A justified paragraph is aligned to the right and left by adding extra spaces. You can see that the edges of the justified paragraph match the edges of the left- and right-aligned paragraphs. In a left-aligned paragraph, the left edge is straight, while in a right-aligned paragraph, the left edge is straight. Do you see how both edges of this paragraph are straight? This is achieved through the text-align:justify style.
In a browser window, the HTML code for the paragraph looks like this:
Line spacing
You can control paragraph line spacing using style=line-height . Use the style attribute with the following values:
line-height: normal|number|length|initial|inherit;
Below is an example of HTML code that displays paragraphs with different line spacing:
This paragraph uses two values for the style attribute. The first line-height:1.5 specifies one-and-a-half line spacing for the paragraph, and the second value text-align:justify specifies that the paragraph text should be spread across the width.
This paragraph is double-spaced and justified. line-height:2 specifies double spacing. The style attribute does not have to have two values. But if you need to specify two values, you can do so by separating them with a semicolon.
Here are a few different ways to use the line-height value for the style attribute:
: Sets the line spacing to 13 pixels;
: Sets the HTML spacing between paragraphs to 200% relative to the current font size;
: Sets the line height to 14 pixels.
Indentations
I used the term "indents" to make it easier to understand. But in HTML, we use spacing to create empty space around an object. You can use the style attribute with a padding value to indent a paragraph to the left or right.
Below is an example of paragraphs with left and right indentation:
This paragraph is not indented, it is simply justified. Look at the P element's style attribute for this paragraph.
For this paragraph, I set the left padding to 30 px using the padding-left:30px style. This paragraph is also justified using the text-align:justify style. As you already know, we can use multiple values for the Style attribute by separating them with a semicolon.
And this paragraph has a right indentation of 30 pixels, but no left indentation. It is also aligned to the width. The 'padding-right' value of the style attribute specifies the right padding. If you don't see the effect, reduce the width of your browser window so that the justified HTML paragraph displays properly.
Indentation between paragraphs (indentation before and indentation after paragraph)
In HTML or CSS we don't need this. We can simply specify the padding style for the element
Padding-top and padding-bottom specify white space before and after a paragraph, which acts like padding at the top or bottom. Look at the tag example below
I installed for the first HTML paragraph indent 10 pixels before the second and 50 pixels after the second paragraph:
This paragraph does not have any before or after indentation specified. This is a regular paragraph, justified. As you already know, we can justify a paragraph using the code style=”text-align:justify” inside the tag.
This paragraph is outsized. It also has 10 pixels of padding before the paragraph and 50 pixels after it. Inside the tag I have set 3 styles.
This is a regular paragraph with no indents and default alignment.
Things to remember
- An HTML paragraph can be aligned using the align attribute or the text-align style;
- HTML will be rendered differently depending on screen sizes, browser window sizes;
- Adding extra spaces or empty lines The HTML code does not affect the output. The browser removes all extra spaces;
- Tags define what should be displayed, and styles define how it should be displayed;
- Styles can be specified in three different ways— built-in (within tags), internal ( inside the same HTML file using the element
Lorem ipsum dolor sit amet, consectetuer adipiscing elit, sed diem nonummy nibh euismod tincidunt ut lacreet dolore magna aliguam erat volutpat.
The result of this example is shown in Fig. 1.
Rice. 1. Applying the height property
Object Model
document.getElementById("elementID ").style.height
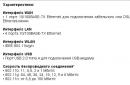
Browsers
Browser Internet Explorer 6 incorrectly defines height as min-height .
In quirk mode, Internet Explorer versions up to and including 8.0 incorrectly calculate the height of an element without adding padding, margin, or border values to it.
Internet Explorer versions up to and including 7.0 do not support the inherit value.
This lengthy tutorial article will focus on important topics, the task of which is to sort out the methods of working with block elements, explain to the reader why changing the model for calculating the width and height of elements is used, how to manage overflow of block elements, and how to work with the minimum and maximum sizes of elements.
While learning about the CSS box model, we learned that the width and height properties set the width and height of the element's interior area ( content area), which can contain text, images and other elements.
In the CSS box model, there is a difference between the width and height values you give an element and the amount of space the browser reserves to display it. The total width and height of elements represents the area of the browser window that consists of the width and height of padding, borders, and custom values specified for them.
The total width of the element is calculated using the formula:
div(width: 150px; /* set the width of the element */ height: 150px; /* set the height of the element */ padding: 10px; /* set the internal padding of the element */ border: 5px; /* set the borders of the element */ }In our case, this saves the situation, and we do not have to make any calculations, and in the future we are afraid of any changes that may be required for our elements. Let's leave these unnecessary calculations on the browser side and look at the result of our example:
To fully understand this model for calculating the width and height of elements, let’s consolidate our knowledge with the following example:
An example of changing the model for calculating the width and height of elements content-boxclass = "test2" > border-box
The value of the content-box property is the default value and calculates the total width and height of the element according to the classical scheme. Using width as an example:
150px (custom width) + 10px (left padding) + 10px (right padding) + 10px (left border) + 10px (right border) = 190px.
As for the second element to which we applied the border-box property, the element's custom width and height already include the element's content, border, and padding. In most cases, using a property with the value border-box is preferable on pages, as it makes the final dimensions of the element obvious and avoids some of the unforeseen situations discussed above.
The result of our example:
Controlling block element overflow
During the layout process, you will encounter situations where the content of an element will be displayed outside the borders of the element. By default, the browser displays this content (element overflow is rendered), which in some cases leads to visual errors. The overflow CSS property is responsible for this browser behavior. Let's consider its possible values:
Let's look at the following example:
Example of element overflow control overflow: visible
class = "test2" >overflow: hidden
Eat some more of these soft French rolls and drink some tea.class = "test3" >overflow: scroll
Eat some more of these soft French rolls and drink some tea.class = "test4" >overflow: auto
Eat some more of these soft French rolls and drink some tea.
In this example we placed four block of fixed width and height, for which different CSS values overflow properties:
- First block(visible value) – content extends beyond the element’s boundaries (default value).
- Second block(value hidden ) – content that overflows the element is trimmed.
- Third block(scroll value) - Trims the overflow but adds a scrollbar.
- Fourth block(auto value) – as with the scroll value, only a scroll bar will be added automatically if the block overflows along a certain axis ( x- horizontal, or y- vertical) and is not displayed permanently on the page.
The result of our example.