To embody their various creative ideas and fantasies, needlewomen sometimes choose the most unexpected materials. One of these is the object of scientific and technological progress - a CD.
Once upon a time, shiny round CDs replaced cassettes, but now they are being replaced by flash drives and other inventions that are more convenient and modern, because time does not stand still. Today, most people prefer to watch movies online or download information directly to their computer, bypassing third-party media, so CDs are increasingly gathering dust on the shelves in our homes.

However, do not rush to throw them away, because even these old and unnecessary (and sometimes simply spoiled) materials can make wonderful products. You only need a little creative imagination to make beautiful, original and practical things with your own hands - crafts from disks.
And decoration, and use or unlimited possibilities of old CDs
So, instead of throwing away media that have outlived their time, it is worth trying to give them a second life, especially since CDs have a lot of advantages: they shine, shimmer, reflect light, plus - it is a very easy to process and durable material, additional benefits it can become a round shape, and even a hole in the middle.
Well, there are a lot of ideas for all kinds of crafts from disks:
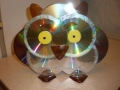
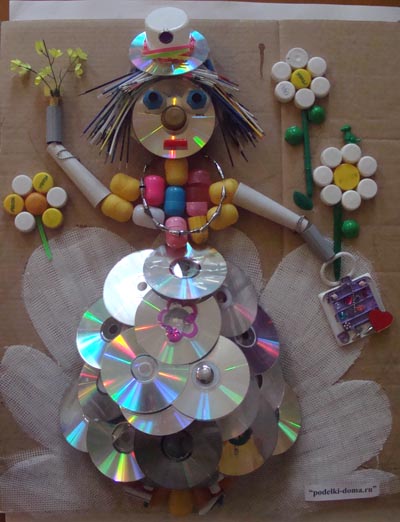
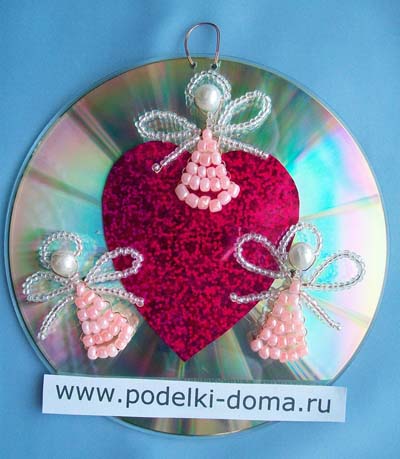
- firstly, you can create a lot of interesting things for children from this material with your own hands - mobile phones, large magnets, key rings, original Christmas tree decorations, toys, coasters and pendants for nursery decor, mosaics, etc .;
- in addition, it will be interesting for children themselves to work with beautiful and shiny circles, from which such funny crafts are made: together with your child, you can make an application or an unusual postcard from disks as a gift, for example, flowers for March 8 or a spaceship for Cosmonautics Day , and fans of cartoons will be able to acquire a whole collection of cheerful Smeshariki created from old CDs;
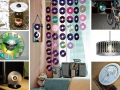
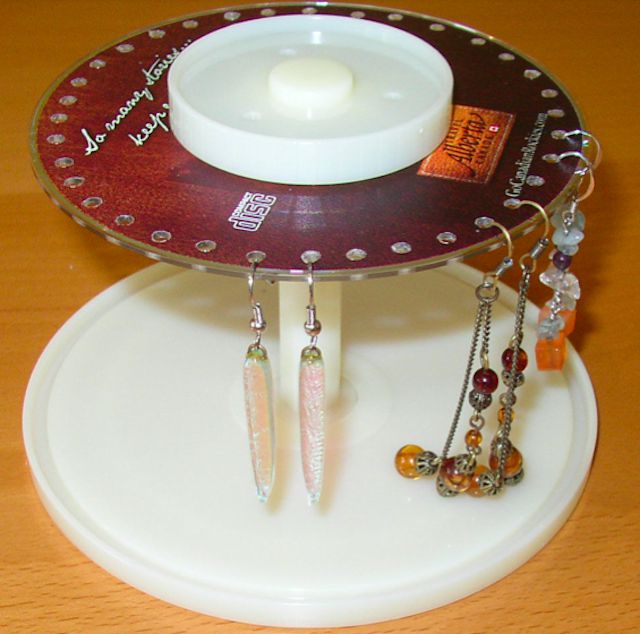
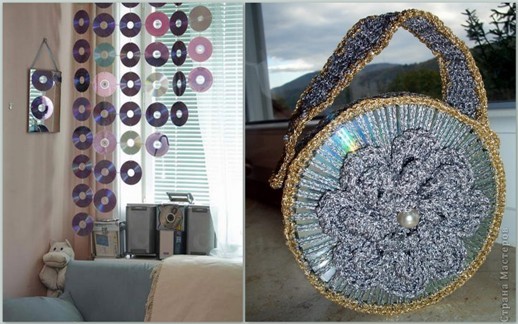
- you can use them both for home decoration (mosaic panels, paintings, various decorative elements, decoration of vases, lamps, lampshades, candlesticks, mirrors, caskets, photo frames, etc.), and for use, creating from them quite practical, functional and products needed in the household (from CDs they make coasters for small things, for storing jewelry or for hot, screens and curtains, clocks, use them as wall and ceiling decoration, decorate furniture and any interior items with them);
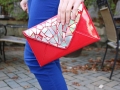
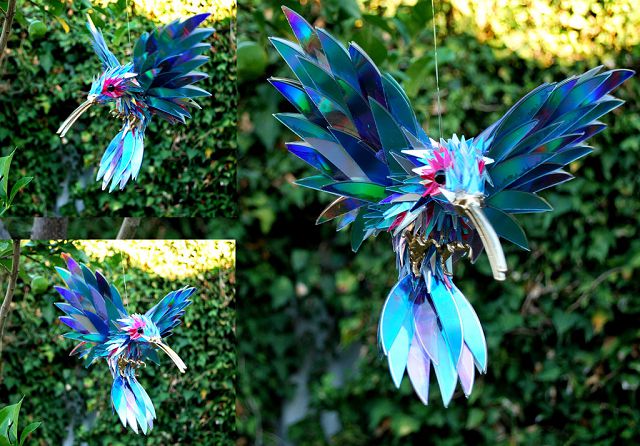
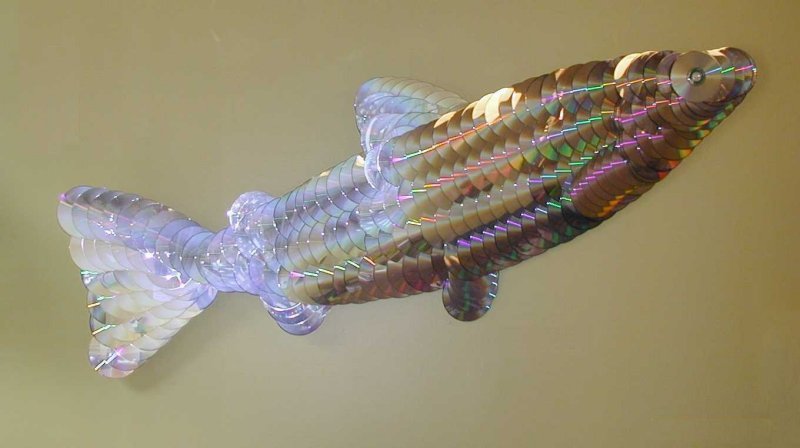
- crafts from CDs can also be global - for example, extravagant fashion designers are known who decorate clothes or accessories with CDs, embroider on them, make jewelry, and designer Sean Avery creates incredible installations and sculptures that have become objects of contemporary art from this wonderful material.
Secrets and features of working with CDs
In order for the manufacture of crafts from disks to bring only benefits, positive emotions and a good result, you need to know some secrets and features of working with this material.
- If you need to “cut” a CD disk with your own hands, that is, get a lot of shiny little fragments from it, then the best option would be to cut it with an ordinary hacksaw. So that the material does not delaminate or break during the sawing process, take your time and work smoothly. Bend the workpiece up or down a little if you want to cut in a curved line.
- If holes need to be drilled in the CD, it is best to burn them with an awl heated over a fire. Just do it in a well ventilated area.
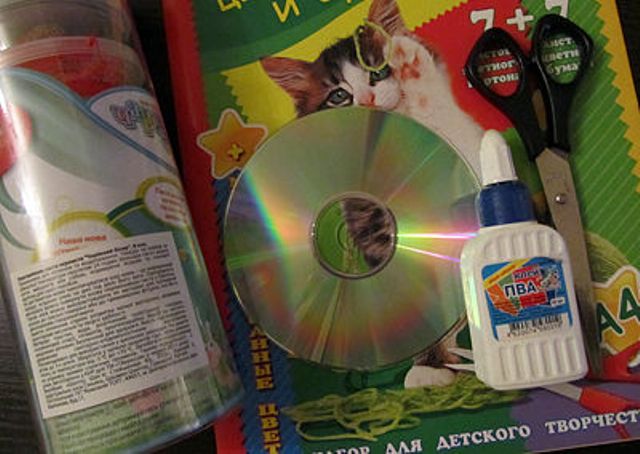
- To fasten decor elements, use glue (you can take "Moment" or PVA) or take a fishing line or wire, depending on how you want to decorate the future disc craft.
- You can take anything for decoration: self-adhesive film, fabrics, fur, fringe, beads, beads, sequins, colored cardboard or paper, napkins, threads, pebbles, shells, etc.
Getting Started
If you have never made crafts from discs before, then start with the simplest.
- You can get acquainted with the material from the manufacture of toys or interesting products for children. Try with your child to make coasters for cups and teapots. To do this, you don’t have to carry out any serious manipulations with the disk - you can leave it in its original form, but if you sheathe or paste over it with a cloth (some craftswomen put cotton pads inside), it will be much more beautiful and practical. You can decorate coasters with pebbles or coffee beans, do decoupage by pasting them with patterned napkins, paint with acrylic paint, varnish.

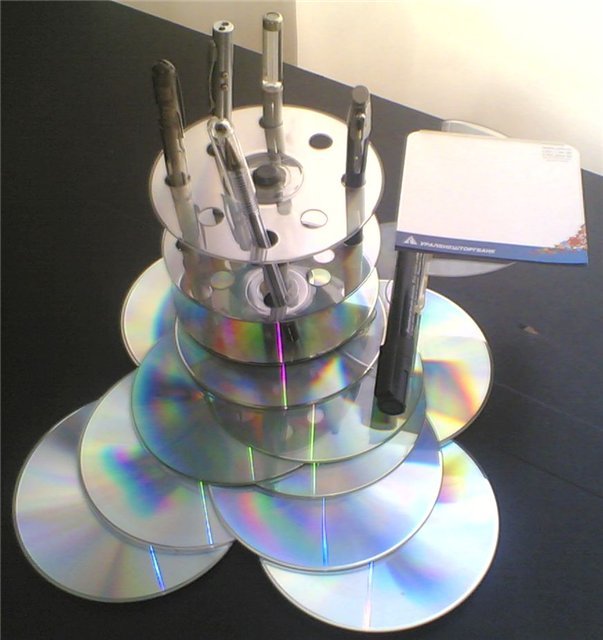
- Another functional thing is a stand for various little things. It can be used for pencils or other stationery that is constantly lost in your home. Just take any cylindrical object and glue it to the disk as if it were a base. Then the product can be painted, braided or pasted over with beads or other decor.
- Another useful disk craft is a stand or napkin holder. For its manufacture, three disks are needed - one for the base, and the holder itself will be formed from two. Take these two discs and carefully cut them about a quarter in a straight line. Then glue your blanks to the base disk and decorate.
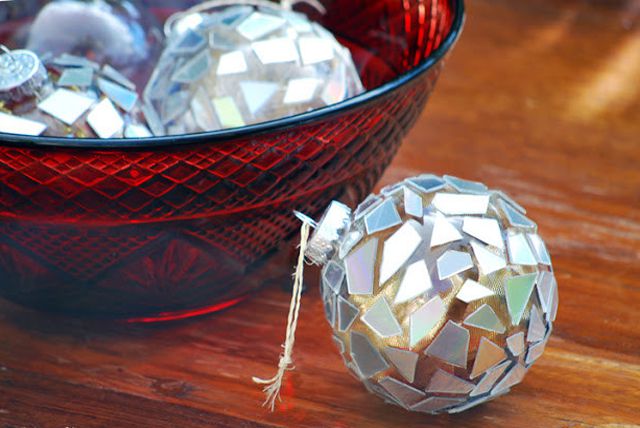
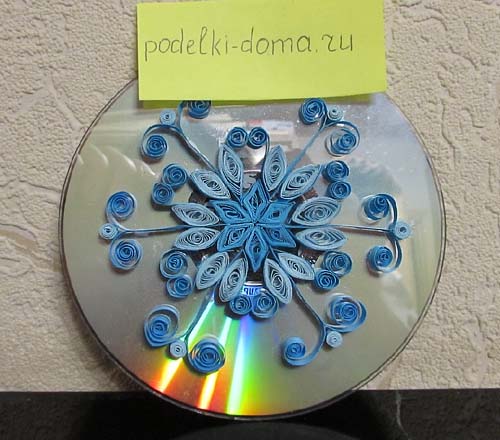
- Make original Christmas decorations with your own hands with your child. You can either simply decorate the material with colored paper, sparkles, tinsel, paint it in the form of various characters, or make mosaic balls - cut the disk into small elements and paste over a transparent blank ball with them.
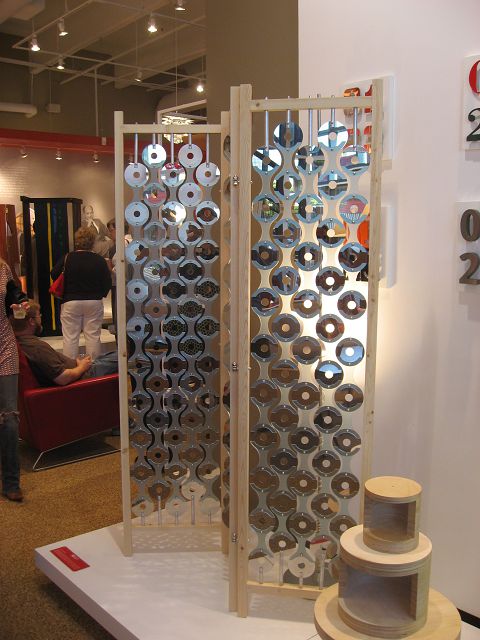
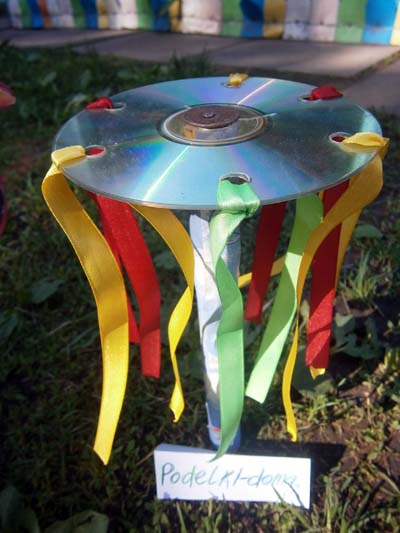
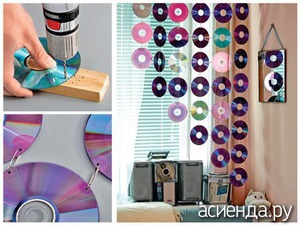
- To make such crafts from cd discs as hanging decorations for the house or all kinds of mobiles, tie the discs together at a certain distance using a strong thread or beautiful twine and hang them on a mount bent in an arc. You can also mount discs on rings, but then you will need to drill holes in them. This is how large curtains or original partitions between rooms are made. You can decorate the material in any way you like.
- If a child needs an interesting craft for school or kindergarten for any holiday - the eighth of March, Cosmonautics Day or some other, use old disks. Kids will surely like funny and funny smeshariki on a shiny basis - to make cartoon characters, you just need to cut out their main details (eyes, nose, mouth, ears, paws) from paper and stick them on the body, the role of which will be played by a round disk. Paper can be immediately taken in color or later it can be painted. Any other figures are made in the same way. And, for example, the sun can be depicted by gluing a lot of multi-colored rays to the disk - folded strips of colored paper (it is better to glue them to a paper base, which must first be attached to reverse side disk), then draw the face of the sun and decorate it.
- The material is useful both as a photo frame and as an unusual photo album. If you want to make a frame, attach decorations to the bottom and top of the disk, and stick the selected photo on it (it must fit the round frame and size). Instead of a photograph, there can be just a beautiful picture that can be hung as a decoration. Connect a lot of these blanks - and you get a whole album.
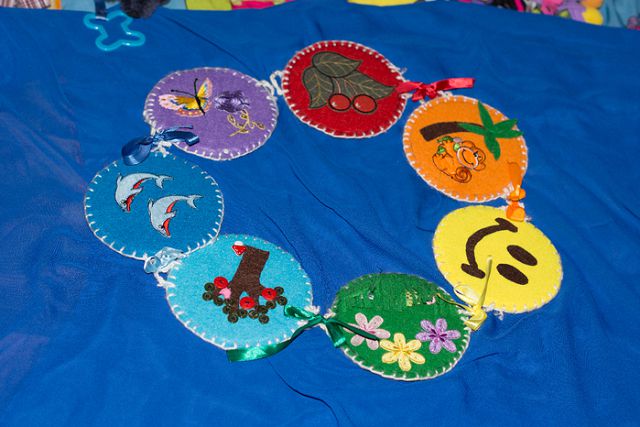
- Any kid will be happy with an interesting educational book that his mother will make with her own hands. Line the discs with felt and decorate them as you wish, then secure the pieces with ribbons.
- It is quite easy to arrange the material in the decoupage style. Thanks to this technique, you can make magnets, coasters, and simply beautiful decorations for your home. You will need special decoupage napkins with different images. Carefully separate the top layer from the selected napkin (you will have a pattern) and glue the napkin onto a disk pre-lubricated with glue. Make sure that there are no wrinkles (you can smooth it with a cotton pad). Cover the craft with varnish (if you want it to be a stand, glue a circle cut out of flexica to the back so that it does not slip on the table).
- A candlestick can be made by simply gluing a variety of decorations onto a disk and placing a candle inside, or you can heat it around the edges so that they bend in a fancy shape, and only then decorate.
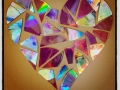
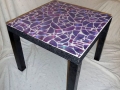
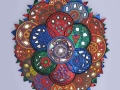
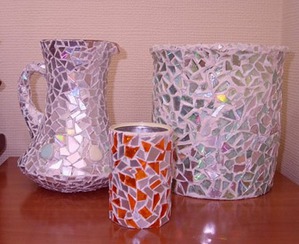
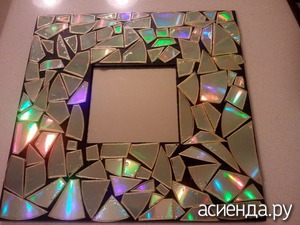
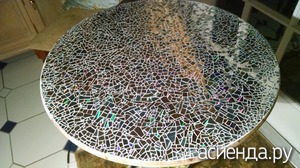
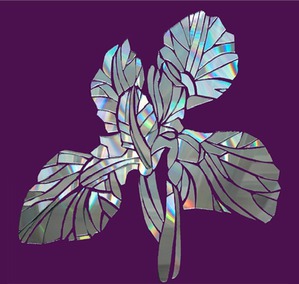
- It’s a little more difficult to work with disc mosaics, but with the skill, you can quickly cut the material into many pieces and paste them over vases and flower pots, mirrors, photo frames, any other objects, and even the surfaces or walls of your home.
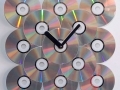
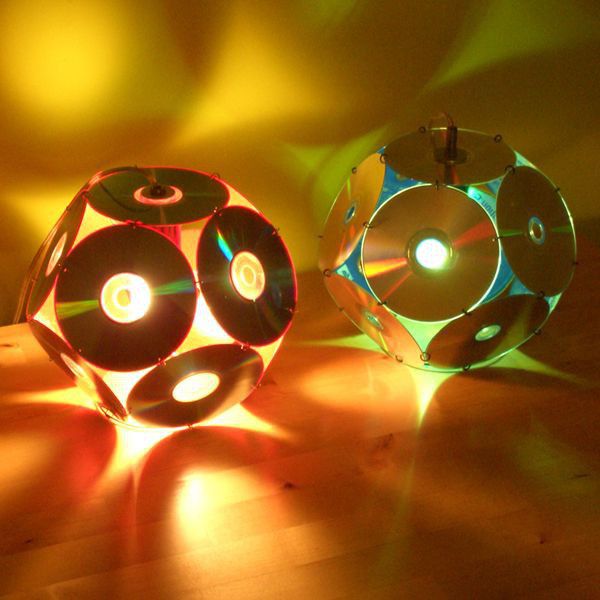
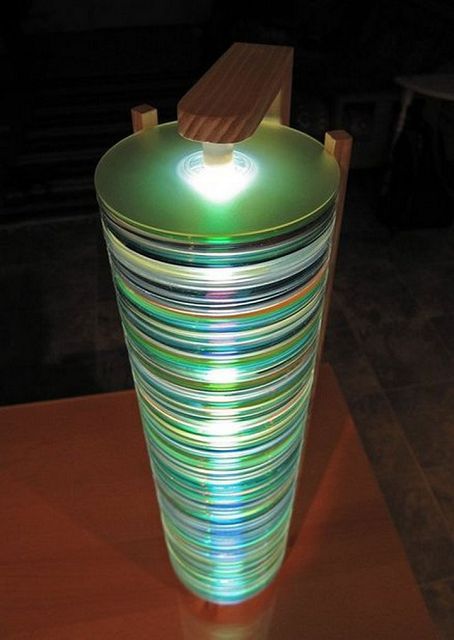
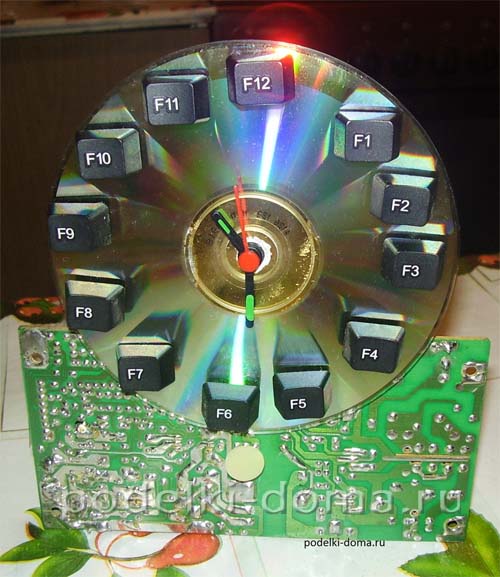
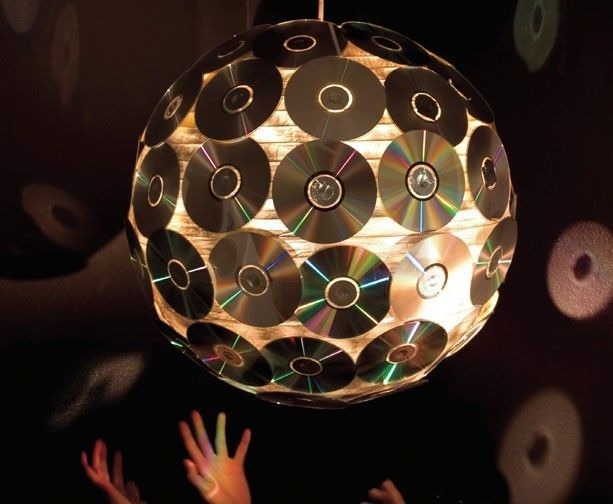
- If you are a “you” with electricity and technology, try making a watch or a lamp out of disks. In the first case, the principle of designing the material is the same as in the manufacture of a stand using the decoupage technique, however central hole you don’t need to glue it - you will need to install the clockwork there, and then think about fastening the clock. A lamp can be made by stacking a lot of disks in a tall pile and holding a light bulb there. Or glue six blanks along the edges around the folded Christmas garland attached to the base, and then take out a few bulbs through the holes in the disks.
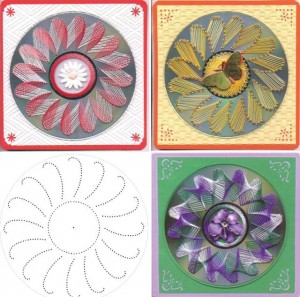
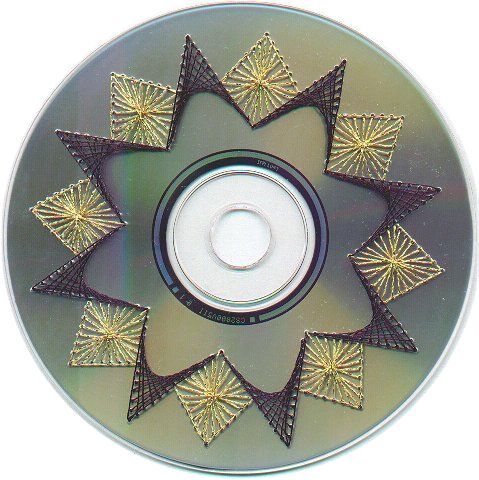
- Skillful craftswomen demonstrate how to embroider or draw on disks, making them real pieces of art.
There are many more interesting options and ideas. Let your creative imagination, inspired by them, help you create your own unique and original masterpieces or just beautiful and useful things.
Surely every house has already accumulated a fair amount old CDs. Any outdated programs, uninteresting movies, and simply unreadable discs (scratched, unformatted, and broken). But at the same time, they are so shiny, of the correct round shape, that it is simply a pity to throw them away. So what can make from cds?
Elena Ilyina made gifts for dad and grandfather on February 23 -,
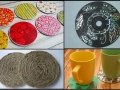
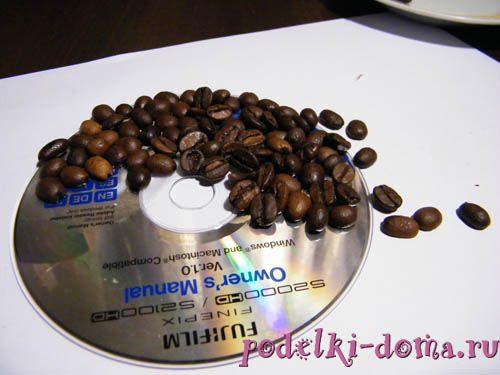
Pavel Polyakov offers a simple option that anyone can do, regardless of age and financial situation. This is about coaster for a cup from coffee beans. It will keep your furniture from thermal overheating and fill the house with a pleasant smell of coffee beans.
For this craft, we need it - a beautiful and clean CD or DVD disk, any glue for plastic or leather, about 50 grams of coffee beans and a little patience.
So, about all the steps in turn.
1. We take a disc and apply glue to it, about one third of the disc. No more is needed, as the glue dries quickly, and we must compact the grains very well into the glue. Glue must be applied in a fairly thick layer.
2. We wait about a minute and rub the glue on the surface of the disc.

3. We pour out the grains and begin to quickly stick them to the disk, leveling and creating a composition of grains.
4. We repeat these procedures on the surface of the entire disk, I remind you that you need to take your time - pour glue on no more than a third of the disk, wait about a minute and press the grains strongly.
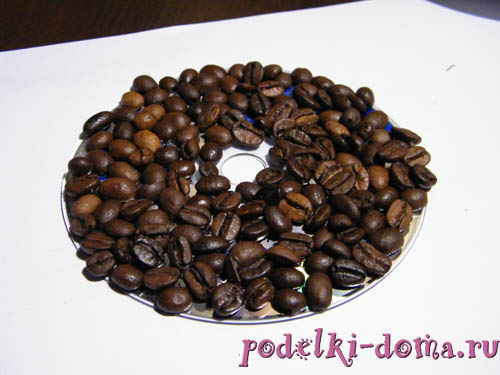
As a result, we get such a disc, quite beautiful and pleasantly smelling.
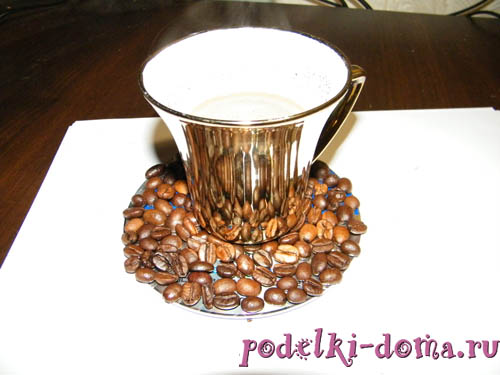
And together with a cup of coffee, he looks like this.
From the problems with operation, it became clear that the grains in the center of the disk must be laid very evenly, otherwise the cup staggers and there is a risk of turning it over. So I immediately removed the grains from the center of the disk, under this particular cup. And the cup immediately acquired increased stability, and the product acquired a finished look!
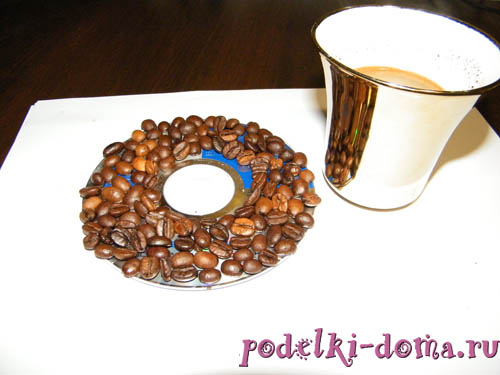 This is such a beauty!
As an addition, along the edge of the disk, you can lay out a border of dried rose hips or beautiful shells. You just need to be smart.
Another video tutorial about similar coasters, but decorated with plastic flowers:
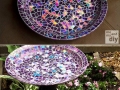
There are many different solutions on the Internet that can be made from disks, as a rule, they are divided into two groups:
- Discs are just decorated(pasted, sheathed, tied) sometimes to such an extent that it is not even clear why a CD is needed at the base, that is, it is the same ordinary element as a flat round piece made of any other material.
In crafts is done focus on the mirror surface of the disk, then the effect is more interesting.
We also have several interesting master classes on the site:

More works sent to our:
Komlev Vladimir, mother Svetlana Vasilievna, 6 years old. "Until the clock strikes 12." 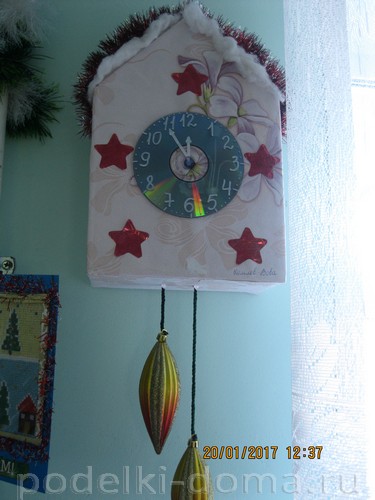
> In general, look and choose what you like best.
Embroidery on disk in:
Video master class about such crafts from disks:
Cute crochet handbag:
Photo frame from disks:
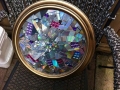
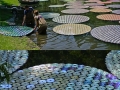
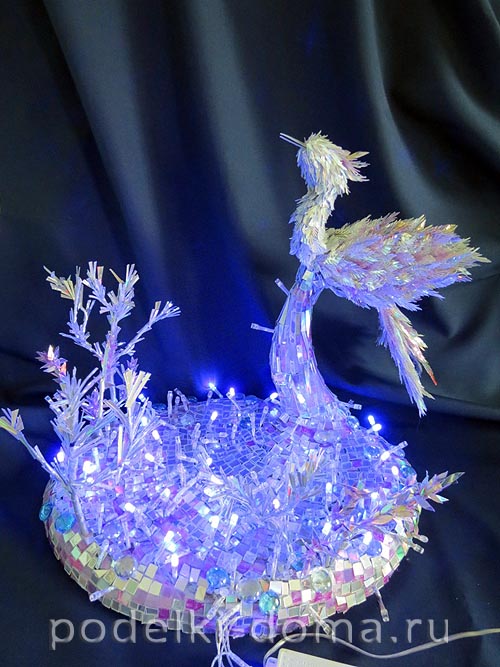
It is interesting to make mirror balls out of them. Largest of whole discs:
Or small ones from pieces: 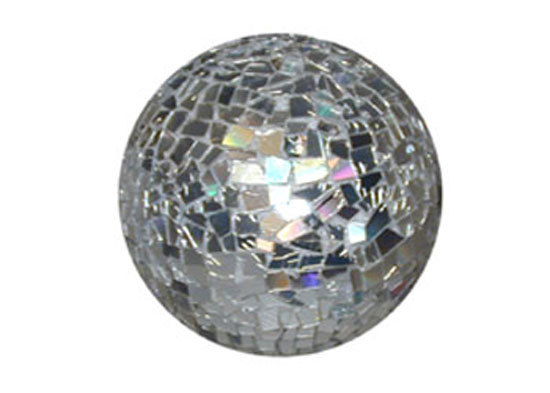
Compact discs are a thing of the past, replaced by other technologies. Previously popular material lies unnecessarily and requires disposal. But in capable hands, this is the potential for creativity. From disks you can make useful things for giving and decorate your home interior.
CDs and suburban area
CDs are the perfect material for outdoor crafts. Works made with the use of CD, DVD are durable: they are not afraid of cold, rain, snow and sun. You just need to choose the right material for fixing.Summer residents use disks in different ways. From them create planar figures for the garden. For example: windmill, animals, flowers, birds, insects. Having fastened the elements with wire, plastic cords or branches, three-dimensional figures are constructed.
Laserdiscs are often used to the benefit of the garden. They serve as additional illumination of shady areas. For these purposes, they are placed in a sunny place in the form of a decorative planar image, a shield stand, on the wall of the house, on the fence. The refracted sunbeam is directed to the shaded flower garden, creating comfortable conditions for plants.
Discs help save crops. It is enough to tie nylon threads to them and hang them on the branches of fruit trees, they will scare away birds and your cherries, plums, apricots, currants will not suffer from the invasion of feathered gourmets. Also, bird nests will not appear on the site and sparrows will not settle.
Hanging balls, spinners from discs will not only bring originality to the design, but also make your territory inaccessible to small rodents, crows, jackdaws. Walking chickens will be an obstacle to leaving the home territory. The reflectivity of CD, DVD is used to eliminate overheating of the roof, gluing them partially or completely on the surface of the roof of the terrace, gazebo, veranda, hozblok.
The use of discs for interior decoration
CDs interesting material, working with them, you can easily create masterpieces for your home. There are no limits to the limit of fantasy and ingenuity. The home interior will be beautifully decorated with disc lamps, photo frames, vases, candlesticks, boxes. It is interesting to look pasted over with disks flowerpots, planters.
Many people decorate furniture elements with colored pieces, paste over the tabletop of a coffee table, and make wall panels-mosaics. Whole disks are used to create decorative curtains, containers for small items, coasters for glasses.
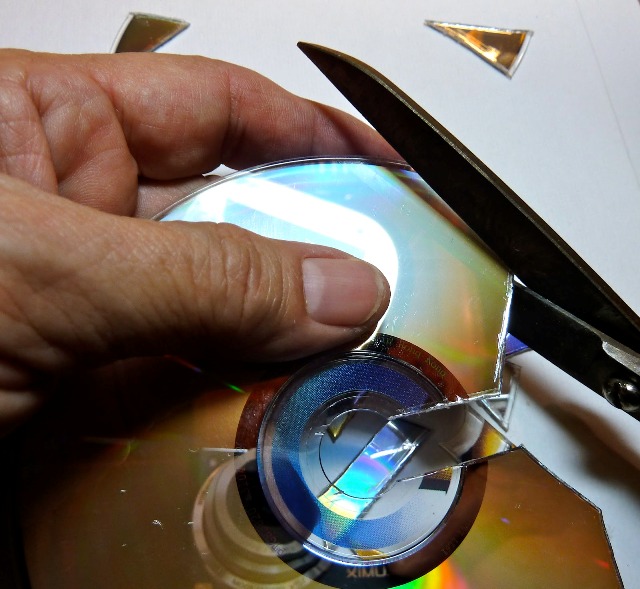
How to cut CDs, DVDs
The flickering and refraction of light on the disk is due to the surface holographic film. When working with this material, you need to take into account its fragility and try to keep it intact.Scissors are used for cutting. The density of the material involves the use of high-quality, hard and sharp tools. It is advisable to choose large scissors: garden or kitchen for cutting poultry. More convenient discs for cutting will not be for double-sided recording, but with plastic with an image on one side, and a holographic film on the other.
Fixation of "laser" elements
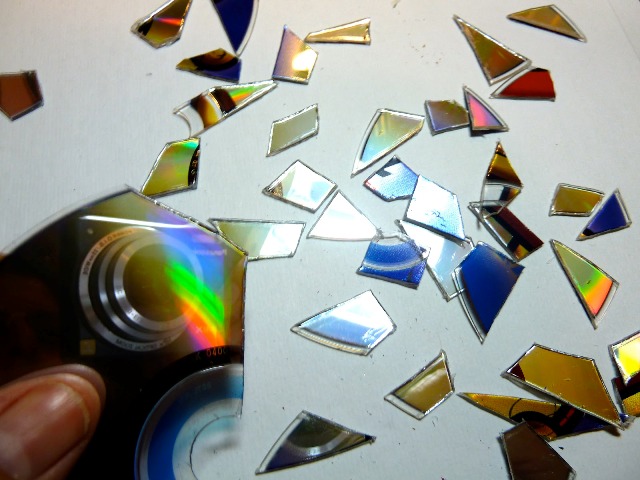
Having mastered the technique of cutting discs, you can not limit yourself in shapes and sizes, create different pieces, which will then serve as material for exclusive crafts. Before work, it will only be necessary to sort large and small pieces into separate containers.
Any glue is used, for the street it is necessarily waterproof. It can be tested by trying to glue two records together. If after drying they hold tight, then the glue is suitable.
When creating monolithic large surfaces, cement mortar is used. In this case, the process of creation is faster. Sliced pieces are placed on the solution, barely pressed / pressed. Half an hour after laying out, the excess cement that has come out must be removed and the surface of the discs wiped with vinegar. For this, 9% vinegar and water are taken 1: 1. The finished project can be protected from scratches with epoxy. The product will have a shiny, transparent, hard surface that does not affect the holographic effect.
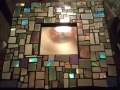
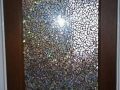
Mosaic from discs for wall decoration
Any suburban building, decorated with a shining mosaic of discs, will successfully highlight any area. In addition, the reflective effect will fill the space with light, give an interesting look and visually increase the boundaries. In shady places will serve as additional lighting. A similar mosaic can be made inside the house, for example, in the kitchen in the hallway, in any small room.To create a mosaic, select a section on the wall, mark the boundaries with a marker. You can use glue or cement mortar. Start gluing from the corners, gradually moving towards the middle, filling the entire plane. First, large pieces with gaps are applied. When the entire area is covered, proceed to fill in the gaps with mini scraps.
In any case, on the finished coating you will have the intervals between the pieces of disks. These places are filled with cement mortar, followed by cleaning the surface of the disks with vinegar. After drying, an epoxy adhesive is applied.
Crafts from disks with your own handsFind out which original and useful things can be made from CDs.
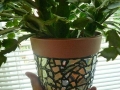
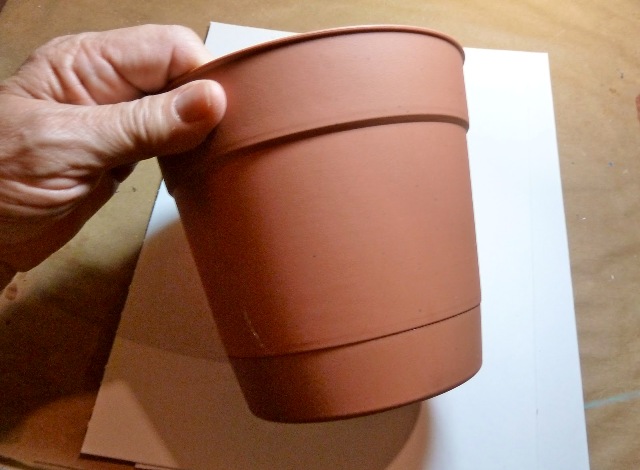
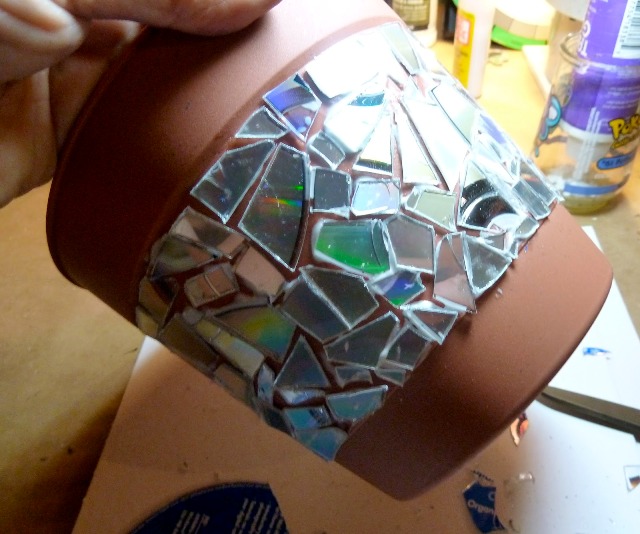
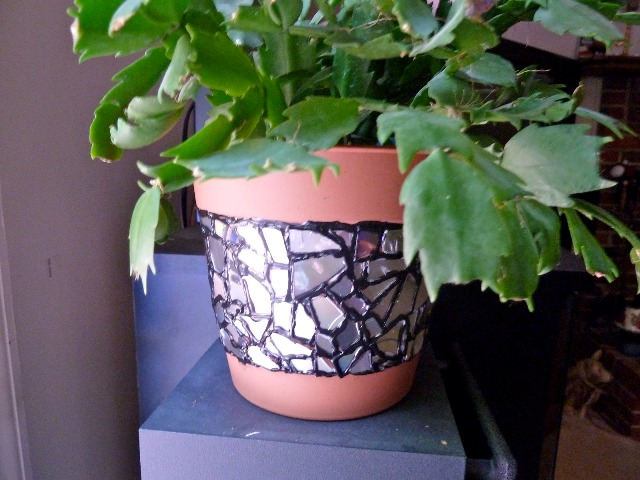
What to make from disks with your own hands. Mosaic for a flower pot.
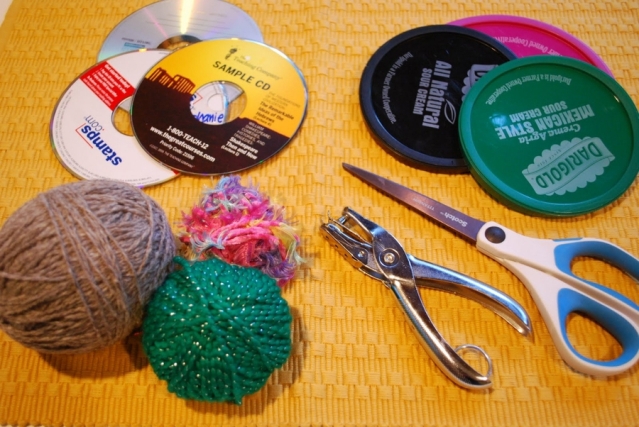
You will need:
CDs (3 or more)
Scissors
PVA glue (or superglue)
plastic pot
Acrylic paint (or regular)
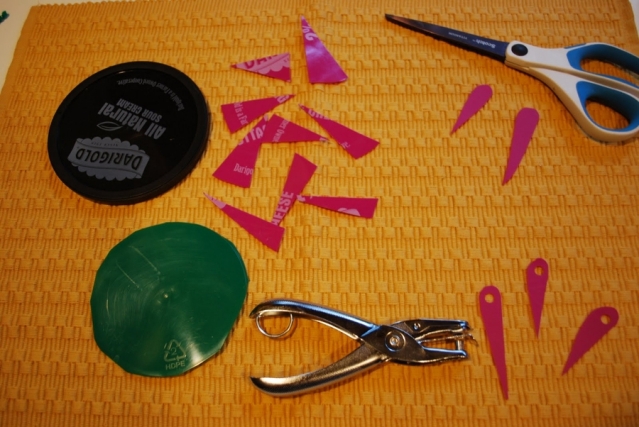
*Before you start cutting the disc, it is worth putting on safety glasses - this will help you avoid injury if parts of the discs "fly up" during cutting.
1. Cut the discs into pieces of different sizes and shapes.
2. Gradually apply glue to the flower pot and start gluing the parts of the disks.
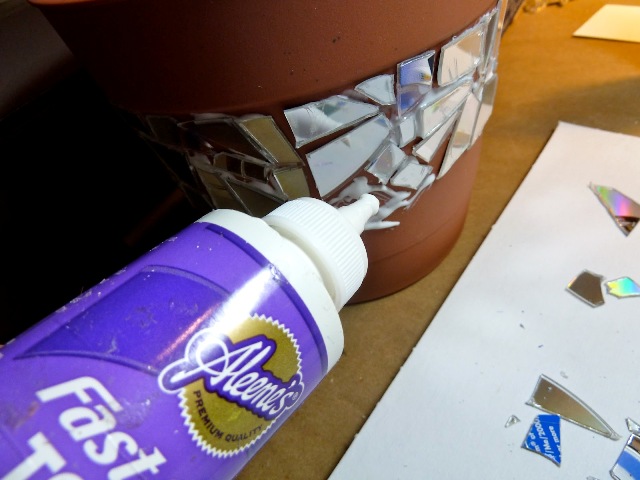
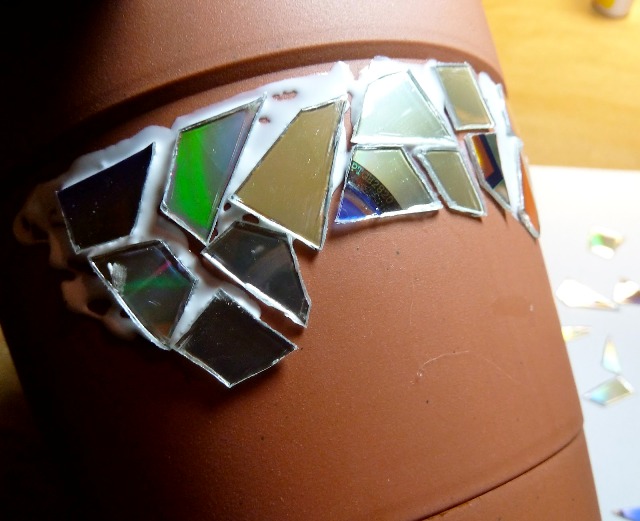
* Don't forget to leave some space between the pieces.
3. Continue pasting until you cover the intended part of the pot and leave the glue to dry.
4. Prepare the paint and start applying it to the gaps between the pieces of disks. Try to keep all lines neat. When you have filled all the cracks with paint, leave it to dry.
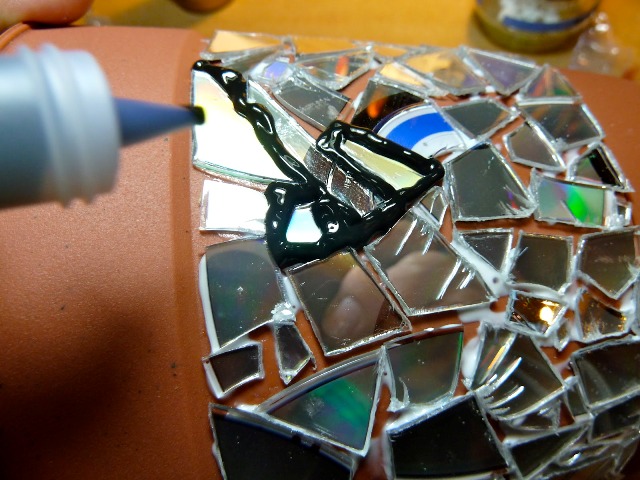
* When the light falls on the pot, it will "glow" where the sun's rays are reflected.
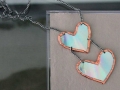
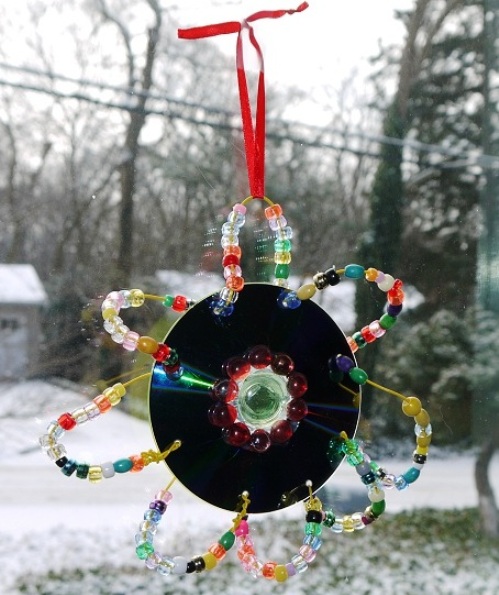
Crafts from CDs. Spring Flower.
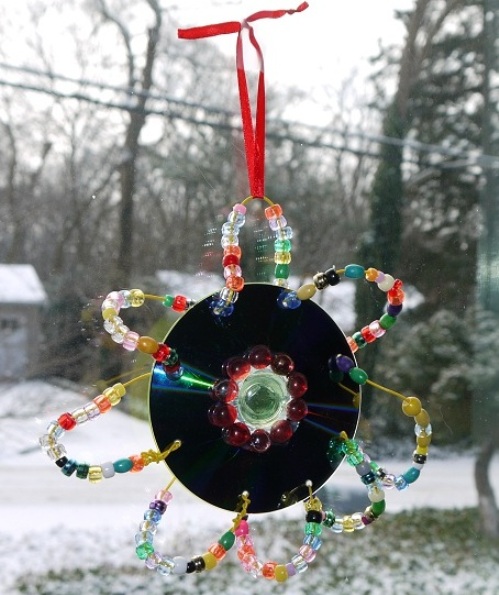
You will need:
1 CD
thin wire
Nippers or scissors
Dremel or electric drill
1. Use a drill to make small holes in the disk - you should get about 8 holes.
2. Pass the wire through the holes, securing it at the first hole and then threading it through the subsequent ones.
3. Alternately, after each threading the wire into the hole, string the beads. Add enough beads to cover the wire arch (see picture).
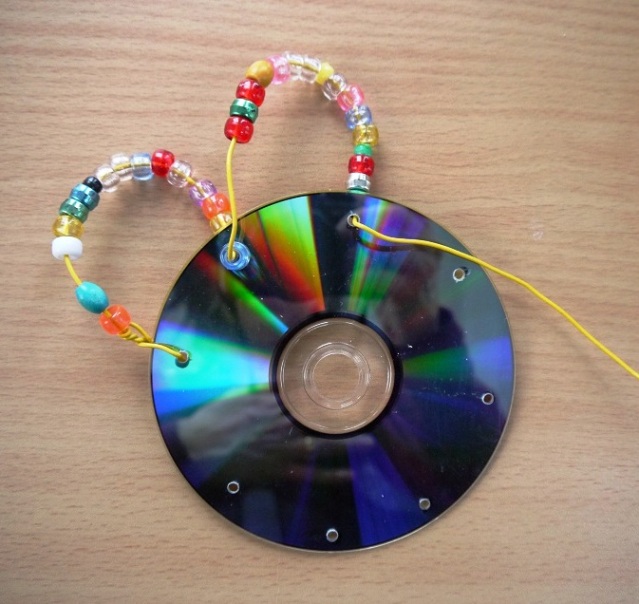
* If there is not enough wire, get more (at the stationery store) and simply insert into the last hole and continue to "weave".
4. You can decorate the hole in the middle of the disk with beads or other decorations - feel free to fantasize.
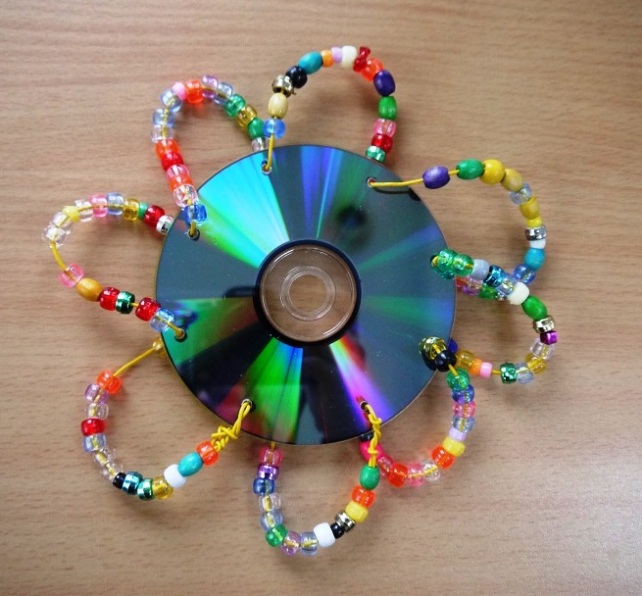
* This flower can be hung on the window - for this, just tie a ribbon or thread.
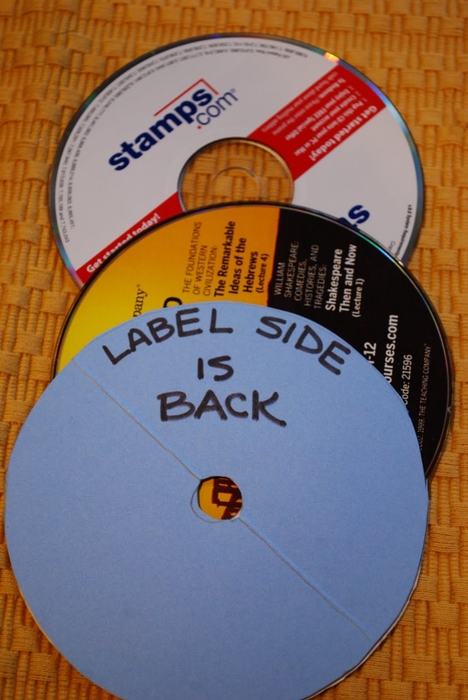
Crafts from CDs. Hot pads.
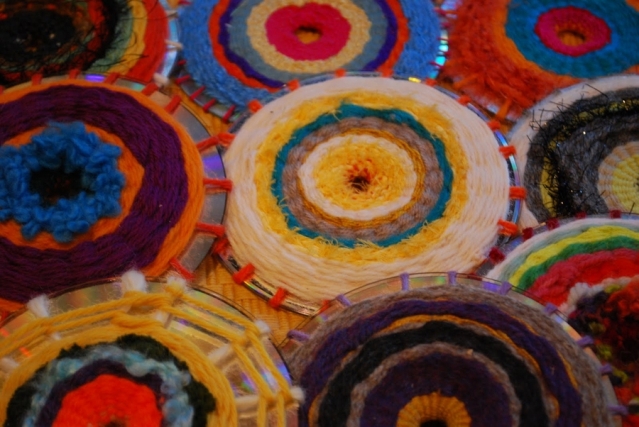
This craft is suitable for the home to put a hot kettle, pot or mug on it.
The pictures show clear instructions on how to make a stand.
You will need:
CDs
Thread of different colors
colored paper
Scissors
![]()
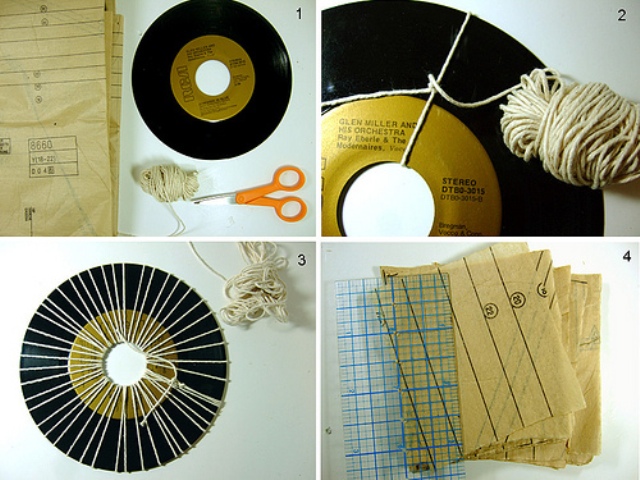
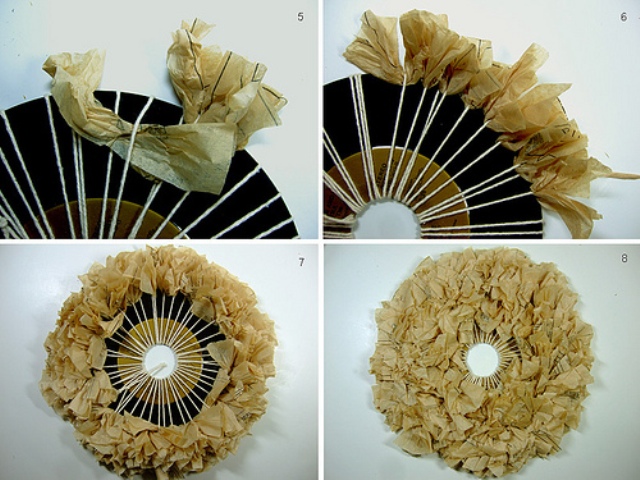
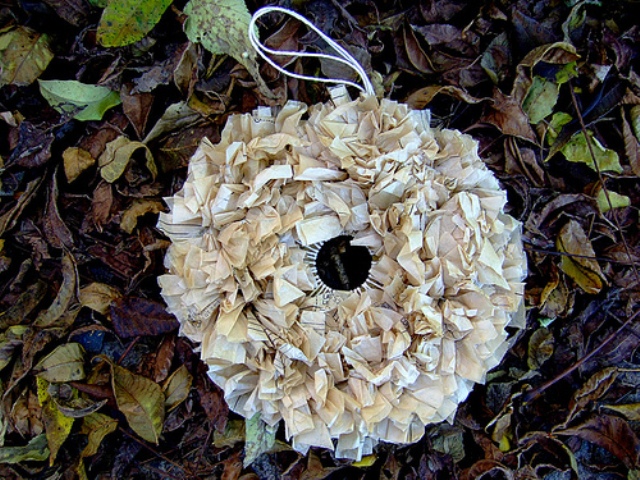
Crafts from old CDs. Bright wreath for interior decoration.
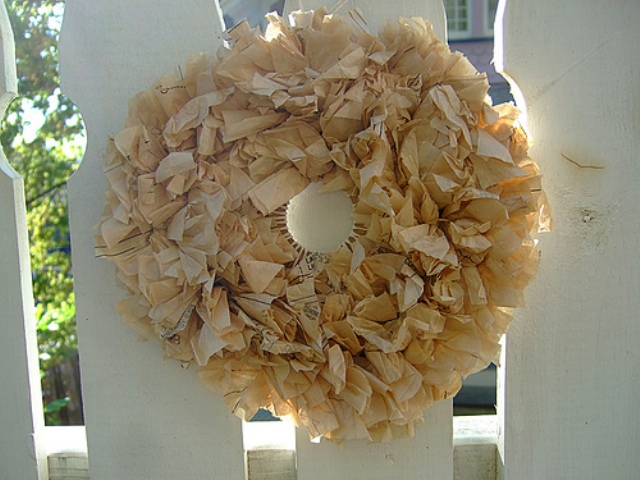
This wreath can decorate a room, porch or front door. It is very easy to make - follow the instructions in the pictures.
You will need:
CDs or records
Thread of different colors
colored paper
Scissors
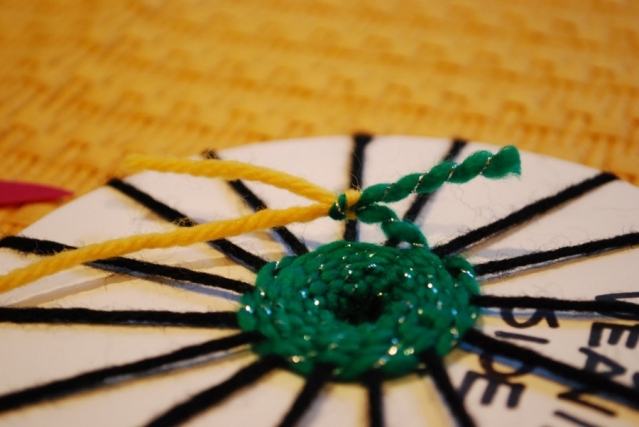
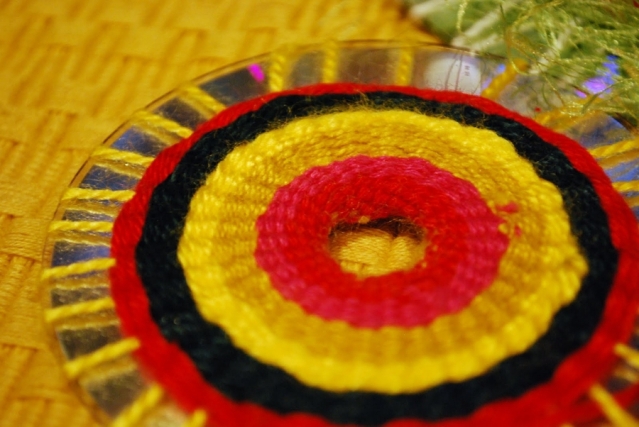
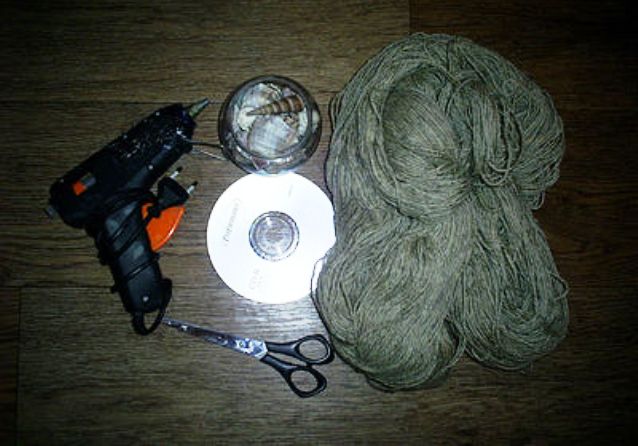
Crafts from disks (master class). Panel with shells.
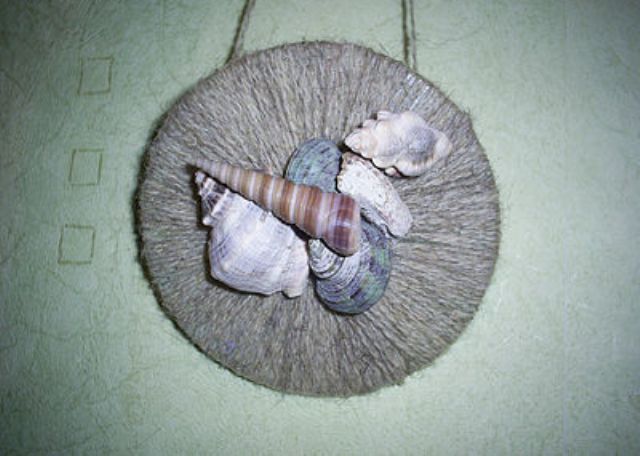
You will need:
1 CD
Woolen thread of one or different colors
shells
Glue (glue hot gun)
Scissors
1. Wrap the thread around the disc.
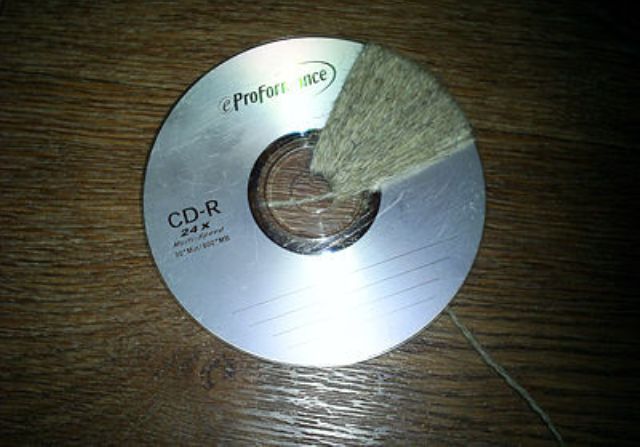
2. You can fasten the ends of the thread with glue, after tying it into a knot.
* To make it easier to wind the thread, you can use several not very long lengths.
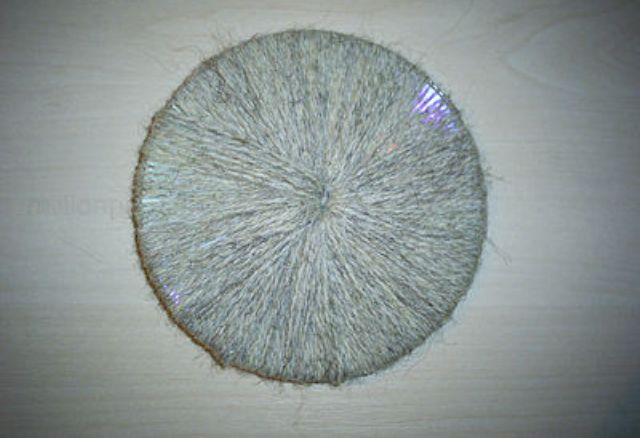
3. It remains to glue the shells using a hot glue gun. If not, you can use superglue.
* You can tie a thread or ribbon to the back to hang the craft on the wall.
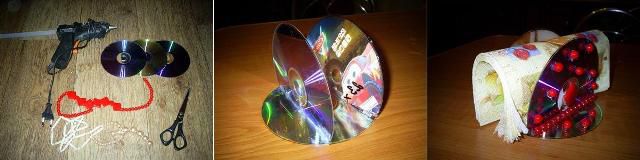
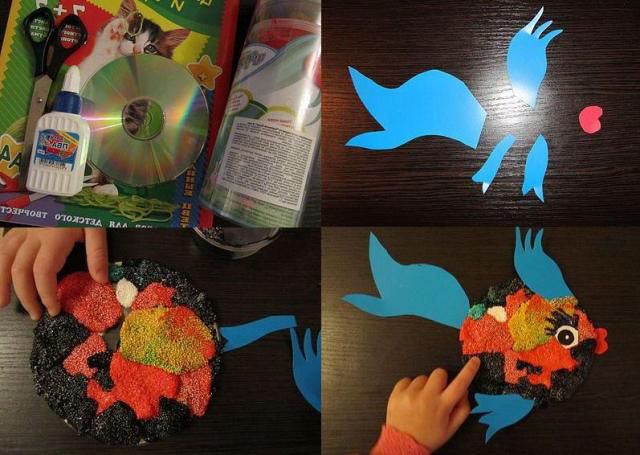
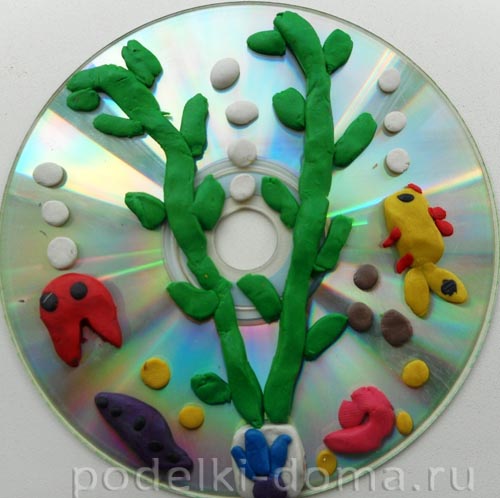
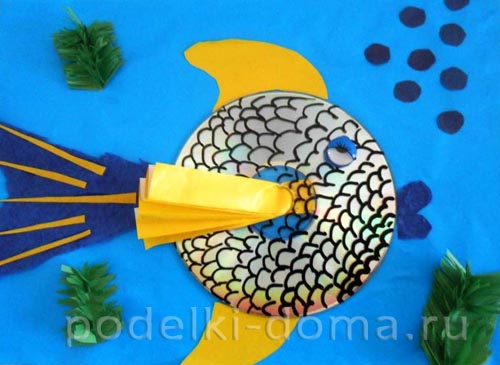
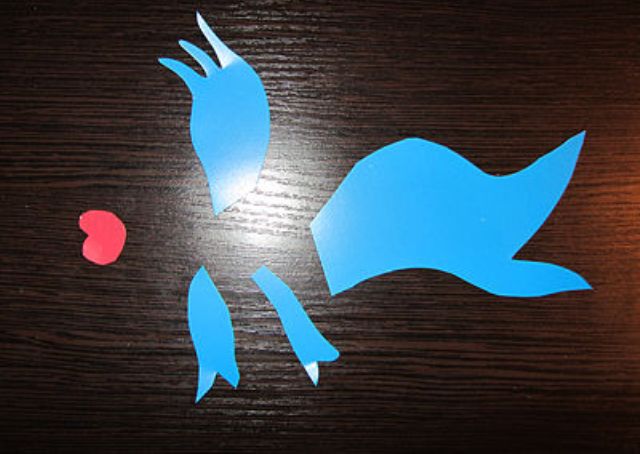
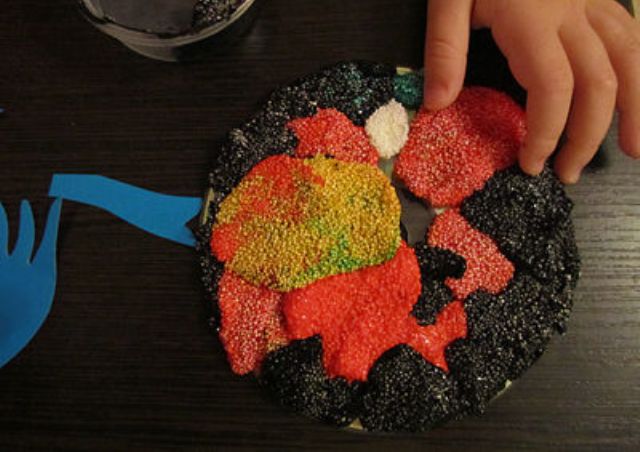
Children's crafts from disks. Fish.
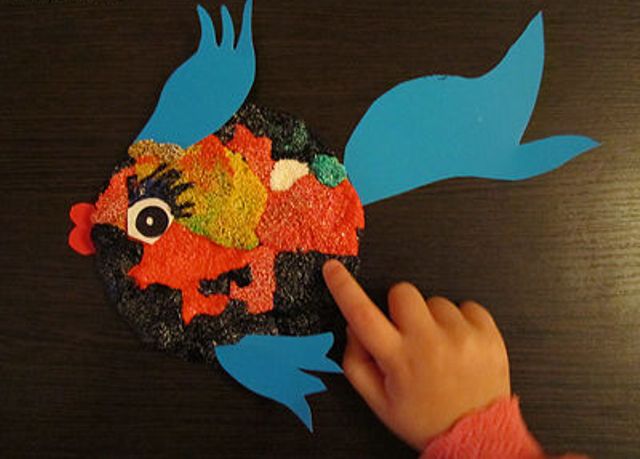
This craft can be done with little kids. The disk fish can be used to decorate a room or as a colorful postcard.
You will need:
1 CD
colored cardboard
Ball plasticine
PVA glue
Scissors
felt-tip pens
1. Prepare colored cardboard and cut out the fins, tail and mouth of the fish.
2. Take a few pieces of ball plasticine of different colors and cover the entire surface of the disk with them.

3. It remains to glue the cut out details of the fish, add plasticine eyelashes and you're done.
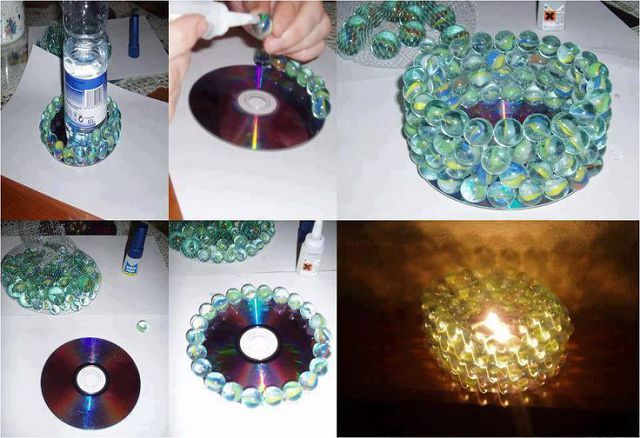
What to do from disks. New Year's candlestick.
Old discs can also be used to make Christmas crafts, such as a candlestick.
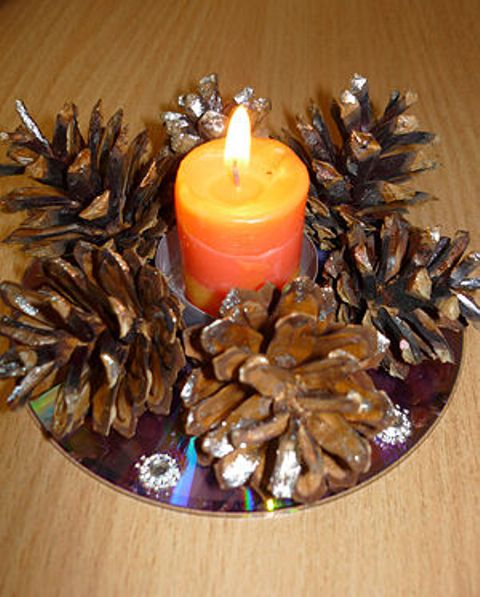
You will need:
1 CD
Superglue (glue "Moment")
Silver or glitter nail polish
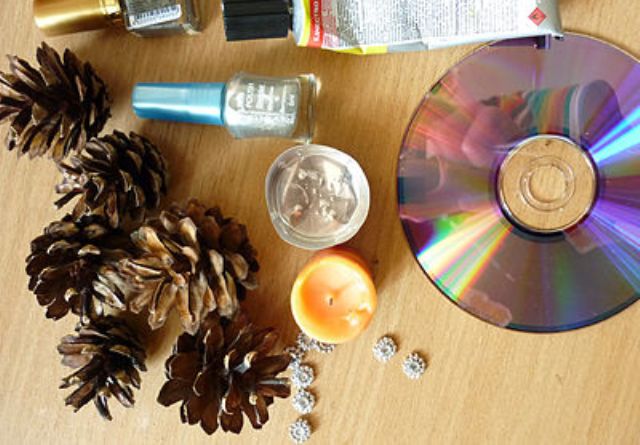
1. Glue the bumps to the disk using superglue. At the same time, leave room for a candle.
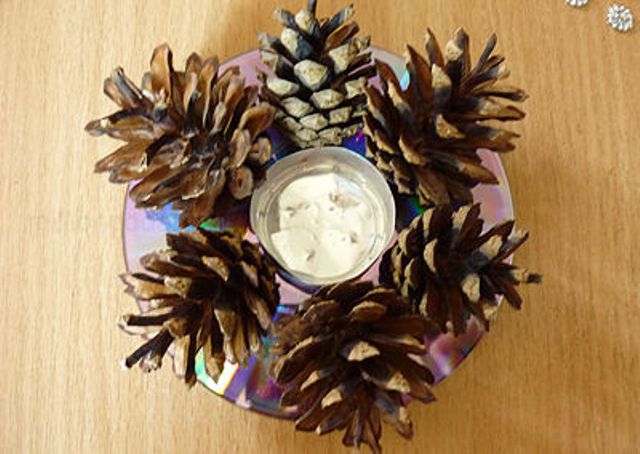
2. Coat the cones with varnish and let the varnish dry.

3. You can glue rhinestones between the bumps and leave to dry.
4. Now you can insert a candle in the middle of the composition.
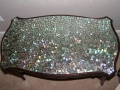
What can be done from disks. We decorate the chair with a mosaic.
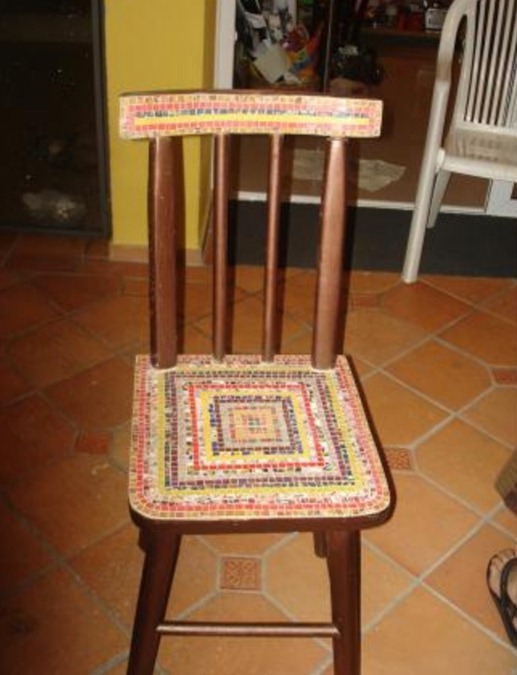
You will need:
About 50 CDs
Sandpaper
PVA glue
Unnecessary glossy magazines
Scissors
Wet rag
Construction putty
1. The mirror surface is not needed, which means that the mirror part of the discs must be processed with sandpaper. After that, each disc must be rinsed with running water.