Epson L210 (click to enlarge)
First we need to determine where our problem is (if the Epson L210 does not print) in the printer or in the computer. To do this, you can print the test on a printer. Press the “Cancel” button, then press the “Power” button and wait until the Power indicator flashes 2 times. Let's release the buttons.
If the test prints (even with stripes), then the printer is alive. This means the problem is most likely in the computer. Computer printing problems are discussed in some detail in this article + you need to check the USB connection (reconnect the cable to a different connector or check with a different cord).
If the printer does not print at all, it is better to immediately contact service center.
If your Epson L210 prints with streaks, read on.
Software cleaning
1. Let's go
Control Panel\Hardware and Sound\Devices and Printers
2. Right-click on the Epson L210 and select “Printer Properties”.
4. In the window that opens, go to the “Service” tab and select “Print head cleaning”.
5. In the window that appears, click “Start”. (On the printer, you can start cleaning by holding down the “Cancel” button for 3-4 seconds.)
6. Wait for the cleaning to complete (until the power indicator on the printer stops blinking). We perform a nozzle test.
- If the test is printed perfectly, you don’t have to read any further.
- If the nozzles are clogged, clean it 2 more times and print the test. If the test shows stripes, read on.
Ink pumping
Air may have entered the system. You can remove it by pumping the ink as described in the article of the same name. Then, we do software cleaning of the nozzles and print the test. If there are stripes again, read on.
To avoid problems with printing on an Epson printer, you should purchase consumables only from official dealers and trusted manufacturers, for example, from Master Service. We diagnose and repair printers with any malfunction.
Most Epson printers are equipped with a separate print head. The ink is located in a separate part of the printer and serves as a kind of storage. As commands are received, ink is drawn from the front of the printer into the device and applied to the paper.
One of the frequent breakdowns in which people contact the service center is that the Epson printer does not print black. It is possible that other colors appear on the screen correctly, but black ink does not appear.
Before making repairs, you should diagnose and understand why the epson printer does not print in black.
Reasons why Epson printer does not print black
Of course, only qualified service center technicians can identify the cause of the malfunction and fix the problem. However, users will also be interested to know about the most common causes of problems why the Epson inkjet printer does not print black. Among them:
- Use of low quality Supplies. Sometimes incorrectly selected cartridges or combining cartridges from different sets leads to the printer not working correctly;
- Using ink that is too thick or thin will cause the nozzles to become clogged;
- For some Epson printer models, insufficient ink levels in the cartridges cause a malfunction. In this case, the black color may be absent or look very pale. It turns out that the printer does not print in black but prints in color;
- The print head is clogged. Only specialists can cope with this problem.
- The printer is not configured correctly. It may not be installed drivers, or not configured correctly, or the printer itself is not configured correctly in the settings. This is often the reason why the Epson printer does not print in black.
Epson inkjet printer does not print in black: repair
Manual cleaning is necessary when using the device for a long time. Only an experienced craftsman can do it efficiently.
In order to consult with a specialist, just call our service center and arrange a convenient time for a visit. Proper cleaning of your printer will extend its lifespan by several years. People come to us especially often because the Epson l120 and r300 printers do not print in black.
Highly qualified specialists, a competent approach to solving each situation and the availability modern equipment allow you to repair and cope with the problem when a color printer does not print black.
Most Epson printers have a separate print head that prints, the rest of the cartridge is the cartridges located at the front of the printer that do not move. That is, cartridges can be considered as small deposits of ink that feed the print head, which does most of the work.
These printers are famous for their high print quality. Most photographers use this device to print their work. After all, it is suitable precisely for those who require best quality print. It is quite possible to achieve good quality if you use original cartridges or a good CISS.
If your printer only prints the color elements of the document and misses the black elements, then there is a problem with the black cartridge. There are many reasons why this problem could occur. The best way to check what the problem is is to print a test page or check the cartridge nozzles. You will receive a page with each individual cartridge color. This way you can tell if the black cartridge is printing. Checking nozzles is not the same as printing an image.
The first and most common problem is that the print head is clogged. This is completely normal and happens often. Therefore, we recommend reading the article . We recommend that you at least try the procedure described in this post, as it has helped many of our readers. Below we leave instructions for performing this procedure in two stages: complete the first, and then the second, if the first does not help.
Try cleaning the print head using the printer software
The printer software can help with print head cleaning if the problem is minor. For black, you can clean the nozzles only for that cartridge and use less ink. Over time, the printer accumulates ink waste on the print head, which prevents ink from flowing through it. If there are not too many of them, you can start cleaning the print head.
There are two types of print head cleaning: standard cleaning is not very effective, and there is also another method calledBefore performing this procedure, remember that it uses a large amount of ink, so we recommend using it only for black. The cleaning process is as follows: using ink from the cartridge, apply strong pressure to the dried residues and push them out of the nozzles to clean the PG.
Perform manual PG cleaning (complicated process)
You can purchase Epson nozzle cleaner at some printer repair stores. Try your best to ensure satisfactory cleaning results. Below we describe the cleaning process. If this fails, this may lead to replacing the printer.
Try the method described in the articleat home. This will require a number of tools, which are a little hard to come by unless you're a professional printer tinkerer, but it's still worth a try to clean the print head.
It should be noted that obtaining a new print head is not easy. They are not very widely available and you won't find them in any printer parts store. Such a part can be removed from a used printer; it can be removed from inside the printer. There are printers that are easy to purchase but they are expensive, check the availability of printers online.
Let's consider possible variant restoration of the device, which is not helped by the usual “soaking”. That is, “soaking” for several days does not change the situation. One or more colors have not been printed and continue to disappear.
For example, let's take Epson printer L100, which we had been trying to restore for a week before. The problem with the device is that the black color disappears.
Let's start restoration. Let's try the so-called “pushing” method.
In order to push it through and not make too much of a mess inside the printer, take a small cloth. Let's fold it to the size of the place where we will then move the printer head and where the ink will drain during the cleaning process.
Now, in order for us to “unpark” the head, we move it to the right all the way. You also need to turn the gears that are located on the upper left edge of the head towards you.
You need to turn it once or twice.

After this, carefully move your head behind the train to the left. At the same time, hold the cloth so that when you move your head, it does not gather into an “accordion”, but neatly ends up under your head.
We need to get paint tanks. To do this, unscrew the lid. In our case, it is secured with two bolts. If you have another similar device, the cover may be secured with three bolts, or there may be a different configuration.

We remove the cover to gain access to the tanks (reservoirs) with paint.
In order to remove these tanks, we press on the latches that hold them in the grooves. The latches are located on the far side of the tank.
Gently press the latches, the tanks will pop out of the grooves. Then we need to raise them. We hook them with something, take them out and put them aside.

We are interested in black color. Therefore, we take a tank with a black color and make sure that there is no air in it. Air may also cause printing problems.

If you have air there, you will need to pump out the air from the reservoir with something and refill it with ink.
If everything is fine here, then proceed to the next step.
We take a special syringe with a rubber band. We must put this rubber band on the fitting where the ink reservoir goes. The elastic band is taken from a diaper of the same device.
If there is no such rubber band, then you will have to come up with something. You can take it from under the system. It seems to fit too, or look for a similar elastic band.
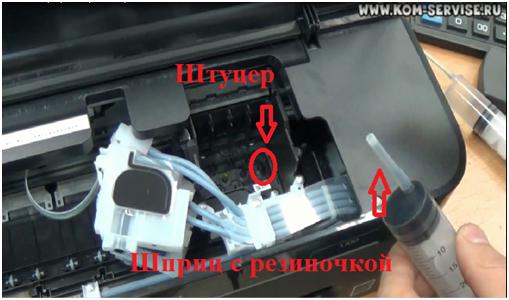
Now we put our syringe with an elastic band on the fitting. The process is quite inconvenient, so to make it easier, you can use improvised means, such as scissors or tweezers. We dress very tightly and all the way.

Let's start pushing. It’s better to play it safe and tightly hold our rubber band on the fitting with something. You can use the same scissors.
We do this because when pushing, a lot of pressure occurs. And if everything is clogged there, then the liquid has nowhere to go, the rubber band can come off and splash everything around.
We squeeze the rubber band and squeeze out all our flushing liquid. Squeezing two to three milliliters of liquid is enough.
If flushing is difficult, it means the nozzles in the device are clogged - this is a bad sign.
The meaning of this washing is as follows. Particles of dried ink inside the nozzles that cannot be dissolved can be squeezed out under the pressure of the washing fluid and your machine will print normally again.
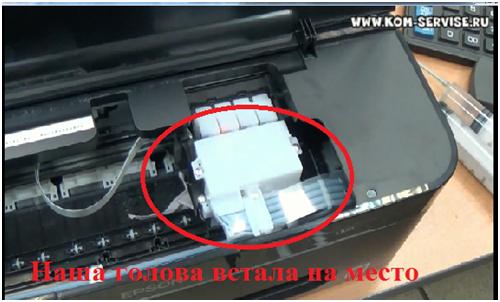
After we have pushed all this through, we install our tanks back.
You need to be careful when putting them back, since the tanks should be placed tightly to the edge of the grooves closest to you. Because if the tank is placed on the far edge, it will fit, but not tightly in the grooves and can break the holder.

After installing the tanks, screw on the lid and move our head to the side.
We will notice that our rag will be covered in washing liquid. Carefully take it or another cloth and once again blot the place where it was lying and any possible liquid leaks nearby.
Let the printer dry and the next day you can test it and see if the problem is resolved.
If the color disappears again during printing, the problem will most likely be in the fine ink filter. It's clogged and the ink just can't keep up. the required speed pass through this filter to the head.
When printing large volumes, the problematic color will disappear. For small volumes, the problem may not be noticeable.