Access can be configured in several places in the program, but it is recommended to do it for the user profile. We go to the administrators profile and what do we see?
Editing of setting values is prohibited. This is absolutely normal and you should not try to install them in another location. The system just thinks if the user has one of the roles - “Full rights”, then he is allowed everything,regardless of the settings of additional rights. Therefore, there is no point in setting them up. For other profiles, additional rights are fine.
But additional rights can be configured not only for a profile, but also for a group and for a specific user.

How will the system behave if the values of additional rights for the user and his profile do not match? It may seem that the system should in this case use the value of the right set by the user as more accurate. But that's not true! The priority of profile rights is higher than that of user group and user.Having read the value of the profile right, the program will not even look at what is set there for the group, which is why it is necessary to configure it in the profile.
Why, then, is it possible to fill in rights for a group and a user if they are not used anyway? And they will be used if the user has not been given a profile. Which rights will the system take in this case? Let's look in the configurator:
Function ReadValueUserRight(Right, DefaultValue, User) ReturnValues= New Array ; Request = New Request; Request.SetParameter("User", User); Request.SetParameter( "User Rights", Law); Request.Text = "SELECT ALLOWED VARIOUS | RegisterValueRightValue|FROM | Information Register.Values of Additional User Rights AS RegisterValue of Rights|WHERE | RegisterValueRight.Right = &UserRight | And RegisterValueRight.UserB| (CHOOSE | UsersGroups.Link AS Link| FROM | Directory.UserGroups.UsersGroups AS UsersGroups| WHERE | UsersGroups.User = &User | | COMBINE EVERYTHING| | CHOOSE | VALUE(Directory.UserGroups.AllUsers) | | COMBINE EVERYTHING| | CHOOSE | &User)"; Sample = Request. Run(). Choose(); If Sample. Quantity() = 0 Then ReturnValues. Add(DefaultValue); Otherwise Bye Selection. Next() Loop ReturnValues. Add(Selection.Value); EndCycle; endIf; return ReturnValues; EndFunctionThe function returns an array of rights values specified for the user, the user's group, and the All Users group.
Function RightIsUser(Right, DefaultValue) ArrayRightValues = GetUserRightValue(Right, DefaultValue); Return ArrayValuesPermissions.Find(True)<>Undefined; EndFunctionDon’t forget about the “All Users” group. It includes all users of the system, but rarely does anyone look at what rights are assigned to it. It would also be wrong to set a value for this group if we want it to apply to all users. I repeat, the profile has a higher priority; it is in it that you should edit additional rights.
It is also worth adding that the system does not read this register every time, but places the data in the cache after the first read and subsequently takes data from it. Therefore, the value set to the user will only take effect in the next session.
So, let's summarize:
If the user has the “Full rights” role, then he does not need to set the values of additional rights; he is already allowed everything. If the user is given a profile, then the value of the corresponding profile is taken. If the profile is not specified, then the system reads the values for the group, the user and the “All Users” group, and selects one according to the principle: if it is allowed in one place, then it is allowed at all.
Working in the 1C program allows different users to assign functional access to documents and database directories. For example:
- If the user works as an accountant, then in 1C he is assigned the appropriate role, which allows him to add, change, delete documents and directories on business activities.
- If a 1C user works only with reports and views database data, say a manager, then he is given rights to read data.
- A user who can work with all objects of the 1C program - Administrator, has full rights and receives unlimited access to work with the database in 1C.
Access rights can only be configured Administrator– 1C user who is assigned Full rights.
Setting access rights in 1C 8.3 Accounting 3.0
In 1C: Accounting 8th edition. 3.0 there are 4 main profiles for working with the program:
- Administrator;
- Accountant;
- Chief Accountant;
- Synchronization with other programs;
- Only reading.
To understand the principle of setting rights in 1C, let’s turn to the configurator. When analyzing configuration objects we will see a special branch Roles, where all possible accesses to database data specified by 1C developers are listed:
Each role corresponds to a set of capabilities for working with configuration objects, these are:
- Reading;
- Addition;
- Carrying out;
- Cancellation;
- Editing;
- Delete.
If you open a given role, then for each object you can view what can be done with each configuration object:

It is important to know that a 1C user can be assigned any set of roles from the list specified by the developers. At the same time, if in some role it is impossible to change an object, but in another role added to this user it is possible, then the resulting user rights will be “changeable”. The roles complement each other. To ensure that an object cannot be changed by the user, none of the roles assigned to it should have “Change”.
Setting up access rights in 1C 8.3 Accounting
Setting up access rights in 1C 8.3 is carried out in the Administration section - User and rights settings:

The User and Rights Settings window opens:

Let's consider the possibilities of setting up access in 1C.
How to create a new user in 1C 8.3

By default, the 1C program sets Login to the program is allowed, Show in selection list and login to the program using the login and password set in 1C. You can set the password yourself, or you can suggest setting it to the program. As a rule, the password specified by the 1C program meets a more serious level of verification and it is more difficult to select such a password when hacking the system.
You must remember the password! If the password is lost, only the Administrator can reset it again. If the passwords are lost and you cannot enter the database, you will have to “hack” the entrance to the database.
Specialists use a HEX editor for this and change the information responsible for working with users in the right places. This is possible, but not advisable.
How to set up access rights based on standard profiles in 1C 8.3
Each user (Administration – User and rights settings – Users) is assigned Access Rights from the list of profiles that is in the configuration. For example, for accountant S.B. Petrova. assign the Accountant profile:

Here we can transfer settings to a new user from a user already working in 1C: Functionality settings, internal report settings, etc., so as not to waste time and type everything manually:

We mark the settings for transfer to the new user Accountant Petrova from the Administrator user:

Transferring personal settings, printing settings and Favorites:

Press the button. Select “Copy and close” in the settings selection form. All settings for a new user from the Administrator user have been transferred.
Setting up access rights with adding new profiles in 1C 8.3
We create a new profile with limited access to directories and documents. Access Group Profiles – Create:

It is convenient to create a new profile for 1C subsystems. For example, for the rights of the Accountant we can note the following functionality:
- Reflection of salaries in accounting;
- Reading taxes and contributions;
- Mutual settlements with employees;
- Personalized accounting;
- Payroll accounting:
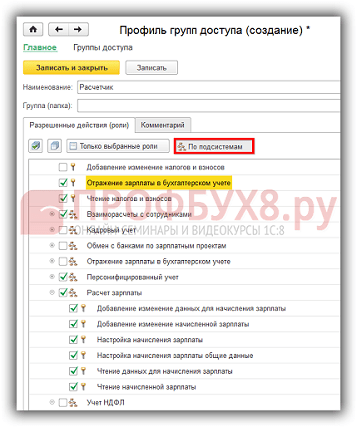
According to the book Only selected roles a list of selected user roles is displayed. Personnel accounting can be set separately for the HR profile.
How to configure additional access rights to existing standard profiles in 1C 8.3
You can add functionality to a specific 1C user with a selected profile. For example, for the user Petrov, in the Accountant profile, the command is not available All functions, but we can add it to this user. Go to Administration – User and rights settings – Access group profiles. Book Create – All functions mode – add rights “All functions” mode:

We add a new profile to accountant S.B. Petrova:

Setting up additional access rights to individual documents and directories in 1C 8.3
This setting allows you to work with the configuration extension. Let's say you need to set up access for a 1C user to an arbitrary set of documents and reference books. The set of these documents and reference books may be different - 1C developers are not able to provide all the options for suitable roles that users may need in practice. Moreover, requests for access to data can be completely extraordinary.
In 1C 8.2, we had to remove the editing ban from the configuration and add a new role to Role objects, assigning access to the necessary directories and documents, and accordingly, difficulties arose with the subsequent 1C update. Such configurations were no longer automatically updated, so only users of organizations with 1C programmers on staff could afford such a pleasure.
In 1C 8.3, due to the emergence of a new ability to work with configuration applications, we can implement our task of delimiting user rights without removing the editing ban from the main configuration and leaving it completely standard. Let’s look at how to do this now:
- For reference Users Let’s enter an additional attribute “Access_Sale_Products”, which will take the values “Yes” or “No”.
Go to Administration – General settings – Additional details and information. We enable the ability to work with “Details and information with a general list of values”:

- Opening the hyperlink Additional details.
In the left column of the lists of configuration objects we find Users and click on the button. Add. Fill out the form that opens as shown below. The new attribute will have two values: “Yes” and “No”. Let's combine the values into the “Access” group. Fill out the Main tab:

Fill in the Values tab:

- Now let's fill in this information for our users.
“Petrov’s Accountant” – No:

"Administrator" - Yes:

All necessary actions in the 1C 8.3 database have been completed, now we will work with Configuration extension.
- We enter the database configurator: Configuration – Configuration extensions:

We add a new configuration extension according to the book. +:

We agree with the default extension data or set our own:

Open the extension configuration using the book. :

Now we will transfer the data necessary for work from the main configuration. The created configuration extension “Extension 1” is still empty:

In the main configuration, we find in the documents – the document Sales of goods and services, and transfer the form with which we will work. For example, let’s add “ProductsDocumentForm” to the configuration extension by clicking on the name of the form and right-clicking on it. mice. From the drop-down menu, select the “Add to extension” command:

Open the form in the configuration extension and create event processing BeforeRecording. When creating an event handler, the 1C 8.3 program will ask you to indicate where to create the program code. Select: Create on the client and a procedure on the server without context:

When an event is created, we will see in the empty cell of the “BeforeRecord” events the event processing procedure assigned by the 1C 8.3 program: “Ext1_BeforeRecord”:

Go to the form module and insert the following program code:

We update the changes and run the database in user mode to check the changes made. Log in as the user Accountant Petrova and edit the document Sales of Goods and Services, click the button. Write down:

For the administrator, editing the document will be no problem.
The given program code can be placed in the 1C 8.3 configuration extension for any document and reference book, and this will allow you not to change the standard configuration, but at the same time solve the problem of access to database objects for different users.
How to provide access to a report version with individual settings for other users in 1C 8.3 ZUP, see our video:
Hello dear blog readers. I had to delay the next article a little due to intensive reporting and a large number of incoming questions about this. By the way, you can ask your questions in the chat or send messages directly to me by email. But enough advertising) Today we will talk about the new useful and interesting opportunities that it gives us new platform 1C Enterprise 8.3 and configurations built on its basis: Salary and HR Management 3.0 And Enterprise Accounting 3.0.
The article will talk about how to configure user access yourself only to those documents, directories and reports that he needs for work and limit access to the rest. This will help us command interface with flexible settings, which appeared in 1C programs version 3.0. Discuss features differentiation of access rights we will use the 1C ZUP 3.0 configuration for program objects, but the same mechanism can be successfully used for the 1C Enterprise Accounting 3.0 software product. Actually, I studied this issue when I assisted in setting up users in Bukh 3.0.
How to create a user in normal user mode of 1C edition 3.0
✅
✅
✅
I would like to immediately note that we will have to work with both the normal user mode of operating the program and the configurator mode. There’s nothing scary or complicated about this, you don’t have to program) I’ll also immediately note that the screenshots in this article will be presented from something new that recently appeared in programs 1C edition 3.0 of the Taxi interface. To switch to it, just open the service menu and find the parameter settings there. In the settings window, in the “Appearance” switch group, select the “Taxi” interface and restart the program. Although, for those who are comfortable staying in the normal interface, all documents, reference books and settings that I will discuss in the article are identical in these interfaces.
Let's look at a situation where you don't yet have the required user. You must create a user in normal user mode. Go to the “Administration” section of the main menu and there we find the “User and Rights Settings” item.

If required, you can immediately set a password.

Now, regarding the access rights for this new user. There is no need to install them. You can access the access rights settings directly from the form in which the user is configured. Just click on the “Access Rights” link at the top of the page. So, it is necessary that in the access rights (and on the tab "Access groups", and on the bookmark “Allowed actions (roles)”) everything was empty. We will configure rights not in user mode, but in the 1C configurator, a little later.

But there is an important feature in this regard. It is necessary that there is at least one user in the database who has administrative rights. My user is Administrator. He is a member of the access group "Administrator" and has roles "System Administrator" And "Full rights."

Now we should go to the configurator mode and continue configuration there. To do this, when starting 1C, select the desired database and click the “Configurator” button. Just don't log in as a new user. He does not yet have any rights, and work will be impossible. You must log in as a user with full rights, in my case it is “Administrator”.
 |
After opening the configurator window, let's make sure that the new user we created is also displayed here. The list of users in the configurator is stored in the main menu section “Administration” -> “Users”.

Please note that the user has a question mark. This means that no role is defined for it, i.e. in other words, no access rights are specified. "Roles" is a configuration object. Each role establishes a set of documents, directories, and reports that a user with this role has access to. We can see all available roles if we open the user and go to the “Other” tab.

Let me remind you that we need to configure an employee’s access to a random set of documents, reference books and reports. At the same time, I didn’t even specify which set we were talking about, it’s not that important. But the important thing is that for such cases there is not and cannot be a suitable role in the configuration. 1C developers are not able to provide for all possible options for restricting access to objects that are encountered in practice. And the end user’s requests can be very extravagant.
Editing mode for a standard configuration in 1c
✅ Seminar “Lifehacks for 1C ZUP 3.1”
Analysis of 15 life hacks for accounting in 1C ZUP 3.1:
✅ CHECKLIST for checking payroll calculations in 1C ZUP 3.1
VIDEO - monthly self-check of accounting:
✅ Payroll calculation in 1C ZUP 3.1
Step-by-step instructions for beginners:
As you probably already understood, I am leading to the fact that we will have to create your own role. In this case, one important detail should be discussed. Creating a new role means making a change to the standard configuration. For those whose configuration has already been finalized and is not standard, nothing will change. To begin with, I’ll tell you how to determine whether the configuration is standard or not.
First, you need to open the configuration. To do this, in the “Configuration” section of the main menu, click "Open configuration". After this, a window with a tree structure of all information base objects will appear on the left side of the configurator. Secondly, also in the “Configuration” section of the main menu, go to “Support” -> “Support Settings”. A window of the same name will open. If the window looks like in the screenshot, then your configuration is standard. By this I mean the presence of the inscription "Configuration is being supported" and the presence of a button.

So, if you have a standard configuration, then we will have to enable the ability to change it, otherwise we will not be able to create a new role. Separately, I would like to note that from the point of view of updating there will not be any special difficulties, since we will be creating a new role and not changing existing ones, therefore all standard configuration objects will remain standard. To enable the ability to edit the configuration, you need to in the window "Support Setup" press the button "Enable editability".
Perhaps in future publications I will write in more detail about this kind of update. So, in this window we need to answer “Yes”.

Next, the “Support Rules Settings” window will open, where you need to select the “Supplier object is edited while maintaining support” radio button. For our task this will be quite sufficient. Just keep in mind that after clicking “OK” you will have to wait a bit before continuing.

After this, the locks should disappear in the tree of configuration objects (remember, when we opened the configuration, it opened on the left side of the configurator), and the message “Support Settings” will appear "The configuration is being maintained with the possibility of change."

How to create a new role in the 1C configurator
✅ Seminar “Lifehacks for 1C ZUP 3.1”
Analysis of 15 life hacks for accounting in 1C ZUP 3.1:
✅ CHECKLIST for checking payroll calculations in 1C ZUP 3.1
VIDEO - monthly self-check of accounting:
✅ Payroll calculation in 1C ZUP 3.1
Step-by-step instructions for beginners:
Now we can start creating a new role. Let me explain once again what a “Role” is - this is a set of rights that determine the ability to view or edit directories, documents and other configuration objects. View and edit are the most understandable permission options, but there are many others. To make it clearer, let’s select the “Full rights” Role in the object tree (General -> Roles -> Full rights). The settings window will open. In this window, all program objects (directories, documents, reports, etc.) are listed on the left, and on the right are the rights that are defined in this role for each of the objects. You can see this in the screenshot.

Now let me remind you of the problem. We need to ensure that the user can work only with a limited range of documents, reports and reference books. The most obvious option is to create a new role and define access only to the necessary objects. However, the configuration contains a large number of all kinds of service objects, such as constants, common forms, common modules, registers for various purposes, and for normal user operation it is necessary to have access to these common objects. There are quite a lot of them and it is very easy to miss some object. Therefore, I will propose a slightly different approach.
Let's create a new role by copying the default Full Rights role. Let's call this new role “Role_Frolov”. To edit the role name, you need to go to the properties and specify a new name without spaces.

Now let's set this role for the user “Frolova”. Before this, we need to save the information base so that the newly created role appears in the list of available user roles. Press the F7 key or click the corresponding button in the toolbar. After this, we can set this role for our user. Go to the list of users (Administration -> Users) and on the “Other” tab, check the box next to the “Frolov Role” role. Click "Ok".

For now, this role is completely identical to the original one (“Full rights”). We will leave it this way. Bye. And we will set up access to documents and reference books, using the flexible configuration capabilities of the 1C program command interface.
How to configure command interface elements in 1C
Now we have to return to normal user mode, i.e. as during normal work in 1C. We need to launch under our new user - Frolov S.M. This can be done from the configurator. However, you must first set the setting so that when you start the Enterprise from the configurator, you are prompted by the user under which it should be launched. To do this, in the main menu, select “Tools” -> “Options” and on the “Launch 1C:Enterprise” tab in the “user” section, set the “Name” switch, click OK and we can launch the user mode directly from the configurator. To do this, use the command from the main menu “Service” -> “1C:Enterprise”. And don’t forget that we must select the user Frolov.

When the program starts under the user Frolov, all objects will be available to him, since his role was created by copying full rights, and we did not change anything. Let's assume that this user only needs to retain the capabilities of personnel records, but not everything, but only admission, transfer and dismissal. First, you need to remove all unnecessary sections and leave only one - “Personnel”.

To do this, go to the service menu View -> Setting up the section panel. In the window that opens, move all unnecessary sections from the right column to the left.

Now note that we will only have 2 sections “Main” and “Personnel”. We cannot remove the “main thing”, so it is necessary to leave only the necessary links in this section. To do this, go to this section and click in the upper right corner "Navigation settings". This window is similar to the one in which we removed unnecessary sections, and it has the same principle of operation. In the right column we leave only the necessary documents and reference books.

And as a result, in the “Main” section we will have only the set of documents, reports and reference books necessary for the personnel officer.

As for the “Personnel” section, it can be left in its original form or configured more finely if, for example, the personnel officer does not have to deal with sick leave, vacations and maternity leave. In the same way, these documents can be removed from the navigation panel. I will not dwell on this in detail, since it already depends on the specific task.
I’ll just point out one more element that also needs to be configured to prevent the user from accessing data that is closed to him. This element is "Home page"or whatever they call it "Desktop". It opens automatically when you start user mode. To set up the home page, open the service menu View -> Set up home page. A window will open in which you can configure the composition of the left and right columns from the list of available forms. The choice of available forms is not so large. So, for example, for our situation, where an employee is engaged in personnel, we should not give him access to such a form as “Salary calculation: Form”. But I decided to remove all forms altogether, so as not to tempt the user once again. The start page will be blank.

Final setup of the user role in the 1C configurator
So, let's assume that we have configured access to all necessary documents and reference books for our personnel officer, using the capabilities of the command interface. Now the main question is how to make it so that the user himself cannot open the interface settings and give himself access to prohibited documents. To do this, return to the configurator and select General -> Roles -> Frolov_Role in the configuration object tree. Let's open this role. Now in the window that opens, position the cursor on the inscription “Salary and Personnel Management”, and in the “Rights” column we look for the setting "Saving user data". Uncheck the box next to this setting. This means that the user himself will not be able to customize the contents of the section panels, navigation bar and desktop, and therefore will not have access to prohibited sections from the command interface.

To verify this, you can go to the database under the user Frolov and try to open the settings for sections or navigation. However, you will not find the “View” item in the service menu. It became unavailable because we removed the right to “Save user data” from the user role Frolov.

Thus, we limited the user's visibility of objects to only those directories, documents and reports that he really needs for work. At the same time, in the configurator mode, only one checkbox was edited in the rights of this employee.
However, that's not all. We have limited explicit access to prohibited objects. However, the user may end up in an unwanted directory or document from a document accessible to him. So our personnel officer Frolov can open the “Organizations” directory from the “Hiring” document and accidentally or purposefully change some data there. To prevent a similar situation from happening, you should review and analyze all objects that are associated with documents and reference books available to the user. And then in the configurator, open the role of our user and prohibit editing or even viewing unwanted objects. The specific option is up to you to choose, depending on the task at hand.

That's all! We solved a rather complex problem in a not very complicated way. Anyone who has read to the end can rightfully be proud of themselves) If I missed something and you have any comments, I will be glad to see it in the comments to the article.
New interesting materials will appear soon on.
To be the first to know about new publications, subscribe to my blog updates:
Access rights system allows you to describe sets of rights corresponding to user positions or types of activities. The structure of rights is determined by a specific application solution.
In addition, for objects stored in the database (directories, documents, registers, etc.) access rights to individual fields and records can be defined. For example, a user can operate with documents (invoices, invoices, etc.) of certain counterparties and not have access to similar documents of other counterparties.
Roles
To implement restriction of access rights in application solutions, special configuration objects - Roles - are intended. .
Interactive and Fundamental Rights
All rights supported by the 1C:Enterprise system can be divided into two large groups: basic and interactive. Basic rights describe actions performed on elements of system data or on the entire system as a whole, and are always checked, regardless of how the data is accessed. Interactive rights describe actions that can be performed interactively by a user. Accordingly, they are checked only when performing interactive operations using standard methods, and in the client-server version, all rights checks (except interactive ones) are performed on the server.
Fundamental and interactive rights are interrelated. For example, there is a basic right called Delete, which has two associated interactive rights: Interactive Delete and Interactive Delete Marked. If a user is prohibited from deleting, then all interactive “deletions” will also be prohibited for him. At the same time, if the user is allowed to Interactively delete marked items, this means that he is also allowed to Delete.
Moreover, fundamental rights may depend on each other. As a result, quite complex chains of relationships are formed that are tracked by the system automatically: as soon as a developer removes permission for a right, the system itself removes permissions for all rights that depend on this right. And vice versa, when a developer sets a right, the system itself installs all the rights on which this right depends.
For example, in order for the user to have the right Interactive removal of marked, he needs to have interactive rights Editing. This right, in turn, requires an interactive right View:
Right Interactive removal of marked Removal. Interactive Law Editing requires a fundamental right Change. Interactive Law View requires a fundamental right Reading.
In addition, basic rights Change And Removal require a fundamental right Reading.
Restricting access to data at the record and field level
Among the actions on objects stored in the database (directories, documents, etc.), there are actions responsible for reading or changing information stored in the database. These actions include:
- reading - obtaining records or their fragments from a database table;
- adding - adding new records without changing existing ones;
- change - changing existing records;
- deletion - deleting some records without making changes to the remaining ones.
For these actions, during the process of setting up roles, additional conditions on data can be set (restricting access to data). In this case, the requested action can be performed on a specific object stored in the database only if the data access restriction for that object's data is true. Similar conditions can be set for database tables that do not have an object nature (registers).

For object tables and information registers, different restrictions can be set for different table fields, which allows you to define restrictions not only at the level of database records, but also at the level of its individual fields:

A data access restriction is a condition described in a language that is a subset of the query language. This condition is applied to each database table record on which the operation is performed. If the condition evaluates to true, then the operation is performed, and if not, then it is not performed. The access restriction condition can be refined using preprocessor instructions (#IF<условие>, #THEN.. etc.), which will make it more effective. When viewing lists and generating reports, it is possible to ensure that only the data that the user is allowed to access is displayed.
For accumulation, accounting and calculation registers, conditions allow you to restrict access by measurement values (for accounting registers by balance sheet measurements), and for object data and information registers, conditions allow you to restrict access to data by any fields.
Restriction conditions can be entered manually or created using the Data Access Constraints Designer.
Session Options
Session parameters are application solution objects that are intended to be used to restrict data access for the current session (but can also be used for other purposes). Their values are saved during a given 1C:Enterprise session. Using session parameters allows you to reduce data access time while restricting access at the record and field level. .
Execution on the server without checking rights
Privileged modules
It is possible to assign privileged modules. Operations that use data for which the current user does not have rights can be transferred to such modules.
For example, a user might be assigned rights that allow them to create a new document. However, the user is not given any rights to the register in which this document creates movements during posting. In such a situation, the procedure for posting a document can be moved to a privileged module, which is executed on the server without checking rights. As a result, even though the corresponding register is not available to the user, the user will still be able to post the documents he has created.
Privileged code execution mode
The privileged code execution mode, similar to the code execution mode of privileged modules, can be turned on/off using the built-in language. For this purpose, a procedure is provided in the global context SetPrivilegedMode(), and also the function PrivilegedMode(), which allows you to determine whether privileged mode is enabled or not.
Using privileged mode allows, firstly, to speed up work, since restrictions on access to data will not be imposed, and secondly, it allows you to perform operations with data on behalf of users to whom this data is not available.
Privileged mode is recommended when you logically need to disable permissions checking, or when you can disable permissions checking to speed things up. It is acceptable to use privileged mode when working with data on behalf of a certain user does not violate the access rights established for this user.
1C has a built-in system of access rights (this system is called 1C roles). This system is static - as the administrator assigned 1C rights, so it will be.
Additionally, there is a dynamic access rights system (called RLS 1C). In it, 1C rights are dynamically calculated while the user is working based on the specified parameters.
One of the most common security settings in various programs is a set of read/write permissions for user groups and then inclusion or exclusion of a user from groups. For example, a similar system is used in Windows AD (Active Directory).
Such a security system in 1C is called 1C Roles. 1C roles are located in the configuration in the General/Roles branch. 1C roles act as groups for which 1C rights are assigned. The user is then included or excluded from this group.
By double-clicking on the name of the 1C role, the rights editor for the 1C role will open. On the left is a list of 1C objects. Select any one and options for access rights will be displayed on the right (at a minimum: read, add, change, delete).

For the top branch (name of the current configuration), 1C administrative rights and access to launch various options are established.
All 1C rights are divided into two groups - a “simple” right and the same right with the addition of “interactive”. What does it mean?

When a user opens a form (for example, processing) and presses a button on it, the program in the built-in 1C language performs certain actions, for example, deleting documents. “Simply” 1C rights are responsible for allowing these actions (performed programmatically).
When a user opens a journal and starts doing something using the keyboard independently (for example, entering new documents), these are “interactive” 1C rights.
A user may have access to several roles, in which case the permissions are cumulative.

A breakdown of the possibilities for setting access rights using roles – 1C object. That is, you can either enable access to the directory or disable it. You can't turn it on a little.
For this purpose, there is an extension of the 1C role system called 1C RLS. This is a dynamic access rights system that allows you to partially restrict access. For example, the user sees only documents for a certain warehouse and organization and does not see the rest.
Carefully! When using the confusing RLS 1C scheme, different users may have questions when they try to reconcile the same report generated from different users.
You take a certain directory (eg, organizations) and a certain right (eg, reading). You allow reading for the 1C role. In the Data Access Restriction panel, you set the query text, which returns TRUE or FALSE depending on the settings. Settings are usually stored in an information register (for example, the configuration information register Accounting and User Access Rights Settings).
This query is executed dynamically (when trying to implement reading) for each directory entry. Thus, for those records for which the security query returned TRUE, the user will see it, but the rest will not.
1C rights that are subject to RLS 1C restrictions are highlighted in gray.

Copying the same RLS 1C settings is done using templates. You create a template, name it (for example) MyTemplate, and specify the security request in it. Next, in the 1C access rights settings, specify the template name like this: “#MyTemplate”.

When a user is working in 1C Enterprise mode, when running RLS 1C, he may receive an error message “Insufficient rights” (for example, to read the Xxxx directory).
This means that RLS 1C has blocked reading several records.
To prevent such a message from appearing, it is necessary to use the word ALLOWED () in the text of the request in the built-in 1C language.
For example: