One of the features of the latest version of the Microsoft operating system, Windows 10, is a large number of options and settings that offer the user advanced capabilities. In this article we will talk about themes for Windows 10, their configuration, installation and removal.
Go to the “Personalization” section in one of two ways.

How to Download and Apply New Themes on Windows 10

How to Use Third Party Themes on Windows
In addition to the themes that you can find on the official Windows media, there is a tool called UltraUXThemePatcher. It allows you to install other themes you find online on Windows 10 with the Creators Update.

The next step is to download the themes.

Windows will ask for permission to move files to this folder, after receiving permission the picture should look like the picture. Thus, you have downloaded the theme on Windows OS. Now you need to double click on the selected .theme file. The changes will be applied.
How to remove themes in windows 10
Use one of three methods.
Via control panel

Via Settings

Note! Original operating system themes cannot be removed from settings.
Via Explorer

How to activate black theme?
Many people prefer text on a dark background, especially when navigating menus on their computers. Some visually impaired users also find that a "dark" or high-contrast theme is much easier to read.
By default, Windows widgets, menus, the email client, and the Edge browser have black or blue text on a white or gray background. However, by tweaking a few settings, you can give the entire OS a dark theme.
- Go to Run using the key combination “Win+R”; enter regedit in the field.
- In the window that opens, click HKEY_LOCAL_MACHINE.

- Then press the SOFTWARE button.

- Then click the Microsoft button

- Click the “Windows” button.

- Next step, “Current Version”.

- Click the Themes button.

- Right-click on the panel window and select “New” - “Key”.

Select “New”, - “Key”
- Name the key "Personalization" and open it.

- Right click - click “New - DWORD 32 bit”.

- For the new section, use the name "AppsUseLightTheme".

- Open the DWORD by double-clicking and see if the value “0” is displayed, if not, you need to enter the number “0”.

- Go to the "Personalization" section.

- Repeat steps 9,10,11.

- Close Regedit and restart your computer.

The settings menu should now have white text on a black background (as shown below).

Installing the default aero theme
The storage location for standard Windows 10 themes is the Themes folder.
This PC → system drive → Windows → Resources → Themes.

Save the file and double-click it on your desktop.
The Aero Lite Theme will be applied.
Find out detailed information with step-by-step actions in the new article -
Video - How to install a theme on Windows 10
As in previous versions of operating systems, Microsoft limits the number of desktop themes in Windows 10. However, this does not mean that it is impossible to change or add a different theme. There are several ways to do this.
Methods to install and change the theme in Windows 10
If you don't like the classic Windows 10 desktop theme, to change it or install a new one, you should follow these steps.
- Click “Start”, “Settings” and select “Personalization”.
- Go to the “Themes” section, and then select “Theme Options”.

- A control panel window will open with a list of available themes for design.

- Select the theme you like and double-click to install it. If you click on the "More themes on the Internet" link, a Microsoft page with new themes will open. Among them you can choose the popular “Star Wars”, “Marvel”, “Aero” and others.


- Download the “Star Wars” theme or any other and launch it on the PC. Go to the control panel and click “Save Theme”, giving it a name.

If you were unable to install the desired theme, you need to try adding pictures to the desired folder.
Themes in Windows 10 are stored in the “Themes” folder, which is located on the C drive in the “Windows” and “Resources” folders.

This is where the classic Aero themes are mostly stored. You need to download new themes here, restart your computer and try installing them again.
For those who like a dark theme, you can resort to editing the registry. To do this, perform the following steps:
- Press “Win+R” and enter “regedit”.

- We make a copy of the registry. In case of incorrect editing, the registry can be restored.
- Go to the branch “HKEY_LOCAL_MACHINE”, “SOFTWARE”, “Microsoft”, “Windows”, “CurrentVersion”, “Themes”, “Personalize”. If you do not have a “Personalize” section, you will need to create it yourself.

- Next, right-click on the “Personalize” section and create a “32-bit DWORD Value.” Let's call it "AppsUseLightTheme".

- We assign the value “0” to the created parameter.
- We log out of the system. Only after you log in again will the dark theme be activated.
Any themes for Windows 10 can be installed this way.
For information on how else you can change and install the theme for Windows 10, watch the video:
Quite often, users, when deciding to change the design of their desktop, want to change the theme. In Windows, this feature is not available by default, so you have to change the way some system files work by removing the limitation. In Windows 10, the theme refers not only to the appearance of the taskbar and Start menu, but also to the screen saver, which affects the color scheme. There are different ways to establish a topic in a familiar or updated sense, let’s look at each of them.
Those who have previously installed themes on Windows 7 probably remember the principle of this procedure. Using a special utility, it was necessary to patch certain files. After this, the ban on installing themes was lifted. Now, as a harmless alternative, you can use themes from the Windows Store. They only change the color scheme and background image, but often this is exactly what certain users want.
Method 1: Microsoft Store
A simple method of installing a theme that does not require intervention in system files. To do this, you must have the “App Store” installed in Windows, through which further downloads will be carried out.
As a rule, such themes are just a selection of background images on a certain topic and a general color scheme, without fundamentally changing anything. Therefore, this option is suitable for users who want to replace the usual background with a set of wallpapers in a slide show format.
- Right-click on an empty space on your desktop and select "Personalization".
- Switch to the topic section and find the link on the right "More topics in the Microsoft Store".
- Will start "Shop" with applications and games from Microsoft. You will be immediately directed to the section "Windows Themes".
- Select the theme you like and open it. Some themes may require a fee. If you are not ready to pay, use free options.
- Click the button "Get".
- After a short wait, the download and installation will occur.
- Expand the personalization window - the downloaded design will be there.

Click on the theme and wait for it to install.
- To make the color of the task bar and other elements more suitable, click on "Color".
- Check the box next to the option if it's not worth it. Additionally, you can turn on transparency by clicking on the parameter knob "Transparency Effects".
- Go up and activate the item "Automatic selection of the main color background" or adjust the color manually using the presented color scheme or by clicking on the link "Additional color".


You can delete a topic by right-clicking on it and selecting the appropriate option.

Method 2: UltraUXThemePatcher
Unfortunately, any themes that are radically different from the standard design cannot be installed without tampering with system files. The UltraUXThemePatcher program patches 3 files responsible for the operation of third-party themes. We strongly recommend that you make a restore point before using this software.
Now all you have to do is download the application from the official website and follow our instructions.

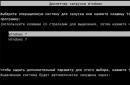
- Download and run the program. In the welcome window, click "Next".
- Check the box next to accepting the license agreement and "Next".
- The second part of the license agreement appears. Click here "I agree".
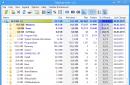
- A new window will open the status of the three files that need to be patched. Usually all three files have the status "not patched", sometimes some do not require change. Click on "Install".
- In the window with status and logs you will see the status of each patched DLL: statuses “Backup completed!” And "File patched!" indicate successful completion of the procedure. The application will inform you that you need to restart your PC to make changes. Click "Next".
- You will be asked to thank the developer by transferring to PayPal. You can skip the step by clicking on "Next".
- In the final window, select the reboot option. "Reboot now"- automatic immediate reboot, "I want to manually reboot later"- manual reboot at any time. Press "Finish".


Now you need to find any theme to your taste and download it. It’s easy to find many sites with topics on the Internet; choose the most well-known and popular sources. Don't forget to check the downloaded files with an antivirus or online virus scanner.
Be sure to check the compatibility of the theme and Windows versions! Installing a theme that does not support your build may seriously disrupt the operating system.

- Download and unpack the theme. Find the folder in it "Theme" and copy the two files that are in it.
- Now open a new folder and navigate to the following path:
C:\Windows\Resources\Themes
- Paste the copied files from "Theme"(folder from Step 1) to the system folder "Themes".
- If a window appears asking you to give administrator rights to add files to the system folder, do this with the button "Continue". Additionally, check the box "Run for all current items".
- Directly from the folder, you can apply the theme by double-clicking with the left mouse button on the corresponding file.

If prompted by the security system, select "Open".
- Done, the theme is applied.

If your taskbar color has not changed, check the setting in "Windows Settings". To do this, right-click on the desktop, open "Personalization".
Switch to tab "Colors" and check the box next to the item "In the Start menu, taskbar, and action center".


The following elements will change color:

In the future, this topic can also be included through the folder "Themes" located inside the Windows folder, or go to "Personalization", switch to section "Themes" and select the desired option.

Right-clicking on a topic opens the item "Delete". Use it if the theme is not installed, you don’t like, or it doesn’t suit you.

Please note that in the downloaded folder with the theme you can also find other design elements: cursor, icons, wallpaper, skins for various software. This is not always all there; in some cases, the creator distributes only the theme without additional elements.

In addition, it is worth understanding that none of the above components are a mandatory part of the theme. Therefore, in most cases, users install the necessary elements separately manually or through special installers created by the developer. We recommend doing this only if you are installing the topic for a long time - otherwise, changing these elements every time may be impractical and time-consuming.
We looked at options for installing themes in Windows 10. The first method is suitable for unassuming users who do not want to manually select wallpapers and colors. The second method will be useful for confident users who don’t mind spending time working with system files and manually searching for topics.
Windows 10, and there is. But if you are used to the dark theme of Windows 7 and Windows 8.1, then in Windows 10 you will not find your usual theme. In the new OS, the themes are quite light, and therefore, users feel additional strain on their eyes.
While Microsoft has yet to implement system-wide dark mode settings, you can now darken some of your everyday apps and other elements, such as . Here we will tell you how to install dark theme on Windows 10, and how to change the color of windows without being an expert.
The darkest Office theme is gray
If you subscribe to Office 365, you should have new versions of Word, PowerPoint, and Excel, as well as several other Microsoft Office applications. (If not, you can install them from your account.)
By default, these apps are pretty light, but luckily Microsoft has provided an easy way to darken them a bit (though you can't set it to pure black).
First, open any of your office applications. We'll demonstrate this using Word, but you can make changes in any office application using the same steps.
Then select File in the upper left corner.

Then select Account at the bottom of the menu on the left, and in the option Office Theme select Dark gray from the drop down menu.

As you can see above, with the dark gray theme, nothing in the application has changed, but the background around the sheet has become a little darker, and the document title at the top and the scroll bar have been made more visible.
The Start menu and taskbar have a dark theme by default
Since they are the main elements that are used every day, how they look is very important. Luckily, Microsoft has provided several options to change their appearance.

To do this, click on Windows logo in the lower left corner of your desktop.

Then click .

Select.


Here you can see the changes if you turn off Automatic selection of the main background color. After this, a grid of colors will appear. Choose the darkest gray option.

Also make sure all other colors are turned off.

As a result Task bar And start menu should become almost black or dark gray with gray icons. This is how easy it is to get a dark theme.
Edge browser has a dark theme
Are you using the latest Microsoft browser specifically designed for Windows 10? You're in luck because it comes with a built-in dark color theme.

To change the Edge color, simply open your browser, go to the three dots menu located in the top right corner and select Settings at the bottom of the drop-down menu.

In option Choosing a theme select Dark, and the theme color will change.

This dark theme is actually all black with dark gray accents, giving the edges of the browser a modern, aesthetically pleasing look.
Google Chrome supports third party themes
Are you still using Chrome? Even if you manage to darken all other apps and elements in Windows 10, it will all be in vain if your browser theme remains blindingly white.
Luckily, Chrome users have access to a wide variety of themes in the Chrome Web Store and the ability to customize them. My favorite dark theme is called Dark Theme and was made by mausx3.

Above you can see Chrome without any theme.

And this is how Chrome looks with the dark theme installed. For added effect, you can leave the default Blackle. The Google search window appears to remain the same, but uses a black background instead of white.
High Contrast Mode turns Windows Black
If it's more important to you to have a black theme rather than just a pretty one, High Contrast mode will come to your rescue.
This method, of course, is not common, but it still gives greater clarity to the image on a fairly dark screen. See for yourself.

Above are the app settings with the default theme.

And these are the application settings in mode Contrast black.
To achieve this, simply go to and select .

Then you need to click Themes from the left menu, and then Theme Options.

There you can enable high contrast mode. To get everything back, just follow the same path and install one of the "Default" themes available in Windows 10.
Registry hack will add a stylish black Theme
This method of changing the theme color is possible if you are familiar with the Windows Registry Editor. Experimenting with the registry can damage your computer, so be careful and remember that we are not responsible for your actions.
It seems fantastic, but this registry patch allows you to install a completely black theme in the application settings, Windows Store, and some other System applications. To do this, simply download this and double-click the file called .

You may need to restart your computer for the changes to take effect, but for me the changes were immediately visible. Above you can see the dark Settings screen.

And this is the dark theme of the Windows Store. To undo all of these changes, simply navigate to the ZIP folder and double-click enable-light-theme.reg to return the default colors.
What do you think of the themes for Windows 10?
Dark themes can truly be your eyes' savior.
But we'd also like to hear from you: What methods do you use to change themes in Windows 10? Let us know in the comments!
You can start customizing the appearance of Windows 10 in the same way as in previous versions of the operating system, from the desktop context menu by selecting “Personalization”. But instead of the old “Personalization” panel, you will see a new one, which is one of the sections of the “Options” panel.
Don’t be confused by the “Gadgets” item - this works great in Windows 10 too.
Desktop wallpaper
You can replace the desktop background image in the section with the obvious name “Background” ( Settings → Personalization → Background). There you can select one of the standard images or specify the path to your own, and also specify the position for it: Fill, Fit, Stretch, Tile, Center expansion.

If you have a large selection of desktop wallpapers, it is convenient to use them as a background in a slide show. To do this, you just need to select the “Slide Show” item in the “Background” drop-down list, and then specify the path to the folder with the image using the “Browse” button. You can also select the appropriate position for the images in the slide show, and of course set the frequency of their change: 1, 10 or 30 minutes, 1 or 6 hours, daily.

If you wish, you can use a solid color as the background, but in Windows 10 their choice is very limited and there is no option to select a custom color.

Start Menu, Taskbar, and Action Center Colors
You can choose the appropriate color for the Start menu, taskbar, Notification Center, frames around program windows, as well as individual elements of the system application interface in the “Colors” section ( Settings → Personalization → Colors). The color can be selected automatically by the system, based on the background image of the desktop, or can be selected manually by the user from several dozen proposed by the system developers.

If desired, the use of the selected color can be disabled for the Start menu, taskbar and Action Center (in favor of dark gray), while maintaining it for other interface elements. Fans of the Aero Glass effect have the option to make them transparent. In the same section of the panel there is a link to go to the “Accessibility” section, where high contrast is adjusted.

Lock screen
For the lock screen in the Personalization panel (Settings → Personalization → Lock screen), just like for the desktop, you can select a background image or set up a slide show. In the Home edition, this list is complemented by the Windows Spotlight feature, which automatically downloads new background images from Microsoft servers. Application notifications provide useful information to the lock screen. For one of the applications selected by the user, it is possible to display detailed information, for another seven - brief information.

Interestingly, you can use multiple image sources for the lock screen slideshow; you can always remove an unnecessary folder from the list of albums by highlighting and using the “Delete” button.

By clicking on the “Advanced slide show options” link, a panel for fine-tuning this mode opens, in which you can enable the display of photos from the “Film” folder of the computer and OneDrive, selection of photos to fit the screen, activation of the lock screen instead of turning off the screen when the computer is idle, and also set the time for the screen to turn off in slide show mode: after 30 minutes, 1 hour, 3 hours, or not turn it off at all.

From the “Lock Screen” section, you can also go to the classic “Screen Saver Settings” panel, where you can configure the screensaver. This tool has not yet moved entirely to the “Options” panel.

Themes
In the "Themes" section (Settings → Personalization → Themes) You can go to the desktop settings that are familiar to users of previous versions of Windows: choosing the theme to use, sound scheme, desktop icons and mouse pointers. To change them, classic tools are used, launched by clicking on the corresponding links.

Most likely, in the future, Microsoft will completely abandon the design themes we are used to, but for now you can use them. You can select one of the default or installed themes using the “Theme Options” link. It's funny, but at the time of this publication you cannot change any theme parameters there.

Not everyone liked the new sounds for standard system events; you can replace them with your own in the “Sounds” panel using the “Advanced sound options” link. This can be either a ready-made sound scheme or separate sound files. In the second case, you just need to select an event from the list, and then specify the path to the audio file (.wav) by clicking on the “Browse...” button.

Mouse pointers (cursors) are replaced in the same way using the “Mouse Pointer Options” link. Among other things, in the “Properties: Mouse” panel that opens, you can turn off the shadow of the pointer if it bothers you. Sets (schemes) of sounds and cursors (.cur, .ani) can be found on the global network, sometimes they are supplied with themes.

You can select your own icons for the Computer, User Files, Recycle Bin, and Desktop Network shortcuts using the “Desktop Icon Options” link. You just need to select a shortcut, use the “Change Icon” button and select an icon from the system set, or specify the path to your own file with icons (.ico, .icl, .dll, .exe). Here you can disable the display of unused shortcuts, restore standard icons, and prevent themes from changing them.

Start
We will not repeat ourselves about using and customizing the Start menu. In short, in the panel Settings → Personalization → Start You can enable full-screen menu mode and disable unused functions.

If we forgot to mention something or you still have any questions, leave them in the comments below, we will try to answer your question and will be happy to supplement the article.