If you bought a new iPhone 7, then you should know that the device in your hands is more advanced and capable of more than the previous iPhone model. And with this review, we will help you discover and teach you how to use new opportunities.
No. 1. Customizing the tactile sensations of the Home button 
The new Home button isn't actually a physical button at all. Similar to pressure-sensing Force Touch on the new Macs, the new Home button is a capacitive screen. The button itself is stationary, but you feel the response of the button thanks to the use of the Taptic Engine under the button.
This means that it is possible to adjust the level of response of this button. There are 3 settings available - “low”, “medium” and “high”. The system asks you for the desired level of tactile sensations from the button at the initial stage of setting up the device. But the parameters can be changed at any time by following the path: "Settings" -> « Basic" -> « Home button".
No. 2. New way to hard reset your device
In cases where your iPhone starts to behave strangely, the first tip is to perform a hard data reset. On previous models, this procedure used a combination of the Home and Power keys. The new model does not have a physical “Home” button, so you should remember a new combination to carry out this recovery procedure. You must press the "Power" button and the volume down button.
No. 3. Enabling “Portrait mode” shooting

If you're using iOS 10.1 on an iPhone 7 Plus, you'll notice a new Portrait Mode shooting option. It is selected with a simple gesture - swipe in the “Camera” application, like any other shooting mode, for example, the “Panoramic” shooting mode.
No. 4. Option to save two copies of one photo in Portrait mode 
When you take a photo in Portrait mode, iOS also saves the normal version of the photo in case you don't like the Portrait mode version of the photo. Which leads to double use of the device's free memory space. If you are confident in your mastery of using the “Portrait” mode, then you can follow the path: “ Settings" -> « Photo and Camera" and disable the option " Keep the normal version of the photo" in the “Portrait mode” subsection.
No. 5. Use Optical Zoom on iPhone 7 Plus

You should know that your iPhone 7 Plus has 2x optical zoom, thanks to the presence of a second telephoto lens on the back. To use it, you need to click on the “2x” icon located above the shutter button. You can also select options from 1 to 10x zoom. Any option above 2x will be a software zoom of the system.
No. 6. Enable 4K video recording
By default, this option is disabled, but the device has the ability to record video in 4K resolution. When shooting video, say at a party, in good lighting, try turning on 4K mode. The end result will take up a lot of memory space, but will look amazing. In “Settings”, select “ Photo and camera". In chapter " Video Recording" switch to the option “ 4K at 30 fps".
No. 7. Locking the focal length when shooting video
The iPhone 7 Plus now has optical zoom, so there is a new setting for locking the focal length of the lens when shooting video. This means that the zoom function will not adjust when a flash of light appears in the frame or when the lighting deteriorates. This option is located there, in the “ Video Recording".
No. 8. Disabling the “Raise to Wake” option (waking up when picking up the device)
In iOS 10, the iPhone 7 has new functionality where the device automatically wakes up when picked up from a surface. If this happens often and bothers you, then you can turn off this option. " Settings" -> « Display and Brightness".
No. 9. Adding widgets to your lock screen

No. 10. Using your iPhone as a magnifying glass

You can use your iPhone's amazing camera capabilities as your personal magnifying glass to read fine print. To enable this option, go to “ Settings" -> « Basic" -> « Universal access» -> « Magnifying glass" and turn it on. To access this functionality, triple pressing the home button will be enough.
No. 11. Charge your battery and listen to music at the same time

The iPhone does not have a headphone jack. Therefore, if you want to listen to music through the Lighting EarPods while charging the batteries at the same time, you will need to purchase an adapter. Belkin produces an adapter with two Lightning ports and it is called “Belkin Lightning Audio + Charge RockStar” and sells for $40. You can also buy Bluetooth headphones. Or Apple AirPods when they go on sale.
No. 12. Using the 3D Touch feature

In iOS 10, the 3D Touch feature has become more widespread. And plays a more significant role when you need to reply to a comment on a locked screen or send a message with a visual effect in the Messages app. It is necessary to use the 3D Touch function more often so that it is integrated into daily practice. Read our list of how to use 3D Touch in iOS 10.
No. 13. Unlocking the screeniPhone without pressing the home button
In iOS 10, you need to press the home button to unlock your iPhone. Even on the iPhone 7 model, which means pressing the “Home” button until you receive a haptic response. What if you want to unlock your device by simply placing your finger on the surface of the scanner/Home button? This can be done provided that the screen is activated and with the appropriate accessibility settings.
In the Settings app, go to " Basic" -> « Universal access" -> « House". And enable the option “ Unlock when placing finger".
No. 14. Disabling haptic feedback (vibration during basic actions)
The iPhone 7 has a really powerful Taptic motor. And in iOS 10, imitation tactile reactions will be used everywhere. Designed to simulate reality. Therefore, when you select a date in any application, you actually feel the scrolling of the date wheel. These sensations are also present in the Mail application when a letter is deleted.
But if this functionality is annoying, then you can go to “Settings” and select the new settings panel “ Sounds and tactile settings". At the bottom of the panel you can turn off the tactile sensation system.
Basic
No. 15. Enabling two-step verification
You'll use your Apple ID for so many things in the Apple world. Purchase from the iTunes Store, enable iCloud services on all your devices, purchase from the Apple Online Store, and much more. Therefore, it is highly recommended that you activate two-step verification on your account to improve its security and prevent it. hackinghackers.
No. 16. Increase or decrease the size of text on the screen
If there is a need to change the size of the text on the screen of your device to improve the comfort of reading it, then this can be done in “Settings”, select the settings panel “ Display and Brightness", then the option " Text size. Move the slider depending on your preference. Please note that the preferred text size will only be displayed in applications that support the Dynamic Type feature.
No. 17. Battery percentage display
By default, iOS graphically displays the remaining battery level in the upper right corner of the status bar on the main screen. To more easily monitor the level of remaining battery charge, you can activate the function to display the charge indicator as a percentage. To enable this option, go to “Settings” > “General” > “Usage” and check the “Battery percentage” option.
No. 18. Closing an application or multiple applications
To completely exit an application or force close it while it is in the background, double-tap the Home button to open a new application switching window or multitasking tab and swipe up to close the desired application. You can close multiple applications at once (up to three applications at a time) using the same gesture, but using three fingers.
No. 19. Move or remove an app from the home screen
If you need to move an application icon to a new location on the home screen, you need to tap and hold your finger on the icon of the required application and wait a couple of seconds until all the icons on the screen begin to wiggle. You can now drag and drop and organize app icons on your home screen. If there is a need to move the application icon to another page of the home screen, then drag the icon to the edge of the screen and wait until it moves to the next or previous page. To remove an application, you need to click on the small cross in the upper corner of the application icon in the same icon shaking mode. To exit the rocking mode, you must press the “Home” button.
No. 20. Do Not Disturb Mode
Notifications and alerts help us not to miss new information received or a new event that has occurred, but if necessary, you can force your iPhone not to notify you of new news either during an important meeting or simply when going to bed. To do this, you need to activate the “Do not disturb” option in Settings. The option can be enabled manually: Settings > Do Not Disturb, and click on the button Manual to enable the option or you can set a schedule for this option. When the option " Do not disturb" is turned on, then incoming calls and alerts will be muted, and a moon icon will appear in the status bar.
No. 21. Convenient access
Easy Access is a new feature that debuted on iPhone 6 and iPhone 6 Plus, which feature larger screens for easier one-handed use. Called by a light double click on the “Home/Touch ID scanner” button. The screen will lower down so that you can reach the required interface element with your thumb. The screen remains in this position for 5-6 seconds, which is quite enough to perform the necessary actions, or remains in this position until the first click on an interface element.
No. 22. Control center
Control Center provides quick access to Camera, Calculator, AirPlay, and music playback controls. You also have access to control screen brightness, enable or disable various system operating modes, such as Airplane mode, Wi-Fi, Bluetooth, Do Not Disturb, and lock or unlock the home screen portrait mode. To access the Control Center, you need to perform a “swipe up” gesture from the bottom edge of the screen.
No. 23. Flashlight
You can use your iPhone as a flashlight. Swipe up from the bottom edge of the screen to bring up the Control Center and click on the torch icon to turn on the flashlight.
No. 24. Apple ID account without credit card
If you're not aware, we remind you that you can create an Apple ID account without providing a credit card to download free apps. Some parents set up such accounts for their children and fund such accounts with iTunes gift cards to control their children's App Store spending.
No. 25. How to add a different language keyboard
If you need to communicate with colleagues or family members in a different language, iPhone offers a one-click solution for switching the keyboard between different layouts. To add a keyboard in another language, launch the Settings application and then: Basic -> Keyboard -> Keyboard Layouts > Add a new layout and add the new language to the working list of keyboard layouts. By performing this action only once, you can simply click on the globe icon next to the space bar on the on-screen keyboard to switch between different languages.
No. 26. Adding a special character
Can't find the special symbol € on your iPhone or iPad keyboard? To print this symbol, you must press and hold the $ (dollar) symbol. In the drop-down list, the system will show the available alternative currency symbols, from which you can select the Euro symbol. This trick can be done to insert many other characters into text, such as an inverted exclamation mark, a longer hyphen, etc., by simply pressing and holding the appropriate key.
No. 27. A quick way to start a new sentence
The iOS keyboard allows you to double-tap the spacebar to add a period after the last word, allowing you to quickly create a new sentence. This is especially useful when working with a large paragraph of text. To enable this option, follow the path: « Settings" -> "General" -> "Keyboard" and check if the option is enabled "Shortcut key".
No. 28. Quickly insert a punctuation mark into text
Many users click on the “ key to view a list of punctuation marks. 123 ” and only after that select the required character to insert it into the text. After this, they press the “key” again ABC” to return the typing keyboard. This procedure can be performed much faster and more efficiently. To do this, press and hold the “ 123 ” and swipe on the keyboard to select the required punctuation mark. After selecting the desired punctuation mark or symbol, remove your finger from the “ key 123 ” and the iOS system will automatically return the keyboard with letters for typing. This saves time on switching between keyboard layouts.
No. 29. Fast capitalization
If you need to type one capital letter in the middle of a sentence, you usually do this by activating the CapsLock key once. There is a faster way: Press the " Shift" and without releasing your finger, move it to the key with the required letter to type. When you remove your finger, you will see that the " Shift" has already been deactivated, allowing you to save unnecessary finger movements.
No. 30. Quickly change domain name extension
The mobile version of the Safari browser has a very convenient ".com" key for quickly adding a domain name extension to an address bar URL link. You can also use the same key to select other extensions such as ".ORG" or ".NET". To do this, hold down the “.COM” key and select the required extension from the drop-down menu. An interesting feature to note is that this drop-down menu will contain extensions specific to the country whose language has been added to the international keyboard list.
No. 31. To undo the last action, simply shake the device
Instead of holding down the "delete" key to delete the typed text, you can simply shake the iPhone (left once and back again). After this, the screen will ask you to ‘ Cancel printing‘. Clicking the button will automatically delete recently typed text.
No. 34. Set of smart quotes
By default, when you press the quote key, you will type regular quotes, often called "stupid" quotes. But you can call up and type a curved version of quotes (called smart quotes) by pressing and holding the quote key.
No. 35. Features of typing text abbreviations in English
When you type the abbreviations “he’ll” or “we’ll,” the iOS system does not automatically correct the text you typed “hell” or “well” to the required text variant. For automatic correction, you need to add an extra “l.” Type “hell,” and the system will recommend that you select “he’ll.” Type “welll,” and the keyboard will prompt you to select “we’ll.”
This option also works when typing the words “were” and “we’re.” Type the extra letter “e” (“weree”) and the program will recommend that you select “we’re.”
Tips for using the Mail app
No. 36. Gestures
By swiping right on a message, you can set the message to read or unread status. By swiping left to the edge of the screen on a message, you can delete the message or send it to the archive. Swiping left on a message gives you more options for working with the message.
No. 37. Quick access to a draft letter
To quickly access the list of draft emails, you need to press and hold the “write new email” button in the lower right corner. The window that appears will display all your draft emails. This method allows you to access drafts faster than the regular method.
No. 38. Selecting part of the text to quote
There are times when you need to select only part of the text from a sent email, but iOS by default selects and pastes the entire message into the reply. To select a piece of text to include in a reply message, you must use the standard iOS mechanism for selecting text and only then click on the “Reply” button. Now in your reply message you will see the selected text from the received email as a quote.
No. 39. Adding media files in the new email window
In the new message window of the Mail application, there is no separate button for selecting media files to send as an attachment. But when you long press in the new message field, you will see a menu appear asking you to add a video or photo as an attachment to this letter (you will need to click on the right arrow to see the offered options). When you click on the right arrow, you will see a standard menu for selecting a photo or video to send along with the letter.
No. 38. Text formatting
You can type the text of a new message and then format it as bold, italicized, or underlined by selecting all the text and pressing the B button I U".
You can increase or decrease the indent size of selected text. First, you need to select the required part of the text, click on the quotation marks, then click on the arrow on the right, and then click on the citation level, and then on the “increase” or “decrease” buttons, depending on the desired text format.
No. 39. Receiving notification of a response to a letter
To receive a notification that someone has responded to a letter, when viewing a message, click on the flag and select “Notify”.
No. 40. Return to top of page
Clicking above the space in the smart search line will return you to the beginning of the page you are viewing. This eliminates the need to scroll to the top of the entire page, saving time.
No. 41. Gestures to go to the previous or next page
Instead of using the back or forward buttons, you can use edge-to-edge swipe gestures to select web pages saved in the app's history. Swipe from the left edge - go back one page, swipe from the right edge - go forward. These gestures are very useful when working in full screen mode of the application, since the forward/back buttons do not appear in this mode.
No. 42. Show recently closed tabs
If you closed the desired tab by mistake, or simply needed to open a tab from your last session, you can simply click and hold the “+” button to view a list of all your recently closed tabs.
No. 43. Access to the history of visited web pages
You can access your browser history to search for a specific tab by long pressing the back or forward buttons so you can quickly jump to a site you've visited in the past.
No. 44. Safari reader
You can click on the icon to the left of the smart search bar (address bar or search field) and get access to the reading mode in the browser, in which articles on the web page will be displayed without advertising and other tinsel. The icon turns white when the “Reader” mode is activated.
No. 45. Reading list
If you come across a long article on the Internet that you find interesting, but don’t have time to read it, then you can add this page to your browser’s reading list, which syncs with all your iOS devices and Mac computers.
You can access your reading list by clicking on the bookmarks icon in the Safari app toolbar and switching to the tab marked with the glasses icon.
No. 46. Search in the current page
To search for the desired fragment on the current web page, you need to enter the text with the keyword in the smart search bar and immediately at the bottom you will see a section called “On this page”, which will show all cases of matches with the search keyword.
When you click the last cell in the On This Page section, Safari will display the first match in the search text, and you can then move through each match using the up or down buttons at the bottom.
No. 47. Closing and organizing tabs
To close the page, you can simply use the “swipe left” gesture or press the “x” button. Tabs can only be closed sequentially, one after another. There is no option to close all tabs at once.
You can organize the order of tabs by dragging them to the desired location.
No. 48. Browsing in privacy mode
To turn Private Browsing on or off for private web browsing, click the tab switch at the bottom of the browser window and then select the Private Browsing button in the left corner of the window.
You will notice that the browser window color turns black when you activate the Private Browsing mode, so you can differentiate the private browsing mode from the normal web browsing mode.
No. 49. Adding an RSS feed in Safari
Starting with iOS 8, it became possible to subscribe to RSS feed updates in the Safari application, which then appear in the “Shared Links” tab. To subscribe to RSS feeds, go to the subscription site from the Safari application, click on the “Bookmarks” icon, and then on the “@” symbol. Then click on the “Subscribe” button located at the bottom and then select “Add current page”. You will begin receiving updates from the selected site in the “Shared Links” tab.
Tips for using the Messages app (iMessage)
No. 50. Send Photos or Videos
In order to send a photo, click on the “Camera” icon in the current conversation, swipe up to take a photo and immediately send it. To send a video, swipe right to start recording a video fragment, then swipe up to stop filming and send the resulting video fragment.
No. 51. Time of sending and receiving a message
Open the Messages app and go to any conversation. Here you will see that the times are indicated for the entire conversation. In order to see the time a message was sent, you need to drag a specific message to the left.
No. 52. Block voice calls, FaceTime calls and Messages
In Settings, select Phone > Blocked, and then click on “ Add new...", and click on the contact you would like to add to the blacklist. You can also block a contact in the Phone, FaceTime, and Messages apps.
If a contact or phone has been blacklisted, all voice calls, FaceTime calls, and messages from that contact will be ignored. You can't block voice calls individually, or just calls from the FaceTime app, or just messages from that contact.
No. 53. Share your location with friends
No. 54. Leave a general iMessage chat
Select the conversation you want to leave in the Messages app, click Details, and then turn on the toggle Do not disturb".
No. 55. How to answer a call with a text message
If you cannot receive a call at a certain point in time, then you can answer it with a text message. You need to click on the “Messages” icon and send a pre-prepared message, for example, “Sorry, I can’t take your call right now,” or “On my way,” or “Can I call you back later?” You can edit pre-written messages in Settings > Phone > Reply with Message.
No. 56. Adding photos to a contact's profile
You can sync profile photos of your friends and family members from social networks like Facebook or Twitter. This way, when they email or call you, you'll see their profile photo from the social network. To synchronize, go to “Settings”, select Facebook or Twitter, log in to your account and click on "Update all contacts".
You can delete the last number entered in the Calculator app by swiping left to right or vice versa on the Calculator app display.
In the Calendar app, it's easier to use the event list view for the month or year. Here's how to set it up: You need to go to the month view. Here you need to click on the “list/month view combination” button, which is located to the left of the search icon. Then you need to click on any day of the month. Now click on the list view icon to the left of the search icon. That's all! This will enable the “list” button and all the events of the month should now be displayed as a list.
Tips for increasing the operating time of your device on a single battery charge
No. 59. Enabling auto-lock
You should enable the auto-lock screen feature on your iPhone to reduce battery consumption. To select the time after which the auto-lock will work, go to “Settings”, go to “ Basic» > "Auto-lock" and set the auto-blocking time to 1, 2, 3, 4 or 5 minutes.
No. 60. Reduce brightness
Dimming the screen brightness also helps save energy. Therefore, you can set the screen brightness to a lower level depending on your preferences. Go to “Settings”, select “Display and Brightness” and reduce the brightness.
No. 61. We identify malicious energy consumers
Starting from iOS 8 and higher, you can determine which application consumes the maximum amount of energy. The information is located: “Settings”, then General > Usage > Battery Usage.
This section of the settings will provide information regarding the energy consumption of a particular application or various system services. It is important to note that an application with a high percentage of battery consumption does not mean that it is so. Perhaps you use this application very often, or if the application is running in the background, it downloads or uploads data to the network.
You should be concerned about applications that are on the top list of electricity consumers, but which you have not even used. iOS 8 provides information about which activities use the most energy, including services running in the background.
No. 62. Determine location only when using the application
In iOS 8, Apple added a new setting option in location services called " Only when using the application". This means that this app will only use location services when you are using this app and not all the time. This can be useful when working with apps like the App Store, which don't have the same need to use location services all the time.
It is possible to view which applications have used location services in Settings > Privacy > Location Services. Applications that have used your location are marked with a compass-shaped indicator. If you select an application in this list, you will see the option “ Only when used". Activate this option if you want the app to detect your location only when you are using the app. This ensures that the application will only use your location when it or one of its services is displayed.
Please keep in mind that this option is available for native applications and for some third-party applications. However, we expect third-party apps to have this option once they are optimized to run iOS 8.
No. 63. Update the app in the background
Update data in the background Allows the application to update while in the background. This feature improves the user experience with applications such as RSS clients, news applications and others, which can download the latest data in the background so that you do not have to waste your time updating content when you launch the application. Although Apple optimizes this process as much as possible to reduce power consumption, it is likely that this process reduces battery life, especially on older iOS devices. To disable this functionality, go to “Settings”, select “ General > Background Update and disable this feature for applications such as Facebook or other applications that do not have any pressing need to constantly update their data in the background.
iOS 8 or higher offers tips to its users on how to increase battery life depending on the user's operating practices. For example, the system will advise the user “Reduce display brightness”, “Enable Auto-lock” and other. To find out what tips Apple offers to increase battery life, you need to go to "Settings", then " Basic» > Usage > Battery Usage.
Siri is Apple's personal assistant that can be launched by long pressing the Home button. He is quite capable of completing many tasks. Click on the "?" to find out what kinds of questions you can ask Siri.
No. 65. What kind of song is this?
If you like a song that's playing on the radio, you can ask Siri "What song is this" to find out the name of that song. You can also buy this song on iTunes, if it is offered there, by clicking on the "buy" button.
No. 66. Hands-Free Siri (UsingSirino hands)
If your device is connected to a power source, instead of pressing the Home button, you can simply say, “Hey Siri.” This will activate the Siri service. Now you can ask questions. There are solutions for voice activation of Siri in moments when.
No. 67. Making Siri respond faster
To make Siri answer a question faster, simply hold down the Home button while you ask your question and release it when you're done speaking. Since Siri won't have to identify when the question ends, you'll get the answer to the question faster.
No. 68. Enabling or disabling various operating modes of the System
Siri can turn on or off various system services, such as Airplane mode (turn on only), Bluetooth, Wi-Fi, Do Not Disturb, and more. All you have to do is say “Turn on Wi-Fi,” “Turn off Bluetooth,” and the like. You can also adjust the screen brightness using Siri. To do this, use commands such as “Increase brightness” or “Decrease brightness”.
You can also open the settings panel of an app that uses Siri capabilities. While in an application, say “Open Settings” to bring up the settings panel for that application. Alternatively, you can say: “Open settings<название приложения>”, for example, “Open Safari Preferences” and the result will be the launch of the Safari Preferences panel.
No. 69. Make Siri pronounce your name correctly
You can tell Siri that she's not pronouncing your name correctly. You can simply say, “That's not how my name [any name] is pronounced,” to begin the learning process. During training, the system will ask you to pronounce the name several times, and then ask you to choose the most correct pronunciation of this name in its performance, depending on how you yourself pronounce this name. After this, the system will continue to use only the correct pronunciation option. Siri itself may ask you to initiate the process of learning to pronounce your name if it considers that it is having this kind of difficulty.
Tips for using the Camera and Photos apps
No. 70. Favorite Album
Click to select a photo, and then click on the heart icon at the bottom of the photo window to add it to your favorite photo album. An album of your favorite photos is available in the Photos app.
No. 71. How to hide a photo
To hide a photo, click and hold on the photo while in Moments, Collections, and Years view or album view, then select the option " Hide».
No. 72. Shutter delay
In the Camera app, take a photo, then click on the Timer icon at the top, select the shutter interval (from 3 to 10 seconds), and click on the shutter button. After pressing the shutter button, a countdown will appear on the screen until the shutter is released.
No. 73. Photo recovery and deletion.
When you command a photo or video to be deleted from the Camera app, it isn't permanently deleted. The system marks them for deletion after 30 days and moves them to a separate album " Recently Deleted», where they are stored during this time. You can either recover an accidentally deleted photo or video fragment or delete it permanently from the album " Recently Deleted».
No. 74. Focus and Exposure Control
The Camera app allows the user to manually control focus and exposure. Point the device at the subject, then click on the desired object on the screen to focus. When an object is in the application's focus, a brightness scale will appear next to it, which is the exposure control mechanism. By moving the slider with your finger along the scale, the subject becomes lighter or darker.
Other Convenient Things You Should Try
No. 75. View IMEI number
It is recommended to always know and store the IMEI number of your device in case you lose it. This 16-digit number (known as the International Mobile Device Identification Number) is the unique identifier of any device that communicates with a mobile network using a SIM card, and allows operators to blacklist the device if it is reported missing.
Blacklisted devices do not work on mobile networks, making it difficult for thieves to use or resell them. And if you are planning to purchase a so-called “updated” or previously used device, then before purchasing such a device it is recommended to always check it to see if it is on blacklists.
On your iOS device, go to “ Settings > General > About this device and using scrolling we go down to the IMEI number of the device and other detailed information about this device.
There are other ways to find out the IMEI number of a device; to do this, read our article on this topic.
No. 76. Screen enlargement
Apple has added a new feature called " Screen enlargement» for devices with increased screen resolution, namely iPhone 6 and iPhone 6 Plus. This option is offered for inclusion during the initial setup procedure of your iPhone 6 or iPhone 6 Plus. You can also change these settings in the Settings panel > Display & Brightness > Overview. You can choose between Standard and Zoom views.
In the Standard view, the iPhone 6 Plus runs at 2208 x 1242 pixels, which at 3x zoom gives a resolution of 736 x 414 pixels. In Standard view, the iPhone 6 runs at a resolution of 1334 x 750 pixels, which at 3x zoom gives a resolution of 667 x 375 pixels.
In Zoom View mode, the iPhone 6 Plus behaves like a virtual iPhone 6 screen, but with 3x retina resolution, which when interpolated results in a resolution of 2001 x 1125 (virtual) pixels. Below are some screenshots that give a clearer idea of the difference between the "Large" and "Standard" screen modes of the iPhone 6 Plus. In Zoom View mode, the iPhone 6 behaves like the virtual screen of the iPhone 5s, but with 2x retina resolution, which when interpolated gives a resolution of 1136 x 640 pixels.
Thus, each iPhone's "Large" screen mode displays the same Standard mode UI of the previous, smaller iPhone model. This means that instead of having more content displayed on screen, the content itself will be larger in size, which is great for users who want slightly larger text, larger app icons, larger captions, and other larger UI elements. .
You can use the center button on your headphones (located between the volume up (+) and volume down (-) buttons) to perform many useful actions without having to take your device out of your pocket. Follow the link below for more details.
No. 78. Application extension
App Extension is a powerful feature that was first introduced in iOS 8 that allows you to greatly extend and control the functionality of the operating system to perform some very cool tasks not available in previous versions.
No. 79. How to Avoid Shorting Your Lightning Cable
In order to avoid a short circuit on the Lightning cable and avoid wires appearing on the outer surface of the cable, it is necessary to put springs on both ends of the cable and do not allow the cable to remain in a bent position for a long time. You can use springs removed from any ballpoint pen, which must be wrapped around both cable connectors. Thus, the service life of your cable is significantly extended.
No. 80. iPhone won't charge?
If you find that your iPhone no longer charges using the Lightning cable, then the likely cause may be debris or a clump of dust that has accumulated in the Lightning connectors over time. You can use a toothpick to remove debris from the connector and restore the ability to charge your iPhone.
Don't miss Apple news - subscribe to our Telegram channel, as well as
Looking at the iPhone 7 and iPhone 7 Plus, you might think that there are very few changes compared to their predecessors, but in fact this is not the case. In the new generation of Apple smartphones, you can already customize the touch-sensitive Home button, portrait mode has appeared in the 5.5-inch iPhone model, and much more.
We have prepared 10 of the most useful tips for owners of the new iPhone 7 and iPhone 7 Plus, and we will also tell you about some secrets that you probably didn’t know about.
1. Setting up the Home button
As you already know, the “Home” button is no longer pressed in the usual way. Apple has decided to abandon the mechanical button in favor of a touch button that recognizes touches. Thanks to Taptic Engine technology, the user feels feedback that simulates pressing.
Cupertino has provided the ability to customize the level of tactile response, you can choose the most suitable one for you. Open Settings, go to General, and then select Home Button from the list. There you will see three different levels of feedback, try each and choose the one that suits you best.
2. Turn your keyboard into a trackpad
This isn't a new feature on the iPhone 7 and 7 Plus, but it's made noticeably more convenient thanks to the capabilities of 3D Touch technology. The usual method, where you tap on a word with your finger to correct a mistake or highlight it, is not very reliable or accurate. Sometimes it's hard to get the cursor exactly where you want it, and even seeing it isn't always easy because your finger is covering the screen.
There is another, more advanced way that will make you crazy. Just press harder on the keyboard to activate 3D Touch capabilities, and then you'll see the letters hiding. This turns the keyboard into a trackpad, just like on a MacBook.
(banner_context-yandex)
Slide your finger across the keyboard surface to move the cursor on the screen. To highlight the desired word, press your finger even harder, and if you need to highlight the entire sentence, then you need to press twice.
3. How to disable vibration feedback
On iPhone 7 and iPhone 7 Plus, vibration feedback is enabled by default in many system applications. For example, while dialing a number or choosing the time when you want to set the alarm. As it turns out, this is annoying for many users, and if you are one of them, then you will be interested in knowing how to disable this feature.
Open the settings application, find the “Sounds and response” item, scroll to the very bottom, where you will see the corresponding vibration response switch in the smartphone system. Turn the switch to the off position to get rid of unpleasant or unnecessary vibration.
4. Clear all notifications at once
The notification center in iOS 10 has become much more convenient, but only owners of the iPhone 6S and iPhone 7 can experience all the benefits of this version of the operating system. On older versions of iOS, users had to clear notifications one at a time each day by pressing the Clear button (X).
But with the advent of 3D Touch technology on the new iPhone 7 and iPhone 7 Plus devices, you can remove all received notifications from applications with one click. We talked about this in detail, so follow the link.
5. Quickly switch between applications
Every iOS device user can switch between recently launched apps by double-pressing the Home button, but 3D Touch-enabled smartphone users can do it much faster.
You can press your finger to the left edge of the screen near the frame to open the multitasking interface, where all the running programs are located in a row. But if you swipe right instead of holding your finger, the app you were running before will open. (Keep in mind that you need to wait for the 3D Touch to respond, otherwise you will return to the previous page).
6. Portrait mode on iPhone 7 Plus
Apple iPhone 7 Plus has a main camera with two lenses: one of them has a focal length of 28 mm, while the other has a focal length of 56 mm. This allows the smartphone to zoom in on objects with less loss of quality than any other digital zoom device. And if your phablet is running iOS 10 beta, then you can take impressive portrait photos with a blurred background (bokeh effect).
Once Apple gets this feature stable and accurate, it will release an update that will add portrait mode to the camera app.
7. Touch unlock
In iOS 10 on iPhone 7 and iPhone 7 Plus, the user has to press the Home button to unlock the screen, instead of touching it as before. Many complained that this unlocking method is far from ideal. Luckily, you can get everything back to normal by changing your phone settings.
To do this, open the “Settings” application, go to the “General” section, and then to “Accessibility”. Find the “Open with finger” option in the “Home” menu and activate it.
8. Disable the “Raise to Activate” function
We think the Raise to Activate feature is one of the most useful new features in iOS 10 on iPhone 7, as it allows the display to automatically light up when the user lifts the phone. But perhaps you prefer to wake up your device yourself? In this case, we will show you how to disable this feature. Open Settings again, go to “Display & Brightness” and then find the “Raise to Wake” option here and turn it off.
9. Disable new effects in the Messages app
Another big innovation in the latest version of iOS is new effects in the Messages app, so you can send beautiful messages to your friends. But the good news is that if you don't like them, you can always turn them off. Your messages will not be accompanied by various effects, which, for example, can have a positive impact on the autonomy of the mobile device.
It's still simple: go to the General section of your iPhone's settings, then select Accessibility and turn on the Reduce Motion option. This will also affect the amount of moving effects in other areas of the system.
10. Shortcuts in the Control Center
3D Touch technology opens up a number of convenient shortcuts for the iPhone user in the Control Center. The panel with switches can be raised by swiping up from the very bottom edge of the display. It still provides users with quick access to the most frequently used functions such as the flashlight, timer, calculator and camera. But in iOS 10, 3D Touch technology brings many additional features.
For example, you can choose the brightness level of a flashlight by pressing its switch a little harder. If you also click on the camera icon, you can immediately select the shooting mode before launching it.
In some situations, the iPhone screen may freeze and not reorient itself from portrait to landscape. In this article we will look at instructions if iPhone screen won't rotate.
Before moving directly to the instructions, we would like to remind you that some applications use only portrait or only landscape format for displaying content. Therefore, first of all, you need to check the screen rotation on the iPhone in standard applications, for example in Calendar or Calculator. If your iPhone screen does not rotate in these applications, then follow the instructions below.
How to make the iPhone screen rotate
iPhone screen stopped rotating
You need to disable orientation lock on your iPhone. In this case, the - icon will be displayed in the notification line.
Do the following:
- swipe from the bottom of the screen to the top,
- A tab with “Control Center” will open, in it you will see an icon with a lock in a circle, press it.

Also if iPhone screen stopped rotating, you need to disable display magnification to rotate the home screen (springboard):
- Go to the Settings app
- Enter the Screen & Brightness app
- Next, in the “Display Enlargement” section, you need to enter the “View” subsection.
- Switch the Zoom function to Standard format. Next, the device will reboot.
If after following the above steps the screen is still Doesn't rotate on iPhone, try rebooting your device again. If the problem is still relevant, then the problem lies not in the settings but directly in the hardware itself. The best option would be to contact a service center to diagnose the problem.
Those who recently purchased an iPhone may have questions about setting up screen rotation. Screen locking is relevant when viewing videos, photos and videos from YouTube due to its convenience and larger image format.
Enable or disable screen rotation on iPhone 5s, 6, 8, plus, SE, X
You can enable or disable rotation on the listed models using the portrait orientation lock method. In order to do this, go to the “Control Center” and click on the button with a lock, which is indicated in the picture.
In the case of different firmware versions, the appearance of the button may differ. If the button cannot be pressed, it is not active as in the image above, then the rotation should work automatically.
When the person watching the video lies on their side, rotating the screen may work automatically. To prevent this from happening, you should lock the screen. A feature of all phones is that when you disable the screen rotation function, the device automatically returns to portrait orientation. Therefore, in order to watch videos comfortably, you need to enable a ban on screen rotation.
Landscape orientation on iPhone models using AssistiveTouch
To enable screen rotation using AssistiveTouch, you must complete the following steps:
- Before using this option, you must disable screen rotation lock;
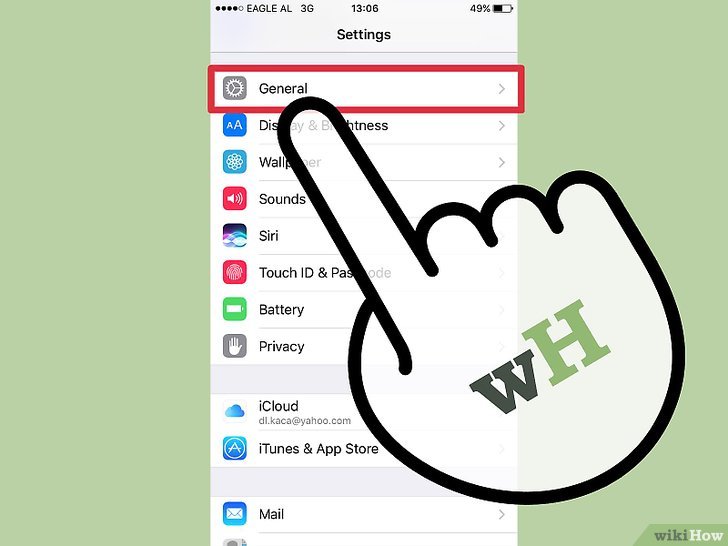
- Go to the “Settings” menu, select “General”;

- Select the “Universal Access” tab, where the “AssistiveTouch” item we are looking for will be located and enable this option;

- After turning it on, open the Photos application and click on the gray square that appeared after turning on AssistiveTouch;
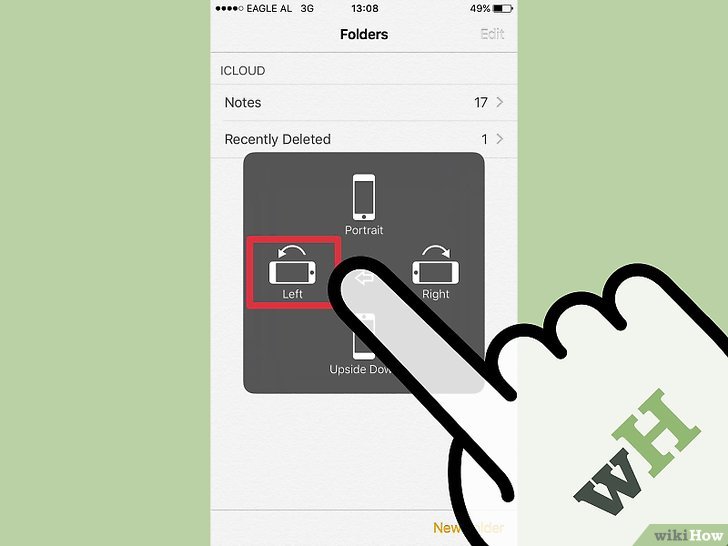
- A window has opened in front of you with various options, among which we need “Device”, after which we click “Rotate screen”. This function will allow you to rotate the screen;
- All you have to do is choose the orientation you need and enjoy watching.
It should also be noted that the AssistiveTouch option on the iPhone is especially relevant if any of the physical buttons on the device fail.
Features of landscape mode on iPhone Plus
On iPhones with the “Plus” prefix, screen rotation is blocked in a similar way. However, the developers worked on these models separately, adding “landscape mode” - an iPhone option when, when rotated, all icons are rearranged to the current position of the screen.
There may be a situation where the icons do not rearrange, the reason for this is usually the increased scale, which can be disabled as follows:
- Go to the “Screen and Brightness” menu, where you need to select “View”;
- Select standard mode.

Significantly superior to all its predecessors: the phone has more advanced cameras, stereo speakers and a bright screen with rich colors and has greater performance and battery capacity. In addition, it is resistant to water, splashes and dust. The device also received the new iOS 10 operating system. Experts listed 20 tricks that will make its use as efficient as possible.
1. Launch and quick access when the screen is locked
Now you can access many features on your iPhone without having to unlock it: just slide the screen to the left to launch the camera, and just slide it to the right to see all the widgets and the Today tool. Alerts are opened by sliding the screen down and the control center up.
2. New features in the control center

In this section, you can change the intensity of the flashlight light, copy the latest calculation results from the calculator, or use the stopwatch.
3. Activation by lifting
![]()
In order for the phone to switch to active mode, you just need to lift it. All notifications will be reflected on the screen (the function is only available for iOS 10 on iPhone 6s and later models).
4.Today section settings

This section can be customized individually by adding and organizing widgets.
5. Individual start button settings

The level of pressure and the force of pressing the start button can be adjusted in the corresponding section of the main phone settings.
6. Water resistance

If the iPhone 7 fell into water, then they need to tap their hand, holding the device with the Lightning connector down, and leave the device in a well-ventilated place. In addition, a fan can be directed to the above-mentioned connector.
7. Formatting messages

The new system allows you to change the appearance of message bubbles.
8. Special effects in messages

iOS 10 users will be able to send each other balloons, confetti, laser beams, fireworks and shooting stars. In addition, special effects are activated automatically if the sender writes “Happy Birthday”, “Happy New Year” and “Congratulations” to the recipient.
9. Group messages

The new Tapback feature will allow users to quickly respond to what is happening in group chats. So, questions like “Pizza or hamburgers?” or “Beach or pool?” can be solved much easier and faster by counting likes.
10. Sending photos from gallery

In order to add a photo to a message, just click on it and drag it into the conversation area. While in the “Messages” section, you need to click on the camera icon and select from existing photos or take a new one.
11. Quicktype

12. Handwritten notes in messages

In order to create a handwritten message, you need to go to the iMessage application and turn your phone horizontally.
13. Own App Store for iMessage

From now on, iPhone and iPad users will be able to find, download and open apps directly from the Messages app. This feature makes it much easier to share content, edit photos, pay bills, and communicate with friends. In addition, it allows you to purchase animated and static stickers.
14. Personalized read receipts

Receipts for reading messages can be configured personally: in an individual conversation, you need to click on the “Information” button and in the menu that opens, activate or disable “Read Receipt” without changing the basic settings.
15. Expanding Siri functionality

Voice assistant Siri can now work with the most popular apps in the App Store: for example, you can ask it to reserve a table at a restaurant through OpenTable, book a ride using Lyft, or send 10 euros to a friend through the Venmo app. In addition, you can ask Siri to take a selfie, and then the assistant will activate the camera in the appropriate mode.
16. Apple Music

Now users have the opportunity to track the lyrics as they listen to the song. To do this, simply slide the screen up and select the “View text” option.
17. Health

With iOS 10, you can sign up for the Donate Life America donor program. To do this, in the “Health” application, you need to select the “Medical Data” tab. The indicated preferences will be saved in the system and will be valid even if you move to another country.
18. Search by photos

Now among the pictures you can find any image the user is interested in, be it a selfie, a photo of his dog, the beach, or even a birthday cake.
19. Memories

Apple devices have a new Memories feature that highlights events, trips and people in specially curated collections.
20. Editing Live Photos

You can now apply filters to Live Photos and control exposure.