The correct display of information on the monitor screen depends on the stability of the video card. This is true for both desktop computers and laptops. If a separate video card is not installed in the computer, the graphics core of the processor is responsible for displaying information on the screen.
Experienced computer users know the concept of video card artifacts. It refers to distortion of the image on the monitor screen caused by improper operation of the graphics component of the system. Due to video card artifacts, “phantom” elements appear on the screen, some displayed images are doubled, tripled, and distorted in various ways, making it difficult or impossible to receive information from the computer screen.
Video card artifacts can occur due to software or hardware problems, and below we will look at the reasons that most often lead to them.
Software reasons for video card artifacts

Artifacts often appear on the screen when running a resource-intensive application. For example, such an application could be a modern game that requires a large load on the video card. To fix artifacts caused by software, it is recommended to do the following:

If none of the above tips helped fix the situation and artifacts continue to appear on the screen when launching productive applications, it is recommended to check whether the situation is related to a problem in the performance of a specific game. Due to poor optimization on the part of the developers, artifacts may be observed on the screens of players with some video card models. Most often, developers correct these errors with the first patches.
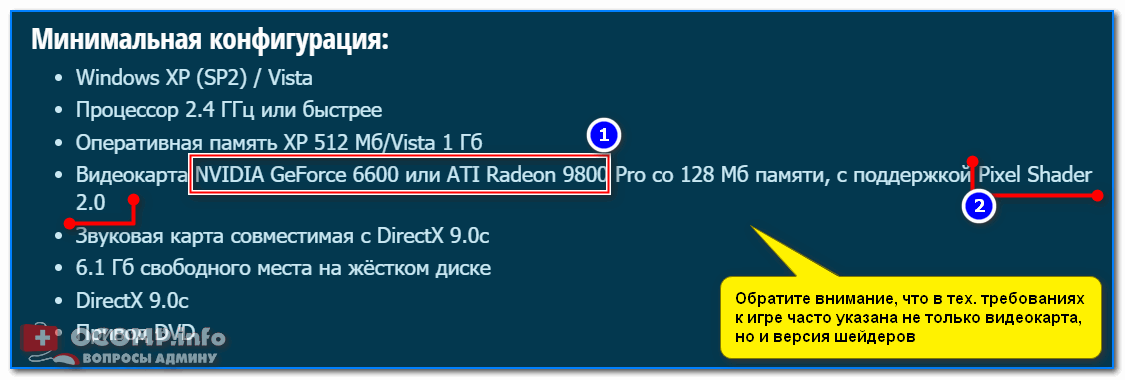
Note: If the minimum system requirements of a game indicate the amount of memory required for correct operation at a level higher than that of the installed video card, this can often cause artifacts to occur.
Hardware causes of video card artifacts
If during software problems artifacts appear only in certain applications, then if the hardware failure of the video card, image distortion will be widespread. That is, artifacts will begin to appear immediately after loading the operating system, and then they will be ubiquitous in the interface and various applications. There are two main hardware reasons for the occurrence of artifacts on the screen:

It is worth noting that various services undertake to “treat” the detachment of the graphics chip. However, if this problem occurs, you need to think about buying a new video card, since the refurbished version usually works for no more than six months, after which the chip finally fails.
User question
Hello!
Recently, stripes and ripples began to appear on my computer screen; the picture can sometimes twitch when passing a horizontal stripe.
This happens only in games. I tried reinstalling Windows, changing video drivers - no effect. These are artifacts on the video card (I was told so at the service center), and it needs to be changed. Or are there other options?
Good day!
In general, the presence of any distortion on the screen is a very alarming sign. Stripes and ripples can appear on the screen both due to problems with software and problems with hardware. In this article I will try to analyze the most basic things that you have to deal with, what can be done and taken to diagnose and find the cause (well, knowing the essence of the problem, you can often fix it on your own 😉).

Photo of a monitor with vertical (horizontal) stripes and ripples (as an example to understand what we are talking about)
What to do if ripples and stripes appear on the screen
STEP 1: check if the cable that connects the monitor to the computer is intact
The first thing I want to start with is the cable (perhaps this is somewhat banal, but still!). The fact is that it can be accidentally interrupted, chewed (by a pet, a cat, for example), etc.
And in general, many users do not always screw the VGA cable (for example) so that it does not come off. Often, simply adjusting the plug will solve the problem.
The photo below shows a damaged USB cable (the video cable is also damaged) ...

I'll add a couple more notes (regarding wires):
- do not use long cables: if the length of your video cable is more than 3 meters, then the image on the screen may begin to distort (here, of course, a lot depends on the monitor);
- see if the video cable is intertwined with the cable of the printer, telephone charger, cable TV, etc. The fact is that such elements can create interference (especially in the absence of shielding). Try placing the video cable away from other wires.
STEP 2: Pay attention when artifacts appear
Immediately after turning on the computer, i.e. they are there when entering the BIOS (), and when loading the OS, and after it has loaded, in all applications and games;
They appear only at a certain stage: for example, when loading the OS, and then disappear. Either when entering a particular game, or after some time spent in the game.
If in the first case, you can’t work on a PC at all and you need to eliminate the cause (you can ruin your eyesight), then in the second, for example, you can continue to work for quite a long time.
By the way, a simple observation like this will help determine the cause of the malfunction. For example, if you experience artifacts in only one game, then most likely the problem lies in the temperature, driver, or errors in the game itself.
I will also note that in the second case, the chances of restoring the PC/laptop (without material costs) are much greater!
STEP 3: Connect another monitor for diagnostics
This step is very important!
It will allow us to determine whether the artifact problem is related to a malfunction of the monitor, or to problems in the system unit (video card, motherboard).
Surely in every house where there is a PC, there is a TV, or another screen of some kind ✌. For example, if stripes appear on your laptop screen, connect it to a regular monitor and see if there are any distortions in the picture. Nowadays, any modern monitor can be easily and quickly connected to a computer using an HDMI cable (sold in almost every computer store).
In the photo below: a TV was connected to the laptop in order to see if there would be artifacts on the TV screen.

If there are no artifacts on the other screen and everything is fine: Then the problem is with the monitor. By the way, the problem of horizontal stripes appearing on CRT monitors used to arise quite often. In general, if the monitor itself is to blame for the streaks on the screen, then without having experience in repairing equipment, you cannot do without it.
If artifacts are present on another monitor: then the problem is probably in your computer: the problem is either with the software or with the hardware. We'll figure it out further...
STEP 4: Check the temperature of components (video card, CPU)
If there are stripes on the screen, first of all you need to look at the temperature of the video card. This can be done using special. utilities: .
An example in the screenshot below. We check the temperature in the GPU-Z utility (see the line "GPU Temperature").

In general, it is difficult to give an exact value critical temperature of the video card : Here you need to look at your specific model (use your manufacturer’s website). But in general, everything above 80 gr. Celsius - should alert you to a thorough check.
To help!
How to find out the permissible and critical temperature of your video card:
If overheating is suspected, it is recommended first clean your computer from dust , replace thermal paste. Dust often blocks ventilation openings, reducing air circulation. As a result, the temperature inside the system unit (laptop) begins to rise.
In laptops, by the way, it is easy to determine overheating if you put your hand near the ventilation holes (usually they are on the left): very hot air starts coming out of there, you can even get burned.
By the way, these utilities can measure the temperature during your game, tracking all the maximums and minimums. As soon as you notice the appearance artifacts– check what the temperature was.
To help!
1) Checking the video card for performance, testing for reliability and stability -
2) How to perform a stress test of the processor and the system as a whole, does it maintain frequencies, is there any overheating -
At all, pay special attention to temperature in hot summer months, when PC components often heat up to significant levels. To reduce the temperature in the system unit, simply remove the side cover and place a regular fan opposite.
There is a special one for laptops. stands that help improve air circulation (due to which it is possible to reduce the temperature by 5-10 degrees Celsius).
STEP 5: check and update your video card drivers
Drivers are everything...
Video card drivers can have a significant impact on picture quality (especially for 3D games).
For example, about 15 years ago I had several versions of drivers (official and not) for my Ati Radeon 8200 video card (if I’m not mistaken).
So, on the official drivers, on the most recent version, there was a glitch: some elements in games (in particular fire) were not shown - instead some squares and sometimes stripes were running... When I switched to another version of the drivers, everything worked, as it should be. Over time, the developers fixed this bug...
By the way, pay attention to how the computer will work when you remove the drivers: will there be stripes or ripples. Below is a link to an article that will help you remove and update drivers.
To help!
How to update the driver for an AMD, nVidia and Intel HD video card: from A to Z –
STEP 6: a few words about overclocking your video card
If you overclocked your video card, then it is likely that artifacts could appear (especially if you have never done this before and have no practical experience 👀).
Overclocking, in fact, is a whole science where you need to know and feel quite accurately how the hardware will behave (and, of course, there is always a certain risk).
Try resetting the frequencies and checking functionality. As a rule, if the problem was related to unsuccessful overclocking, it is solved.

Screenshot from the game Doom 3: pay attention to the white dots - the result of unsuccessful overclocking
In general, in most cases, if software overclocking fails, modern video cards, processors and memory themselves reset the settings to safe ones.
STEP 7: Check if the desired shader version is supported
Each video card supports a certain version of shaders (and games, by the way, also require a certain version, see the description for any game).
The point is: if you are trying to run a new game on a video card that is not new, it is quite possible that it does not support the necessary pixel shaders.
In general, usually, in this case, Windows will tell you that the game cannot be launched and an error will appear. But sometimes this doesn’t happen, and the game starts with distortions in the picture (especially now there are special shader emulators that allow you to run games on video cards that are not approved by the developers).
So if you have a problem in any one game, check : whether your video card model is included in the list of those supported by the game.
To help!
How to find out the amount of memory of a video card, its type and other characteristics -
STEP 8: what else to pay attention to (hardware malfunction: video card, motherboard)
As a rule, when there are problems with hardware, artifacts appear everywhere: in the BIOS, when loading Windows, in games, in any other programs. In some cases, artifacts appear when the video card is heated to certain temperatures (for example, in games), etc. Most often, the reason lies in the detachment of the graphics chip, or overheating of the memory chips.
You can try the following: open the system unit, remove the video card and inspect it. Is there any visible damage on it? Most likely, there will be no visual signs of damage on it (statistics from personal experience).
However, if there is a lot of dust and high temperature readings in AIDA, Speccy, I recommend this:
1) First: clean the system unit from dust (can be blown out with a regular vacuum cleaner). .
2) Pay special attention to the video card contacts. Try cleaning its contacts with a regular eraser (clean the part that is inserted into the motherboard). Then blow through the entrance itself where it is inserted. With artifacts, this method helps, but not in all cases.
3) If the artifacts are not missing, it would be a good idea to check the video adapter on another work computer (however, I understand that this advice is unlikely to suit ordinary users; not everyone has 2 PCs at home...).
The photo below shows what normal capacitors look like (red arrows) and a swollen one (circled).

The motherboard/video card could also fail for reasons beyond your control. (i.e. without overclocking). For example, there was a power outage, a manufacturing defect, overheating, etc.
In general, for problems with iron (and lack of repair experience), it is better to contact the service center.
However, I want to warn you right away:
1. Some craftsmen may offer to repair and replace the chip on the video card. It is expensive (almost like a new video card), and it is unknown how the repair will be carried out, and how the video card will behave later. In general, I do not recommend it;
2. They may suggest warming up the video card (sometimes called hot). This topic is specific and extensive. But I want to say right away that such a repaired video card (at best) will not work for long, at most another six months. Then it still comes to an end...
The most preferable option for these problems is to replace the video card with a new one. In the end, it's cheaper for the wallet... 👌
By the way, I would like to provide a couple of links to repairing a video card yourself:
– is it possible to repair a video card in the oven;
There are probably other people besides me who have heard that you can repair a video card by warming it up, or heating it, but they probably don’t know how to actually do it. This is what I will talk about in this article.
In order to completely solve the problem of video card problems, you need to use special equipment, which you, of course, do not have. How then can such repairs be made without resorting to special equipment or to a specialist for money?
So, we will repair the ASUS EN9800GT video card. Just don’t think that only this video card can be repaired in this way; absolutely any will do. This malfunction is due to poor soldering of the contacts of the video card processor, which is located under the cooler. A cooler is a processor cooling system, so to speak.
Video processor malfunction, manifests itself in the form of the appearance of artifacts and other “glitches”, and this:
But there is one nuance, if these artifacts do not change the position and nature of their manifestation, then the problem is most likely in the video card processor, and if these artifacts somehow change, then the problem may be in the video card memory. But in my case it's the processor.
First you need to remove the video card, having previously removed all the connectors, of course, with the computer turned off. Once you have the video card in your hands, you will need to remove the cooler from it. Unscrew the screws that hold the cooler. Under the cooler you will see a paste that transfers temperature from the processor to the cooler, thereby cooling it. Under no circumstances do not touch this paste if you do not have a spare tube; after the repair you will need to put the cooler back in the same place. And so, the cooler was removed.
In order to repair the processor and video card as a whole, you need to warm it up. I use a soldering station that includes a hair dryer and a soldering iron, but in this case I only need a hair dryer. You also need a special flux, it is necessary to remove oxidation from the balls on which the processor itself actually rests. I set the hair dryer temperature to 250 - 480 degrees. Along the edge of the processor, it is necessary to apply flux and heat it evenly, with little air pressure. Be careful not to shake off the tin when it starts to melt, otherwise you won't be able to do anything with your graphics card. You should first warm it up from below (on the back of the printed circuit board), and then from above the processor. You will notice that the flux begins to melt and melt. This way, the video processor's solder balls are primed and the flux removes all oxides. The contact between the tracks and the balls becomes reliable, thereby solving the problem of breakdown. This failure may occur due to overheating of the video card, or due to kinks during installation. I repeat, be careful when you notice that the tin is shiny when warming up the processor, do not shake it off or blow it off with a hairdryer.
After warming up, when the tin has become shiny, we can finish our repairs and let the board cool for 10 minutes. To test the video card, you need to assemble it. You need to tighten the screws carefully and without fanaticism; warming up does not return to factory settings. We put our video card back on the computer, connecting all the connectors. If the artifacts have disappeared and no others have appeared, then we have successfully completed our task.
Published on January 11, 2018 at 10:14 am Updated 12/01/2019 at 11:53
Stripes and artifacts on a laptop or computer monitor most often occur due to overheating of the video card (video chip), but the culprit for the appearance of artifacts may be the monitor matrix itself or the cable.
When the reason is in the cable, stripes may not always appear, for example, the lid is open at a certain angle. In the future, the problem worsens and changing the angle of the lid does not help.
The article is intended for ordinary users, so we will not consider damage to the matrix; we will touch upon common problems - overheating and damage to the cable.
Causes of malfunction

This happens due to insufficient cooling.
Possible reasons:
- The cooling system is clogged with dust (radiator).
- The cooler has exhausted its resource and cannot reach the required speed for cooling.
- When changing thermal paste, the cooling system (radiator) is installed incorrectly, skewed.
- Insufficient air flow to the cooling system - when using the laptop on soft surfaces (bed, sofa, etc.), the ventilation holes are blocked.
Do-it-yourself video card restoration

At home, it is possible to repair a laptop or computer (clarification: this is a diagnostic procedure*) with your own hands without special tools using a regular “mini autogen” lighter.
*Service centers carry out warm-up for diagnostic purposes to identify faults - video chips, north and south bridges. According to the rules, after identifying the problematic component, they are obliged to replace it and eliminate the root cause.
There is a video on the Internet where heating is carried out using an industrial (construction) hair dryer - we do not recommend using a hair dryer - not only the video chip heats up, but also the surrounding electronic components. Without calculating the required power and temperature, you risk completely destroying the entire laptop or video card.
In any case, you perform the procedure at your own peril and risk!
Disassemble the laptop, remove the cooling system, remove thermal paste from the chip. Find the video chip - on the upper part, where the marking is indicated, there should be an abbreviation GPU - Graphics Processing Unit.
Place the laptop in a horizontal position, begin to warm up the video chip in a circular motion, without touching the surface with the flame. The approximate warm-up time is 40 seconds; it is better to carry out the procedure in a room with a room temperature of 20-22 0 C. Let the chip cool, but to prevent microcracks from occurring during the cooling process, heat the chip several times for 1-2 seconds.
If the artifacts do not disappear, this indicates that the heating is not complete; in this case, you can repeat the procedure.
After it has cooled completely, apply a thin layer of fresh thermal paste. If you have never applied it, apply thermal paste the size of a match head to the center of the chip (this is enough for a laptop video chip), the amount of paste depends on the size of the surface. Press down with a radiator and spread with small circular movements (laptop manufacturers themselves recommend this).
Once you have pressed the paste with the radiator, you can no longer lift it, otherwise you will have to repeat the procedure - after pressing and rubbing the paste, the radiator is forced out of air and sticks to the chip.
Video on how to diagnose a video card by warming it up
For clarity, we have prepared video instructions on how to warm up the GPU (video card), this video does not show how to apply thermal paste.
A restored video card by heating loses performance by several percent. The video card may fall off again if the laptop overheats, for example, while playing resource-intensive games.
Restoring the cable
First of all, make sure that the video card is working by connecting the laptop to an external monitor or TV. The absence of artifacts or stripes on the monitor of an external device indicates damage to the cable (loop).
The cable from the video card to the matrix of any laptop runs next to the tilting mechanism (if it is not an inversion). Accordingly, the cause of damage is wear and tear of one or more wires.

As a rule, the cable going to the matrix is half a cable, and not a completely flat ribbon from a group of conductors.

Disassemble the laptop and find a silver cable in one of the corners of the rotating mechanism. You will need to carefully cut the braid lengthwise by 3-4 centimeters next to the inclined mechanism (after the place where the cable bends and goes inside the laptop from the matrix), without damaging the internal wires (it is better to use nail scissors).
The cable braid is a conductive, adhesive tape. Once you cut it, you will find about ten thin wires. Visually they may be intact. The task is to determine the damaged core: disconnect all the wires and try to stretch the wire one by one (strong tension is not required). If the inner core is broken, the braid will begin to stretch (you will feel the insulation “floating”). Usually 3-5 pieces break off.
After identifying the “culprits of the stripes or artifacts,” all that remains is to solder them, insulate them, and lay the cable back into the grooves.
If you have any questions, ask in the comments, the TechnoGuru editors will answer as soon as possible, and in order not to miss the answer, we recommend subscribing to notifications in the comments.
Video card artifacts. A rather unpleasant problem, it usually appears unexpectedly and begins to ruin life). So where do they come from, these so-called video card artifacts and what are they anyway?
Video card artifacts are usually distortions on a computer or laptop monitor. These are stripes, non-standard screen color, and so on in a similar style. They often cover the entire screen.
Video card artifacts are divided into software and hardware. They arise for different reasons, and they need to be dealt with accordingly - in different ways.
Popular in this topic:
Video card artifacts - software artifacts
It is quite easy to distinguish them from hardware ones. They are not in the BIOS and when the PC boots. They are also not on the OS desktop. Although sometimes they exist, if there is some kind of problem with drivers or Windows. They appear when you start any program or game.
Often when starting a specific program or game. In other cases, the PC works fine and opens all other games and programs without problems.
Solving this problem is easier than in the case of hardware artifacts of the video card. Everything is quite simple here.
First - Check on the forums to see if others have this problem with this program or game. If there is, we act according to the forum recommendations.
Second - It is worth checking the temperature of the video card and the load on it, the operation of the video memory. There are a lot of useful programs for this. I described them in the articles above, I will not repeat them. If the temperature is too high, you should clean the video card and check the cooling system.
Third - update the software and video card drivers. DirectX and everything else like that is also worth updating. It is also worth updating the game or program where glitches appear on the screen.
Fourth - look at the operating system logs. There may well be an important clue there. Maybe it’s worth starting with the logs, it will immediately be clear where the problem is.
Video card artifacts - hardware artifacts
In this case, artefacts appear immediately when you turn on the PC or laptop. It can occupy either the entire screen or part of it. Treating such a scourge is much more difficult. There aren't many solutions here. There are essentially two things that can be done.


